1. Wprowadzenie
The Oster Oven Fryer 12L 3-in-1 electric air fryer is designed for preparing lighter and healthier meals. This versatile appliance combines the functions of an air fryer, oven, and dehydrator, offering an expanded capacity suitable for daily family use. It provides practical and quick options for a variety of healthy preparations.

This image illustrates the key features: 3-in-1 functionality (Air Fryer, Oven, Dehydrator), 12 liters capacity, and 1800W power.
2. Ważne instrukcje bezpieczeństwa
Przed użyciem urządzenia należy uważnie przeczytać wszystkie instrukcje. Nieprzestrzeganie tych instrukcji może spowodować porażenie prądem, pożar lub poważne obrażenia.
- Bezpieczeństwo elektryczne: Upewnij się, że objętośćtage gniazdka jest zgodne z voltage specified on the appliance. Do not immerse the cord, plug, or appliance in water or other liquids.
- Gorące powierzchnie: The appliance surfaces become hot during use. Always use oven mitts or gloves when handling hot components or accessories. Do not touch hot surfaces directly.
- Umieszczenie: Place the appliance on a stable, heat-resistant surface, away from walls and other heat sources. Ensure adequate ventilation around the unit.
- Nadzór: Close supervision is necessary when any appliance is used by or near children. Do not leave the appliance unattended during operation.
- Akcesoria: Only use accessories recommended by the manufacturer. Using unapproved accessories may cause injury or damage to the appliance.
- Konserwacja: Odłącz urządzenie od gniazdka, gdy nie jest używane oraz przed czyszczeniem. Przed dotknięciem lub czyszczeniem części odczekaj, aż całkowicie ostygnie.
- Szkoda: Nie używaj urządzenia z uszkodzonym przewodem lub wtyczką, ani po awarii lub uszkodzeniu urządzenia w jakikolwiek sposób. Skontaktuj się z obsługą klienta w celu sprawdzenia, naprawy lub regulacji.
- Przeznaczenie: To urządzenie jest przeznaczone wyłącznie do użytku domowego. Nie używać na zewnątrz.
3. Składniki produktu
The Oster Oven Fryer comes with the following components:
- Main Unit (Oven Fryer)
- 2 x Airflow Racks (Grids)
- 1 x kosz na rożna;
- 1 x Accessory Removal Hook
- 1 x rożen rożen
- 1 x taca ociekowa
- 1 x Instrukcja obsługi
- 1 x Warranty and Technical Assistance Leaflet
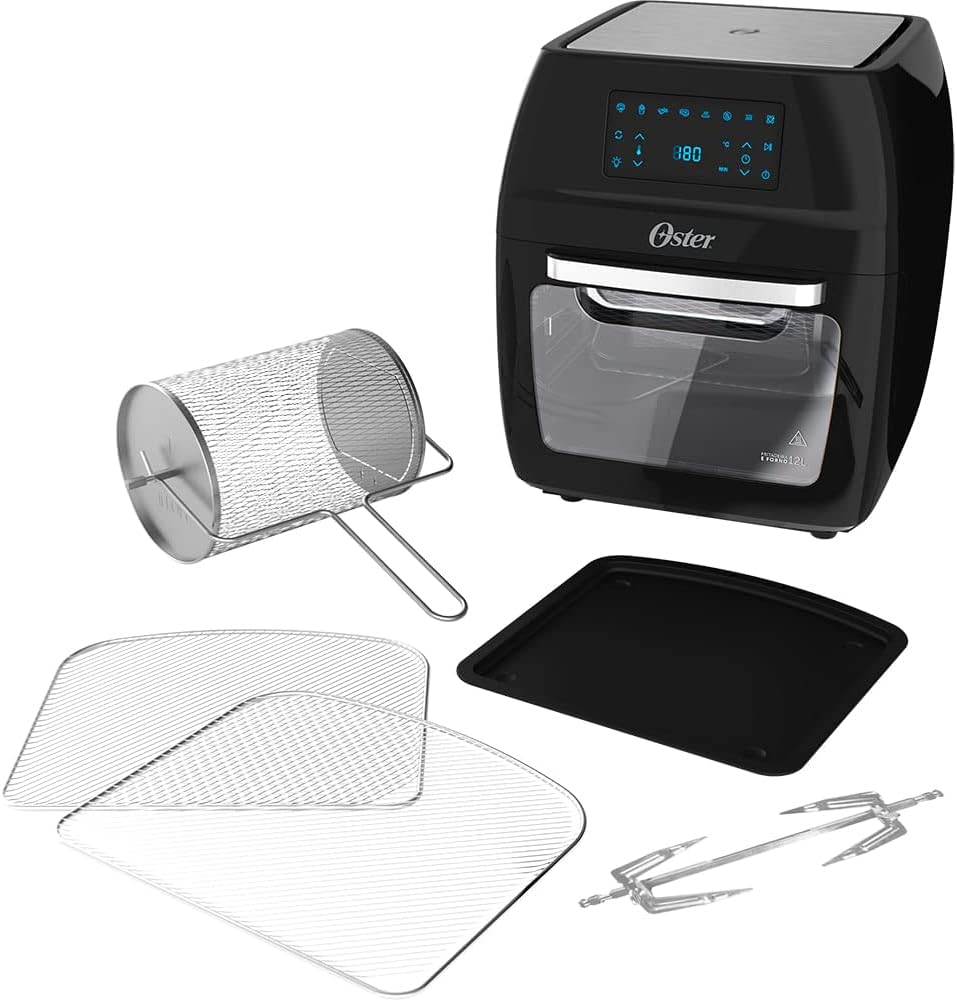
This image displays all included accessories alongside the main Oven Fryer unit.
4. Przewodnik konfiguracji
4.1 Rozpakowanie
- Ostrożnie wyjąć wszystkie elementy z opakowania.
- Remove any protective film or stickers from the appliance and accessories.
- Zachowaj materiały opakowaniowe w celu późniejszego przechowywania lub utylizacji.
4.2 Czyszczenie początkowe
- Wash the airflow racks, rotisserie basket, rotisserie spit, and drip tray with warm, soapy water. Rinse thoroughly and dry completely.
- Wytrzyj wnętrze i zewnętrzną część jednostki głównej za pomocąamp ściereczka. Nie używaj środków czyszczących o właściwościach ściernych.
4.3 Umieszczenie
- Place the Oven Fryer on a stable, level, and heat-resistant surface.
- Ensure there is at least 10-15 cm (4-6 inches) of clear space around the back and sides of the appliance for proper ventilation.
- Nie umieszczaj urządzenia w pobliżu materiałów łatwopalnych ani pod szafkami.
4.4 Pierwsze użycie (wypalanie)
- Podłącz urządzenie do uziemionego gniazdka elektrycznego 220 V.
- Run the appliance empty for approximately 10-15 minutes at 180°C (350°F). This helps to burn off any manufacturing residues and eliminate initial odors. A slight odor or smoke during this process is normal.
- Ensure the area is well-ventilated during this initial burn-off.
5. Instrukcja obsługi
5.1 Panel sterowania ponadview
The Oster Oven Fryer features an intuitive touch control panel. The digital display shows temperature and time settings, while various icons represent pre-programmed functions and customizable settings.

The touch control panel allows for easy selection of cooking functions and adjustments.
5.2 Pre-programmed Functions
The appliance includes 4 pre-programmed functions for common dishes:
- Warzywa: Optimized settings for cooking various vegetables.
- Frytki: Ideal for crispy French fries.
- Drób: Suitable for chicken, turkey, and other poultry.
- Mięsa: For cooking different types of meat.

These icons represent the four pre-programmed cooking functions.
5.3 Funkcje konfigurowalne
In addition to pre-programmed options, you can customize settings using these 5 functions:
- Odwodnić: Do suszenia owoców, warzyw i mięsa.
- Smażenie na powietrzu: For oil-free frying.
- Piec: For roasting various foods.
- Podgrzanie: For warming up previously cooked meals.
- rożen: For cooking whole poultry or large cuts of meat with continuous rotation.
5.4 Regulacja temperatury i czasu
- The temperature can be adjusted from 40°C do 200°C (105°F do 400°F).
- The timer allows for precise cooking durations and features an automatyczne wyłączanie for safety and convenience.
5.5 Korzystanie z akcesoriów
Zawsze umieszczaj tacka ociekowa at the bottom of the oven to catch any oil or food particles.
5.5.1 Airflow Racks
- Insert the airflow racks into the desired slots within the oven.
- These are suitable for general air frying, roasting, or dehydrating.
- When using multiple racks, rotate them halfway through cooking for even results, especially with larger items.

The interior of the Oven Fryer showing the placement of two airflow racks.
5.5.2 Rotisserie Basket
- Place smaller items like French fries or vegetables into the rotisserie basket.
- To install, first insert the left side of the basket into the motor drive socket, then secure the right side into its support.
- Select the 'Rotisserie' function for continuous 360° rotation, ensuring even cooking.
- Use the accessory removal hook to safely remove the hot basket after cooking.
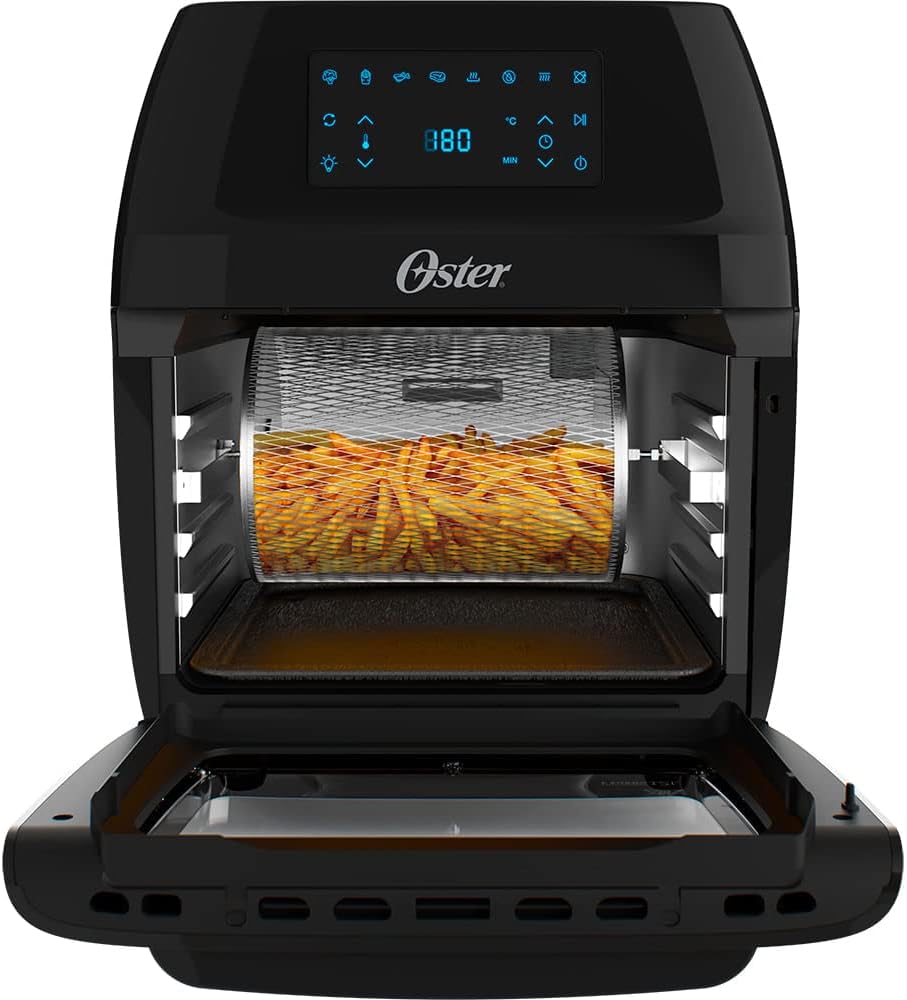
The rotisserie basket is ideal for achieving crispy results on items like French fries.
5.5.3 rożen rożen
- Secure a whole chicken or large roast onto the rotisserie spit.
- Insert the left side of the spit into the motor drive socket, then secure the right side into its support.
- Activate the 'Rotisserie' function for 360° rotation, which ensures uniform cooking and browning.
- Use the accessory removal hook to safely remove the hot spit and food after cooking.

A whole chicken cooking evenly on the rotisserie spit inside the Oven Fryer.
5.6 Uruchamianie i wstrzymywanie
- After selecting your desired function and settings, press the Odtwórz/Pauza przycisk, aby rozpocząć gotowanie.
- Naciśnij Odtwórz/Pauza button again to temporarily stop cooking. You can then adjust settings or check food.
- The appliance also features a przeprogramować function to change settings mid-cycle if needed.
5.7 Internal Illumination
The transparent door and internal illumination allow you to monitor the cooking process without opening the door, helping to maintain consistent temperature.
6. Czyszczenie i konserwacja
Proper cleaning and maintenance ensure the longevity and optimal performance of your Oster Oven Fryer.
- Odłącz i ostudź: Przed przystąpieniem do czyszczenia należy zawsze odłączyć urządzenie od gniazdka elektrycznego i poczekać, aż całkowicie ostygnie.
- Akcesoria: Remove all accessories (airflow racks, rotisserie basket, rotisserie spit, drip tray). Wash them with warm, soapy water using a non-abrasive sponge. Rinse thoroughly and dry completely. Notatka: Akcesoriów tych nie można myć w zmywarce.
- Wnętrze: Wytrzyj ściany wewnętrzne za pomocą adamp cloth and mild detergent. For stubborn food residues, a soft brush can be used. Avoid using metal scouring pads or harsh abrasive cleaners, as they can damage the non-stick coating.
- Zewnętrzny: Przetrzyj zewnętrzną część urządzenia miękką ściereczką.amp ściereczką. Nie używaj środków czyszczących o właściwościach ściernych ani nie zanurzaj jednostki głównej w wodzie.
- Składowanie: Przed schowaniem urządzenia upewnij się, że wszystkie jego części są czyste i suche. Przechowuj urządzenie w chłodnym i suchym miejscu.
7. Przewodnik rozwiązywania problemów
If you encounter any issues with your Oster Oven Fryer, please refer to the following common problems and solutions:
| Problem | Możliwa przyczyna | Rozwiązanie |
|---|---|---|
| Urządzenie nie włącza się. | Brak podłączenia; problem z gniazdkiem elektrycznym; awaria urządzenia. | Ensure the power cord is securely plugged into a working 220V outlet. Check the circuit breaker. If the issue persists, contact customer support. |
| Jedzenie nie gotuje się równomiernie. | Overcrowding; incorrect temperature/time; improper accessory placement. | Do not overcrowd the racks or basket. Cook in smaller batches if necessary. Adjust temperature and time as per recipe. Ensure racks are rotated or food is shaken/flipped halfway through cooking. Verify rotisserie accessories are correctly installed. |
| Z urządzenia wydobywa się biały dym. | Grease or food residue on heating element or drip tray. | Unplug the appliance and let it cool. Clean the heating element and drip tray thoroughly. Ensure the drip tray is always in place. |
| Nietypowy zapach podczas gotowania. | First use burn-off; food residue. | A slight odor is normal during initial uses. Ensure the appliance is clean. If the odor is strong or persistent, unplug and contact support. |
| Rotisserie basket/spit not rotating. | Incorrect installation; 'Rotisserie' function not selected. | Ensure the left side of the accessory is fully engaged in the motor drive socket and the right side is secured. Select the 'Rotisserie' function on the control panel. |
8. Specyfikacje produktu
Here are the technical specifications for the Oster Oven Fryer 12L 3-in-1:
- Nazwa modelu: OFRT780-220V
- Pojemność: 12 litrów
- Moc wyjściowa: 1800 watów
- Tomtage: 220 wolty
- Wymiary (dł. x szer. x wys.): 34.7 cm x 39 cm x 42.8 cm (13.66 cala x 15.35 cala x 16.85 cala)
- Waga przedmiotu: 5.9 kilogramów (13 funty)
- Tworzywo: Plastic, Glass (exterior); Plastic (interior)
- Metoda sterowania: Panel dotykowy
- Technologia smażenia na powietrzu: Cyrkulacja gorącego powietrza
- Cechy szczególne: Programmable, Dehydrate Function, Automatic Shut-off Timer, Non-stick coating
- Zalecane zastosowanie: Roasting, Dehydrating, Frying
- Można myć w zmywarce: No (for main unit and accessories)
- Kraj pochodzenia: Chiny
9. Gwarancja i wsparcie
9.1 Informacje o gwarancji
This Oster Oven Fryer comes with a 12-miesięczna gwarancja against manufacturing defects. Please retain your proof of purchase for warranty claims. The warranty covers defects in materials and workmanship under normal household use.
9.2 Obsługa klienta
For technical assistance, warranty claims, or any questions regarding your product, please refer to the contact information provided in the included Warranty and Technical Assistance leaflet. You may also visit the official Oster webwitryna zawierająca zasoby pomocy.


