Carpuride 12V Rear Camera
Carpuride 12V Rear Camera User Manual
Model: 12V Rear Camera (Compatible with 701, 706, 707, 708, 901, 101, 103)
Wstęp
This user manual provides comprehensive instructions for the installation, operation, and maintenance of your Carpuride 12V Rear Camera. Designed to enhance visibility behind your vehicle, this camera features a 2.5mm jack interface and is compatible with various Carpuride models, including 701, 706, 707, 708, 901, 101, and 103. It supports a 12-24V voltage range and includes a 6-meter cable for convenient installation.
Informacje dotyczące bezpieczeństwa
- Aby zapobiec zwarciom, należy upewnić się, że wszystkie połączenia są solidne i właściwie zaizolowane.
- Nie próbuj demontować ani modyfikować aparatu. Może to spowodować unieważnienie gwarancji i uszkodzenie.
- Przed przystąpieniem do prac instalacyjnych lub konserwacyjnych należy zawsze odłączyć zasilanie.
- Jeśli nie jesteś pewien któregokolwiek etapu instalacji, skonsultuj się ze specjalistą.
- This camera is designed as an aid for reversing and parking; it does not replace the need for careful driving and direct observation.
Zawartość opakowania
Sprawdź, czy w opakowaniu znajdują się wszystkie elementy:
- Carpuride 12V Rear Camera Unit
- 6-meter Video Cable with 2.5mm Jack
- Power Cable (Red and Black wires)
- Wspornik montażowy i śruby
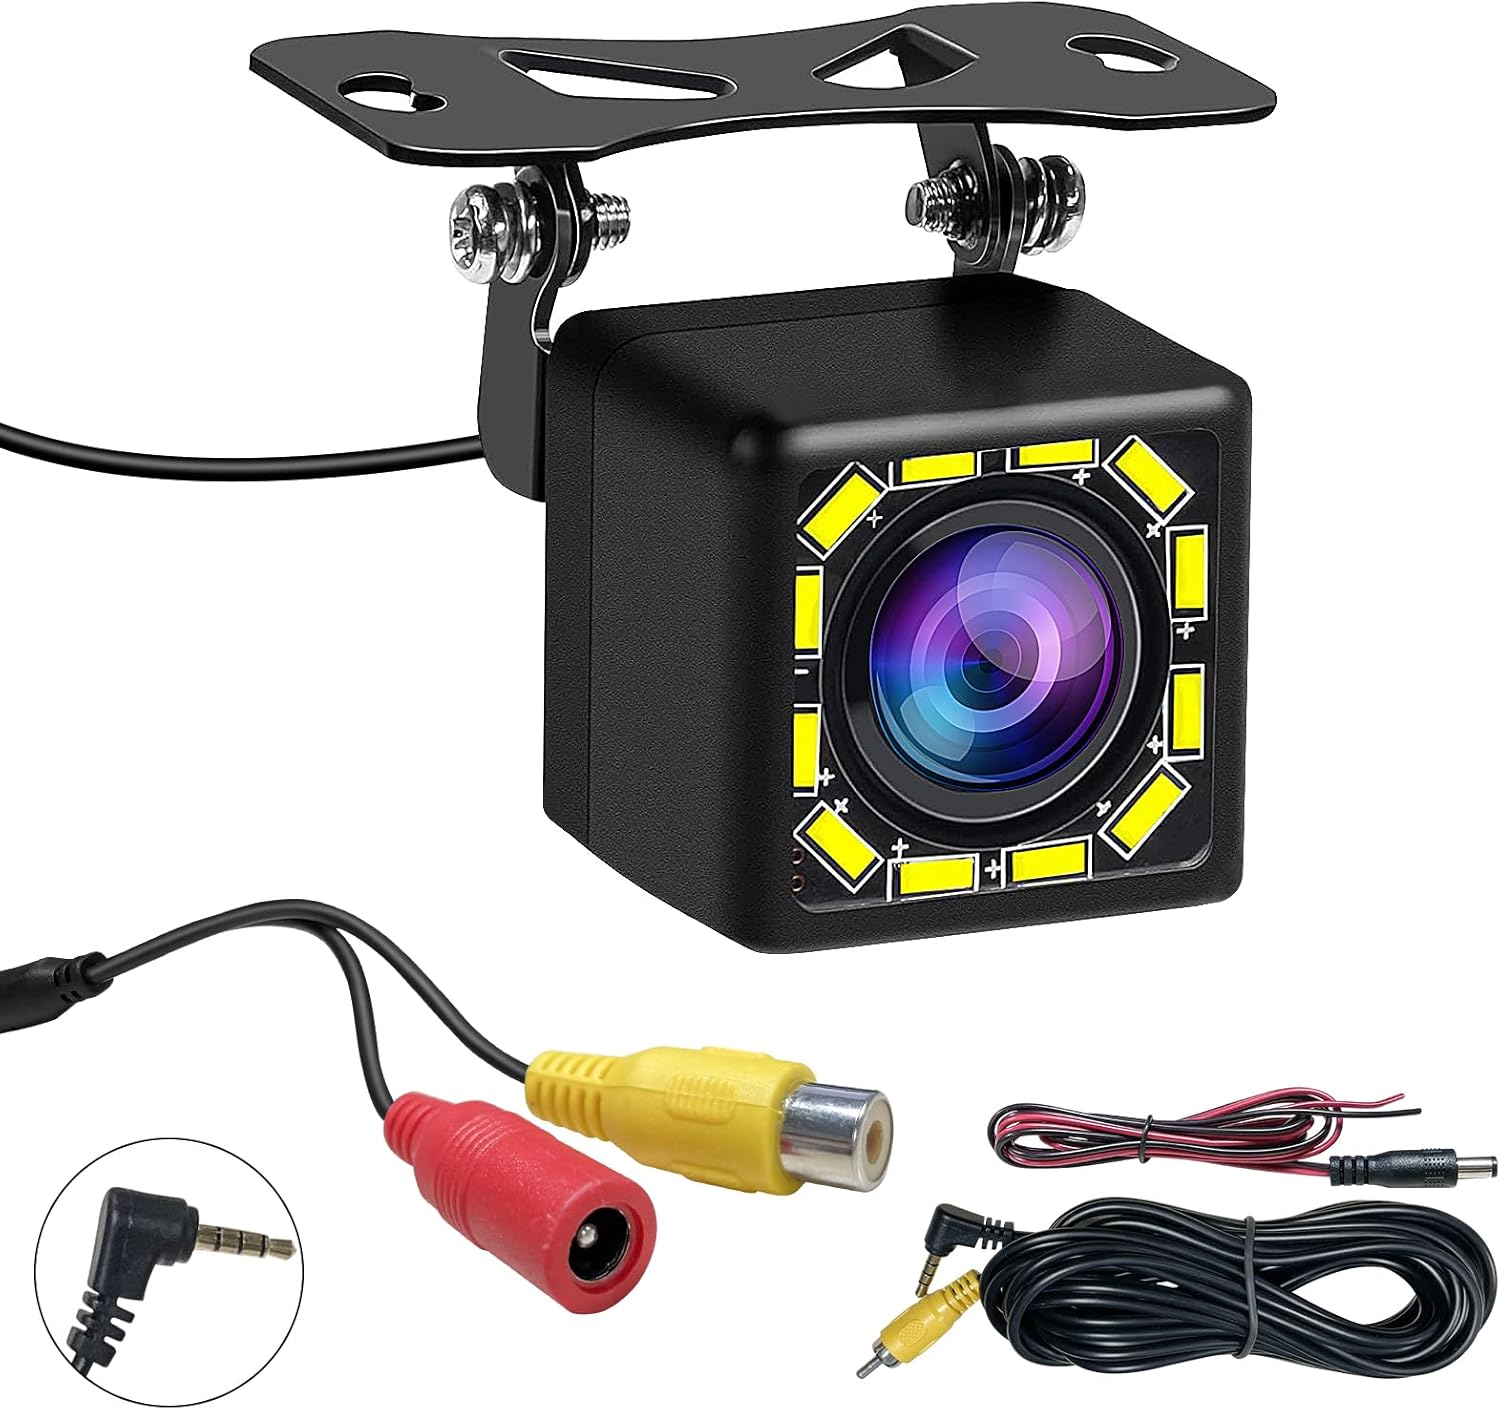
Image: The Carpuride 12V Rear Camera unit, along with its 6-meter video cable, power cable, and necessary connectors.
Produkt ponadview
The Carpuride 12V Rear Camera is designed for durability and clear visibility, featuring night vision capabilities and an adjustable bracket.

Image: The camera demonstrating its 12-LED night vision and waterproof design in a wet environment, highlighting its suitability for various weather conditions.
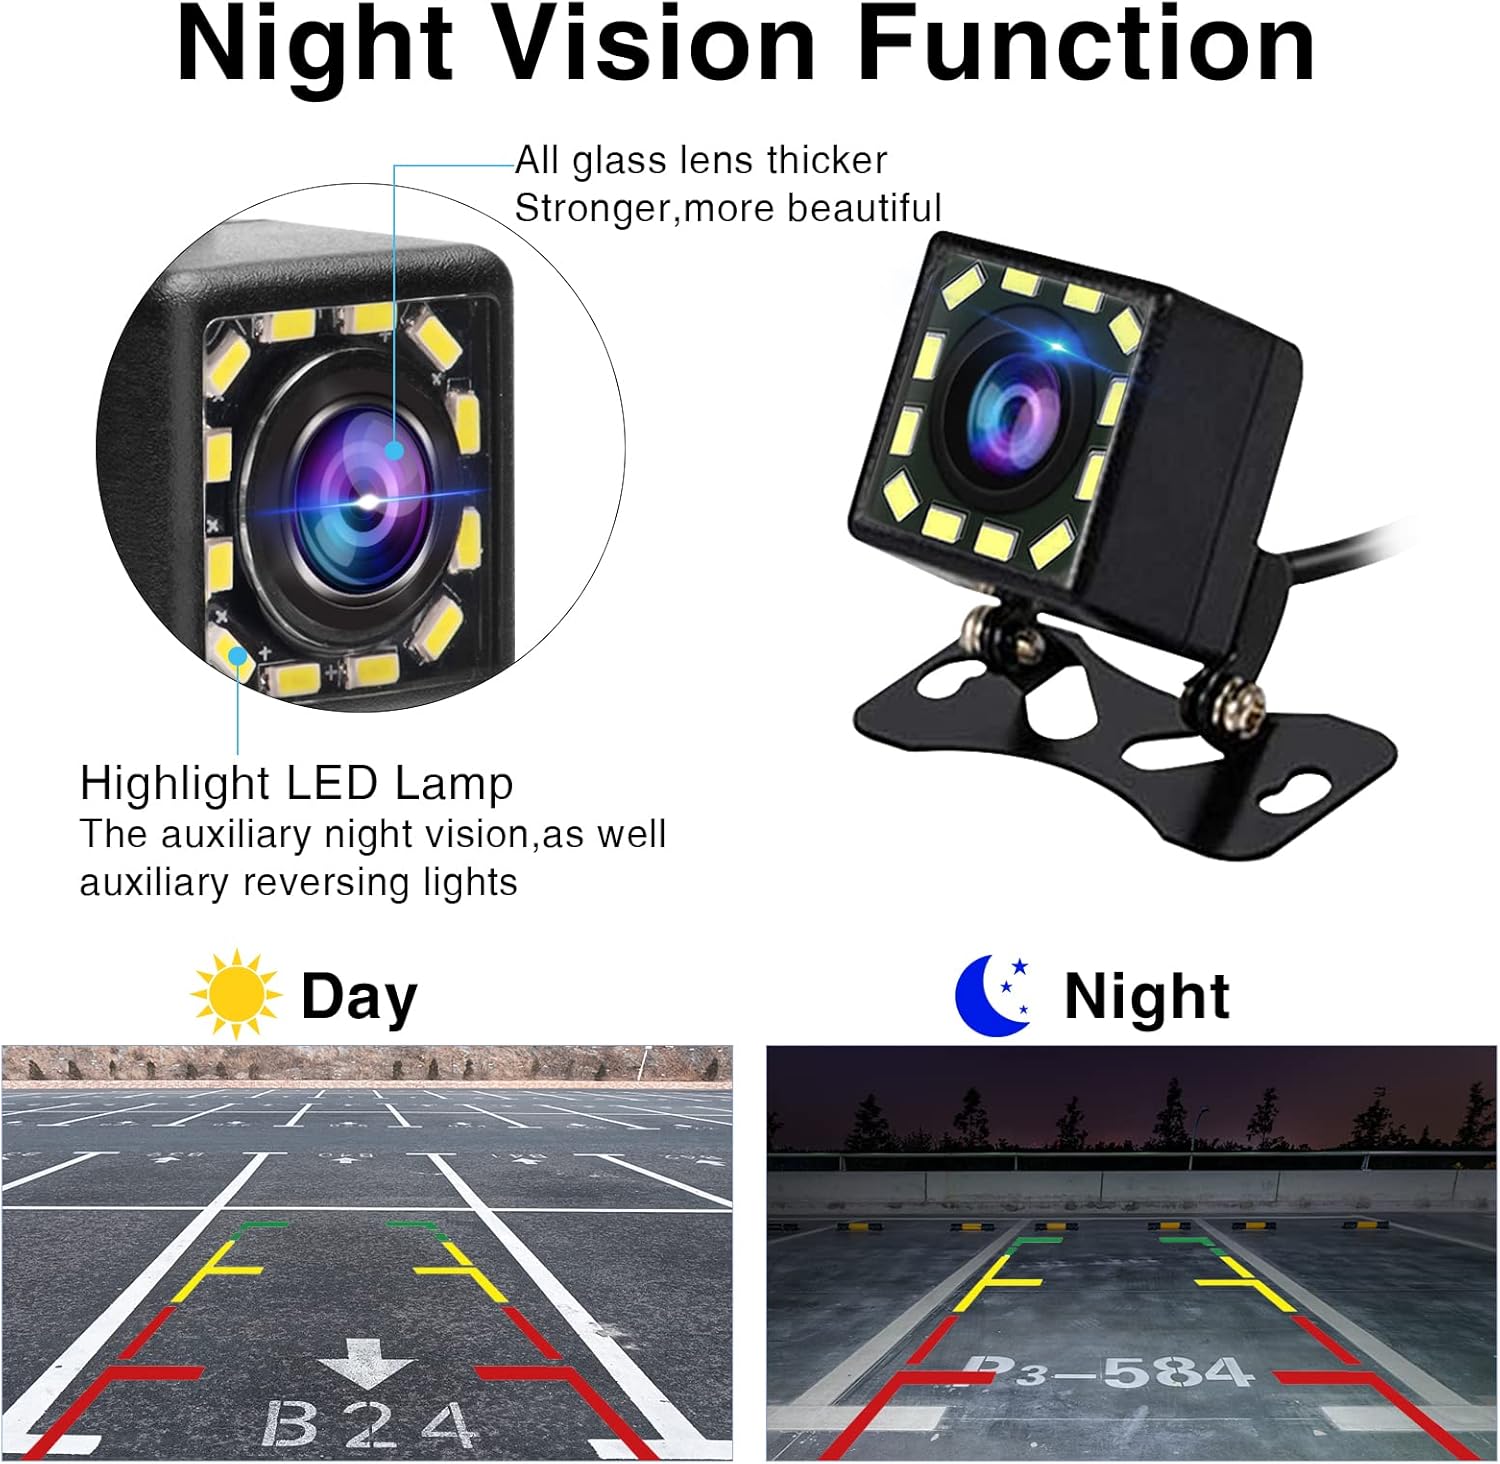
Image: A close-up illustrating the camera's night vision function, showing the highlight LED lamps that provide auxiliary illumination for reversing, and a comparison of day vs. night view z liniami parkingowymi.

Image: The camera mounted on its adjustable bracket, demonstrating how it can be adjusted for high or low angles to achieve an optimal 170-degree rear view.
Konfiguracja i instalacja
Follow these steps for proper installation of your Carpuride rear camera. It is recommended to test the camera connection before finalizing the installation.
- Wybierz miejsce montażu: Select a suitable location at the rear of your vehicle, typically above the license plate or near the trunk handle, ensuring a clear view and protection from direct impact.
- Zamontuj kamerę: Secure the camera using the provided mounting bracket and screws. Ensure it is firmly attached and the angle can be adjusted as needed.
- Poprowadź kabel wideo: Carefully route the 6-meter video cable from the camera to the location of your Carpuride car stereo or monitor. Ensure the cable is not pinched or exposed to sharp edges.
- Podłącz zasilanie:
- Połącz czerwony przewód of the power cable to the positive electrode of your vehicle's reverse light (typically 12V). This allows the camera to activate automatically when reversing.
- Połącz czarny drut of the power cable to a reliable ground point (DC 12V negative) on your vehicle's chassis.
- Connect Video Input: Plug the 2.5mm jack of the 6-meter video cable into the "CAM IN" (2.5mm) port on your compatible Carpuride car stereo or monitor.
- Przetestuj system: Turn on your vehicle and engage reverse gear. Verify that the camera image appears clearly on your Carpuride display. Adjust the camera angle if necessary.

Image: A detailed wiring diagram showing the connections for the Carpuride HD Rear Camera. It illustrates routing the 6-meter video cable to the car stereo, connecting the red power wire to the reverse light positive electrode, and the black wire to DC 12V ground.
Notatka: This camera is designed for 2.5mm interface models (701, 706, 707, 708, 901, 101, 103). It does nie support Carpuride W903 car audio. For W903, please refer to ASIN: B0CLY6CV27 for a compatible camera.
Instrukcja obsługi
Once installed, the Carpuride 12V Rear Camera operates automatically with your compatible Carpuride display unit.
- Aktywacja automatyczna: When your vehicle is put into reverse gear, the camera will automatically power on and transmit video to your connected Carpuride display.
- Vieww kanale: The display will automatically switch to the camera's view, providing a clear picture of the area behind your vehicle.
- Widzenie nocne: The integrated 12 LED lights provide enhanced visibility in low-light conditions, acting as auxiliary reversing lights.
- Wytyczne dotyczące parkowania: The camera feed includes static parking guidelines to assist with accurate parking maneuvers.
Konserwacja
To ensure optimal performance and longevity of your Carpuride 12V Rear Camera, follow these maintenance guidelines:
- Wyczyść obiektyw: Regularnie czyść obiektyw aparatu miękką,amp szmatką, aby usunąć brud, kurz lub plamy wodne, które mogą blokować view. Unikaj środków czyszczących o działaniu ściernym.
- Sprawdź połączenia: Periodically inspect all cable connections to ensure they remain secure and free from corrosion.
- Sprawdź okablowanie: Check the wiring for any signs of wear, fraying, or damage. Repair or replace damaged wiring immediately.
- Bezpieczeństwo uchwytu: Ensure the mounting bracket remains tight and secure. Re-tighten screws if necessary.
Rozwiązywanie problemów
If you encounter issues with your Carpuride 12V Rear Camera, refer to the following common problems and solutions:
| Problem | Możliwa przyczyna | Rozwiązanie |
|---|---|---|
| Brak obrazu na wyświetlaczu podczas cofania. |
|
|
| Obraz jest rozmazany lub niewyraźny. |
|
|
| Camera image flickers or cuts out. |
|
|
| Widzenie w nocy jest słabe. |
|
|
Specyfikacje
| Funkcja | Szczegół |
|---|---|
| Waga przedmiotu | 5.6 uncji |
| Tomtage Kompatybilność | 12-24 woltów |
| Typ złącza | Gniazdo 2.5 mm |
| Długość kabla | 6 metrów (ok. 19.7 stóp) |
| Kąt rzeczywisty View | 170 stopni |
| Wizja nocna | 12 LED Auxiliary Lights |
| Compatible Carpuride Models | 701, 706, 707, 708, 901, 101, 103 |
| Incompatible Carpuride Models | W903 (requires separate camera ASIN: B0CLY6CV27) |
Gwarancja i wsparcie
Carpuride products are designed for reliability and performance. For specific warranty details, please refer to the warranty card included with your product or visit the official Carpuride website. If you encounter any issues or require technical assistance, please contact Carpuride customer support through their official channels. When contacting support, please have your product model number and purchase information ready.
Więcej informacji znajdziesz na stronie Carpuride Store on Amazon.