BOJACK BJ-YJF-6112-1
BOJACK Bathroom Vent Fan Motor Instruction Manual
Model: BJ-YJF-6112-1
1. Wprowadzenie
This manual provides detailed instructions for the installation, operation, and maintenance of your BOJACK Bathroom Vent Fan Motor. This motor is designed as a replacement for various bathroom exhaust fan units, offering efficient ventilation and improved air quality.
Przed instalacją i użyciem należy dokładnie przeczytać niniejszą instrukcję, aby zagwarantować prawidłowe działanie i bezpieczeństwo.
2. Ważne instrukcje bezpieczeństwa
OSTRZEŻENIE: Aby ograniczyć ryzyko pożaru, porażenia prądem elektrycznym lub obrażeń ciała, należy przestrzegać następujących zasad:
- Always disconnect power at the service panel before servicing or cleaning the unit. Lock out the service panel to prevent power from being switched on accidentally.
- All electrical wiring must be performed by a qualified electrician in accordance with all applicable codes and standards, including fire-rated construction.
- Do not use this motor with any solid-state speed control device.
- This motor is intended for general ventilating use only. Do not use to exhaust hazardous or explosive materials and vapors.
- Ensure the fan housing is securely mounted and properly grounded.
- Keep fingers and foreign objects away from the fan blade during operation.
3. Zawartość opakowania
Sprawdź, czy wszystkie elementy są obecne i nieuszkodzone:
- 1 x BOJACK Bathroom Vent Fan Motor
- 1 x Blower Wheel Fan Blade

Image 1: Contents of the BOJACK Bathroom Vent Fan Motor package, showing the motor and separate blower wheel.
4. Specyfikacje produktu
| Numer modelu | BJ-YJF-6112-1 |
| Objętość roboczatage | 120 wolty |
| Częstotliwość | 60 Hz |
| Aktualny | 1 Amp |
| Prędkość | 3000 obr./min. |
| Obrót | CCW (przeciwnie do ruchu wskazówek zegara) |
| Wymiary wału | 3/16 inch x 1.5 inch with splines |
| Fan Blade Dimensions | 4 5/8 inch (diameter) x 1 1/8 inch (height) |
| Długość przewodu | 6 1/2 inch with 2-prong plug |
| Orzecznictwo | Certyfikat UL |
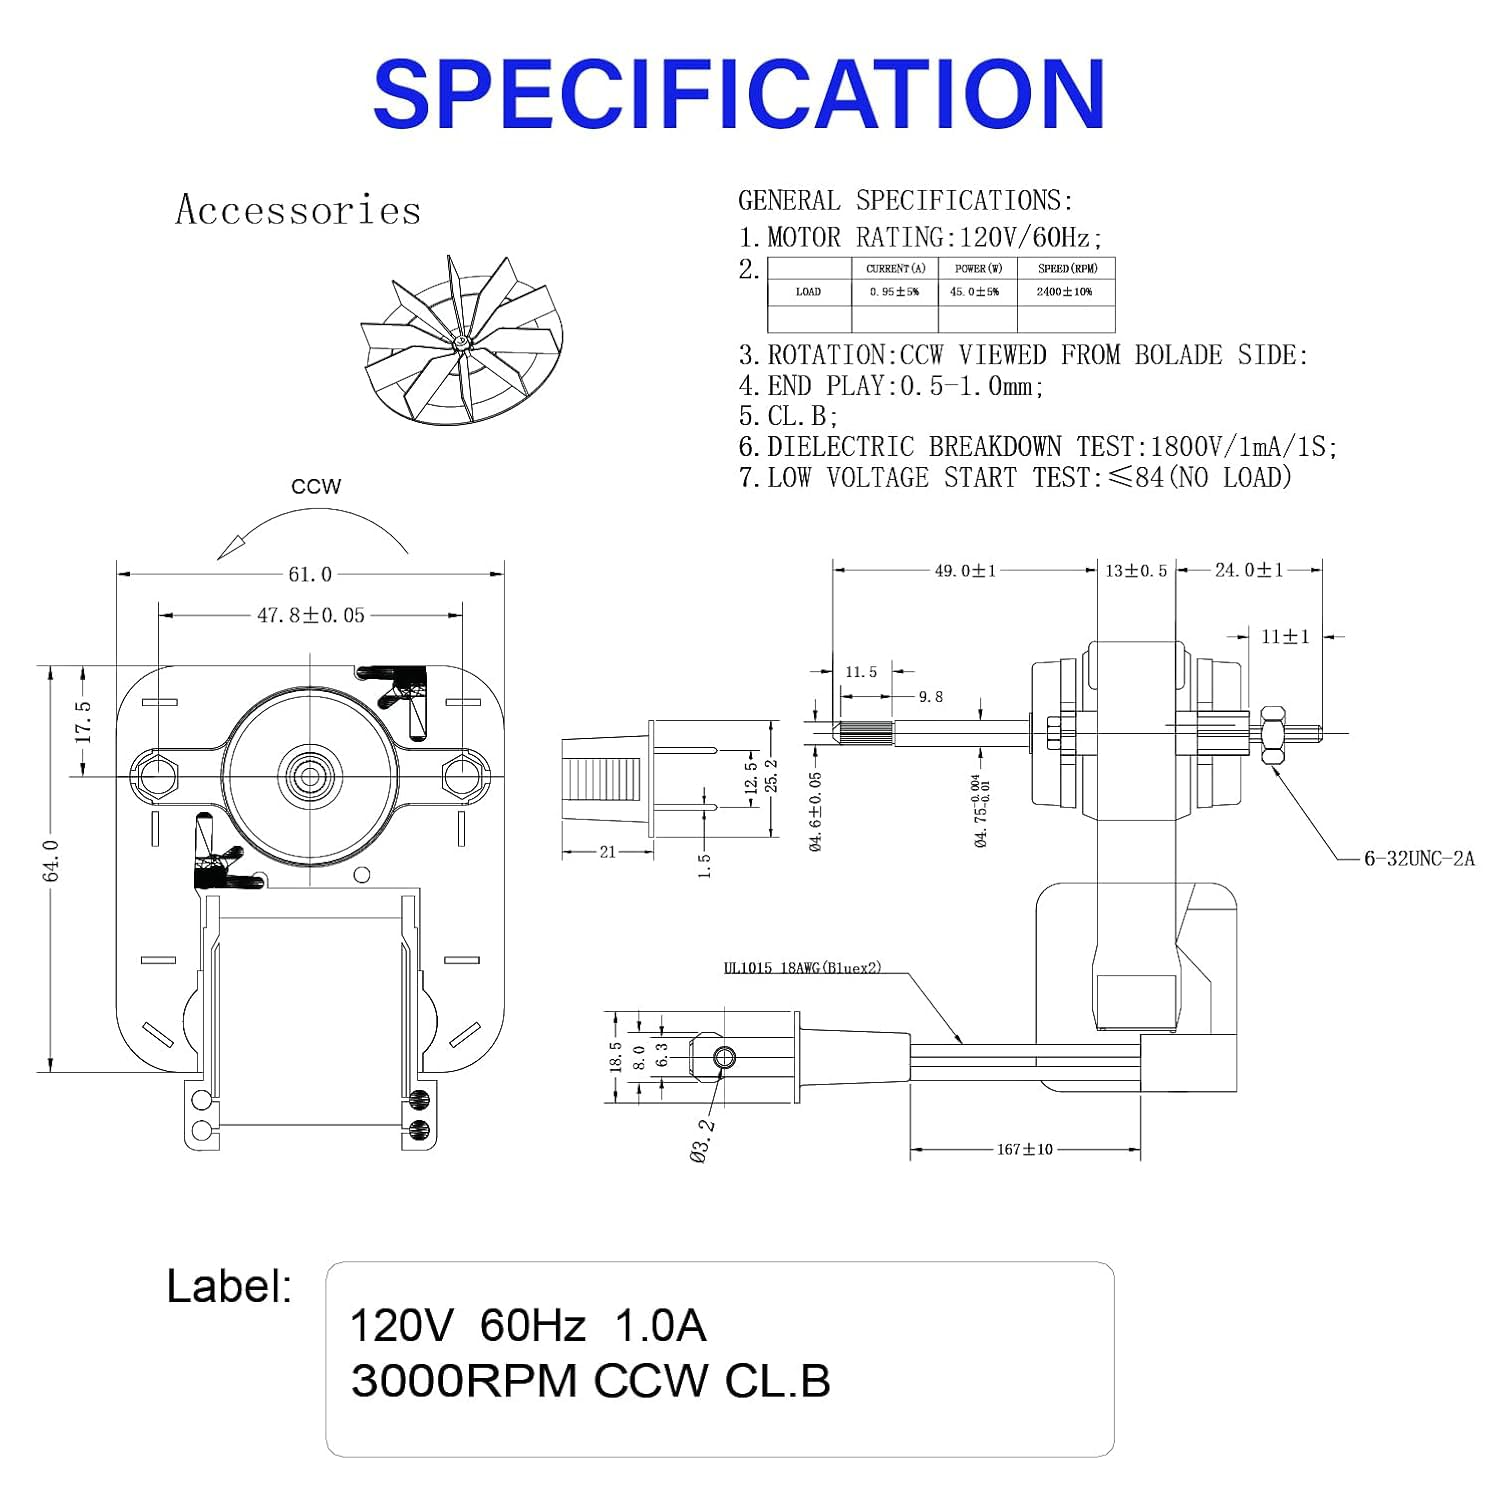
Image 2: Detailed technical specifications and dimensions of the motor and fan blade.

Image 3: Dimensions of the blower wheel, showing 115 mm (4.53 inch) diameter and 28 mm (1.1 inch) height.
5. Zgodność
This BOJACK motor is designed as a replacement for various bathroom exhaust fan models. It is compatible with, but not limited to, the following Nutone and Broan models and part numbers:
- Nutone Broan: 688, 659, 662, 663, 668, 678
- Part Numbers: 162502, 02S0055, 15617, 0340775B, 101-1770, 14266A, 15194A, 301-3001, C202A, CC0053, CC0154, P-608-31-1, P-10294, P-14266A, P-15194, P-15617, P-9983, S10625236, S10625002, S10625237, 5KSB33BG1858
Note: Always compare the specifications and physical dimensions of your existing motor with those provided in this manual to ensure proper fit and function.
6. Instrukcje instalacji
This section outlines the general steps for replacing a bathroom vent fan motor. Specific fan housing designs may vary, so refer to your original fan's manual if available.
Wymagane narzędzia:
- Śrubokręt (krzyżakowy i/lub płaski)
- Wrench or Socket Set (e.g., 8mm for mounting nuts)
- Pliers (optional, for stubborn nuts)
- Rękawice robocze
- Okulary ochronne
Kroki instalacji:
- Odłącz zasilanie: Before beginning any work, turn off the power to the bathroom fan at the circuit breaker or fuse box. Verify power is off using a voltagtester.
- Zdejmij osłonę wentylatora: Carefully pull down the fan cover (grille) and detach any springs or clips holding it in place.
- Remove Existing Motor Assembly:
- Locate the power cord connecting the motor to the fan housing. Disconnect it from the receptacle.
- Identify the mounting screws or nuts holding the motor assembly to the fan housing. Loosen and remove them.
- Carefully remove the old motor and fan blade assembly from the housing.
- Detach Old Fan Blade: If the old fan blade is still attached to the old motor, carefully remove it. Note its orientation for reference.
- Prepare New Motor:

Image 4: The BOJACK motor unit, ready for fan blade attachment.
- Take the new BOJACK motor.
- Align the new blower wheel fan blade onto the motor shaft. Ensure it is pushed down firmly and securely onto the splines of the shaft. The fan blade should be oriented correctly to draw air upwards.

Image 5: The BOJACK motor with the blower wheel correctly installed.
- Montaż nowego zespołu silnika:
- Position the new motor assembly into the fan housing, aligning the mounting holes.
- Secure the motor with the mounting screws or nuts. Ensure it is tightly fastened to prevent vibration and noise.
- Plug the motor's 2-prong power cord into the receptacle within the fan housing.
- Replace Fan Cover: Reattach the fan cover (grille) to the housing.
- Przywróć zasilanie: Włącz ponownie zasilanie za pomocą wyłącznika obwodu.
- Operacja testowa: Turn on the bathroom fan switch to ensure the new motor operates correctly and quietly.
7. Działanie
The BOJACK Bathroom Vent Fan Motor operates automatically when power is supplied through the fan's wall switch. Once installed, simply use your existing bathroom fan switch to turn the ventilation fan on or off.
The motor is designed for continuous counter-clockwise rotation (CCW) at 3000 RPM, providing effective air circulation for your bathroom.
8. Konserwacja
Regular maintenance helps ensure the longevity and efficient operation of your vent fan motor.
- Odłączenie zasilania: Przed przystąpieniem do prac konserwacyjnych należy zawsze odłączyć zasilanie za pomocą wyłącznika automatycznego.
- Czyszczenie kratki wentylatora: Periodically remove the fan grille and wash it with mild soap and water. Dry thoroughly before reattaching.
- Wyczyść koło dmuchawy: With the power off, carefully remove the blower wheel (if easily detachable) and clean it with a soft brush or cloth to remove dust and debris. A build-up of dust can reduce airflow and increase noise.
- Czyszczenie silnika: Gently wipe the exterior of the motor with a dry cloth. Do not use water or cleaning solutions directly on the motor. The motor is permanently lubricated and does not require additional oiling.
- Ponowny montaż: Reassemble all components, ensuring they are securely fastened. Restore power and test operation.
9. Rozwiązywanie Problemów
If you experience issues with your BOJACK Bathroom Vent Fan Motor, refer to the following common problems and solutions:
| Problem | Możliwa przyczyna | Rozwiązanie |
|---|---|---|
| Wentylator się nie włącza. | Brak zasilania urządzenia. Motor not properly plugged in. Uszkodzony przełącznik ścienny. | Sprawdź wyłącznik automatyczny. Ensure motor plug is fully inserted. Sprawdź lub wymień przełącznik ścienny. |
| Wentylator jest wyjątkowo głośny. | Luźne śruby mocujące. Brudne koło dmuchawy. Fan blade hitting housing. | Dokręć wszystkie śruby mocujące. Clean blower wheel (see Maintenance). Ensure fan blade is properly seated on shaft and not touching housing. |
| Słaby przepływ powietrza. | Dirty blower wheel or grille. Przeszkoda w przewodach wentylacyjnych. | Clean blower wheel and grille. Sprawdź kanały wentylacyjne pod kątem zatorów. |
Jeśli wykonanie czynności rozwiązywania problemów nie pomoże, skontaktuj się z obsługą klienta.
10. Gwarancja i obsługa klienta
BOJACK products are manufactured to high-quality standards. For specific warranty information, please refer to the product packaging or contact BOJACK customer support directly.
For technical assistance, replacement parts, or general inquiries, please visit the official BOJACK webstronie lub skontaktuj się z działem obsługi klienta.