Andoer NDB7090303116798WD
Instrukcja obsługi przenośnego aparatu cyfrowego Andoer
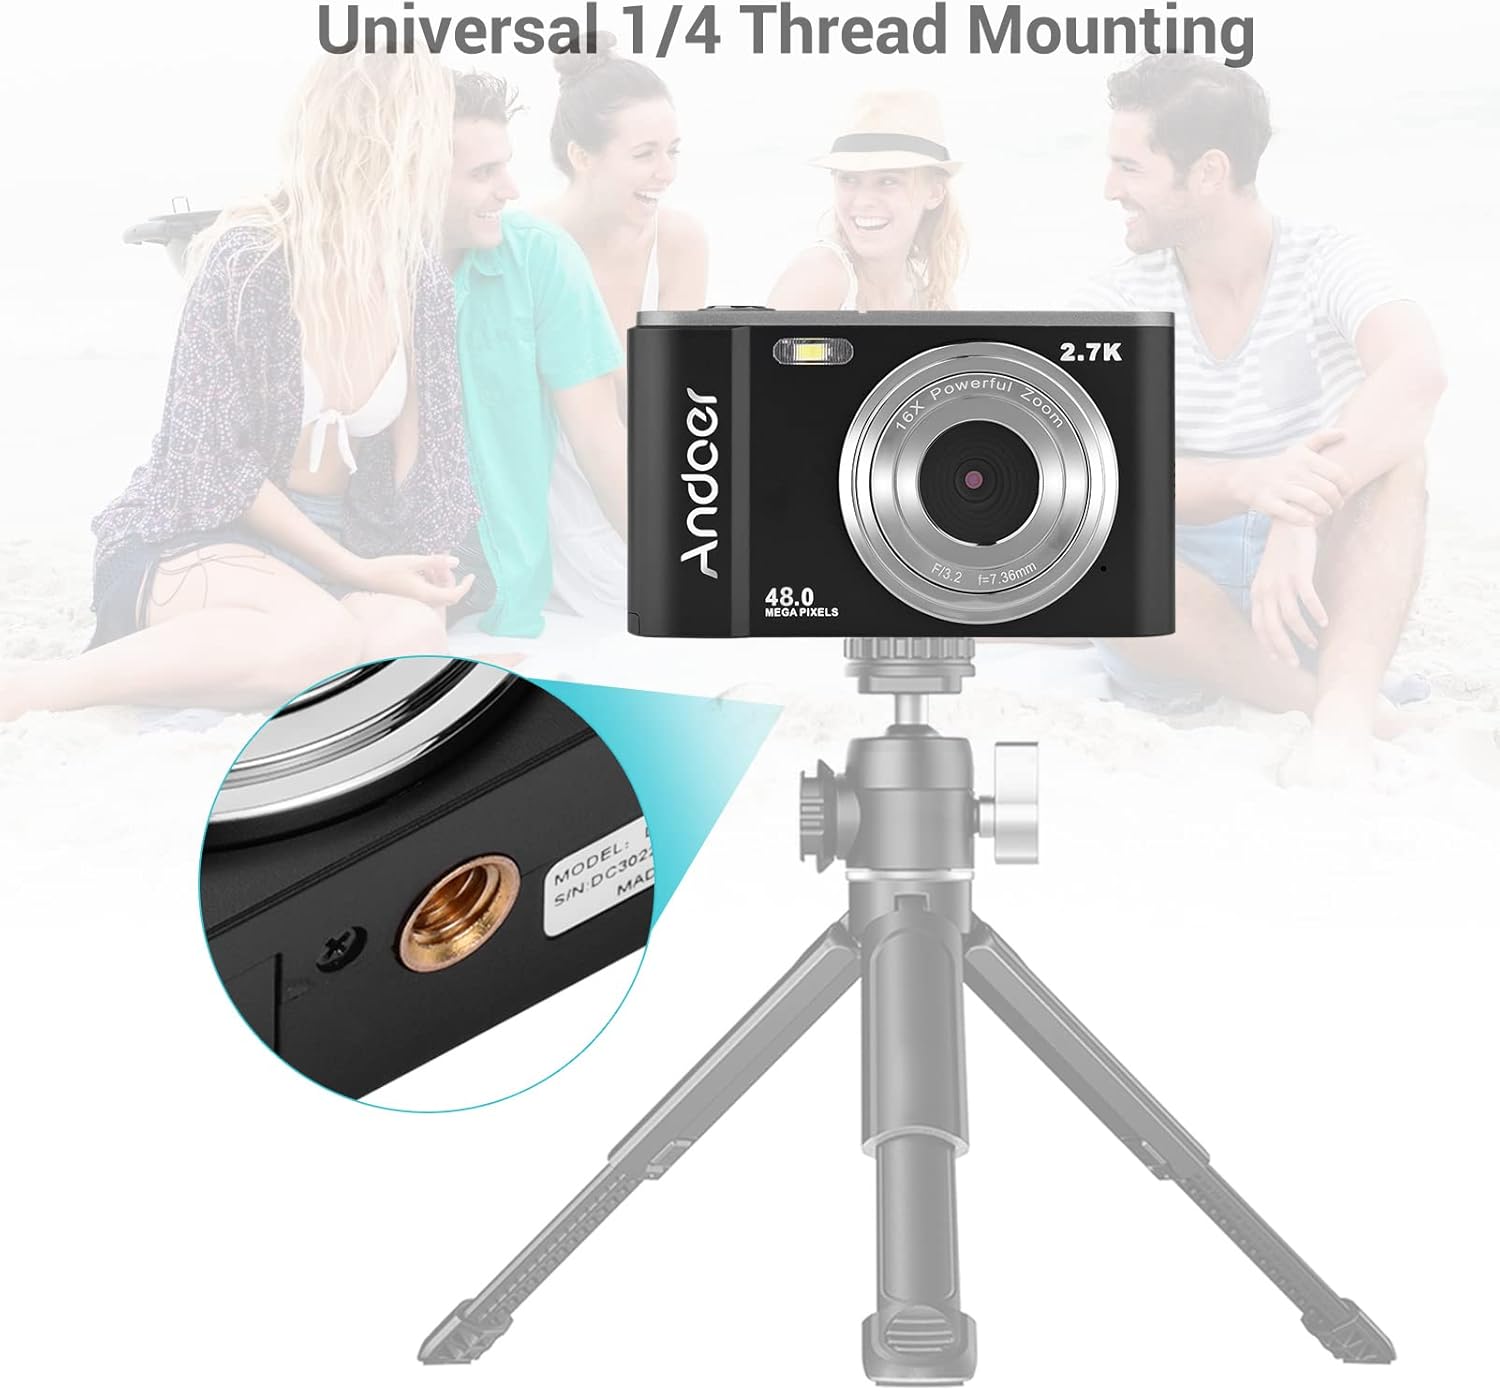
Model: NDB7090303116798WD | Brand: Andoer
Wstęp
Thank you for choosing the Andoer Portable Digital Camera. This compact and lightweight camera is designed for ease of use, allowing you to capture high-quality photos and videos. Featuring a CMOS image sensor, it supports up to 1080P video resolution and 16MP (interpolation) image resolution, along with 16X digital zoom and a 2.7-inch rotatable LCD screen. It includes functions such as digital anti-shake, white balance adjustment, exposure control, and built-in speaker and microphone for a versatile shooting experience.

The Andoer Digital Camera offers a range of features including 48 Megapixel photos, 2.7K video recording, 16X powerful zoom, anti-shaking technology, self-timer options, a 2.88-inch IPS screen, 128GB extended memory support, and face detection.
Co jest w pudełku
Sprawdź zawartość paczki, aby upewnić się, że znajdują się w niej wszystkie elementy:
- Aparat cyfrowy
- Kabel USB
- Pasek na rękę
- Torba transportowa
- 2 x baterie
- Instrukcja obsługi
The complete package includes the digital camera, USB cable, hand strap, carry pouch, two rechargeable batteries, and the user manual.
Organizować coś
1. Instalacja baterii
The camera uses a BL-5C Li-ion Battery. Ensure the battery is charged before first use.
- Otwórz pokrywę komory baterii znajdującą się na spodzie aparatu.
- Insert the BL-5C battery into the compartment, ensuring the correct polarity.
- Dokładnie zamknij pokrywę komory baterii.

The camera uses a 700 mAh rechargeable lithium battery. Insert it into the designated compartment at the bottom of the camera.
2. Instalacja karty pamięci
The camera supports memory cards up to 32GB. A Class 10 or higher memory card is highly recommended for optimal performance.
- Znajdź gniazdo karty SD, zazwyczaj znajdujące się obok komory baterii.
- Insert the memory card into the slot with the metal contacts facing the correct direction until it clicks into place.
- Aby wyjąć kartę, delikatnie wciśnij ją, aż wysunie się.
3. Ładowanie akumulatora
Naładuj akumulator za pomocą dostarczonego kabla USB.
- Podłącz jeden koniec kabla USB do portu USB aparatu.
- Podłącz drugi koniec do zasilacza USB (nie ma go w zestawie) lub do portu USB komputera.
- Zaświeci się kontrolka ładowania. Po zakończeniu ładowania zgaśnie lub zmieni kolor.
Obsługa aparatu
1. Włączanie/wyłączanie zasilania
Press and hold the power button (usually marked with a circle and a vertical line) to turn the camera on or off.
2. Podstawowe sterowanie
Familiarize yourself with the camera's buttons and their functions:
- Spust migawki: Press halfway to focus, fully to take a photo or start/stop video recording.
- Przycisk trybu (M): Przełącza między trybami zdjęć, wideo i odtwarzania.
- Dźwignia zoomu (W/T): Adjusts the digital zoom (Wide/Telephoto).
- Klawiatura kierunkowa/przycisk OK: Umożliwia nawigację po menu i potwierdzanie wyborów.
- Przycisk menu: Dostęp do ustawień aparatu.
- Przycisk usuwania: Usuwa wybrane files w trybie odtwarzania.
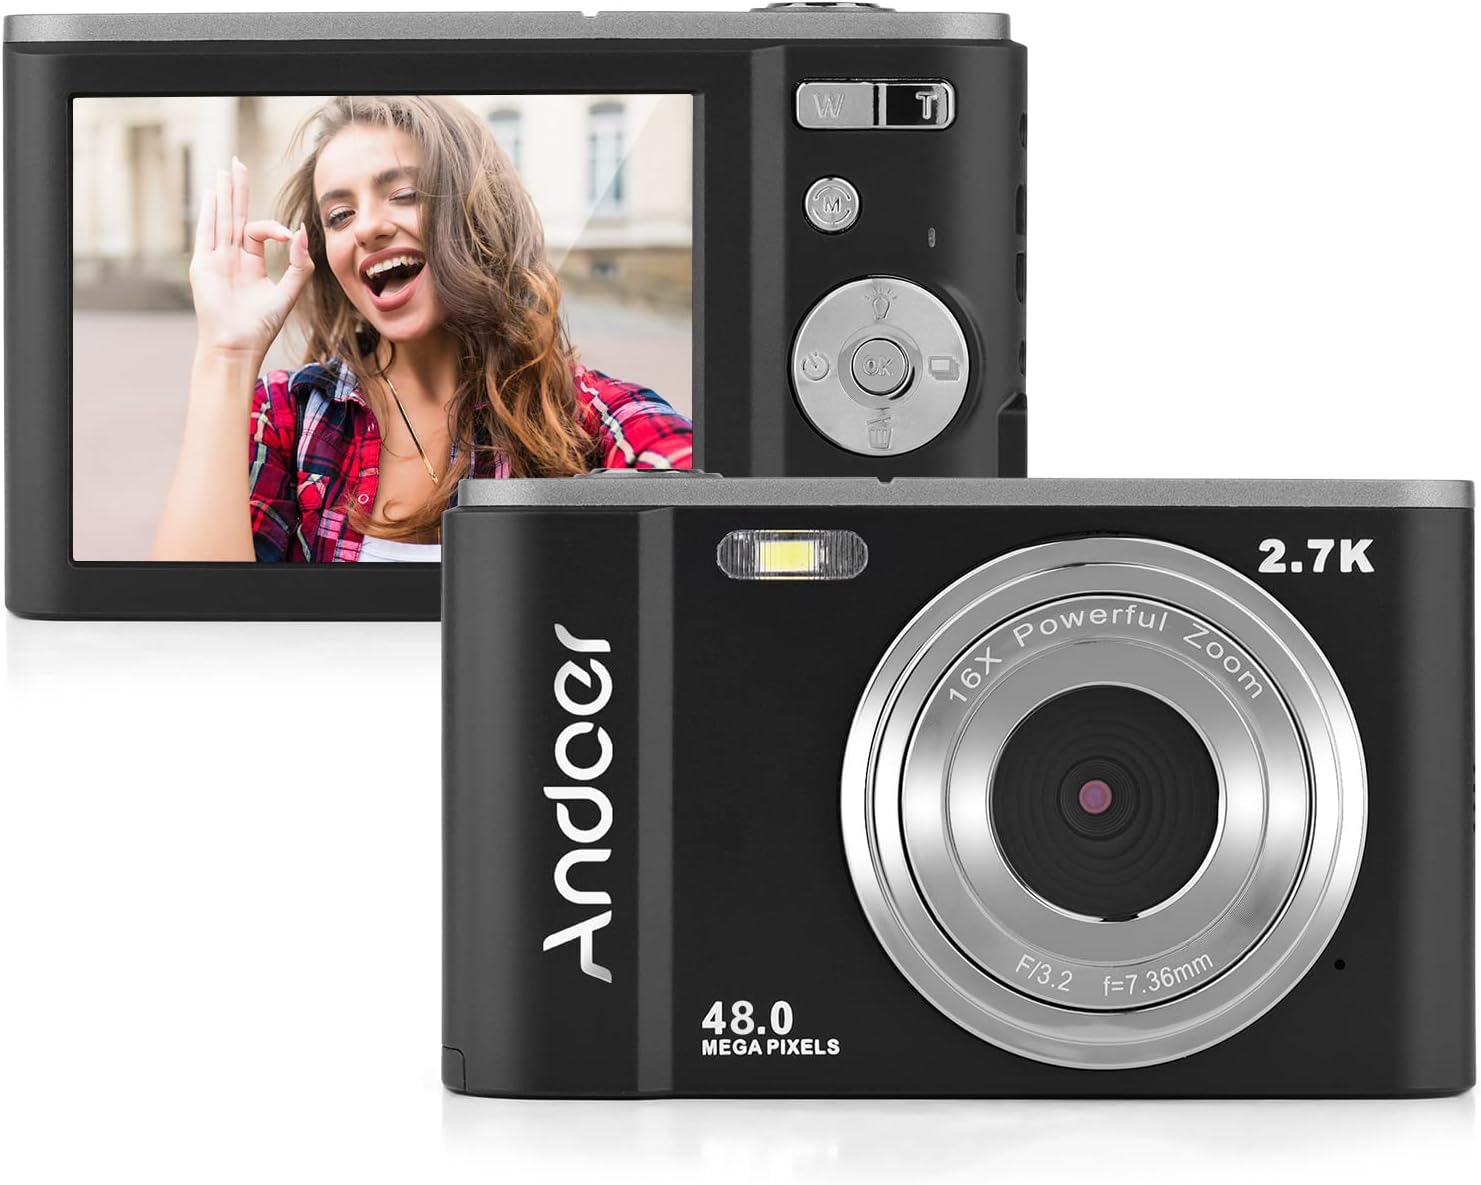
The camera features a 2.7-inch IPS screen and intuitive controls on the back for easy operation.
3. Robienie zdjęć
In photo mode, frame your shot using the LCD screen. Press the shutter button halfway to focus, then fully to capture the image. Photos are saved in JPEG format with resolutions up to 16MP (interpolation).
4. Nagrywanie filmów
Switch to video mode using the Mode button. Press the shutter button to start recording, and press it again to stop. Videos are saved in AVI format with resolutions including 1080P, 720P, and VGA.

The camera supports both 2.7K video recording and 48 Megapixel photo capture for high-quality media.
5. Funkcja powiększania
Use the W/T lever to adjust the 16X digital zoom. 'T' (Telephoto) zooms in, and 'W' (Wide) zooms out.

The 16X powerful zoom allows for detailed close-up shots.
6. Samowyzwalacz
Access the self-timer option in the camera's menu. Available settings include off, 2 seconds, 5 seconds, and 10 seconds.
7. Smart Detection (Face Detection, Smile Capture)
The camera features smart detection capabilities, including face detection and smile capture, to assist in taking better portraits.
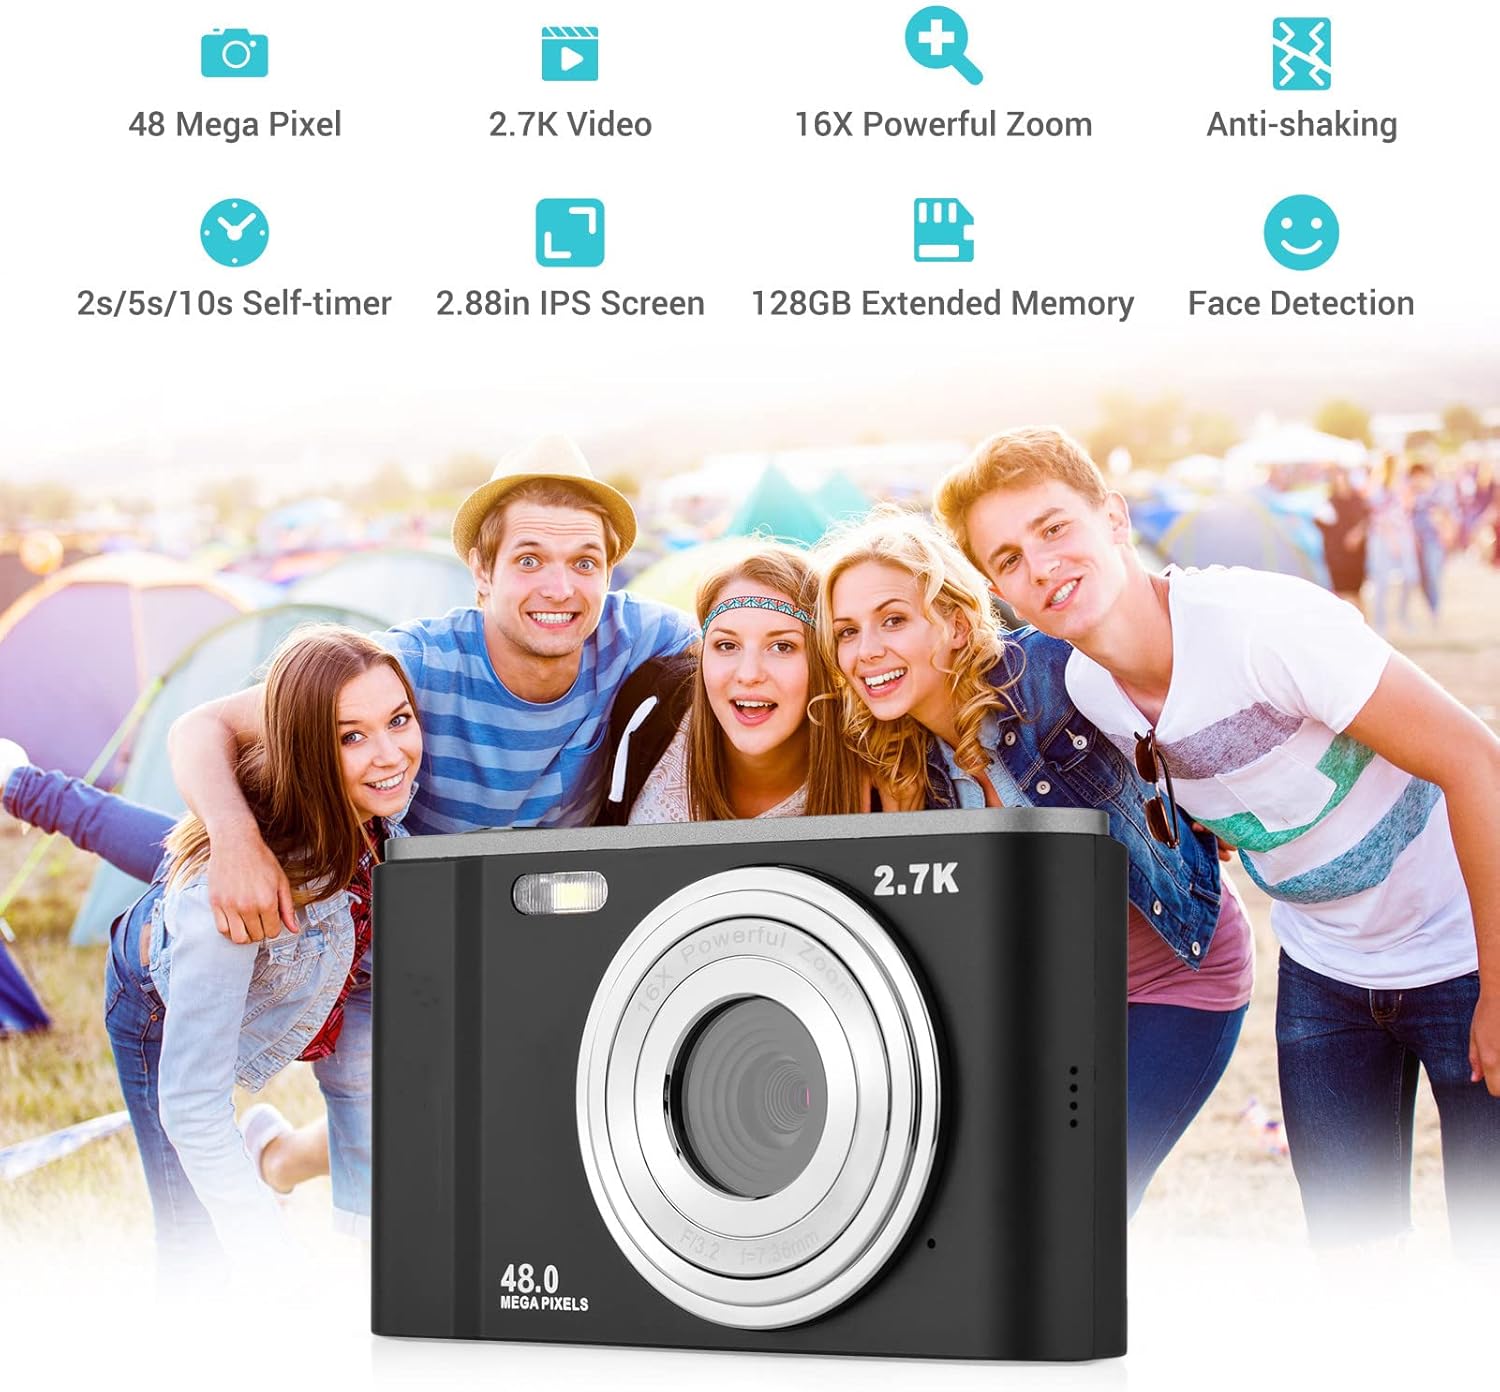
Smart detection features like face detection and smile capture enhance portrait photography.
8. Antywstrząsowy
The digital anti-shake function helps reduce blur caused by camera movement, resulting in clearer images and videos.
9. Podłączanie do komputera
Use the provided USB cable to connect the camera to a computer for transferring photos and videos.
- Podłącz aparat do komputera za pomocą kabla USB.
- Aparat będzie widoczny na Twoim komputerze jako dysk wymienny.
- You can then access and transfer your files.
Konserwacja
1. Czyszczenie aparatu
- Do czyszczenia korpusu aparatu należy używać miękkiej, suchej ściereczki.
- Do czyszczenia soczewek należy używać specjalnej ściereczki i płynu do czyszczenia soczewek. Unikaj dotykania soczewek palcami.
- Nie używaj żrących chemikaliów ani ściernych środków czyszczących.
2. Pielęgnacja baterii
- Baterie, które nie są używane, przechowuj w chłodnym i suchym miejscu.
- Aby przedłużyć żywotność akumulatora, należy unikać jego całkowitego rozładowywania.
- Jeżeli aparat nie będzie używany przez dłuższy czas, należy wyjąć baterię.
3. Przechowywanie
- Store the camera in its carry pouch or a protective case to prevent scratches and dust accumulation.
- Trzymaj aparat z dala od ekstremalnych temperatur, dużej wilgotności i bezpośredniego światła słonecznego.
Rozwiązywanie problemów
Jeśli masz problemy z aparatem, zapoznaj się z poniższymi, często występującymi problemami i ich rozwiązaniami:
| Problem | Możliwa przyczyna | Rozwiązanie |
|---|---|---|
| Kamera się nie włącza | Bateria jest rozładowana lub nieprawidłowo włożona. | Naładuj akumulator do pełna. Upewnij się, że akumulator jest włożony z zachowaniem prawidłowej polaryzacji. |
| Słaba żywotność baterii | Battery degradation or frequent use of power-intensive features. | Ensure battery is fully charged. Reduce use of flash or prolonged video recording. Consider replacing the battery if it's old. |
| Obrazy są rozmazane | Camera shake, dirty lens, or incorrect focus. | Hold the camera steady. Clean the lens. Ensure the camera has focused before taking the shot. |
| Błąd karty pamięci | Card not inserted correctly, incompatible card, or corrupted card. | Reinsert the card. Ensure it's a compatible SD card (up to 32GB, Class 10 recommended). Try formatting the card (this will erase all data). |
Specyfikacje
Detailed technical specifications for the Andoer Portable Digital Camera:
| Funkcja | Specyfikacja |
|---|---|
| Transduktor | Czujnik CMOS |
| Maksymalna rozdzielczość obrazu | 16MP (interpolation) |
| Rozdzielczość wideo | 1080P / 720P / VGA |
| Ekran | 2.7 inch LCD (rotatable) |
| Brzęczenie | 16-krotny zoom cyfrowy |
| Odległość ogniskowania | 1.2m do nieskończoności |
| Pojemność karty pamięci | Max. 32GB (Not included, Class 10 or above recommended) |
| Format zdjęcia | Plik JPEG |
| Format wideo | Plik AVI |
| Narażenie | ± 2.0 EV |
| Samowyzwalacz | Wyłączony, 2s, 5s, 10s |
| Port USB | USB2.0 |
| Zasilacz | 1 * BL-5C Li-ion Battery |
| Wymiary produktu | 0.98 x 3.78 x 2.2 cala |
| Waga przedmiotu | 3.28 uncji |

Physical dimensions of the camera for reference.
Gwarancja i wsparcie
For warranty information and customer support, please refer to the documentation provided with your purchase or contact Andoer customer service through their official webZachowaj dowód zakupu na wypadek roszczeń gwarancyjnych.
Ask a question about this manual
Ask about setup, troubleshooting, compatibility, parts, safety, or missing instructions. Manuals+ will review the question and use this page’s manual context to help answer it.