
UNITOPSCI A3041
UNITOPSCI 9-Inch Android Car Stereo with Apple CarPlay and Android Auto (Model A3041) - User Manual
Model: A3041 | Brand: UNITOPSCI
1. Wprowadzenie
This manual provides detailed instructions for the installation, operation, and maintenance of your UNITOPSCI 9-inch Android Car Stereo. Please read this manual thoroughly before using the product to ensure proper functionality and to maximize your user experience. Keep this manual for future reference.
2. Koniec produktuview
2.1 Główne cechy
- System Android 13: Wyposażony w 2 GB pamięci RAM i 64 GB pamięci ROM zapewniające płynne działanie.
- 9-Inch HD Capacitive Touchscreen: 1024x600 resolution for clear visuals.
- Bezprzewodowy Apple CarPlay i Android Auto: Bezproblemowa integracja ze smartfonem umożliwiająca nawigację, wykonywanie połączeń i słuchanie muzyki.
- Wbudowany Bluetooth 4.2: Supports hands-free calling, phone book sync, and A2DP music streaming.
- Nawigacja GPS: Supports online and offline maps (preloaded with Here WeGo, compatible with Google Maps, Waze, Sygic).
- Łączność WiFi: Access online functions like streaming, browsing, and social media via a WiFi hotspot.
- Radio FM/RDS: 18 preset stations for news, music, and weather broadcasts.
- Funkcja łącza lustrzanego: Display content from Android (via WiFi or USB) and iOS (via WiFi) phones.
- Obsługa kamery cofania AHD: Automatic display of parking video with night vision and 170-degree viewkąt.
- HiFi EQ Setting: Customizable audio effects for enhanced sound quality.
- Funkcja podzielonego ekranu: Uruchom dwie aplikacje jednocześnie na jednym ekranie.
- Sterowanie z kierownicy (SWC): Easily manage radio channels, songs, and volume for safer driving.
- Wyjście wideo: Share video content to external monitors, such as headrest displays.
2.2 Zawartość pudełka

Figure 2.2.1: Included Components and Product Dimensions.
This image displays the main unit with its dimensions and a detailed layout of all accessories included in the package, such as cables, antennas, and the backup camera.
- 1 x Android Car Stereo for VW
- 1 x kamera cofania AHD
- Kabel 1 x RCA
- 1 x antena GPS
- 1 x kabel wejściowy kamery
- 2 x kable zasilające
- Kable 2 x USB
- 1 x dekoder Canbus
- 1 x adapter radiowy
3. Konfiguracja i instalacja
Proper installation is crucial for the optimal performance of your car stereo. If you are unsure about any steps, it is recommended to seek professional assistance.
3.1 Sprawdzenie zgodności
Before installation, confirm the compatibility of the stereo with your vehicle's original car system configuration, year, and central control map. This unit is designed for specific Volkswagen, SEAT, and Skoda models. Refer to the compatibility image below.
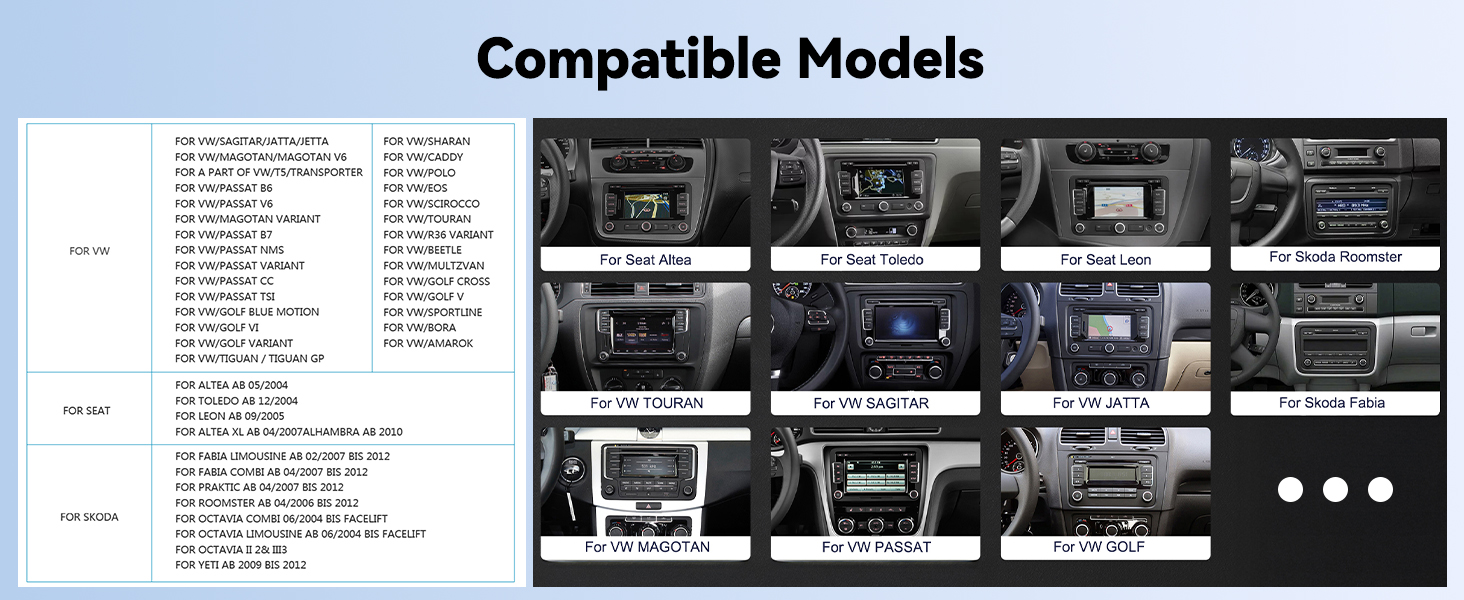
Figure 3.1.1: Compatible Vehicle Models.
This image provides a list of Volkswagen, SEAT, and Skoda models for which this car stereo is compatible. Please verify your vehicle model against this list.

Figure 3.1.2: Installation Compatibility Note.
Na tym zdjęciu widać byłegoamples of car dashboard layouts, distinguishing between configurations where the stereo can be installed (green checkmark) and where it cannot (red cross), based on the original car system's design.
3.2 instrukcje okablowania
The package includes both 36-pin and 40-pin harnesses. Choose the correct harness for your car model. Refer to the diagrams below for proper wiring connections.

Figure 3.2.1: Wiring Diagram (Canbus Connection).
This diagram illustrates how to connect the ACC (A, B plug) and Canbus. It shows plugging the Canbus into the port at the back of the unit to provide power to the Canbus.

Figure 3.2.2: Detailed Wiring Harness Connections.
Na tym obrazie przedstawiono szczegółowo view of the 36-pin and 40-pin harnesses, indicating connections for power, RCA cables, reverse input, USB, Canbus, and GPS antenna. Ensure you select the correct harness for your vehicle.
- Przed rozpoczęciem jakichkolwiek prac elektrycznych należy odłączyć akumulator pojazdu.
- Identify the correct wiring harness (36-pin or 40-pin) for your vehicle.
- Connect the main power cable to the vehicle's power supply, ensuring ACC and ground connections are secure.
- Podłącz dekoder Canbus, jeśli Twój pojazd tego wymaga do sterowania kierownicą lub innych zintegrowanych funkcji.
- Podłącz antenę GPS i skieruj ją do miejsca z czystym dostępem view nieba.
- Connect the USB cables and route them to an accessible location (e.g., glove compartment).
- For the backup camera, connect the video input cable to the stereo and the power/ground wires to the vehicle's reverse light circuit.
- Connect any additional RCA cables for external amplifiers or video output.
- Once all connections are made, reconnect the vehicle's battery and test the unit before fully reassembling the dashboard.
4. Instrukcja obsługi
4.1 Bezprzewodowy Apple CarPlay i Android Auto
Connect your smartphone wirelessly to access navigation, make calls, send messages, and play music through the car stereo's interface.

Figure 4.1.1: Wireless CarPlay and Android Auto Interfaces.
This image shows the car stereo's display with both Apple CarPlay and Android Auto interfaces, demonstrating how smartphone apps are integrated for in-car use.
- Upewnij się, że w smartfonie są włączone Bluetooth i Wi-Fi.
- W samochodowym radiu wybierz aplikację CarPlay lub Android Auto.
- Follow the on-screen prompts to pair your phone. For Apple CarPlay, select your car stereo from your iPhone's Bluetooth settings. For Android Auto, ensure the app is installed and follow the pairing process.
- Once connected, you can use voice commands (Siri or Google Assistant) for various functions.
4.2 Łączność Bluetooth
Wbudowany moduł Bluetooth umożliwia prowadzenie rozmów telefonicznych w trybie głośnomówiącym oraz bezprzewodowe przesyłanie strumieniowe dźwięku.

Figure 4.2.1: Hands-Free Calling via Bluetooth.
This image illustrates the hands-free calling feature, showing a driver on a call with the car stereo displaying the call interface.
- Przejdź do ustawień Bluetooth w samochodowym radiu.
- Włącz Bluetooth w swoim smartfonie i wyszukaj dostępne urządzenia.
- Select "UNITOPSCI" (or similar device name) from your phone's list and pair.
- Po sparowaniu możesz bezprzewodowo wykonywać i odbierać połączenia oraz odtwarzać muzykę.
4.3 Nawigacja GPS
Utilize the integrated GPS for reliable navigation, with support for both online and offline maps.

Rysunek 4.3.1: Interfejs nawigacji GPS.
This image shows the car stereo displaying a navigation map, along with icons representing different map applications like Google Maps, Waze, and Here WeGo.
- Dostęp do aplikacji Nawigacja uzyskasz z menu głównego.
- The unit comes preloaded with Here WeGo maps. You can download additional offline maps or use online navigation apps like Google Maps or Waze when connected to Wi-Fi.
- Wprowadź cel podróży, aby otrzymać wskazówki krok po kroku.
4.4 Łączność Wi-Fi
Connect to a Wi-Fi hotspot to access online features and applications.
Figure 4.4.1: WiFi and Online Applications.
This image highlights the Wi-Fi capability of the stereo, showing the Wi-Fi icon and various online applications that can be accessed, such as YouTube, Facebook, and web przeglądarek.
- Przejdź do Ustawienia > Sieć i Internet > Wi-Fi.
- Turn on Wi-Fi and select your desired hotspot from the list.
- Jeśli zostaniesz o to poproszony, wprowadź hasło.
- Once connected, you can use online navigation, stream videos, browse the internet, and use other online applications.
Radio 4.5 FM/RDS
Tune into your favorite radio stations with the built-in FM/RDS tuner.

Rysunek 4.5.1: Interfejs radia FM/RDS.
This image shows the car stereo's FM radio interface, displaying the current frequency, available preset stations, and controls for tuning.
- Wybierz aplikację Radio z menu głównego.
- Użyj funkcji skanowania, aby znaleźć dostępne stacje lub ręcznie dostrój się do określonej częstotliwości.
- Save up to 18 of your favorite stations as presets for quick access.
- System RDS (Radio Data System) dostarcza dodatkowych informacji, takich jak nazwa stacji i typ programu, jeśli są dostępne.
4.6 Funkcja łącza lustrzanego
Wyświetlaj zawartość ekranu swojego smartfona bezpośrednio na wyświetlaczu radia samochodowego.

Rysunek 4.6.1: Funkcjonalność łącza lustrzanego.
This image demonstrates the Mirror Link feature, where a smartphone's display is replicated on the car stereo screen. It also indicates connection methods for Android (WiFi or USB) and iOS (WiFi).
- For Android phones: Connect via Wi-Fi or USB cable.
- For iOS phones: Connect via Wi-Fi.
- Select the Mirror Link application on the stereo and follow the pairing instructions specific to your phone's operating system.
4.7 Funkcja podzielonego ekranu
Wyświetlaj dwie aplikacje jednocześnie, aby usprawnić wykonywanie wielu zadań jednocześnie.

Figure 4.7.1: Split Screen Display.
This image shows the car stereo's display divided into two sections, with a navigation map on one side and the FM radio interface on the other, demonstrating the split-screen capability.
- While an application is open, long-press the recent apps button or drag an app to one side of the screen (method may vary slightly based on Android version).
- Select a second application to occupy the other half of the screen.
4.8 Sterowanie z kierownicy (SWC)
Configure your vehicle's steering wheel buttons to control the stereo functions.

Rysunek 4.8.1: Konfiguracja sterowania z kierownicy.
This image displays a car steering wheel with its control buttons alongside the car stereo's interface for learning and configuring steering wheel controls, allowing users to map functions like volume, track skip, and mode selection.
- Go to Settings > Steering Learn (or similar option).
- Follow the on-screen instructions to program each steering wheel button to its corresponding function on the stereo.
4.9 HiFi EQ Setting
Customize your audio experience with the integrated HiFi Equalizer.
Figure 4.9.1: HiFi EQ Settings.
This image shows the car stereo's graphic equalizer interface, allowing users to adjust various frequency bands and select from predefined sound presets like Custom, Classical, Jazz, Rock, and Pop.
- Dostęp do ustawień korektora dźwięku uzyskasz z menu audio.
- Adjust frequency bands manually or select from preset sound modes (e.g., Pop, Rock, Jazz, Classical).
4.10 Kamera cofania AHD
System automatycznie wyświetla tył view gdy pojazd jest na biegu wstecznym.

Figure 4.10.1: Backup Camera Display and Wiring.
This image illustrates the clear rear-view display with parking guidelines provided by the AHD backup camera. It also includes a simplified diagram showing how to connect the camera to the stereo and the vehicle's reverse light for automatic activation.
- Ensure the backup camera is correctly installed and wired to the reverse light circuit.
- When the vehicle is shifted into reverse, the stereo will automatically switch to the camera view.
- The camera features night vision and a 170-degree viewing angle for improved visibility.
5. Konserwacja
- Czyszczenie ekranu: Delikatnie przetrzyj ekran dotykowy miękką, niepozostawiającą włókien ściereczką. W przypadku uporczywych plam delikatnie przetrzyj.ampPrzetrzyj ściereczkę wodą lub środkiem do czyszczenia ekranów. Unikaj silnych środków chemicznych i materiałów ściernych.
- Aktualizacje oprogramowania: Okresowo sprawdzaj dostępność aktualizacji oprogramowania od producenta, aby zapewnić optymalną wydajność i dostęp do nowych funkcji.
- Opieka ogólna: Unikaj wystawiania urządzenia na działanie ekstremalnych temperatur, długotrwałego bezpośredniego światła słonecznego i nadmiernej wilgoci.
6. Rozwiązywanie Problemów
Jeśli masz problemy z radiem samochodowym, zapoznaj się z poniższymi typowymi procedurami rozwiązywania problemów:
- Brak zasilania:
- Sprawdź wszystkie połączenia zasilania i bezpieczniki.
- Sprawdź, czy akumulator pojazdu jest naładowany.
- Verify the ACC wire is correctly connected and receiving power when the ignition is on.
- Brak dźwięku:
- Sprawdź połączenia przewodów głośnikowych.
- Sprawdź, czy głośność nie jest wyciszona lub ustawiona zbyt nisko.
- Sprawdź ustawienia wyjścia audio w menu stereo.
- Problemy z połączeniem Bluetooth:
- Upewnij się, że Bluetooth jest włączony zarówno w zestawie stereo, jak i w telefonie.
- Usuń poprzednie sparowania na obu urządzeniach i spróbuj sparować je ponownie.
- Uruchom ponownie system stereo i telefon.
- GPS nie działa / jest niedokładny:
- Upewnij się, że antena GPS jest prawidłowo podłączona i umieszczona w miejscu z wolnym dostępem view nieba.
- Verify that location services are enabled in the stereo's settings.
- If using online maps, ensure a stable Wi-Fi connection.
- Unit Lagging / Slow Response:
- Zamknij niepotrzebne aplikacje działające w tle.
- Wykonaj restart systemu.
- Consider a factory reset if the issue persists (note: this will erase all user data and settings).
- Kamera cofania nie jest wyświetlana:
- Check the camera's video input connection to the stereo.
- Verify the camera's power and ground connections to the reverse light circuit.
- Ensure the reverse trigger wire (if applicable) is correctly connected.
If these steps do not resolve the issue, please contact UNITOPSCI customer support for further assistance.
7. Specyfikacje
| Marka | UNITOPSCI |
| Numer modelu | A3041 |
| System operacyjny | Android 13 |
| BARAN | 2 GB |
| ROM | 64 GB |
| Rozmiar wyświetlacza | 9 cali |
| Rozdzielczość wyświetlacza | 1024x600 |
| Moc wyjściowa | 4x45W |
| Wersja Bluetooth | 4.2 |
| Łączność | Wireless (CarPlay, Android Auto, Bluetooth, WiFi) |
| Map Type Compatibility | Google Map, Here WeGo, Waze, Sygic (North America, Worldwide) |
| Waga przedmiotu | 3.14 funta |
| Wymiary produktu | 8.58 x 2.09 x 5.12 cala |
8. Gwarancja i wsparcie
8.1 Gwarancja na produkt
The UNITOPSCI A3041 car stereo comes with a 1-letnia gwarancja from the date of purchase, covering manufacturing defects. For specific warranty claims or details, please contact customer support.
8.2 Obsługa klienta
For technical assistance, troubleshooting, or warranty inquiries, please contact UNITOPSCI customer service:
- E-mail: UNITOPSCI@126.com
- Zasady zwrotu: 30-day refund/replacement policy through Amazon.
- Plany ochrony: Optional 2-Year and 3-Year protection plans are available for purchase separately.

Figure 8.2.1: Customer Support Information.
This image provides details on customer support, including email contact, replacement policy, response times, and lifetime after-sales technical support.
Powiązane dokumentyA3041


Ask a question about this manual
Ask about setup, troubleshooting, compatibility, parts, safety, or missing instructions. Manuals+ will review the question and use this page’s manual context to help answer it.