Wstęp
This manual provides detailed instructions for the safe installation, operation, and maintenance of your bimar Wi-Fi Ceiling Fan, Model 1 (Ø 132). Please read this manual thoroughly before using the product and retain it for future reference.
Przeznaczenie: This high-performance ceiling fan is designed for ventilation in indoor domestic environments. Any other use is considered improper and potentially hazardous. The manufacturer cannot be held responsible for any damages resulting from improper use or repairs performed by unqualified personnel.
Ważne instrukcje bezpieczeństwa
Aby ograniczyć ryzyko pożaru, porażenia prądem elektrycznym lub obrażeń ciała, należy przestrzegać następujących zasad:
- Przed zainstalowaniem wentylatora należy przeczytać wszystkie instrukcje.
- Instalację musi wykonać wykwalifikowany elektryk, zgodnie ze wszystkimi lokalnymi i krajowymi przepisami elektrycznymi.
- Ensure the installation site can support the fan's weight (approximately 6.2 kg).
- Przed przystąpieniem do instalacji lub serwisowania należy zawsze odłączyć zasilanie za pomocą głównego wyłącznika.
- Nie należy używać wentylatora, jeśli przewód zasilający lub wtyczka są uszkodzone.
- Keep hands, hair, and clothing away from moving blades.
- Nie wkładaj żadnych przedmiotów do łopatek wentylatora podczas jego pracy.
- Urządzenie to nie jest przeznaczone do użytku przez osoby (w tym dzieci) o ograniczonej sprawności fizycznej, sensorycznej lub umysłowej, a także osoby nieposiadające odpowiedniego doświadczenia lub wiedzy, chyba że znajdują się one pod nadzorem osoby odpowiedzialnej za ich bezpieczeństwo lub otrzymały od niej instrukcje dotyczące korzystania z urządzenia.
- Dzieci powinny znajdować się pod nadzorem, aby mieć pewność, że nie bawią się urządzeniem.
Co jest w pudełku
Your bimar Wi-Fi Ceiling Fan package includes the following components:
- bimar Wi-Fi Ceiling Fan unit (with 3 blades)
- Zdalne sterowanie
- Elementy montażowe (śruby, wsporniki itp.)
- Instrukcja obsługi (ten dokument)

Image: The bimar Wi-Fi Ceiling Fan, featuring three light-colored wooden blades and a brushed metal motor housing and downrod.
Konfiguracja i instalacja
1. Instalacja wentylatora
Zdecydowanie zaleca się zlecenie instalacji profesjonalnemu elektrykowi. Ensure the ceiling structure can safely support the fan's weight and that all wiring complies with local electrical codes.
- Przygotuj miejsce montażu: Turn off power at the circuit breaker. Securely attach the mounting bracket to a ceiling joist or a fan-rated outlet box.
- Złóż drążek opuszczający i silnik: Attach the downrod to the fan motor housing.
- Zawieś wentylator: Ostrożnie podnieś zespół wentylatora i zawieś go na wsporniku montażowym.
- Podłącz wentylator: Connect the electrical wires (live, neutral, ground) from the ceiling to the fan's wiring, following the wiring diagram provided in the separate installation guide (if applicable).
- Zamontuj ostrza: Securely fasten the three blades to the motor housing.
- Zabezpiecz baldachim: Raise the canopy to cover the wiring and mounting bracket, securing it in place.

Obraz: Bok view of the bimar ceiling fan, illustrating the angle of the light wood blades and the connection to the downrod.
2. Połączenie Wi-Fi i aplikacji
The bimar Wi-Fi Ceiling Fan is compatible with the Bimar Live Smart app for advanced control and scheduling.
- Pobierz aplikację: Szukaj "Bimar Live Smart" in your smartphone's app store (iOS or Android) and install it.
- Utwórz konto: Otwórz aplikację i postępuj zgodnie z instrukcjami wyświetlanymi na ekranie, aby utworzyć nowe konto użytkownika lub zaloguj się, jeśli już je posiadasz.
- Dodaj urządzenie: Power on the ceiling fan. In the Bimar Live Smart app, tap "Add Device" or the "+" icon. Select "Ceiling Fan" or the appropriate device type.
- Połącz się z Wi-Fi: Follow the app's instructions to put the fan into pairing mode (usually by pressing a button on the fan or remote for a few seconds). Connect the fan to your home 2.4GHz Wi-Fi network.
- Name the Device: Once connected, you can name your fan for easy identification within the app.

Image: A modern living room featuring the bimar ceiling fan installed, with a smartphone displaying the Bimar Live Smart app interface, indicating Wi-Fi and voice control capabilities.
Instrukcja obsługi
Your bimar Wi-Fi Ceiling Fan offers multiple control options for convenience.
1. Obsługa pilota zdalnego sterowania
The included remote control allows direct access to all fan functions.
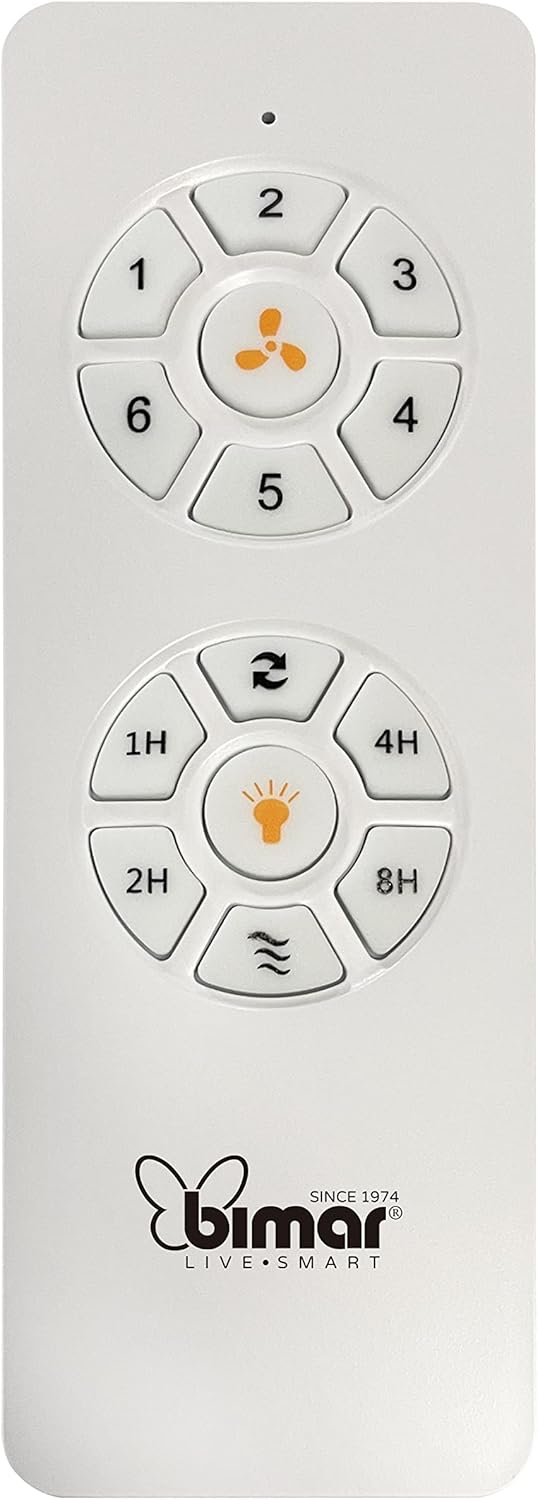
Image: The white remote control for the bimar ceiling fan, showing buttons for fan speed (1-6), fan on/off, timer (1H, 2H, 4H, 8H), mode selection, and reverse function.
- Włączanie/wyłączanie: Naciśnij przycisk z ikoną wentylatora, aby włączyć lub wyłączyć wentylator.
- Regulacja prędkości: Use buttons 1-6 to select one of the six available fan speeds.
- Funkcja timera: Press 1H, 2H, 4H, or 8H to set the fan to automatically turn off after the selected duration.
- Wybór trybu: Use the mode button (often represented by waves or arrows) to cycle through Normal, Natural, Sleep, and Breeze modes.
- Tryb lato/zima: The reverse button (often two arrows forming a circle) changes the blade rotation direction.
2. App Control (Bimar Live Smart)
Once connected to the Bimar Live Smart app, you can access enhanced features:
- Zdalna obsługa: Control all fan functions from anywhere with an internet connection.
- Harmonogram: Program daily and weekly on/off times for automated operation.
- Regulator czasowy: Adjust the timer from 1 to 8 hours.
- Mode and Speed Selection: Easily switch between the 6 speeds and 4 operating modes.
3. Sterowanie głosowe
The bimar Wi-Fi Ceiling Fan is compatible with popular voice assistants like Amazon Alexa and Google Assistant. After connecting the fan to the Bimar Live Smart app, link your Bimar account to your voice assistant app (e.g., Alexa app or Google Home app).
Example Polecenia głosowe:
- "Alexa, turn on the ceiling fan."
- "Hey Google, set ceiling fan speed to 3."
- "Alexa, turn off the ceiling fan in 1 hour."
4. Operating Modes and Speeds
- 6 Ventilation Speeds: Adjust the airflow intensity to your preference.
- Tryb normalny: Stały przepływ powietrza przy wybranej prędkości.
- Tryb naturalny: Imituje naturalny wiatr poprzez zmianę prędkości wentylatora.
- Tryb uśpienia: Pracuje z niższą, cichszą prędkością, zapewniając niezakłócony odpoczynek.
- Tryb bryzy: Provides a gentle, intermittent airflow.
5. Summer/Winter Function
The reversible blade function allows for year-round use:
- Tryb letni (obrót w kierunku przeciwnym do ruchu wskazówek zegara): Tworzy strumień powietrza skierowany w dół, generujący chłodną bryzę.
- Tryb zimowy (obrót zgodnie z ruchem wskazówek zegara): Tworzy przepływ powietrza skierowany ku górze, rozprowadzając ciepłe powietrze uwięzione pod sufitem, co poprawia efektywność ogrzewania.

Image: A diagram illustrating the airflow patterns for summer (indirect ventilation, pushing air upwards) and winter (direct ventilation, pulling air downwards) modes of a ceiling fan.
Konserwacja
Regularna konserwacja zapewnia optymalną wydajność i długowieczność wentylatora sufitowego.
- Czyszczenie: Before cleaning, ensure the fan is turned off and power is disconnected at the circuit breaker. Use a soft, damp cloth to wipe down the blades and motor housing. Do not use abrasive cleaners or solvents.
- Kontrola ostrza: Periodically check the blades for any signs of damage or warping. Ensure all blade screws are tight.
- Smarowanie silnika: The fan's DC motor is designed for maintenance-free operation and does not require lubrication.
- Dokręć elementy złączne: Z czasem niektóre elementy złączne mogą się poluzować. Sprawdzaj i dokręcaj wszystkie śruby i połączenia raz w roku.

Obraz: Zbliżenie view of the bimar ceiling fan's brushed metal motor housing and the attachment points for the light wood blades, highlighting areas for cleaning and inspection.
Rozwiązywanie problemów
| Problem | Możliwa przyczyna | Rozwiązanie |
|---|---|---|
| Wentylator się nie uruchamia | No power supply; Remote control battery low; Incorrect wiring. | Check circuit breaker and wall switch. Replace remote batteries. Verify wiring connections (consult electrician). |
| Wentylator się chwieje | Luźne ostrza lub elementy montażowe; Niewyważone ostrza. | Ensure all blade screws and mounting screws are tight. Use a balancing kit (not included) if necessary. |
| Pilot nie działa | Low battery; Obstruction between remote and receiver; Remote not paired. | Replace remote batteries. Ensure clear line of sight. Refer to pairing instructions in the full manual. |
| Problemy z połączeniem Wi-Fi | Incorrect Wi-Fi password; Router too far; 5GHz network selected. | Verify Wi-Fi password. Move router closer or use a Wi-Fi extender. Ensure you are connecting to a 2.4GHz network. Reset fan and re-attempt pairing. |
| Wentylator jest głośny | Loose screws; Blades hitting an obstruction; Motor issue. | Check and tighten all screws. Ensure nothing is obstructing the blades. If noise persists, contact customer support. |
Specyfikacje
| Funkcja | Szczegół |
|---|---|
| Marka | bimar |
| Numer modelu | 1 |
| Wymiary produktu | 132 x 132 x 27.5 cm (średnica x średnica x wysokość) |
| Waga | 6.2 kilogramów |
| Liczba ostrzy | 3 |
| Tworzywo | Drewno |
| Kolor | Black (Note: Blades are light wood finish as shown in images) |
| Typ silnika | DC (Brushless, energy-saving) |
| Pobór mocy | 35 W |
| Metody kontroli | Remote Control, Bimar Live Smart App, Voice Control (Amazon Alexa, Google Assistant) |
| Prędkości wentylatora | 6 |
| Tryby pracy | Normal, Natural, Sleep, Breeze |
| Regulator czasowy | 1 do 8 godzin |
| Dodatkowe funkcje | Silent operation, Summer/Winter mode (reversible blades) |
| Źródło zasilania | Elektryczny |
| Typ instalacji | Montaż sufitowy |

Image: The three light wood fan blades, detached and laid flat, showcasinich design i faktura.


Obraz: Dwa views of the bimar ceiling fan, illustrating different downrod lengths: one with a 25 cm downrod and another with a 13 cm downrod, affecting the overall height of the fan.
Gwarancja i wsparcie
For warranty information, technical support, or service inquiries, please refer to the warranty card included with your product or visit the official bimar webZachowaj dowód zakupu na wypadek roszczeń gwarancyjnych.
Producent: Bimar S.r.l.
Kontakt: Proszę odwiedzić the bimar store on Amazon or the official bimar webstrona dla danych kontaktowych.