
1. Wprowadzenie
Thank you for choosing the Xigmatek Lux M Micro-ATX Mini Tower PC Case. This manual provides detailed instructions for the installation, operation, and maintenance of your new PC chassis. Please read this manual carefully before beginning the assembly process to ensure proper installation and to maximize the performance and longevity of your system.
The Lux M case is designed to offer a robust and aesthetically pleasing housing for your computer components, featuring a tempered glass side panel, a metallic front panel with a unique cut-out pattern, and pre-installed fixed RGB fans for optimal cooling and visual appeal. It supports Micro-ATX and Mini-ITX motherboards and is compatible with various cooling solutions, including water cooling.
2. Informacje dotyczące bezpieczeństwa
Podczas instalacji i obsługi należy przestrzegać następujących środków ostrożności:
- Always disconnect the power supply from the wall outlet before installing or removing any components to prevent electric shock.
- Handle all components with care. Avoid touching circuit boards directly; hold them by their edges.
- Podczas pracy z delikatnymi elementami elektronicznymi należy nosić opaskę antystatyczną, aby zapobiec uszkodzeniom spowodowanym wyładowaniami elektrostatycznymi (ESD).
- Keep the case and components away from liquids, excessive heat, and direct sunlight.
- Aby zapobiec przegrzaniu, należy zapewnić odpowiednią wentylację wokół obudowy komputera.
- Przechowuj małe części i śruby poza zasięgiem dzieci.
3. Zawartość opakowania
Verify that all items are present in your package. If any items are missing or damaged, please contact your retailer.
- Xigmatek Lux M Micro-ATX Mini Tower PC Case
- Accessory box (containing screws, standoffs, cable ties, etc.)
- Instrukcja obsługi (ten dokument)
4. Koniec produktuview
Familiarize yourself with the various parts of your Xigmatek Lux M PC case.
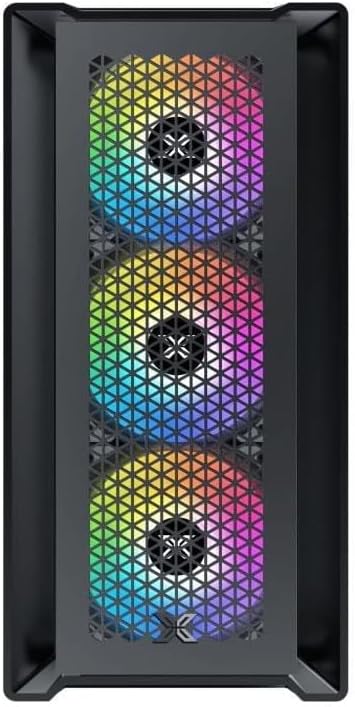
Rycina 4.1: Przód View. This image displays the front of the Xigmatek Lux M case, highlighting the metallic mesh panel with a triangular design and the three pre-installed 120mm fixed RGB fans.

Figure 4.2: Angled Top-Front View. This perspective shows the tempered glass side panel, offering a clear view of the interior, and the top panel with its I/O ports (USB, audio) and power button.
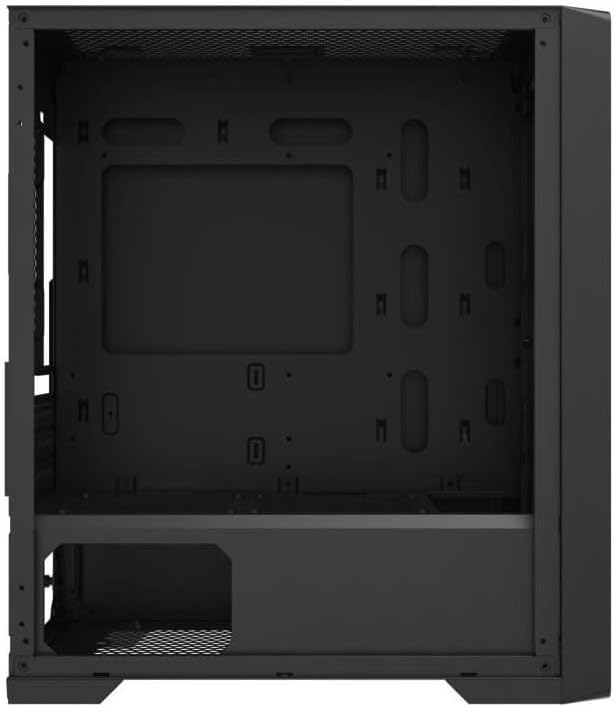
Figure 4.3: Interior Layout. The internal structure of the case, featuring the motherboard mounting tray, cutouts for cable management, and the power supply shroud at the bottom.
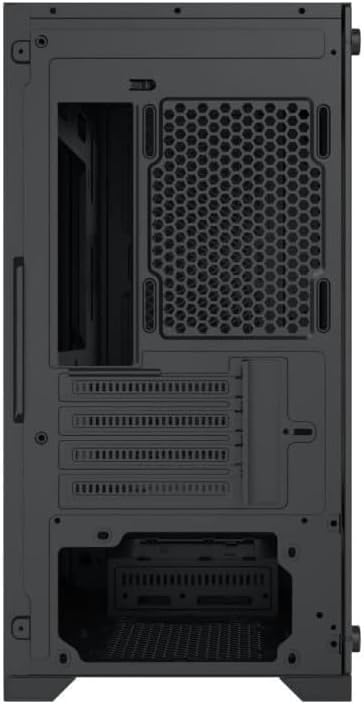
Rysunek 4.4: Tył View. This image illustrates the rear of the case, including the expansion slots for graphics cards and other add-in cards, the rear fan mounting area, and the power supply mounting bracket.
5. Konfiguracja i instalacja
Follow these steps to install your computer components into the Xigmatek Lux M case.
5.1. Przygotowanie sprawy
- Połóż obudowę na płaskiej i stabilnej powierzchni.
- Remove the tempered glass side panel by unscrewing the thumb screws and carefully lifting it off. Set it aside on a soft, non-abrasive surface.
- Remove the opposite steel side panel by unscrewing the thumb screws and sliding it backward.
5.2. Instalacja płyty głównej
The Lux M supports Micro-ATX and Mini-ITX motherboards.
- Zainstaluj osłonę I/O (jeśli nie została zamontowana na płycie głównej) w tylnym otworze obudowy.
- Align the motherboard with the pre-installed standoffs. Ensure all screw holes on the motherboard match the standoffs.
- Secure the motherboard using the provided motherboard screws. Do not overtighten.
5.3. Instalacja zasilacza (PSU)
The PSU mounts at the rear bottom of the case.
- Slide the PSU into its designated compartment from the rear of the case.
- Align the PSU's screw holes with the holes on the case's rear panel.
- Secure the PSU with the provided screws.
5.4. Storage Drive Installation (2.5"/3.5" Drives)
The case supports 2x 2.5"/3.5" storage drives.
- Locate the drive cage beneath the PSU shroud or dedicated 2.5" mounting points behind the motherboard tray.
- For 3.5" HDDs, slide the drive into a drive tray (if applicable) and secure it with screws.
- For 2.5" SSDs, secure them directly to the mounting points using the provided screws.
5.5. Instalacja karty graficznej (VGA) i karty rozszerzeń
Obudowa obsługuje karty graficzne o długości do 320 mm.
- Zdejmij niezbędne zaślepki gniazd rozszerzeń z tyłu obudowy.
- Insert your graphics card or other expansion card into the appropriate PCIe slot on your motherboard.
- Secure the card to the case using the expansion slot screws.
5.6. Cooling System Installation (Optional)
The Lux M comes with 4x 120mm X24F fixed RGB fans. It supports additional cooling options.
- Chłodzenie procesora: Max height of 160mm. Install your CPU cooler according to its manufacturer's instructions.
- Wsparcie chłodnicy: The case supports radiators of 360mm, 240mm, or 120mm. Refer to your radiator's manual for installation. Common mounting locations include the front and top panels.
5.7. Zarządzanie kablami
Wykorzystaj wycięcia na kable i punkty mocowania za tacką płyty głównej, aby uporządkować kable. Poprawia to przepływ powietrza i estetykę.
5.8. Montaż końcowy
- Once all components are installed and cables are managed, reattach the steel side panel and secure it with thumb screws.
- Carefully reattach the tempered glass side panel and secure it with thumb screws.
6. Instrukcja obsługi
After completing the installation, connect your peripherals (monitor, keyboard, mouse) and power cable to the PC. Press the power button located on the top panel of the case to start your system.
The pre-installed X24F RGB fans feature fixed RGB lighting, which will illuminate automatically upon system power-on. No additional software or controller is required for their basic operation.
Ensure that the case's ventilation is not obstructed to maintain optimal airflow and cooling performance.
7. Konserwacja
Regularna konserwacja pomaga zapewnić długowieczność i optymalną wydajność podzespołów komputera.
- Czyszczenie kurzu: Periodically clean dust filters (if present) and the interior of the case using compressed air or a soft brush. Dust accumulation can hinder airflow and lead to overheating.
- Czyszczenie zewnętrzne: Przetrzyj zewnętrzne powierzchnie miękką, damp cloth. Avoid harsh chemicals that may damage the finish or tempered glass.
- Szkło hartowane: Clean the tempered glass panel with a glass cleaner and a microfiber cloth to avoid scratches and streaks.
8. Rozwiązywanie Problemów
Jeśli w trakcie lub po instalacji napotkasz problemy, rozważ poniższe typowe kroki rozwiązywania problemów:
- Brak zasilania:
- Upewnij się, że kabel zasilający jest solidnie podłączony do zasilacza i gniazdka ściennego.
- Check that the PSU switch is in the 'ON' position.
- Verify that the front panel power switch cable is correctly connected to the motherboard's front panel header.
- Fans Not Spinning / RGB Not Lighting:
- Ensure all fan power cables are securely connected to the motherboard or a fan controller.
- For RGB, confirm that any necessary RGB headers are connected to the motherboard (though the included fans are fixed RGB and should light up with power).
- Brak wyjścia wyświetlacza:
- Verify that your monitor cable is connected to the graphics card (if installed) and not the motherboard's integrated graphics port.
- Ponownie włóż kartę graficzną do gniazda PCIe.
- Przegrzanie:
- Sprawdź, czy wszystkie wentylatory obudowy obracają się i są prawidłowo zorientowane, aby zapewnić optymalny przepływ powietrza (wlot/wylot).
- Clean any dust filters and internal components.
- Verify that the CPU cooler is properly seated and making good contact with the CPU.
For more complex issues, consult your component manuals or seek assistance from Xigmatek support or a qualified technician.
9. Specyfikacje
| Funkcja | Specyfikacja |
|---|---|
| Marka | Xigmatek |
| Nazwa modelu | Lux M |
| Numer modelu | EN48540 |
| Typ sprawy | Mini Tower |
| Zgodność płyty głównej | Micro-ATX, Mini-ITX |
| Tworzywo | Tempered Glass (side panel), Metal (front panel) |
| Kolor | Czarny |
| Fabrycznie zainstalowane wentylatory | 4 x 120mm X24F Fixed RGB Fans |
| Wsparcie chłodnicy | 360mm, 240mm, 120mm |
| Maksymalna wysokość chłodnicy procesora | 160mm |
| Maksymalna długość VGA | 320mm |
| Maksymalna długość zasilacza | 165mm |
| Zatoki magazynowe | 2x 2.5"/3.5" |
| Cechy specjalne | RGB Lighting, Triangular Mesh Front Design |
10. Gwarancja i wsparcie
Xigmatek products are manufactured to the highest quality standards. For warranty information and technical support, please refer to the warranty card included with your product or visit the official Xigmatek webStrona. Zachowaj dowód zakupu na wypadek roszczeń gwarancyjnych.
For further assistance, you may contact Xigmatek customer support through their official channels.