
1. Wprowadzenie
This manual provides comprehensive instructions for the installation, operation, and maintenance of your OAE 60A MPPT Solar Charge Controller. This device is designed to efficiently manage power flow from your solar panels to various battery types, including Lithium, Sealed, Gel, and Flooded batteries, ensuring optimal charging and system longevity.
2. Informacje dotyczące bezpieczeństwa
Przed instalacją i uruchomieniem należy uważnie przeczytać wszystkie instrukcje bezpieczeństwa. Nieprzestrzeganie tych instrukcji może spowodować porażenie prądem, pożar lub poważne obrażenia.
- Ensure all power sources are disconnected before installing or servicing the controller.
- Use appropriate personal protective equipment (PPE) such as insulated gloves and eye protection.
- Verify correct polarity for all connections (solar panel, battery, load) to prevent damage.
- Zainstaluj kontroler w dobrze wentylowanym pomieszczeniu, z dala od materiałów łatwopalnych i bezpośredniego światła słonecznego.
- Nie rozmontowuj ani nie próbuj samodzielnie naprawiać kontrolera. W tym celu skontaktuj się z wykwalifikowanym personelem.
- Zapewnij prawidłowe uziemienie systemu.
3. Funkcje produktu
The OAE 60A MPPT Solar Charge Controller offers advanced features for efficient solar power management:
- Auto 12/24/36/48V Battery System: Automatically detects and adapts to your battery voltage.
- Wszechstronna kompatybilność baterii: Supports 4 charging options: Sealed, Gel, Flooded, and User-defined, compatible with lithium batteries.
- Technologia MPPT o wysokiej wydajności: Creative maximum power point tracking technology significantly increases energy utilization rate (up to 97% transfer efficiency). Quickly scans the entire I-V curve to track the maximum power point within seconds.
- Informacyjny wyświetlacz LCD: Clear display of operating data and working conditions. Features real-time energy statistics, Chinese and English language options, and a multi-function LCD screen with operation menu. Displays daily power generation and current curves, and fault records for timely troubleshooting.
- Kompleksowe funkcje ochronne: Built-in protections ensure system safety and longevity.
- Komunikacja RS485: Capable of Wi-Fi remote monitoring (additional purchase required) for real-time wireless monitoring via APP (Android & iOS compatible). Simple and convenient to set, with one-key factory settings restore.
4. Zawartość opakowania
Po otwarciu opakowania należy sprawdzić, czy wszystkie elementy znajdują się w opakowaniu i są nieuszkodzone:
- OAE 60A MPPT Solar Charge Controller (Blue)
- Uchwyt montażowy
- Instrukcja obsługi
- Kabel czujnika temperatury
- Śruby do montażu

Figure 1: OAE 60A MPPT Solar Charge Controller (Blue model).
5. Konfiguracja i instalacja
Follow these steps for proper installation of your MPPT solar charge controller. For a visual guide, please refer to the installation video below.
Video 1: OAE 60A MPPT Solar Charge Controller Installation Guide. This video demonstrates the unboxing, physical setup, and wiring connections for the solar charge controller.
5.1 Fizyczna instalacja
- Rozpakowanie i sprawdzenie: Carefully remove the controller from its packaging. Inspect for any visible damage. The package typically includes the controller, mounting bracket, and user manual.

Figure 2: The OAE MPPT Solar Charge Controller as packaged in its box.
- Montaż kontrolera: Loosen the four screws on the bottom of the MPPT controller to detach the mounting bracket. Secure the bracket to a stable, vertical surface in a well-ventilated area, then reattach the controller to the bracket using the screws.

Rysunek 3: Strona view of the controller showing dimensions and mounting points.
5.2 połączeń przewodów
Before making any connections, ensure all power sources are OFF. Connect the wires in the following order:
- Podłączenie akumulatora: Connect the battery wires to the "BATTERY" terminals on the controller. Ensure correct polarity (positive to positive, negative to negative). Loosen the terminal screws, insert the wires, and tighten securely.

Figure 4: Connection diagram illustrating solar panel, battery, and DC load connections.
- Podłączenie panelu słonecznego: Connect the solar panel wires to the "SOLAR PANEL" terminals. Observe correct polarity. The controller supports a maximum PV input of 150V.

Figure 5: Close-up of the controller's terminal block, showing connections for solar panel, battery, and DC load.
- Podłączenie obciążenia DC (opcjonalnie): If using a DC load directly from the controller, connect the load wires to the "DC LOAD" terminals, ensuring correct polarity.
- Podłączenie czujnika temperatury: Connect the temperature sensor cable to the designated "TEMPERATURE INTERFACE" port. This ensures accurate battery temperature compensation for optimal charging.
6. Instrukcja obsługi
Once all connections are secure, the controller will boot up automatically. The LCD display provides real-time system information and allows for configuration.
6.1 Wyświetlacz LCD powyżejview
The multi-function LCD screen displays various parameters and allows access to settings. Use the MENU, DOWN, UP, and ENTER buttons to navigate and adjust settings.
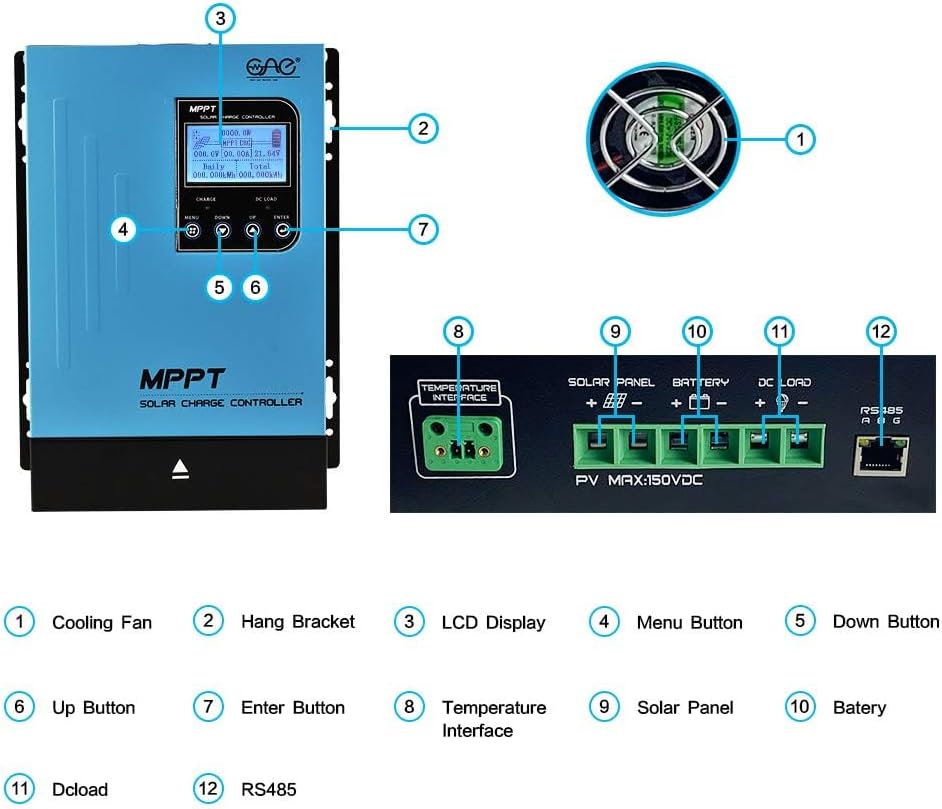
Figure 6: Detailed description of the main interface and display parameters.
6.2 Podstawowa obsługa
- Włączanie: After connecting the battery, the controller will automatically power on. The display will show "Boot up, please wait..."
- Monitorowanie: The main interface displays PV module voltage, daily power generation, charging power, charging current, battery capacity indication, battery voltage, total power generation, date, time, charging state (MPPT tracking, floating charge, stop charge), external temperature, and internal temperature.
- Nawigacja po menu: Use the "MENU" button to cycle through different display screens and settings options. Use "UP" and "DOWN" to change values or navigate within a menu. Press "ENTER" to confirm selections.
- DC Load Control: The DC load output can be configured for automatic operation (e.g., time control) or manual ON/OFF. This is accessed via the "DC Output Setting" menu.
7. Konserwacja
Regularna konserwacja zapewnia długowieczność i optymalną wydajność regulatora ładowania słonecznego:
- Czystość: Utrzymuj kontroler w czystości, bez kurzu i zanieczyszczeń. Do czyszczenia używaj suchej ściereczki.
- Wentylacja: Ensure the cooling fan and ventilation holes are not obstructed. Periodically check for dust buildup in the fan.


Figure 7: Cooling fan and ventilation holes for proper airflow.
- Znajomości: Okresowo sprawdzaj wszystkie połączenia przewodów pod kątem szczelności i korozji. Luźne połączenia mogą prowadzić do przegrzania i pogorszenia wydajności.
- Stan baterii: Monitoruj pojemność bateriitage and health regularly. Ensure the battery type setting on the controller matches your battery.
8. Rozwiązywanie Problemów
W tej sekcji omówiono typowe problemy, jakie mogą wystąpić podczas korzystania z regulatora ładowania słonecznego.
| Problem | Możliwa przyczyna | Rozwiązanie |
|---|---|---|
| Kontroler nie włącza się. | Brak podłączonego akumulatora lub niski poziom naładowania akumulatoratage za niskie. | Upewnij się, że akumulator jest podłączony z zachowaniem prawidłowej biegunowości i ma wystarczającą pojemność.tage (above minimum operating voltagmi). |
| No charging current from solar panels. | Solar panels not connected, insufficient sunlight, or incorrect panel voltage. | Check solar panel connections and polarity. Ensure adequate sunlight. Verify panel voltage is within controller's input range. |
| DC load not working. | Load output disabled, overloaded, or incorrect wiring. | Check DC output settings on the LCD. Reduce load if overloaded. Verify load wiring and polarity. |
| Unusual noise from controller (e.g., fan). | Normal operation (fan activates under load) or obstructed fan. | Ensure proper ventilation. Clean fan if obstructed. If noise is excessive or unusual, contact support. |
9. Specyfikacje
Key technical specifications for the OAE 60A MPPT Solar Charge Controller:
- Numer modelu: MP-60A
- Marka: OAE
- Aktualna ocena: 60A
- Objętość systemu bateriitage: Auto 12V/24V/36V/48V
- Maks. Objętość wejścia PVtage: 150 V
- Typ wyświetlacza: PROWADZONY
- Tworzywo: Metal
- Wymiary produktu: 7.9 x 3.5 x 12.4 cala
- Waga przedmiotu: 7.96 funta (3.62 kilograma)
- Kompatybilne typy baterii: Sealed, Gel, Flooded, Lithium, and User-defined
10. Gwarancja i wsparcie
For warranty information, technical support, or to purchase additional accessories, please visit the official OAE store or contact their customer service.
Dostępne są plany ochrony o rozszerzonym zakresie ochrony:
- 3-letni plan ochrony
- 4-letni plan ochrony
- Complete Protect (miesięczny plan obejmujący kwalifikujące się zakupy)
Więcej szczegółów znajdziesz na stronie OAE Store on Amazon.