
Wstęp
This manual provides comprehensive instructions for the safe and efficient operation, maintenance, and troubleshooting of your SINGER 4423 Heavy Duty Sewing Machine and its compatible Extension Table. Please read this manual thoroughly before using the machine to ensure optimal performance and longevity.
Instrukcje bezpieczeństwa
- Always unplug the machine from the electrical outlet when removing covers, lubricating, or when making any other user servicing adjustments mentioned in this instruction manual.
- Trzymaj palce z dala od wszystkich ruchomych części. Należy zachować szczególną ostrożność wokół igły maszyny do szycia.
- Użyj właściwej płytki ściegowej. Niewłaściwa płytka może spowodować złamanie igły.
- Nie ciągnij ani nie popychaj materiału podczas szycia. Może to spowodować odchylenie igły i jej złamanie.
- Always use the foot controller to operate the machine.
- Nigdy nie używaj maszyny z zablokowanymi otworami wentylacyjnymi. Utrzymuj otwory wentylacyjne maszyny do szycia i regulatora nożnego w czystości, bez kłaczków, kurzu i luźnych kawałków materiału.
- Urządzenie to nie jest przeznaczone do użytku przez osoby (w tym dzieci) o ograniczonej sprawności fizycznej, sensorycznej lub umysłowej, a także osoby nieposiadające odpowiedniego doświadczenia lub wiedzy, chyba że znajdują się one pod nadzorem osoby odpowiedzialnej za ich bezpieczeństwo lub otrzymały od niej instrukcje dotyczące korzystania z urządzenia.
Zawartość opakowania
Your SINGER 4423 Heavy Duty Sewing Machine package typically includes the following items:
- Maszyna do szycia o dużej wytrzymałości SINGER 4423
- Kontroler nożny
- Standard Presser Foot (All-Purpose Foot)
- Stopka do zamków błyskawicznych
- Stopka do dziurek
- Stopka do przyszywania guzików
- Rozpruwacz szwów/szczotka do kłaczków
- Pakiet igieł
- Szpulki
- Spool Holders
- Pomocniczy trzpień szpuli
- Filc na szpulkę
- Śrubokręt
- Miękka osłona przeciwkurzowa
- SINGER Heavy Duty Sewing Machine Extension Table
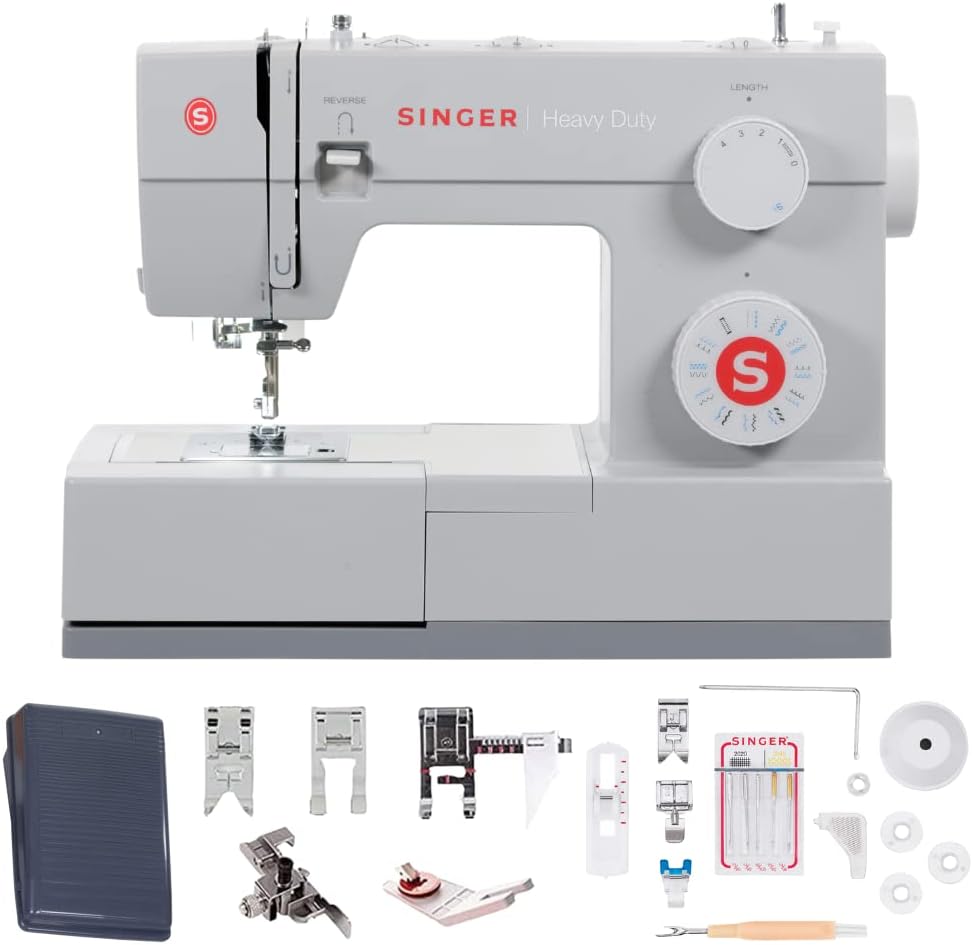
Image: SINGER 4423 Heavy Duty Sewing Machine with various presser feet, needles, bobbins, and a foot pedal.

Image: Close-up of SINGER sewing machine accessories, including different presser feet and a pack of universal needles. For more information on needles, visit https://uqr.to/hjvc.
Organizować coś
1. Rozpakowanie i ustawienie
Ostrożnie wyjmij maszynę z opakowania. Ustaw maszynę na stabilnej, płaskiej powierzchni. Upewnij się, że wokół maszyny jest wystarczająco dużo miejsca, aby zapewnić komfortową obsługę.
2. Podłączenie zasilania
Connect the foot controller plug into the machine's power socket. Then, plug the power cord into a suitable electrical outlet.

Obraz: Tył view of the SINGER 4423 sewing machine showing the power input and foot pedal connection point.
3. Mocowanie stołu rozkładanego
To attach the extension table, slide it onto the free arm of the sewing machine until it clicks securely into place. The table provides an expanded work surface, useful for larger projects.

Image: The SINGER extension table, designed to provide a larger work area for sewing projects.

Obraz: Góra view of the SINGER extension table, featuring integrated measurement markings in inches and centimeters.
4. Nawlekanie maszyny
Prawidłowe nawlekanie jest kluczowe dla dobrej jakości ściegu. Postępuj ostrożnie według poniższych kroków:
- Nawijanie szpulki: Place a spool of thread on the spool pin. Guide the thread through the bobbin winding tension disc and then around the bobbin several times. Place the bobbin onto the bobbin winder spindle and push it to the right. Press the foot controller to wind the bobbin. Stop when the bobbin is full and push the spindle to the left to disengage.
- Wkładanie szpulki: Open the bobbin cover plate. Insert the wound bobbin into the bobbin case, ensuring the thread unwinds in the correct direction (usually counter-clockwise). Guide the thread through the tension spring and out the bobbin case opening. Close the bobbin cover.
- Górny gwint: Raise the needle to its highest position using the handwheel. Place a spool of thread on the spool pin. Guide the thread through the upper thread guide, down into the tension discs, up and through the take-up lever, and then down to the needle. Thread the needle from front to back.
- Podnoszenie nici szpulkowej: Hold the upper thread lightly. Turn the handwheel towards you to lower and then raise the needle. The upper thread will catch the bobbin thread, bringing a loop up through the needle plate hole. Pull both threads under the presser foot and towards the back of the machine.
Obsługa maszyny
1. Wybór ściegu
The SINGER 4423 offers 97 stitch applications. Use the stitch selector dial on the front of the machine to choose your desired stitch pattern. Refer to the stitch chart on the machine for available options.

Obraz: Zbliżenie view of the SINGER 4423 sewing machine's stitch selector dial, showing various stitch patterns.
2. Regulacja długości i szerokości ściegu
Adjust the stitch length using the upper dial and stitch width using the lower dial, as indicated on the machine. Experiment with different settings on a scrap piece of fabric to achieve the desired result for your project.
3. Korzystanie z pedału nożnego
The foot pedal controls the sewing speed. Press gently for slower speeds and apply more pressure for faster sewing. Release the pedal to stop.
4. Szycie wsteczne
To reinforce stitches at the beginning and end of a seam, press and hold the reverse lever (usually located on the front of the machine) while sewing. Release the lever to resume forward stitching.
5. Needle and Presser Foot Replacement
Always use the correct needle type and size for your fabric. To replace the needle, loosen the needle clamp screw, remove the old needle, insert the new needle with the flat side facing the back, and tighten the screw. To change presser feet, raise the needle and presser foot lifter, then press the release button on the back of the presser foot holder. Attach the new foot by aligning it and lowering the presser foot lifter until it snaps into place.
Konserwacja
1. Czyszczenie
Regular cleaning helps maintain your machine's performance.
- Usuwanie kłaczków: Unplug the machine. Remove the needle, presser foot, and needle plate. Use the provided lint brush to remove lint and dust from the bobbin area and feed dogs.
- Czyszczenie powierzchni: Przetrzyj obudowę urządzenia miękką, suchą ściereczką. Nie używaj silnych środków chemicznych ani ściernych środków czyszczących.
2. Olejowanie
Your SINGER 4423 Heavy Duty Sewing Machine is designed to require minimal oiling. Refer to the full instruction manual for specific oiling points if necessary, or consult a qualified service technician. Over-oiling can attract lint and cause issues.
3. Przechowywanie
When not in use, cover the machine with the provided dust cover to protect it from dust and debris. Store in a dry, stable environment.
Rozwiązywanie problemów
W tej sekcji omówiono typowe problemy, z którymi możesz się spotkać. W przypadku bardziej złożonych problemów skontaktuj się z wykwalifikowanym technikiem serwisowym.
| Problem | Możliwa przyczyna | Rozwiązanie |
|---|---|---|
| Pominięte ściegi | Niewłaściwa igła, wygięta igła, nieprawidłowe nawlekanie, nieodpowiedni rozmiar igły do rodzaju materiału. | Replace needle, re-thread machine, use correct needle for fabric type. |
| Zrywanie wątku | Improper threading, tension too tight, damaged needle, poor quality thread. | Re-thread machine, adjust tension, replace needle, use good quality thread. |
| Marszczenie się tkaniny | Tension too tight, incorrect stitch length, wrong presser foot. | Adjust tension, increase stitch length, use appropriate presser foot. |
| Maszyna nie uruchamia się | Niepodłączony, wyłączony, sterownik nożny niepodłączony. | Check power connections, ensure switch is on. |
Specyfikacje
- Numer modelu: 4423
- Marka: PIOSENKARZ
- Waga przedmiotu: 14.5 funtów
- Tworzywo: Metal, Stal nierdzewna
- Źródło zasilania: Elektryczny przewodowy
- Zastosowania ściegów: 97
- Kolor: Szary
Gwarancja i wsparcie
Aby uzyskać informacje o gwarancji i obsłudze klienta, zapoznaj się z kartą gwarancyjną dołączoną do produktu lub odwiedź oficjalną stronę internetową firmy SINGER webZachowaj paragon jako dowód zakupu.