
1. Wprowadzenie
This manual provides detailed instructions for the installation, operation, and maintenance of your OAE AP-60A MPPT Solar Charge Controller. This advanced Maximum Power Point Tracking (MPPT) solar charge controller is designed to maximize power harvesting from your solar panels and efficiently charge various battery types, including sealed, gel, flooded, and lithium batteries. It features automatic 12V/24V/36V/48V battery system recognition and supports a maximum PV input voltage 150V.

Figure 1: OAE AP-60A MPPT Solar Charge Controller
2. Instrukcje bezpieczeństwa
Please read all instructions and warnings in this manual carefully before installation and operation. Failure to follow these instructions may result in electric shock, fire, or severe injury.
- Ensure all wiring is correctly sized and properly insulated to prevent overheating and short circuits.
- Always disconnect the solar panel and battery power before installing or servicing the controller.
- Zainstaluj kontroler w dobrze wentylowanym pomieszczeniu, z dala od materiałów łatwopalnych i gazów żrących.
- Do not disassemble or attempt to repair the controller yourself. Refer to qualified service personnel.
- Wear appropriate personal protective equipment (PPE), including eye protection and insulated gloves, during installation.
- Ensure the battery bank is properly fused and protected.
- This device is designed for indoor use only. Avoid exposure to rain, moisture, or direct sunlight.
3. Koniec produktuview
The OAE AP-60A MPPT Solar Charge Controller is equipped with a clear LCD display and intuitive buttons for easy operation and monitoring. Key features include:
- Automatic 12V/24V/36V/48V battery system recognition.
- Maximum Power Point Tracking (MPPT) efficiency up to 99%.
- Compatible with sealed, gel, flooded, and lithium batteries.
- Max 150V PV input voltage.
- Multiple protections: overcharge/over discharge/overheat/reverse/overload/short-circuit protection.
- RS485 communication port for potential Wi-Fi remote monitoring (requires additional purchase).
3.1. Identyfikacja komponentów

Figure 2: Component Identification
- Wentylator chłodzący
- Wspornik do zawieszania
- Wyświetlacz LCD
- Przycisk menu
- Przycisk w dół
- Przycisk w górę
- Przycisk Enter
- Interfejs temperatury
- Wejście panelu słonecznego
- Wejście baterii
- Wyjście obciążenia DC
- Port komunikacyjny RS485
3.2. Obsługiwane typy baterii
The controller is compatible with various battery chemistries and voltages, automatically detecting 12V, 24V, 36V, and 48V systems.
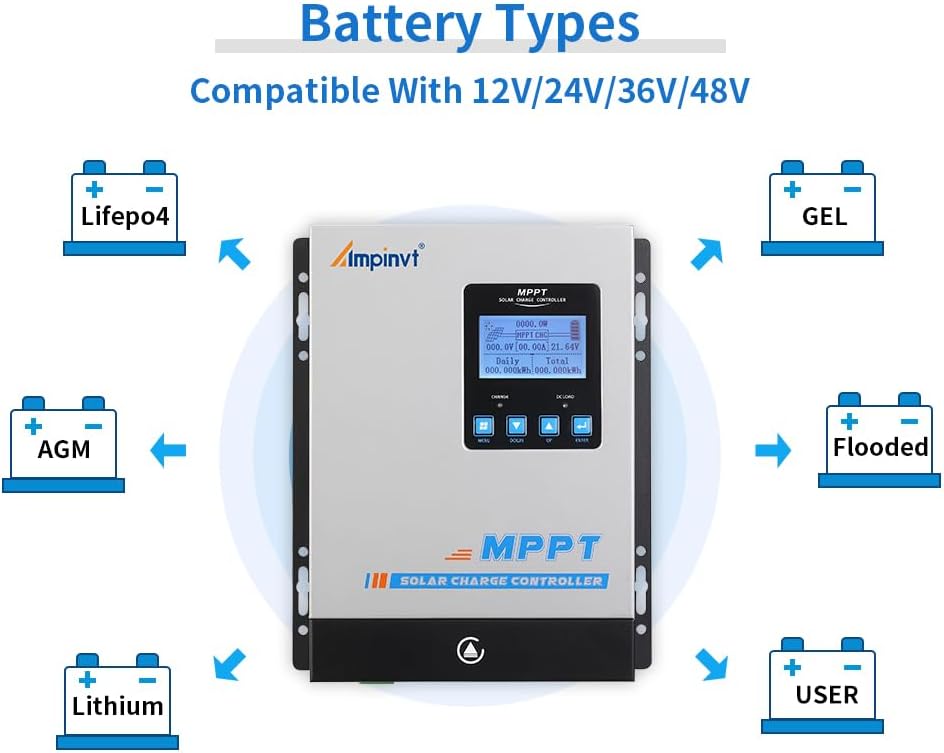
Figure 3: Compatible Battery Types (Lifepo4, AGM, Lithium, GEL, Flooded, User-defined)
4. Konfiguracja i instalacja
Follow these steps for proper installation. Ensure all power sources are disconnected before making any connections.
4.1. Wiring Connection Diagram

Rysunek 4: Schemat połączeń okablowania
- Montowanie: Mount the controller vertically on a flat, non-flammable surface, ensuring adequate ventilation around the unit. Use the provided hang brackets.
- Podłączenie akumulatora: Najpierw podłącz akumulator do zacisków akumulatora kontrolera. Upewnij się, że biegunowość jest prawidłowa (+ do + i - do -). Kontroler automatycznie wykryje napięcie akumulatora.tage.
- Podłączenie panelu słonecznego: Connect the solar panels to the controller's solar panel terminals. Ensure correct polarity. The controller supports up to 150V PV input.
- Podłączenie obciążenia DC (opcjonalnie): Connect your DC loads to the DC load terminals. This output is controlled by the controller and can be programmed for various operating modes.
- Czujnik temperatury: Connect the external temperature sensor to the designated port (8). This ensures accurate temperature compensation for battery charging.
- Komunikacja RS485: If using remote monitoring, connect the RS485 communication cable to the port (12).
Wiring Order is Crucial: Always connect the battery first, then solar panels, then DC load. Disconnect in reverse order.
5. Instrukcja obsługi
The LCD display provides real-time system information, and the four buttons (Menu, Down, Up, Enter) allow for navigation and parameter adjustment.
5.1. Nawigacja wyświetlacza
Naciśnij MENU button to cycle through different display screens showing various system parameters such as PV voltage, prąd ładowania, pojemność akumulatoratage, daily and total energy generated, and load status.
5.2. Ustawienia parametrów
Aby wejść w tryb ustawiania parametrów, naciśnij i przytrzymaj przycisk WCHODZIĆ button for a few seconds. Use the UP I W DÓŁ buttons to navigate through the settings, and WCHODZIĆ to select or confirm changes. The default password for accessing settings is usually a sequence of arrow presses (e.g., Down, Down, Down, Up, Up, Up), refer to the specific manual for the exact sequence.
- Ustawienie typu baterii: Select the appropriate battery type (Sealed, Gel, Flooded, Lithium, or User-defined) to ensure optimal charging algorithms.
- Objętość ładowaniatage Ustawienia: Adjust parameters like Floating Charge Voltage, Objętość ładunku wyrównawczegotage, and Over-discharge Protection Voltage based on your battery manufacturer's recommendations, especially for user-defined battery types.
- Tryb kontroli obciążenia: Configure the DC load output to operate in various modes (e.g., always on, light control, timer control).
5.3. Demonstracja operacyjna
Video 1: Demonstration of MPPT Solar Charge Controller Operation, including menu navigation and settings adjustment.
Wideo 2: Ponadview of Ampinvt Solar Charge Controller models (40A, 60A, 80A), showcasinich cech i konstrukcji.
6. Konserwacja
Regularna konserwacja zapewnia długowieczność i optymalną wydajność regulatora ładowania słonecznego.
- Czyszczenie: Periodically clean the exterior of the controller with a dry cloth. Ensure the cooling fan and ventilation holes are free from dust and debris.
- Kontrola połączenia: Annually inspect all wiring connections to ensure they are tight and free from corrosion. Loose connections can cause overheating and damage.
- Kontrola baterii: Regularly check your battery bank for any signs of damage, corrosion, or swelling. Ensure battery terminals are clean.
- Monitorowanie wydajności: Monitor the daily and total energy readings on the LCD display to ensure the system is performing as expected.
7. Rozwiązywanie Problemów
W tej sekcji omówiono typowe problemy, jakie mogą wystąpić podczas korzystania z regulatora ładowania słonecznego.
| Problem | Możliwa przyczyna | Rozwiązanie |
|---|---|---|
| Kontroler nie włącza się. | Brak podłączonego akumulatora lub niski poziom naładowania akumulatoratage too low. Reverse polarity connection. | Najpierw sprawdź, czy akumulator jest podłączony i ma wystarczającą pojemność.tage. Check battery polarity. |
| Brak ładowania z paneli słonecznych. | Niepodłączone panele słoneczne, niewystarczające nasłonecznienie lub brak zasilania fotowoltaicznegotage za niskie/za wysokie. | Check solar panel connections and polarity. Ensure adequate sunlight. Verify PV voltage is within the controller's operating range (max 150V). |
| Ładowanie nie działa. | Load output disabled, overload, or short circuit. | Check load settings on the controller. Reduce load if overloaded. Inspect wiring for short circuits. |
| Akumulator nie jest w pełni naładowany. | Nieprawidłowe ustawienie typu baterii, niewystarczające doprowadzenie energii słonecznej lub starzenie się baterii. | Verify battery type setting. Increase solar panel capacity if needed. Consider battery health. |
For persistent issues not covered here, please contact OAE customer support.
8. Specyfikacje
| Funkcja | Szczegół |
|---|---|
| Model | AP-60A |
| Objętość systemutage | Auto 12V/24V/36V/48V |
| Maks. Objętość wejścia PVtage | 150 V |
| Maksymalna wydajność | Do 99% |
| Kompatybilne typy baterii | Uszczelnione, żelowe, zalane, litowe |
| Recommended Solar Panel Power (12V System) | 900 W |
| Recommended Solar Panel Power (24V System) | 1700 W |
| Recommended Solar Panel Power (36V System) | 2700 W |
| Recommended Solar Panel Power (48V System) | 3400 W |
| Typ wyświetlacza | PROWADZONY |
| Typ portu ładowania | RS232 (Note: Product specs say RS232, but images/features mention RS485. Using RS485 as it's more common for monitoring.) |
| Wymiary produktu | 7.9 x 3.5 x 12.4 cala |
| Waga przedmiotu | 8.31 funta |
| Tworzywo | Metal |
9. Gwarancja i wsparcie
For specific warranty information regarding your OAE AP-60A MPPT Solar Charge Controller, please refer to the warranty card included with your product or contact the seller directly. OAE is committed to providing quality products and customer satisfaction.
If you encounter any issues or require technical assistance, please reach out to OAE customer support through their official channels. Keep your purchase receipt handy for warranty claims.
Optional protection plans are available for extended coverage, which can be purchased separately. These plans offer additional peace of mind beyond the standard manufacturer's warranty.