
1. Wprowadzenie
Thank you for choosing the HISTTON Fanless Mini PC J4125. This compact and robust industrial-grade mini computer is designed for stable and efficient operation in various environments. Featuring a fanless design for silent performance and dust protection, it is equipped with an Intel Celeron J4125 processor, ample RAM, and versatile connectivity options. This manual provides essential information for setting up, operating, maintaining, and troubleshooting your device.

Image 1.1: The HISTTON Fanless Mini PC J4125, a compact black device with a ribbed top for heat dissipation, featuring various ports on its front and back panels.
2. Zawartość opakowania
Proszę zaznaczyć pole dotyczące następujących elementów:
- 1 x HISTTON Mini PC (J4125)
- 1 x zasilacz
- 1 x Instrukcja obsługi
- 1 x kabel HDMI
- 1 x mocowanie VESA
- 1 x zestaw śrub
- Kabel 1 x SATA
3. Koniec produktuview
3.1 Główne cechy
- Edytor: Intel Celeron J4125 (4 Cores 4 Threads, 2.00GHz Base, 2.70GHz Turbo)
- Grafika: Karta graficzna Intel UHD 600
- System operacyjny: Pre-installed Windows 11 Pro (64-bit, activated)
- Pamięć: DDR4 RAM (Single SODIMM slot, up to 32GB supported)
- Składowanie: 1x mSATA SSD slot, 1x SATA 3.0 for 2.5-inch HDD/SSD
- Łączność: Dual Gigabit RJ45 LAN, Dual-band Wi-Fi (2.4G+5.0G), Bluetooth 4.0
- Wyjście wideo: 1x HDMI, 1x VGA (Dual display support)
- Porty: 2x USB 3.0, 2x USB 2.0, 2x RS232 COM, 1x 3.5mm Mic/SPK out
- Cechy szczególne: Fanless design, RTC wake up, Wake on LAN, Auto Power on (BIOS setting), Network boot
3.2 Panele przednie i tylne
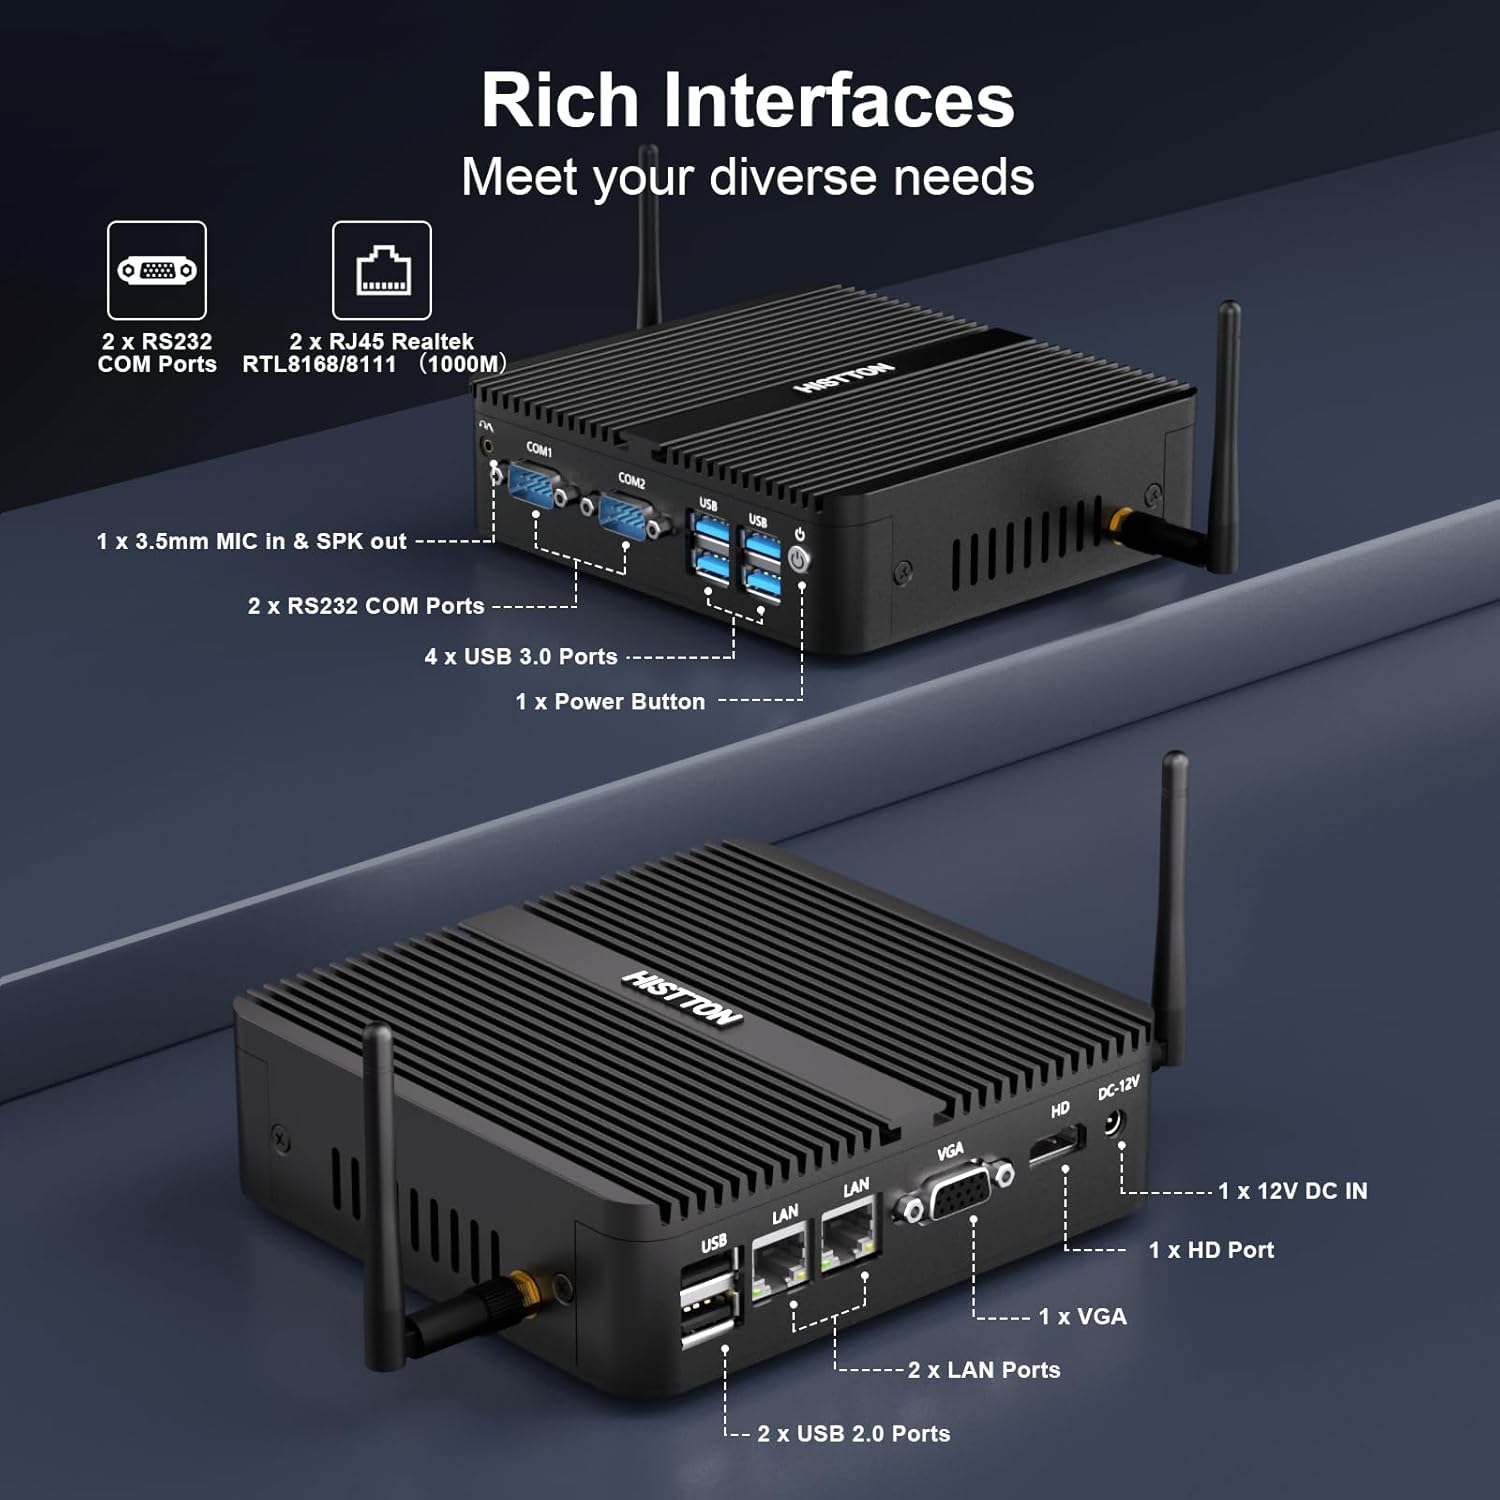
Rysunek 3.1: Szczegółowy view of the HISTTON Mini PC's front and rear panels, highlighting the various input/output ports including USB, COM, LAN, HDMI, and VGA.
- Panel przedni: Power button, 2x USB 3.0 ports, 2x USB 2.0 ports, 2x RS232 COM ports (COM1, COM2), 3.5mm audio jack (Mic/SPK out).
- Tylny panel: DC-12V power input, 1x HDMI port, 1x VGA port, 2x Gigabit RJ45 LAN ports, Wi-Fi antenna connectors.
3.3 Internal Components and Expandability
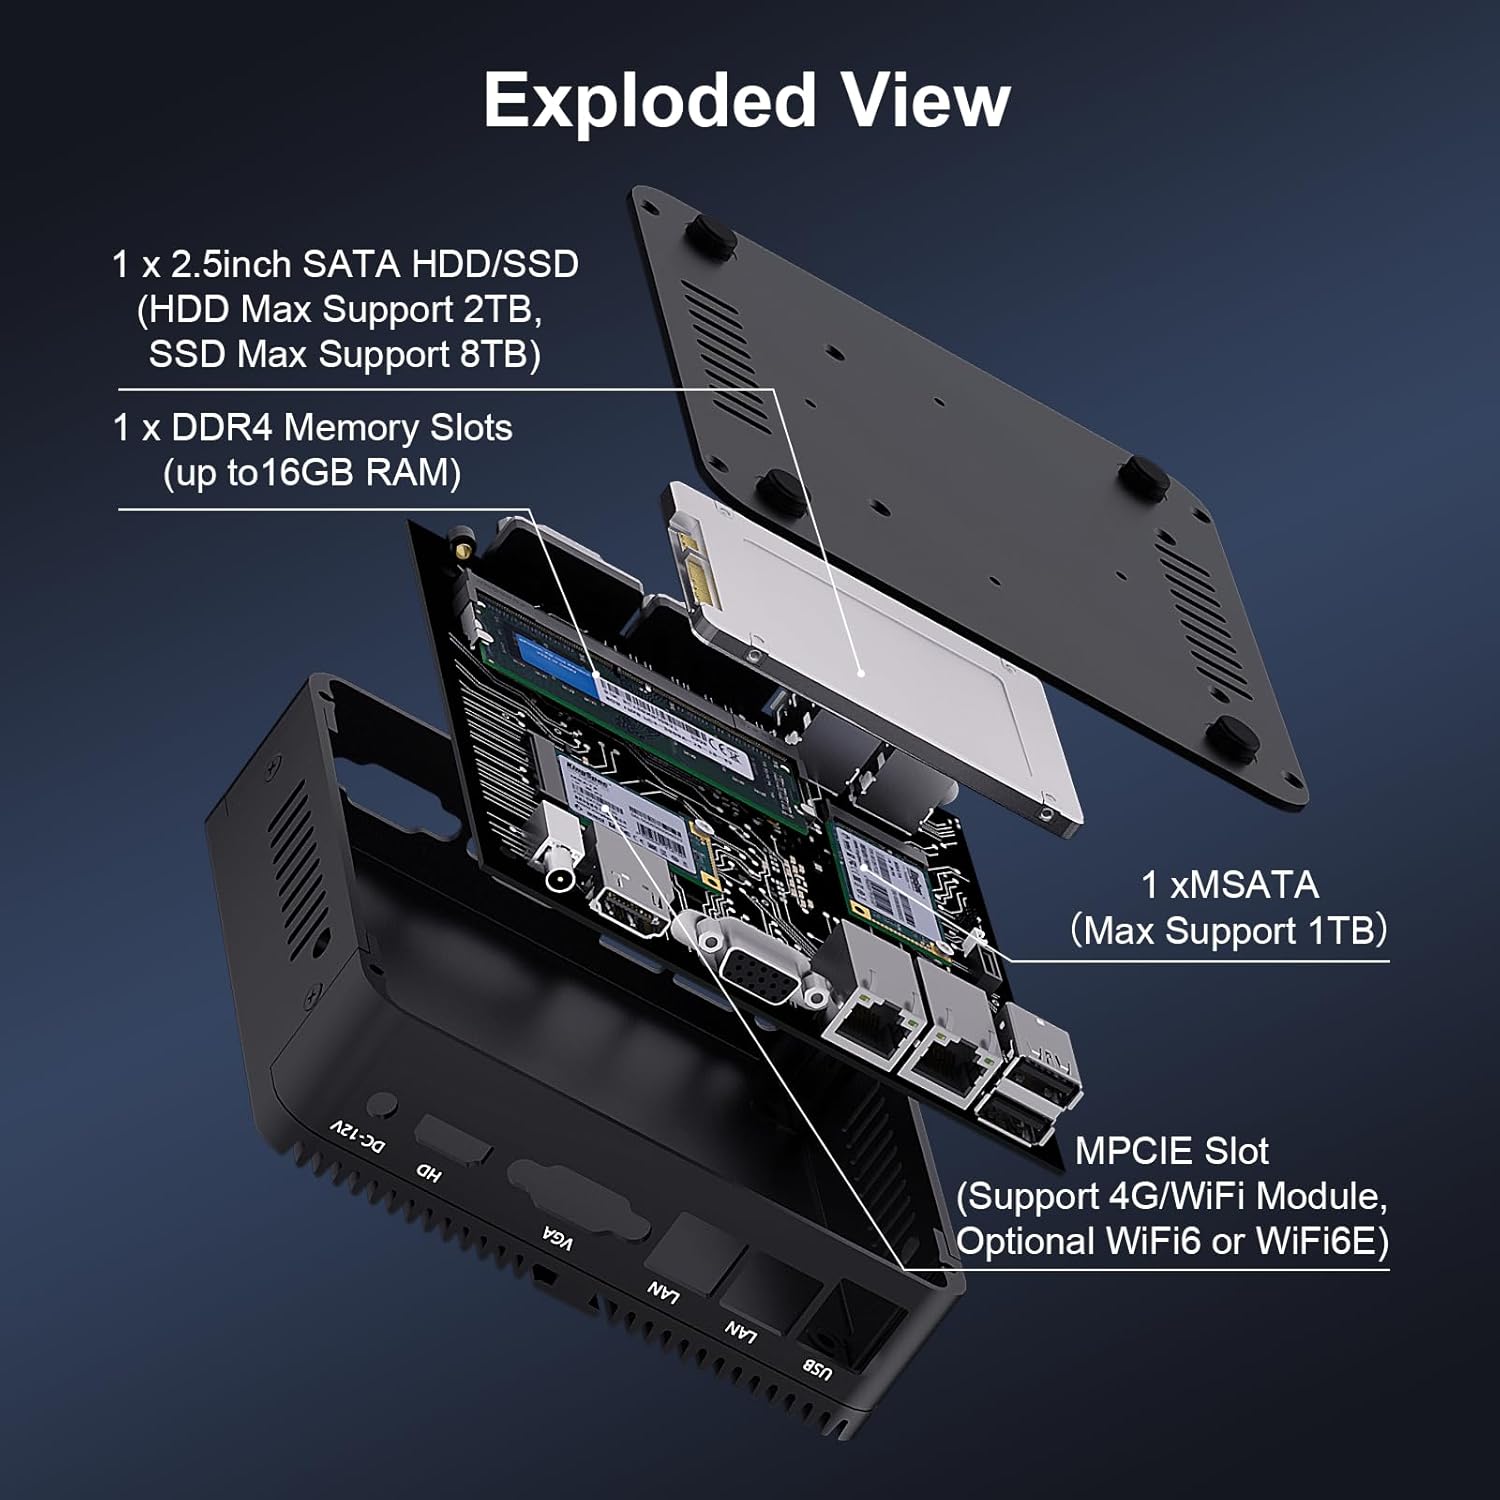
Obraz 3.2: Wybuch view of the HISTTON Mini PC, showing the internal layout including the mSATA SSD slot, DDR4 memory slot, and space for a 2.5-inch SATA drive.
- BARAN: Single SODIMM slot for DDR4 memory, supporting up to 32GB.
- Dysk SSD: 1x mSATA slot (Max Support 1TB).
- Dysk twardy/SSD: 1x SATA 3.0 port for a 2.5-inch HDD (Max Support 2TB) or SSD (Max Support 8TB).
- Bezprzewodowy: MPCIE slot for 4G/WiFi module (Optional WiFi6 or WiFi6E).
4. Instrukcje konfiguracji
4.1 Podłączanie urządzeń peryferyjnych
- Connect your monitor(s) to the HDMI and/or VGA ports on the rear panel.
- Connect your keyboard and mouse to the USB ports on the front panel.
- Attach the Wi-Fi antennas to the connectors on the rear panel.
- For wired network access, connect an Ethernet cable to one of the RJ45 LAN ports.
- Connect the power adapter to the DC-12V input port on the rear panel, then plug it into a power outlet.
4.2 Włączanie
Press the power button on the front panel to turn on the Mini PC. The power indicator light will illuminate.
4.3 Montaż uchwytu VESA (opcjonalnie)
The Mini PC supports VESA mounting, allowing you to attach it to the back of a compatible monitor or to a wall mount. Use the provided VESA mount and screws to secure the Mini PC. Ensure the monitor's VESA holes are compatible with the mount.
Video 4.1: An official product video demonstrating the physical features of the HISTTON Fanless Mini PC and its VESA mounting process.
5. Instrukcja obsługi
5.1 Początkowa konfiguracja systemu Windows
Upon first boot, follow the on-screen instructions to complete the Windows 11 Pro setup, including language, region, network connection, and user account creation.
5.2 Konfiguracja podwójnego wyświetlacza
The Mini PC supports dual display output via its HDMI and VGA ports. Connect two monitors and configure display settings within Windows (Right-click on desktop > Display settings) to extend or duplicate your desktop.

Image 5.1: The HISTTON Mini PC connected to two monitors, demonstrating its dual display capability via HDMI and VGA ports.
5.3 Ustawienia BIOS-u
To access the BIOS, press the USUNĄĆ key repeatedly during startup. The BIOS allows configuration of advanced features such as:
- RTC Wake Up: Schedule the PC to power on at a specific time.
- Obudź się w sieci LAN: Power on the PC remotely via a network signal.
- Automatyczne włączanie: Automatically power on the PC when power is restored after an outage.
- Rozruch sieciowy: Boot the PC from a network server.
6. Konserwacja
6.1 Czyszczenie
Regularly clean the exterior of the Mini PC with a soft, dry cloth. Avoid using liquid cleaners or abrasive materials. As it is fanless, internal dust accumulation is minimized, but ensure the ribbed chassis remains clear of obstructions for optimal heat dissipation.
6.2 Aktualizacje oprogramowania
Aktualizuj system operacyjny Windows i sterowniki, aby zapewnić optymalną wydajność i bezpieczeństwo. Dostęp do usługi Windows Update można uzyskać w Ustawieniach > Windows Update.
7. Rozwiązywanie Problemów
| Problem | Możliwa przyczyna | Rozwiązanie |
|---|---|---|
| Mini PC się nie włącza. | Brak zasilania, uszkodzony zasilacz, luźne połączenie. | Check power cable connection. Ensure power adapter is working. Try a different power outlet. |
| Brak obrazu na monitorze. | Loose video cable, incorrect input source on monitor, monitor off. | Ensure video cables (HDMI/VGA) are securely connected. Select correct input source on monitor. Turn on monitor. |
| Brak połączenia sieciowego. | Luźny kabel Ethernet, wyłączone Wi-Fi, problem ze sterownikiem. | Check Ethernet cable connection. Ensure Wi-Fi is enabled and connected to a network. Reinstall network drivers if necessary. |
| Niska wydajność. | Zbyt wiele uruchomionych aplikacji, mało miejsca na dysku, nieaktualne sterowniki. | Zamknij niepotrzebne aplikacje. Zwolnij miejsce na dysku. Zaktualizuj sterowniki i system Windows. |
8. Specyfikacje
| Funkcja | Szczegół |
|---|---|
| Marka | HISTTON |
| Numer modelu | J4125 |
| System operacyjny | Windows 11 Pro |
| Model procesora | Celeron J4125 |
| Prędkość procesora | 2 GHz (do 2.7 GHz Turbo) |
| Koprocesor graficzny | Karta graficzna Intel UHD 600 |
| Zainstalowana pamięć RAM | 16 GB DDR4 (maks. 32 GB) |
| Pojemność pamięci masowej | Dysk SSD 512 GB |
| Opis dysku twardego | HDD, SSD (1x mSATA, 1x 2.5-inch SATA) |
| Interfejs wyjścia wideo | HDMI, VGA, |
| Technologia łączności | Ethernet, HDMI, LAN, Wi-Fi, Bluetooth |
| Technologia bezprzewodowa | Bluetooth 4.0, Dual-band Wi-Fi (2.4G+5.0G) |
| Wymiary przedmiotu | 5.31 x 5 x 1.54 cala (13.5 x 12.6 x 4.0 cm) |
| Waga przedmiotu | 0.6 kilograma |
| Łączna liczba portów USB | 4 (2x USB 3.0, 2x USB 2.0) |
| Porty COM | 2x RS232 |
| Porty LAN | 2x gigabitowe RJ45 |
9. Gwarancja i wsparcie
HISTTON provides customer support for your Mini PC. If you encounter any issues or have questions, please refer to the following contact methods:
- Wsparcie Amazona: Zaloguj się na swoje konto Amazon, przejdź do zakładki „Twoje zamówienia” i wybierz opcję „Zadaj pytanie dotyczące produktu”, aby uzyskać pomoc.
- Wsparcie posprzedażowe: For direct technical assistance, you may send an email to the HISTTON After-Sales Team at minipc_service@yeah.net.
Proszę zachować dowód zakupu na potrzeby roszczeń gwarancyjnych.