DieseRC 2404
DieseRC 4-Channel Wireless Remote Control Switch User Manual
Model: 2404 | Brand: DieseRC
Produkt ponadview
The DieseRC DC 12V 24V 4CH Wireless Remote Control Switch is a versatile radio frequency (RF) relay receiver system designed for controlling various electrical appliances. It offers stable and reliable performance with high reception sensitivity, allowing control within a 50-meter range in open areas. The system utilizes EV1527 learning code technology for enhanced security. This product is ideal for applications such as garage doors, lights, motors, and awnings.

Image: The DieseRC 4-channel wireless remote control switch receiver board and two accompanying RF transmitters.
Główne cechy
- 433Mhz Radio Frequency: Ensures stable and reliable wireless control with high reception sensitivity.
- Rozszerzony zasięg: Operates effectively within 50 meters in open areas, capable of passing through walls, floors, and doors.
- EV1527 Learning Code: Enhances security for the remote control system.
- Wiele trybów pracy: Supports Momentary, Toggle, and Latched modes, programmable to suit various application needs.
- 4 Independent Relays: Each of the four relays can be controlled independently, offering flexibility for different devices.
- Wysoka ładowność: Equipped with 10A relays, suitable for high-power electrical appliances.
- Szeroki zakrestage Kompatybilność: Supports DC 6V to 30V, making it compatible with both DC12V and DC24V systems.
- Trwałe komponenty: High-quality relays designed for over 100,000 operations.
Product Components and Wiring
The system consists of a receiver board with four relays and two RF transmitters. Understanding the components and proper wiring is crucial for safe and effective operation.
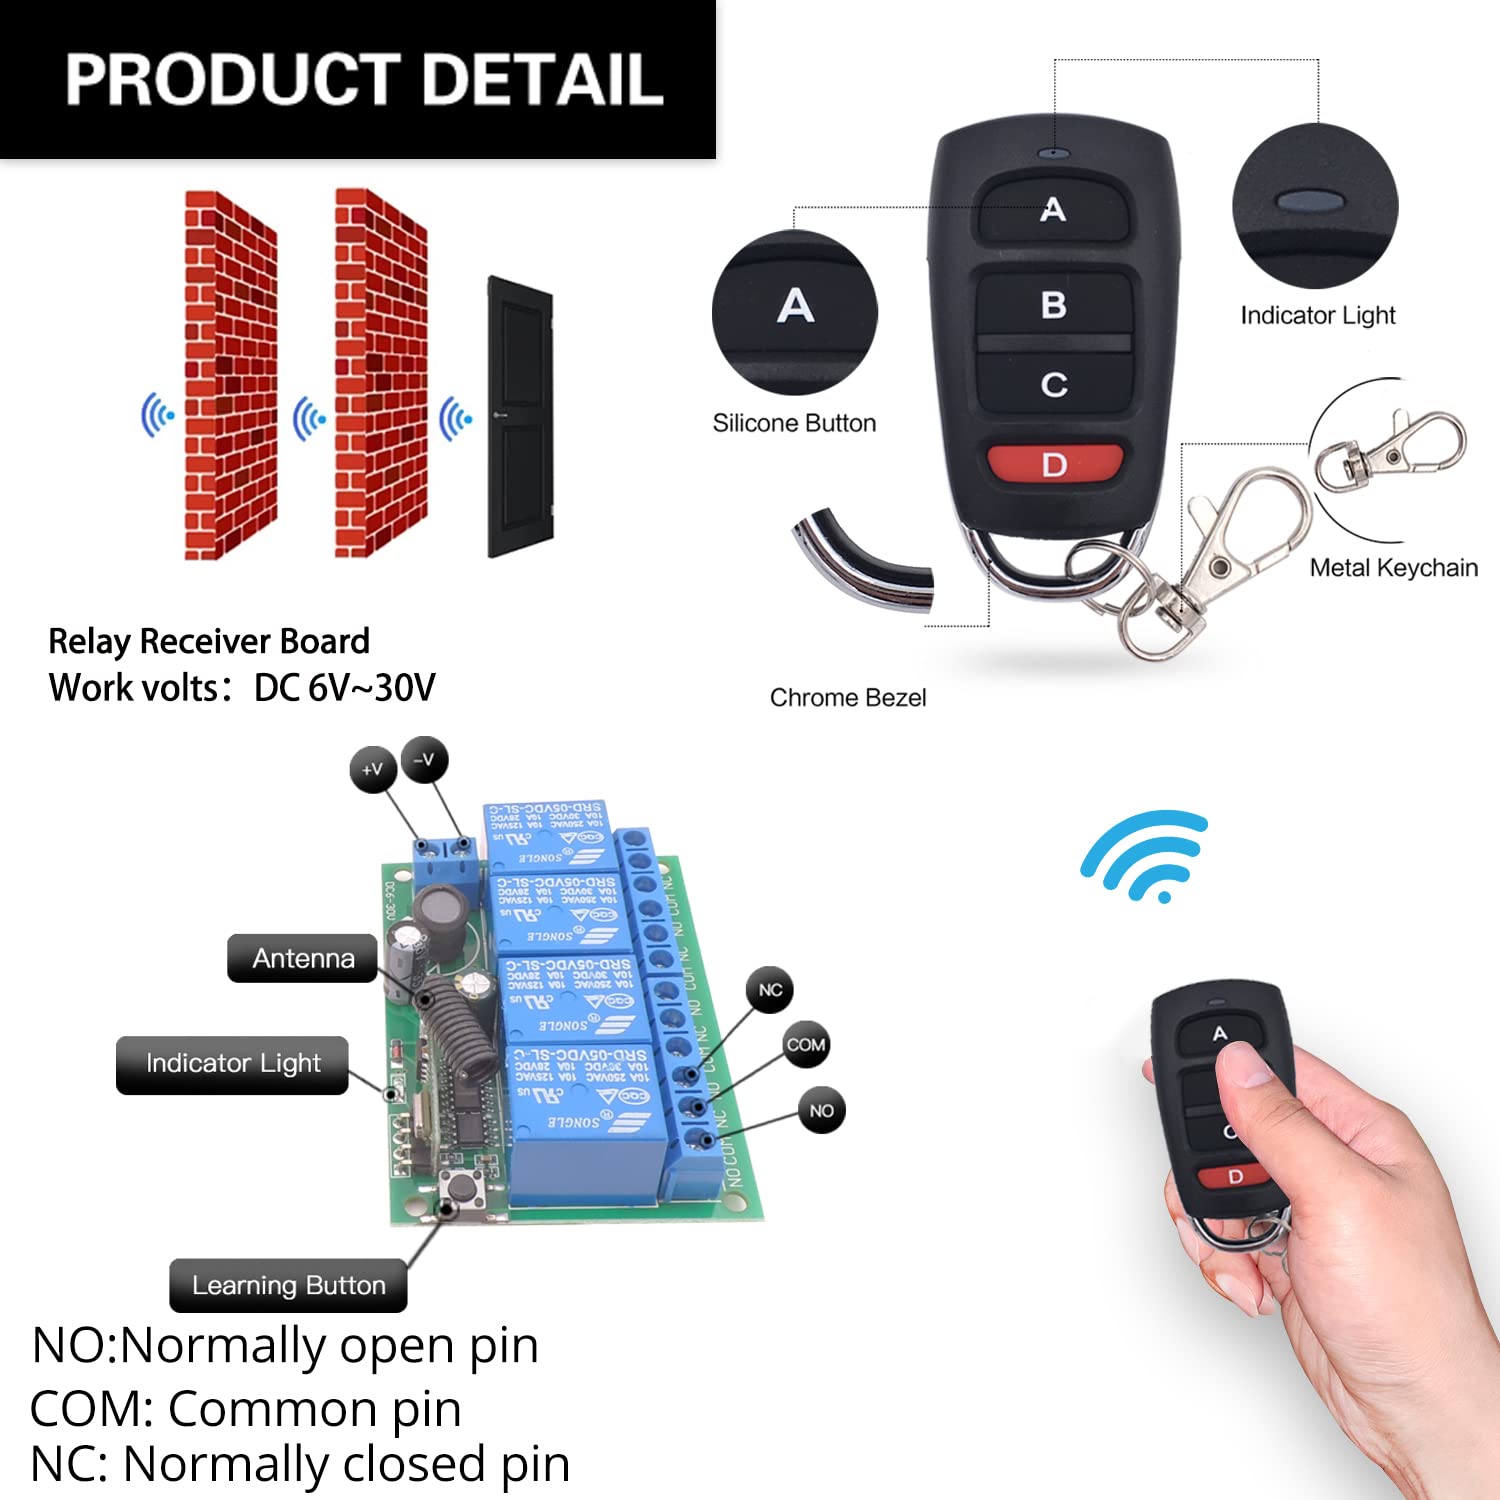
Obraz: Szczegółowy view of the remote control's silicone buttons, indicator light, and metal keychain, along with the receiver board's antenna, indicator light, learning button, and terminal pins (NO: Normally Open, COM: Common, NC: Normally Closed).
Schematy połączeń
The receiver features three terminals for each relay: Normally Open (NO), Common (COM), and Normally Closed (NC). This allows for flexible wiring depending on the application. Below are common wiring configurations:

Image: Illustrations of four different wiring modes for the relay receiver, demonstrating connections for controlling a lamp (AC 1V-250V), a curtain motor (DC 12V, 30V), and a garage motor (AC 110V, 220V, 250V).
Ensure all connections are secure and match the voltage requirements of your devices. Always disconnect power before performing any wiring.
Tryby pracy i programowanie
The DieseRC remote control switch supports three primary operating modes: Momentary, Toggle, and Latched. These modes determine how the relay behaves when a button on the remote is pressed.
Instrukcje programowania
- Tryb chwilowy (naciśnij 1 raz): Press the learning button on the receiver board once. The indicator light will illuminate. Then, press any button on the remote control. The indicator light will flash, confirming successful programming. In this mode, the relay remains active only while the remote button is held down.
- Przełącz tryb (naciśnij 2 razy): Press the learning button on the receiver board twice. The indicator light will illuminate. Then, press any button on the remote control. The indicator light will flash, confirming successful programming. In this mode, pressing the remote button once turns the relay ON, and pressing it again turns it OFF.
- Tryb zablokowany (naciśnij 3 razy): Press the learning button on the receiver board three times. The indicator light will illuminate. Then, press button 'A' on the remote control to turn Relay 1 ON. Press button 'B' to turn Relay 2 ON (and turn Relay 1 OFF). In this mode, one relay turns ON while another turns OFF, ensuring only one is active at a time.

Image: Step-by-step visual guide for programming the receiver into Momentary, Toggle, and Latched modes using the learning button and remote control.

Image: Demonstrations of how each operating mode functions: Momentary (press and hold), Toggle (press once for ON, press again for OFF), and Latched (press 'A' for Relay 1 ON, press 'B' for Relay 2 ON and Relay 1 OFF).
Resetowanie odbiornika
To clear all programmed remote controls and reset the receiver to its default state, press the learning button on the receiver board 8 times. The indicator light will flash, confirming that all previous pairings have been cleared.

Image: Visual instruction for resetting the receiver by pressing the learning button eight times.
Oficjalne filmy produktowe
Wideo: Ponadview of the relay remote control switch, demonstrating its general functionality and applications.
Video: A detailed guide on how to program the remote control switch, covering the different operating modes.
Szerokie zastosowanie
This wireless remote control switch is highly versatile and can be integrated into various settings to remotely operate a wide range of devices. Its robust signal transmission allows for control even through obstacles.
- Automatyka domowa: Control lights, electric curtains, fans, and other household appliances.
- Bramy garażowe: Ideal for remote operation of garage door openers.
- Zastosowanie przemysłowe: Suitable for factories, laboratories, and other industrial environments for controlling machinery or ventilation systems.
- Systemy bezpieczeństwa: Can be used for signal transmission in various security applications.

Obraz: Byłyamples of common applications for the wireless RF relay module, such as controlling garage doors, lamps, electric curtains, ventilation systems, and electric fans.

Image: The system offers a 50-meter remote control distance, meeting home convenience needs for controlling outdoor lights and other devices.
Specyfikacje
| Funkcja | Szczegół |
|---|---|
| Wymiary produktu | 2.95 x 2.17 x 1.18 cala; 5.93 uncji |
| Numer modelu przedmiotu | 2404 |
| Baterie | Wymagana 1 bateria CR2032 (w zestawie) |
| Producent | DieserRC |
| Typ złącza | Śruba |
| Materiał kontaktowy | Srebrny |
| Typ kontaktu | Normalnie zamknięty |
| Obecna ocena | 10 Amps |
| Typ montażu | Montaż powierzchniowy |
Konserwacja
To ensure the longevity and optimal performance of your DieseRC Wireless Remote Control Switch, follow these general maintenance guidelines:
- Zachowaj czystosc: Regularly wipe the receiver and remote control with a dry, soft cloth to remove dust and debris. Avoid using harsh chemicals or abrasive cleaners.
- Chroń przed elementami: Ensure the receiver is installed in a dry environment, away from direct moisture, extreme temperatures, and corrosive substances.
- Wymiana baterii: Replace the CR2032 battery in the remote control when its range decreases or the indicator light dims.
- Sprawdź okablowanie: Periodically check all wiring connections to the receiver for any signs of wear, corrosion, or looseness. Ensure connections remain secure.
- Unikaj przeciążania: Nie przekraczać maksymalnego prądu znamionowego wynoszącego 10 Amps per relay to prevent damage to the unit.
Rozwiązywanie problemów
If you encounter issues with your DieseRC Wireless Remote Control Switch, refer to the following common troubleshooting steps:
| Problem | Możliwa przyczyna | Rozwiązanie |
|---|---|---|
| Remote not responding / No control |
|
|
| Relay not activating/deactivating correctly |
|
|
| Accidental activation or erratic behavior |
|
|
Gwarancja i wsparcie
DieseRC is committed to providing high-quality products and excellent customer service. Our products undergo rigorous quality assurance to ensure reliability and longevity.
- Zapewnienie jakości: Our relays are designed for over 100,000 operations, ensuring long-lasting and stable use.
- Serwis posprzedażowy: We strive to provide perfect after-sales service and are dedicated to resolving any customer issues.
For further assistance, technical support, or warranty inquiries, please contact DieseRC customer service. You may also refer to the official User Manual (PDF) available for download from the product page for more detailed information.
Adres e-mail serwisu: dieseelectronic@163.com
Producent / Importer: Huizhou Wenqiao Electronic Technology Co., Ltd.
Adres: Room 03, 12th Floor, Building T19, East Coast Garden, Fangzhilonghuwan, No. 27, Sanhuan South Road, Huicheng District, Huizhou City, Guangdong Province, China 516001
Ask a question about this manual
Ask about setup, troubleshooting, compatibility, parts, safety, or missing instructions. Manuals+ will review the question and use this page’s manual context to help answer it.