Wstęp
The Godox MF12 MF12-K2 Macro Flash is a versatile lighting solution designed for macro photography. This twin macro flash system offers precise control and flexible positioning to illuminate small subjects effectively. It features 2.4G wireless control, TTL/Manual modes, and a built-in lithium battery for extended use. This manual provides comprehensive instructions for setting up, operating, maintaining, and troubleshooting your MF12 Macro Flash.
Główne cechy:
- Twin Flash Design: Features a specially designed slope structure for inward illumination, ideal for extreme close-up subjects.
- Akumulator litowy: Powerful 3.4V/1700mAh built-in battery supports up to 500 full-power flashes with 0.01-1.7s recycling time. Rechargeable via Type-C cable.
- Sterowanie bezprzewodowe 2.4G: Compatible with Godox XPro, X1, X2 triggers for Canon, Nikon, Sony, Fuji, Olympus, and Panasonic cameras. Offers long-distance transmission with 5 groups and 32 channels.
- Elastyczne użytkowanie: Can be mounted as a ring flash with adjustable angles or used off-camera with a flash stand or hot shoe adapter.
- Kompleksowe akcesoria: Includes MF-11C Color Effects and MF-11T Color Temperature Adjustment Sets, a mounting ring for multi-flash solutions, and an adapter ring set (49mm-77mm).
Organizować coś
1. Multi-flash Setup (On-Camera)
For on-camera macro photography, the MF12 flashes can be mounted around your lens using the provided mounting ring and adapter rings. This setup allows for even illumination of your subject.
- Attach the appropriate adapter ring (49mm, 52mm, 55mm, 58mm, 62mm, 67mm, 72mm, or 77mm) to your camera lens.
- Mount the MF-AR mounting ring onto the adapter ring.
- Slide the MF12 flashes onto the adjustable brackets of the mounting ring. Ensure the arrow on the bracket aligns with the arrow on the mounting ring.
- Press the push buttons on the brackets to position the flashes. You can slide them freely along the mounting ring and adjust their angles for optimal lighting.

Obraz: Ponadview of the Godox MF12 Macro Flash kit components, including two flash units, mounting ring, adapter rings, and color filters.

Image: Two Godox MF12 macro flashes attached to a camera lens via the mounting ring, demonstrating the on-camera setup.
Video: A detailed tutorial demonstrating the multi-flash setup for the Godox MF12 Macro Flash, including attaching the mounting ring and positioning the flashes.
2. Off-camera Setup
The MF12 flashes can also be used off-camera for more creative lighting control. Each flash unit comes with a cold shoe adapter and a mini stand.
- Slide the cold shoe adapter into the bracket on the bottom of the MF12 flash unit.
- Mount the adapter onto the provided mini stand or any compatible light stand.
- Screw up the adapter to secure the flash unit to the stand.

Image: A single Godox MF12 flash unit mounted on its mini stand, illustrating the off-camera setup.
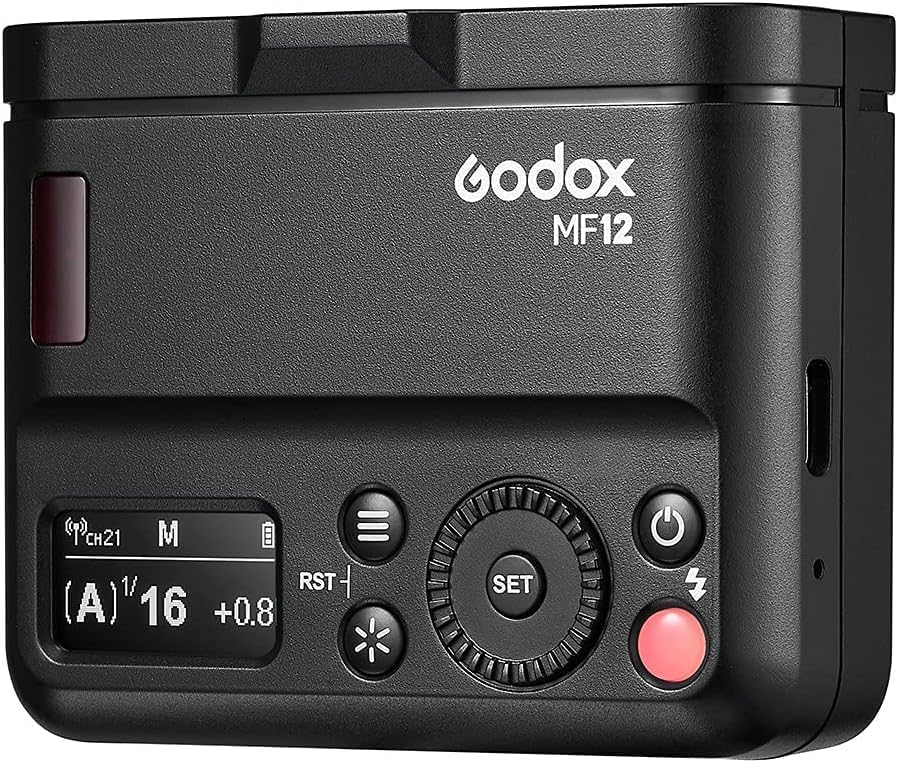
Image: Two Godox MF12 flashes set up off-camera to illuminate a subject, showcasing flexible lighting possibilities.
Operating the MF12 Macro Flash
1. Sterowanie i wyświetlacz
Familiarize yourself with the main controls and display of the MF12 flash unit:
- Przycisk zasilania: Włącza/wyłącza urządzenie.
- Przycisk testowy: Wyzwala błysk testowy.
- Przycisk menu: Accesses the menu for various settings.
- Wybierz pokrętło: Navigates through menu options and adjusts values.
- Przycisk Ustaw: Potwierdza wybór.
- Modelling Light Button: Controls the modelling light.
- Wyświetlacz: Pokazuje bieżące ustawienia i status.

Obraz: Zbliżenie view of the Godox MF12 flash unit's control panel, highlighting the buttons and display.
Video: Demonstrates the basic operation of the Godox MF12, including powering on, navigating the home page, and controlling the modelling light.
2. 2.4G Wireless Pairing
To use the MF12 with a Godox X-series trigger (e.g., XPro, X1, X2), ensure both devices are set to the same channel and ID for successful pairing.
- Turn on both the MF12 flash and your Godox X-series trigger.
- On the MF12, navigate to the wireless settings (usually via the menu button).
- Set the MF12 and the trigger to the same channel (e.g., Channel 26).
- Set both devices to the same ID (e.g., ID 5).
- Ensure the MF12 and trigger are set to the same group (e.g., Group C) to pair successfully.
- Adjust the flash power of the MF12 directly from the trigger.
- Press the test button on the trigger to fire a test flash and confirm successful pairing.
Video: Illustrates the process of 2.4G wireless pairing between the Godox MF12 flash and a compatible trigger, including setting channels, IDs, and groups.
3. Mode Settings (TTL/Manual)
The MF12 supports both TTL (Through-The-Lens) and Manual flash modes, as well as optical slave modes (S1/S2).
- Press the Menu button to enter the settings.
- Use the Select Dial to navigate to "MODE" and press the Set button.
- Rotate the dial to choose between M (Manual) or TTL mode, then press Set to confirm.
- To set the optical slave mode, navigate to "PHOTOC" in the menu.
- Rotate the dial to select OFF, S1, or S2, then press Set to confirm.
- To enable/disable the wireless function, navigate to "WL" in the menu.
- Rotate the dial to select ON or OFF, then press Set to confirm.
Video: Explains how to access and adjust various menu functions on the Godox MF12, including flash modes (M/TTL), optical slave modes (S1/S2), and wireless function.
Konserwacja
Pielęgnacja i ładowanie akumulatora:
The MF12 is equipped with a built-in 3.7V/1700mAh lithium battery. To ensure optimal performance and longevity:
- Recharge the battery using the provided Type-C cable when the power runs low.
- Unikaj częstego całkowitego rozładowywania akumulatora.
- Store the flash with a partially charged battery if not used for extended periods.
- The battery supports approximately 500 full-power flashes on a single charge.

Image: Diagram highlighting the rechargeable high-performance battery of the Godox MF12, showing recycling time, flash count, and Type-C USB charging.
Ogólna pielęgnacja i czyszczenie:
- Aby utrzymać lampę błyskową w czystości, należy ją czyścić miękką, suchą ściereczką.
- Unikaj wystawiania lampy błyskowej na działanie ekstremalnych temperatur, wilgoci lub bezpośredniego światła słonecznego.
- Nie używaj żrących chemikaliów ani ściernych środków czyszczących.
- Store the flash and accessories in the provided carrying case when not in use to protect them from dust and damage.
Rozwiązywanie problemów
If you encounter issues with your Godox MF12 Macro Flash, refer to the following common problems and solutions:
| Problem | Możliwa przyczyna | Rozwiązanie |
|---|---|---|
| Lampa błyskowa nie działa. | Low battery; Incorrect wireless settings; Flash not properly mounted. | Charge the battery; Verify channel, ID, and group settings on both flash and trigger; Ensure flash is securely mounted. |
| Nierównomierna moc błysku. | Battery low; Interference; Flash mode mismatch. | Recharge battery; Change wireless channel/ID; Ensure flash mode (TTL/Manual) is appropriate for shooting conditions. |
| Modelling light not working. | Light turned off; Brightness set to minimum. | Short press the Modelling Light button to turn on; Adjust brightness using the Select Dial. |
| Cannot pair with trigger. | Mismatched channel/ID/group; Wireless function off. | Ensure all wireless settings (channel, ID, group) match on both devices; Turn on wireless function in the menu. |
Jeśli po wypróbowaniu tych rozwiązań problem nadal występuje, skontaktuj się z obsługą klienta Godox, aby uzyskać dalszą pomoc.
Specyfikacje
| Funkcja | Szczegół |
|---|---|
| Marka | GODOX |
| Numer modelu | MF12-K2 |
| Wymiary opakowania | 10.16 x 9.69 x 3.9 cala |
| Waga przedmiotu | 2.51 funta |
| Baterie | Wymagane 1 baterie litowo-jonowe (w zestawie) |
| Żywotność baterii | 500 Hours (standby, actual flash count is 500 full-power flashes) |
| Kompatybilne mocowania | Canon, Nikon, Sony, Olympus, Fuji, Panasonic (with compatible trigger) |
| Typ lampy błyskowej aparatu | Makro |
| Prędkość synchronizacji błysku | 1/34000s |
Co jest w pudełku
The Godox MF12-K2 Macro Flash kit typically includes the following items:
- MF12 Macro Flash Units (x2)
- Color Gels Kit (MF-11C Color Effects Set, MF-11T Color Temperature Adjustment Set)
- Camera Lens Adapter Ring (MF-AR)
- Flash Head Diffuser (x2)
- Cold Shoe Adapter (x2)
- Mini stojak (x2)
- Kabel ładujący USB typu C (x2)
- Etui transportowe

Image: All components included in the Godox MF12-K2 Macro Flash kit laid out, showing the flashes, mounting ring, adapter rings, color filters, diffusers, and carrying case.
Gwarancja i wsparcie
Godox products are designed for reliability and performance. For warranty information, product registration, or technical support, please refer to the official Godox webOdwiedź witrynę lub skontaktuj się z autoryzowanym dealerem. Zachowaj paragon jako dowód zakupu na wypadek roszczeń gwarancyjnych.
Aby uzyskać dalszą pomoc, możesz odwiedzić stronę Sklep GODOX na Amazon.


