1. Koniec produktuview
The AEGIS 5-Gun Rifle Security Safe is designed to provide secure storage for up to five long guns, along with a separate lock box for ammunition, pistols, and other valuables. Constructed from reinforced solid steel, it features a digital keypad for quick access and multiple locking bolts for enhanced security. This safe is suitable for home or office use, helping to keep firearms and valuables protected from unauthorized access.

Obraz 1.1: Koniecview of the AEGIS Digital Gun Security Cabinet, highlighting its key features including spare keys, solid construction, quick access, theft alert alarm, mounting bolts, and pre-drilled mounting holes.
2. Instrukcje konfiguracji
2.1 Rozpakowanie i kontrola
Carefully remove the safe from its packaging. Inspect the safe for any signs of damage. Report any damage to the retailer immediately.
2.2 Instalacja baterii
The safe requires 4x 1.5V AA batteries (not included) for the digital keypad. These batteries power the electronic lock system.
- Open the safe using the emergency key (refer to Section 3.2).
- Znajdź komorę baterii po wewnętrznej stronie drzwi sejfu.
- Zdejmij pokrywę baterii.
- Insert four (4) 1.5V AA batteries, ensuring correct polarity (+/-) as indicated in the compartment.
- Załóż z powrotem pokrywę baterii.
Video 2.1: This video demonstrates the process of installing the batteries into the AEGIS Rifle Gun Safe's electronic keypad. It shows how to access the battery compartment and correctly insert the 4x AA batteries.
2.3 Montaż sejfu
For optimal security, it is recommended to securely mount the safe to a wall or floor. Mounting hardware is included.
- Identify a suitable location for the safe, such as a closet or against a sturdy wall.
- Locate the pre-drilled mounting holes on the back and bottom of the safe.
- Position the safe and mark the drilling points on the wall or floor.
- Wywierć otwory prowadzące w zaznaczonych miejscach.
- Align the safe with the drilled holes and secure it using the provided mounting bolts.

Image 2.2: The AEGIS gun safe securely mounted within a closet, demonstrating a recommended installation location.

Rysunek 2.3: Szczegółowy view of a pre-drilled mounting hole, indicating where to secure the safe to a wall or floor.
3. Instrukcja obsługi
3.1 Initial Opening and Code Setting
Upon first use, the safe can be opened using the factory default code. It is crucial to change this code immediately for security.
- Open with Factory Code: Enter the factory code 1-5-9 on the digital keypad. Press the "CLEAR/LOCK" button to confirm. Two beeps and a green "OK" light will indicate successful entry.
- Rotate Handle: Rotate the handle clockwise to open the safe door.
- Set New Code: With the door open, press the red reset button located on the inside of the door. The keypad will beep once.
- Enter your new 3-8 digit code. Press the "CLEAR/LOCK" button to confirm. The safe will beep twice, indicating the new code is set.
- Przetestuj nowy kod przy otwartych drzwiach, zanim je zamkniesz.
Video 3.1: This video demonstrates how to open the AEGIS Rifle Gun Safe using the factory code and how to set a new personal access code for the electronic keypad.
3.2 Dostęp do klucza awaryjnego
In case of forgotten code or battery failure, the safe can be opened using the emergency key.
- Locate the emergency keyhole, usually concealed behind a cap on the keypad panel.
- Zdejmij nasadkę.
- Włóż kluczyk awaryjny i przekręć go zgodnie z ruchem wskazówek zegara.
- Przytrzymując przekręcony klucz, przekręć klamkę zgodnie z ruchem wskazówek zegara, aby otworzyć sejf.
Video 3.2: This video illustrates the procedure for opening the AEGIS Rifle Gun Safe using the emergency key, which is useful if the digital code is forgotten or batteries are depleted.
3.3 Using the Separate Lock Box
The safe includes an internal lock box for smaller items, secured by a separate key.
- Open the main safe door.
- Locate the internal lock box at the top of the safe.
- Insert the small emergency key into the lock box keyhole and turn clockwise to open.
- Store items such as ammunition, pistols, or documents inside.
- Turn the key counter-clockwise to lock the internal box.

Obraz 3.3: Zbliżenie view of the separate lockable box located inside the safe, demonstrating its key-operated locking mechanism for securing smaller valuables.
3.4 Zamykanie sejfu
To lock the safe, simply close the door and rotate the handle counter-clockwise. The electronic lock will automatically engage.
Video 3.4: This video shows the final step of securing the AEGIS Rifle Gun Safe by closing the door and rotating the handle counter-clockwise to engage the locking mechanism.
3.5 Adjustable Gun Rack
The safe is equipped with an adjustable and removable foam gun rack. This allows for customization based on the length and configuration of your firearms.

Obraz 3.5: Zbliżenie view of the adjustable foam gun rack, designed to accommodate various firearm sizes and configurations.
4. Konserwacja
To ensure the longevity and proper functioning of your AEGIS 5-Gun Rifle Security Safe, follow these maintenance guidelines:
- Czyszczenie: Przetrzyj powierzchnię zewnętrzną i wewnętrzną miękką szmatką.amp szmatką. Unikaj środków czyszczących o działaniu ściernym i rozpuszczalników, które mogą uszkodzić wykończenie.
- Mechanizm blokujący: Periodically check the locking bolts and hinges for smooth operation. Apply a small amount of lubricant if necessary.
- Wymiana baterii: Replace the AA batteries annually, or immediately when the low battery warning is indicated (red battery light).
- Przechowywanie kluczy: Przechowuj klucze awaryjne w bezpiecznym miejscu, z dala od sejfu i poza zasięgiem osób nieupoważnionych.
5. Rozwiązywanie Problemów
5.1 Alarm System and Lockout
The safe features an anti-theft alarm system:
- 3 Wrong Entries: If three incorrect codes are entered consecutively, the safe will emit a warning sound and lock the user out for 20 seconds.
- Additional Wrong Entries: If another three invalid code attempts are made after the initial lockout, the safe will trigger a longer warning and lock the user out for 5 minutes.
- Bypassing Lockout: You can always use the emergency key to open the safe, even during a lockout period.
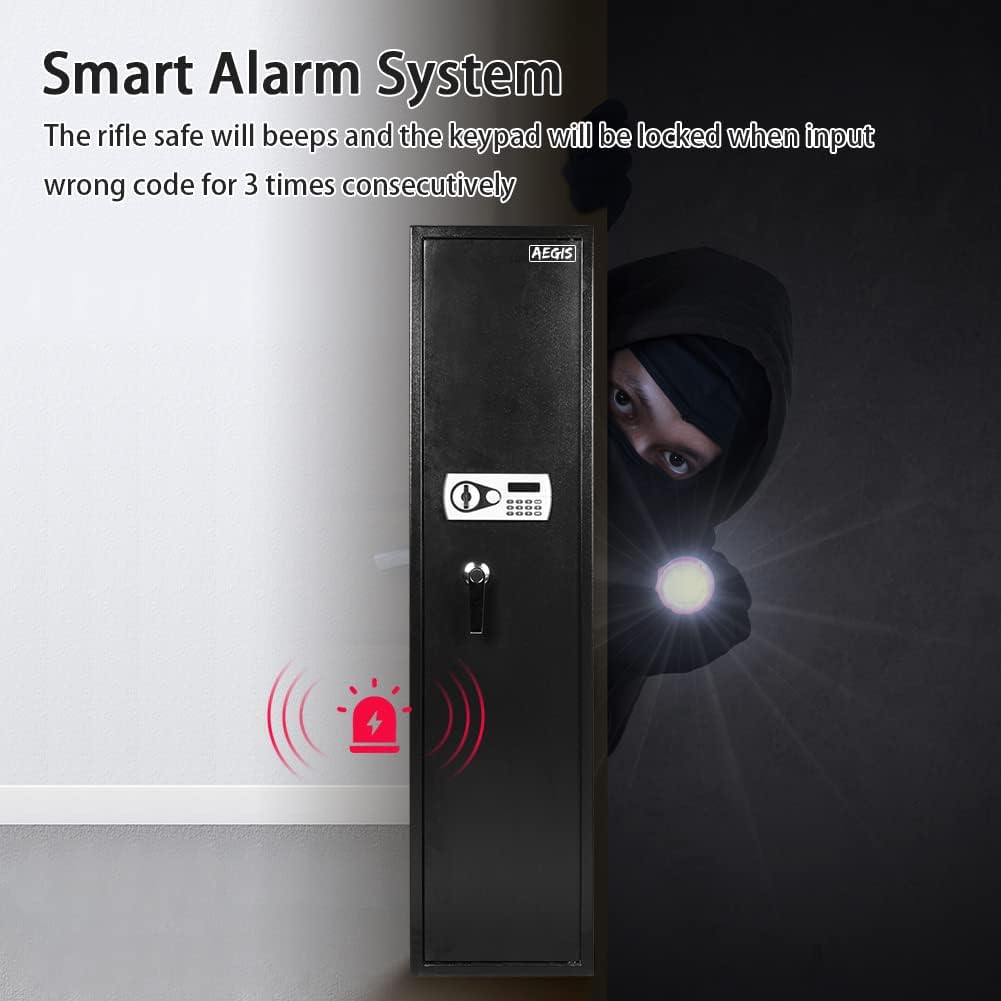
Image 5.1: Illustration of the smart alarm system, showing the safe activating an alarm when an unauthorized attempt is made to open it.
5.2 Ostrzeżenie o niskim stanie baterii
If the red battery light on the keypad illuminates, it indicates that the batteries are low. Replace the batteries immediately to ensure continued functionality of the electronic lock. Refer to Section 2.2 for battery installation instructions.
6. Specyfikacje produktu
| Funkcja | Szczegół |
|---|---|
| Marka | EGIDA |
| Model | 5-Gun Rifle Security Safe |
| Exterior Dimensions (D*W*H) | 13.8" x 11.8" x 57.1" |
| Interior Dimensions (D*W*H) | 13.5" x 11" x 50.4" |
| Separate Lock Box Size (D*W*H) | 13.5" x 7.9" x 6.7" |
| Pojemność | Up to 5 long guns (up to 49" long) |
| Tworzywo | Stal stopowa |
| Typ zamka | Klawiatura cyfrowa, klucz awaryjny |
| Alarm | Anti-theft (triggered by incorrect code entries) |
| Typ montażu | Floor Mount, Wall Mount (pre-drilled holes) |
| Zawarte komponenty | Mounting Bolts, Keys |
| Wymagane baterie | 4x 1.5V AA (Alkaline, not included) |
| Masa netto | Około 86 funtów |

Image 6.1: Detailed diagram illustrating the exterior, interior, and separate lock box dimensions of the AEGIS 5-Gun Rifle Security Safe.
7. Informacje o gwarancji
Specific warranty details are not provided in the product information. Please refer to the product packaging or contact AEGIS customer support for warranty terms and conditions.
8. Obsługa klienta
For further assistance, technical support, or inquiries regarding your AEGIS 5-Gun Rifle Security Safe, please refer to the contact information provided on the product packaging or the official AEGIS webstrona.