1. Wprowadzenie
The eSynic HDMI 2.0 4K60Hz Extender is designed to transmit HDMI signals over long distances using a single Cat6 Ethernet cable. This device supports high-resolution video up to 4K@60Hz, 3D, and 1080P, along with various advanced audio formats. It features Power over Ethernet (PoE), bi-directional IR control, RS232 pass-through, automatic EDID management, HDCP, HDMI2.0, and CEC compatibility. This manual provides comprehensive instructions for the installation, operation, and maintenance of your HDMI extender.
2. Zawartość opakowania
Po otwarciu opakowania należy sprawdzić jego zawartość, aby upewnić się, że wszystkie elementy są obecne i nieuszkodzone:
- 1 x HDMI Extender Transmitter Unit
- 1 x HDMI Extender Receiver Unit
- 2 x IR Transmitter Cables
- 2 x kable odbiornika podczerwieni
- 1 x zasilacz DC 12V2A
- 1 x Instrukcja obsługi (ten dokument)

Image: Contents of the eSynic HDMI Extender package, showing the transmitter and receiver units, two IR transmitter cables, two IR receiver cables, a DC 12V2A power adapter, and the user manual.
3. Funkcje produktu
- 4K 60Hz Resolution & Advanced Audio: Supports resolutions up to 4K@60Hz (4:4:4), 4K x 2K@30Hz, 3D 1080P@60Hz, and 1080p@60Hz. Audio support includes Dolby Atmos, Dolby TrueHD, DTS-HD Master, and LPCM 2.1/5.1/7.1CH for high-quality sound.
- Transmisja dalekiego zasięgu: Extends HDMI signals up to 50 meters (164 feet) over a single Cat6 Ethernet cable.
- Plug and Play with Advanced Control: Features bi-directional Power over Ethernet (PoE), bi-directional IR control, and RS232 pass-through. Includes automatic EDID management and is highly compatible with HDCP, HDMI 2.0, and CEC.
- Szeroka kompatybilność: Compatible with various HDMI source devices such as PCs, PS4, Xbox, DVD players, satellite boxes, cable boxes, and displays like TVs, monitors, and projectors.
- Wyjście HDMI: The transmitter unit includes an HDMI loop-out interface, allowing for a local display connection in addition to the extended display.
4. Specyfikacje
| Parametr | Wartość |
|---|---|
| Szerokość pasma częstotliwości | 18 Gb/s |
| Transmitter I/O Ports | 1x HDMI Female (Input), 1x HDMI Female (Output), 1x CAT6 (Output), 1x IR Transmitter, 1x IR Receiver, 1x RS232 |
| Receiver I/O Ports | 1x HDMI Female (Output), 1x CAT6 (Input), 1x IR Transmitter, 1x IR Receiver, 1x RS232 |
| Zasilacz | Prąd stały 12 V 2 A |
| Ochrona ESD (model ciała ludzkiego) | ± 8 kV (air gap discharge) / ± 4 kV (contact discharge) |
| Wymiary (dł. x szer. x wys.) | 120 × 70 × 20 mm (4.72 × 2.75 × 0.82 cala) |
| Temperatura pracy | 0°C ~ 40°C / 32°F ~ 104°F |
| Temperatura przechowywania | -20°C ~ 60°C / -4°F ~ 140°F |
| Wilgotność względna | 20 ~ 90% RH (bez kondensacji) |

Image: Physical dimensions of the extender unit, illustrating its compact size.
5. Konfiguracja i instalacja
Follow these steps to properly set up your eSynic HDMI Extender:
- Zidentyfikuj nadajnik i odbiornik: The units are labeled 'Transmitter' (TX) and 'Receiver' (RX). Familiarize yourself with the ports on each unit.
- Connect HDMI Source to Transmitter: Connect your HDMI source device (e.g., PC, PS4, DVD player) to the HDMI IN port on the Transmitter unit using a high-quality HDMI cable.
- (Optional) Connect Local Display: Jeśli chcesz mieć wyświetlacz lokalny blisko źródła, podłącz go do Wyjście HDMI (Loop Out) port on the Transmitter unit.
- Connect Transmitter to Receiver via Cat6 Cable: Połącz WYCIĄGNIJ portu na jednostce nadawczej do KOT W port on the Receiver unit using a single Cat6 Ethernet cable. Ensure the cable is of good quality and properly terminated for optimal performance, especially for 4K signals over 50 meters.
- Connect Display to Receiver: Connect your remote HDMI display (e.g., TV, monitor, projector) to the Wyjście HDMI port on the Receiver unit using an HDMI cable.
- Podłącz kable IR:
- Connect an IR Transmitter cable to the Wyjście IR port on the Transmitter unit and place its emitter head near the IR sensor of your HDMI source device.
- Connect an IR Receiver cable to the IR W portu na jednostce nadawczej.
- Connect an IR Transmitter cable to the Wyjście IR port on the Receiver unit and place its emitter head near the IR sensor of your remote display.
- Connect an IR Receiver cable to the IR W portu w jednostce odbiorczej.

Image: Bi-directional IR setup, demonstrating how to connect IR transmitters and receivers to control devices from either end of the extension.
- Podłącz zasilanie: Connect the included DC 12V2A power adapter to the Prąd stały 12 V port on either the Transmitter or Receiver unit. Due to PoE (Power over Ethernet) functionality, only one unit requires external power, and it will power the other unit through the Cat6 cable.
- Włączanie: Power on all connected devices (HDMI source, displays, and the extender). The system should automatically detect and display the video signal.
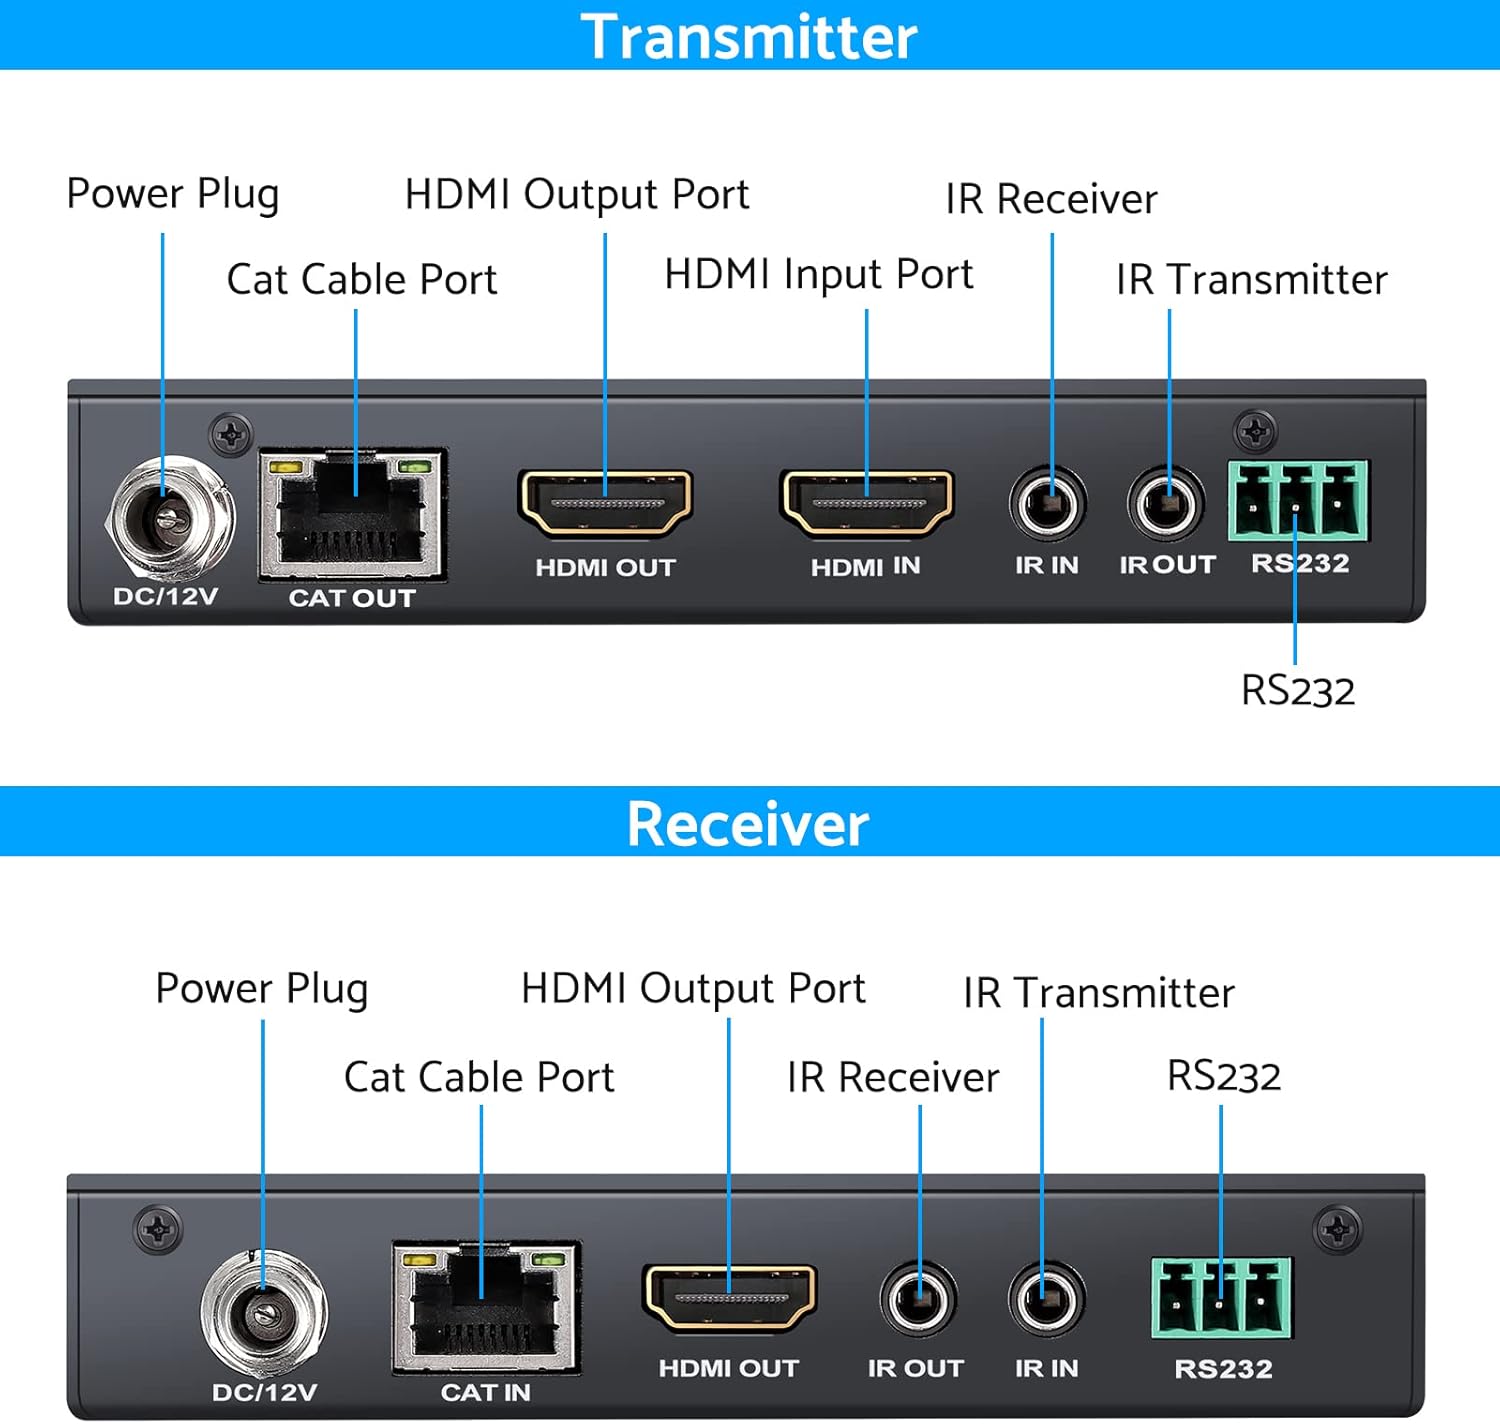
Obraz: Szczegółowy view of the ports on both the Transmitter and Receiver units, including HDMI In/Out, Cat Cable, IR In/Out, RS232, and Power.
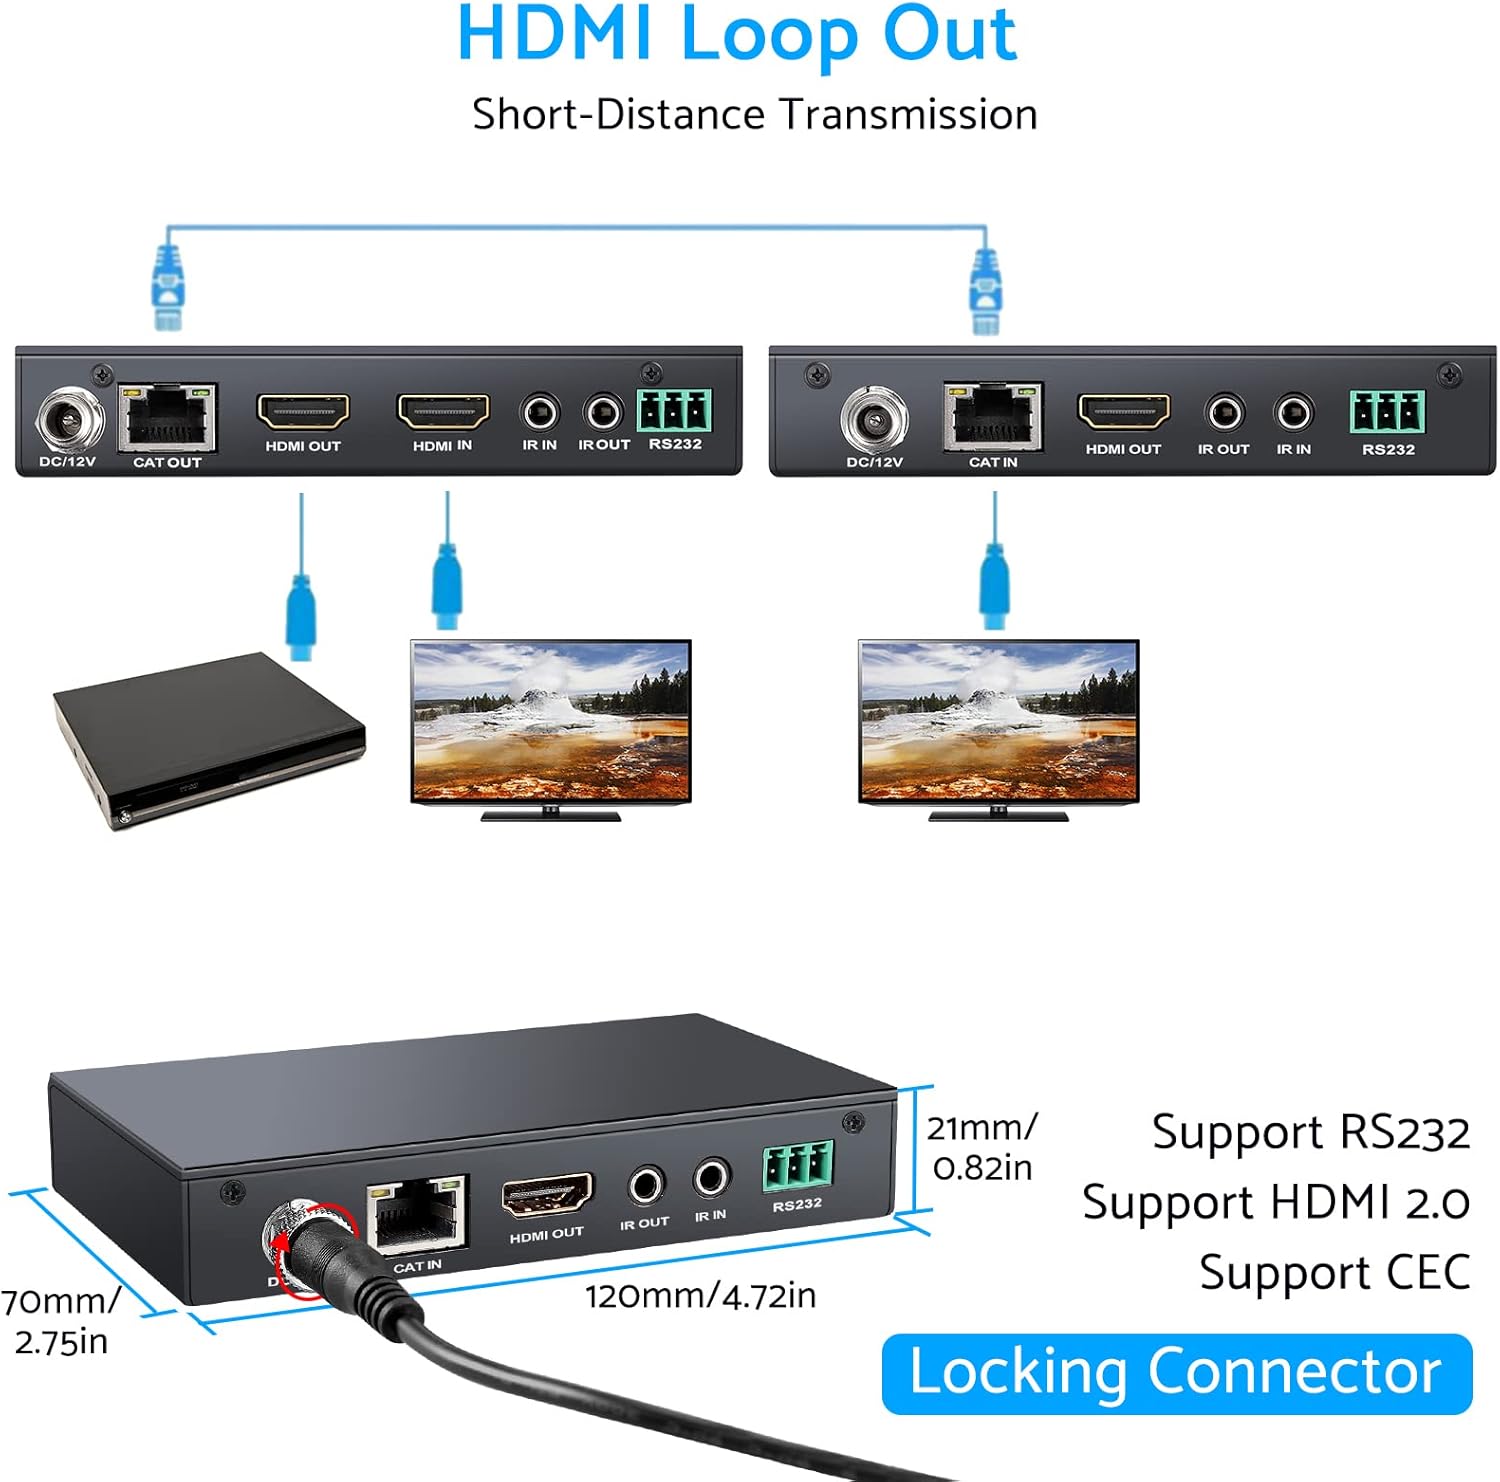
Image: Connection diagram for the HDMI Loop Out feature, showing a local display connected to the Transmitter.

Image: Illustration of the long-range transmission capability, connecting the Transmitter and Receiver units via a Cat6 cable over a distance of 50 meters.
6. Instrukcja obsługi
Once the setup is complete, the eSynic HDMI Extender operates largely automatically:
- Automatic EDID Management: The extender automatically manages EDID (Extended Display Identification Data) to ensure compatibility between your source and display devices, optimizing resolution and audio settings.
- Bi-Directional IR Control: Use your original remote control at either the source or display location to control the corresponding device. For example, you can control your DVD player from the remote TV location using its remote.
- RS232 Pass-Through: The RS232 ports allow for serial communication pass-through, enabling control of RS232-compatible devices over the extended distance.
- High-Quality Visuals and Audio: The extender supports 4K@60Hz resolution and various advanced audio formats, providing a high-fidelity experience.

Image: A visual representation of the extender's capability to deliver dynamic 4K@60Hz visuals and support various audio formats like Dolby Atmos and DTS-HD Master.
7. Konserwacja
To ensure the longevity and optimal performance of your eSynic HDMI Extender, follow these maintenance guidelines:
- Czyszczenie: Use a soft, dry cloth to clean the units. Avoid using liquid or aerosol cleaners, as they may damage the device.
- Środowisko: Keep the extender in a cool, dry place, away from direct sunlight, heat sources, and excessive humidity. Ensure adequate ventilation around the units.
- Obsługiwanie: Handle the units and cables with care. Avoid bending or crimping cables excessively, especially the Cat6 Ethernet cable, as this can affect signal integrity.
- Moc: Use only the provided DC 12V2A power adapter. Using an incorrect power supply may damage the device and void the warranty.
8. Rozwiązywanie Problemów
If you encounter issues with your HDMI Extender, please refer to the following troubleshooting steps:
- Brak wyjścia wideo/audio:
- Ensure all HDMI and Cat6 cables are securely connected to their respective ports.
- Verify that the power adapter is correctly connected and the unit is receiving power.
- Check if the HDMI source device and display are powered on and functioning correctly.
- Spróbuj podłączyć źródło HDMI bezpośrednio do wyświetlacza, aby sprawdzić, czy działają niezależnie.
- Ensure the Cat6 cable meets specifications (Cat6 or higher) and is not damaged.
- Reduce the length of the Cat6 cable if it is close to the maximum supported distance (50m/164ft).
- Poor Video Quality (Flickering, Distortion):
- Check the quality and integrity of the Cat6 cable. A damaged or low-quality cable can cause signal degradation.
- Ensure the HDMI cables are high-speed and suitable for 4K resolution.
- Try a different HDMI source or display to rule out compatibility issues.
- Sterowanie IR nie działa:
- Ensure the IR Transmitter and Receiver cables are correctly plugged into the Wyjście IR I IR W ports respectively.
- Verify that the IR emitter head is directly aligned with the IR sensor of the device you wish to control.
- Check if the remote control has fresh batteries and is functioning.
- Problemy z komunikacją RS232:
- Ensure RS232 cables are correctly wired and connected to the RS232 terminals on both units.
- Verify the baud rate and other serial communication settings on your control devices.
9. Gwarancja i wsparcie
For warranty information or technical support, please refer to the documentation provided with your purchase or contact your retailer/seller directly. Please have your product model number (LATHE116EU) and purchase details ready when contacting support.


