1. Wprowadzenie
Thank you for choosing the Hanchen HC Manual Stainless Steel Meat Grinder. This manual provides essential information for the safe and efficient operation, maintenance, and care of your new appliance. Please read it thoroughly before first use and keep it for future reference.
This manual meat grinder is designed for grinding various food items, including meat, vegetables, and nuts, and can also be used for making sausages and cookies. Its robust stainless steel construction ensures durability and food safety.
2. Instrukcje bezpieczeństwa
- Always ensure the grinder is securely fixed to a stable surface before operation.
- Keep hands and fingers away from the feeding opening and cutting blades during operation. Use the provided pushing rod to feed ingredients.
- Do not attempt to grind bones or other hard, non-food items, as this can damage the grinder.
- Przed użyciem upewnij się, że wszystkie części są prawidłowo zmontowane.
- Przed pierwszym użyciem i po każdym kolejnym użyciu dokładnie wyczyść wszystkie części.
- Store the grinder and its components in a dry place to prevent rust. Apply cooking oil to metal parts, especially blades, if storing for extended periods.
- Przechowywać w miejscu niedostępnym dla dzieci.
3. Koniec produktuview i komponenty
The Hanchen HC Manual Meat Grinder comes with several components designed for versatile food processing. Familiarize yourself with each part before assembly.

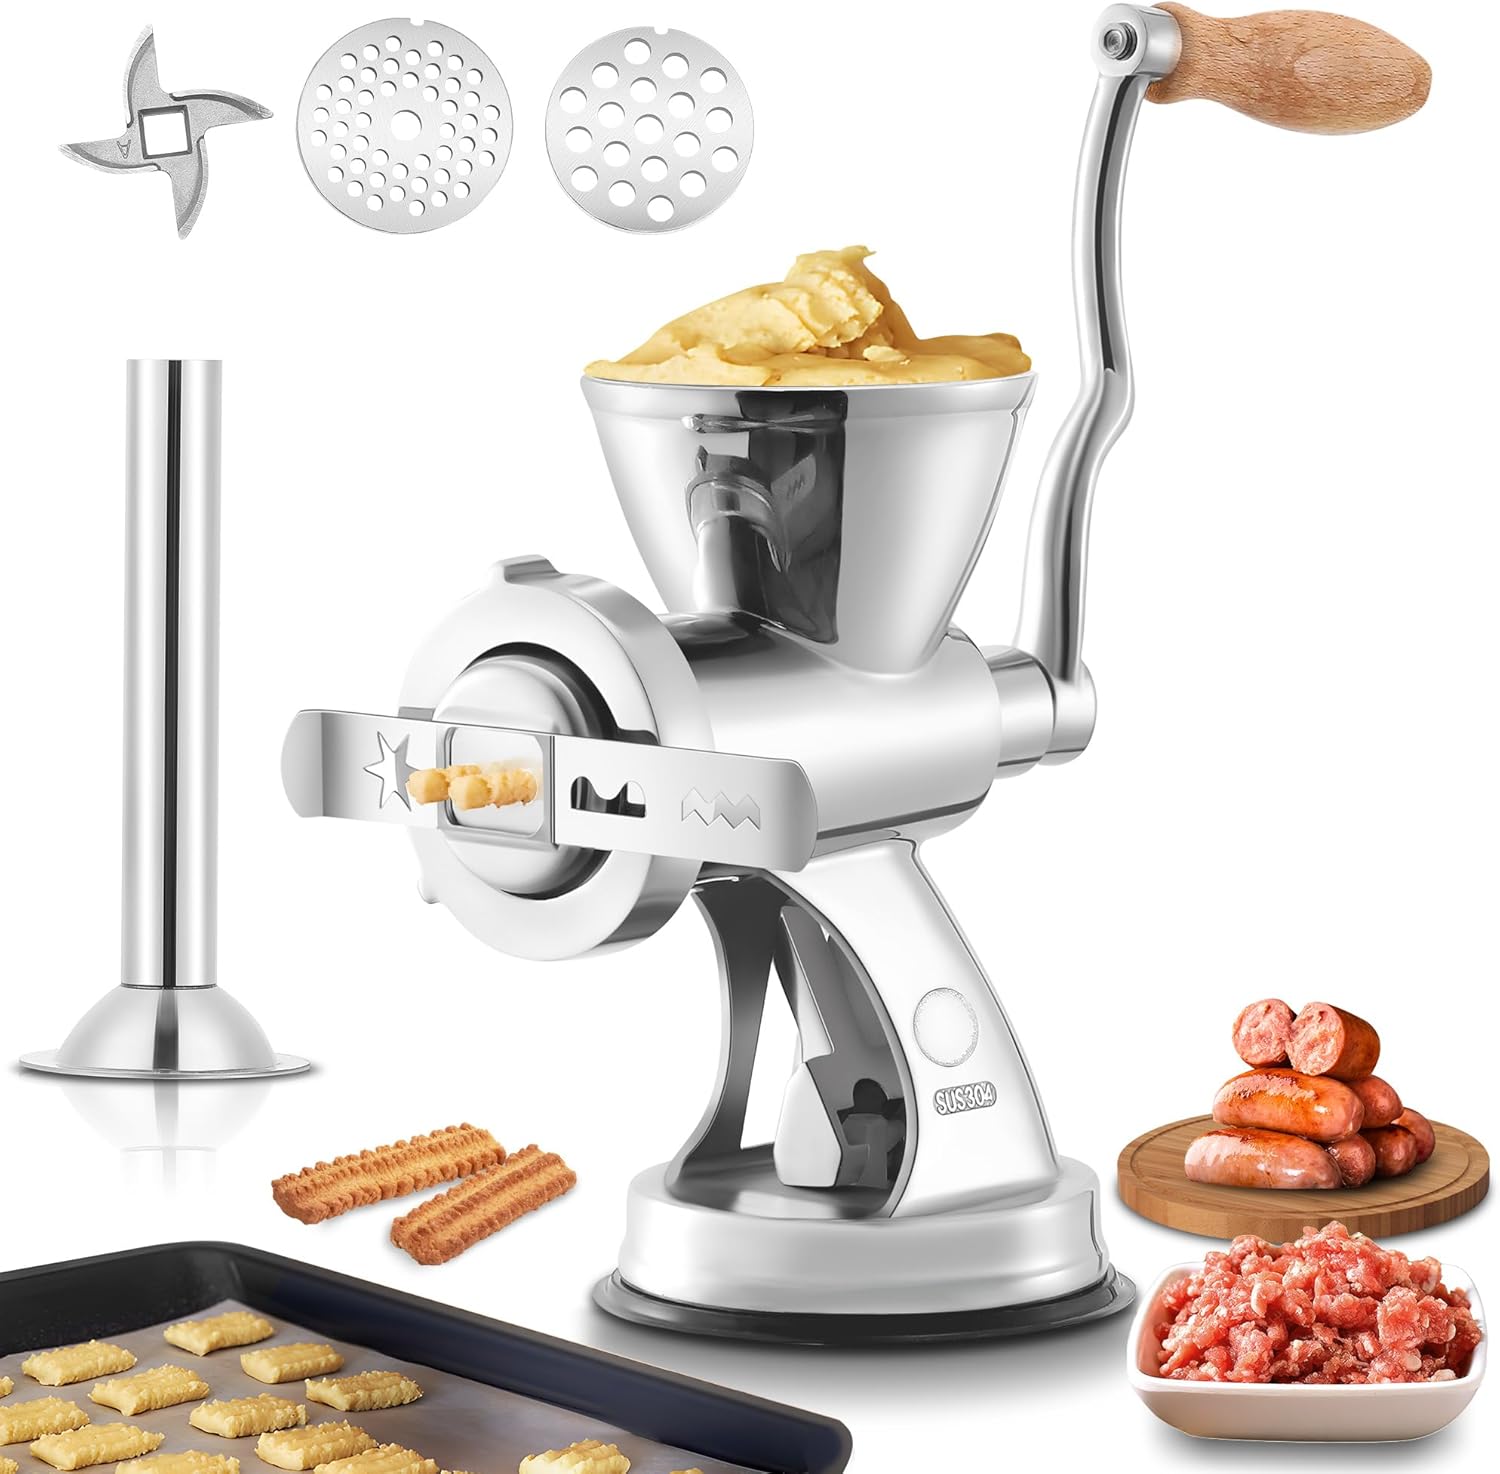
Rysunek 3.1: All components of the Hanchen HC Manual Meat Grinder. This image displays the main grinder body, the wooden handle, two cutting discs (5mm and 8mm), a cross blade, a screw auger, a sausage filling tube, a cookie board attachment, a pushing rod, and a cleaning brush.

Rysunek 3.2: Dimension drawing illustrating the grinder's size and key components. It shows the overall dimensions (e.g., 19cm height, 18cm width) and labels accessories like the 8mm and 4.5mm cutting discs, pushing rod, brush, cross blade, screw auger, and sausage filling tube.
Lista komponentów:
- Main Grinder Body: Stainless steel housing with feeding hopper and output barrel.
- Uchwyt: Wooden handle for manual operation.
- Screw Auger: Feeds ingredients towards the cutting blade.
- Ostrze krzyżowe: Sharp blade for cutting ingredients.
- Tarcze tnące: Two interchangeable discs (5mm and 8mm) for different grinding textures.
- Sausage Filling Tube: Attachment for making sausages.
- Cookie Board: Attachment for shaping cookies.
- Pushing Rod: For safely pushing ingredients into the hopper.
- Mocowanie Clamp: For securing the grinder to a countertop.
- Podstawa przyssawki: Alternative method for securing the grinder to a smooth surface.
- Szczotka do czyszczenia: Łatwe czyszczenie podzespołów.
4. Specyfikacje
| Parametr | Wartość |
|---|---|
| Model | HC |
| Materiał korpusu | Stal nierdzewna 304 |
| Cutting Plate Material | Stal nierdzewna 420 |
| Rozmiary płyt tnących | 5 mm, 8 mm |
| Input Opening Size | 9.3 cm |
| Masa netto | 2.9 kilogramów |
| Wymiary opakowania | Wymiary 30.2 x 22.7 x 18.3 cm |
5. Instalacja i montaż
Follow these steps to assemble your meat grinder and secure it for use.
5.1 Kroki montażu:
- Przed montażem należy upewnić się, że wszystkie elementy są czyste i suche.
- Insert the screw auger into the main grinder body.
- Place the cross blade onto the end of the screw auger, ensuring it is correctly oriented.
- Select the desired cutting disc (5mm or 8mm) and place it over the cross blade.
- Screw on the locking ring tightly to secure the cutting disc and blade.
- Attach the handle to the screw auger shaft at the back of the grinder body and secure it.
5.2 Securing the Grinder:
The grinder offers two methods for secure attachment to a countertop:

Rysunek 5.1: Illustration of the two methods to secure the grinder: the suction cup base and the fixing clamp.
- Suction Cup Fixation: Place the grinder on a clean, smooth, non-porous surface. Pull up the lever on the suction cup base to create a vacuum, firmly attaching the grinder to the desktop.
- Mocowanie Clamp: For table thicknesses between 1-5 cm, use the integrated clamp. Position the grinder on the edge of the table and tighten the screw of the clamp until it is firmly secured. It is recommended to place a cushion between the table and the clamp to protect your table surface.
6. Instrukcja obsługi
Prepare your ingredients and follow these steps for grinding.
Rysunek 6.1: The Hanchen HC Manual Meat Grinder ready for use, demonstrating its versatility for grinding meat, making sausages, and shaping cookies.
6.1 Preparing Ingredients:
- Mięso: Cut meat into pieces approximately 2 cm (0.8 inches) in size. Remove any bones, skin, or tough tendons to prevent damage to the grinder and ensure smooth operation.
- Warzywa: Cut vegetables like carrots, peppers, mushrooms, or garlic into manageable pieces that fit the feeding hopper.
- Orzechy: For nuts such as peanuts, walnuts, or almonds, ensure they are shelled. Harder nuts may require more effort to grind.
6.2 Grinding Process:
- Podstaw miskę lub pojemnik pod wylot młynka, aby zbierać przetworzoną żywność.
- Place the prepared ingredients into the feeding hopper.
- Slowly turn the handle clockwise. Use the pushing rod to gently guide ingredients into the auger. Nigdy nie używaj palców ani dłoni.
- Continue turning the handle until all ingredients are processed.

Rysunek 6.2: The grinder's applications, including sausage making with the sausage mouth, cookie shaping with the cookie board, and the output texture from 5mm and 7mm (or 8mm) cutting discs.
6.3 Sausage Making:
- Remove the cutting disc and cross blade.
- Attach the sausage filling tube to the grinder output and secure it with the locking ring.
- Przygotuj mieszankę kiełbasianą.
- Przesuń kiełbasę casing onto the filling tube.
- Feed the sausage mixture into the hopper and turn the handle to fill the casing. Przewodnik casing as it fills to create desired sausage links.
6.4 Cookie Shaping:
- Remove the cutting disc and cross blade.
- Attach the cookie board to the grinder output and secure it with the locking ring.
- Prepare your cookie dough.
- Feed the dough into the hopper and turn the handle. The dough will be extruded through the cookie board, forming shapes. Cut the dough to desired lengths.
7. Czyszczenie i konserwacja
Proper cleaning and maintenance will extend the life of your Hanchen HC Meat Grinder.

Rysunek 7.1: Cleaning process for the Hanchen HC Manual Meat Grinder, highlighting its detachable design for easy washing by hand or in a dishwasher.
- Demontaż: After each use, disassemble the grinder by reversing the assembly steps.
- Mycie: All metal accessories of the meat grinder are made of stainless steel and are dishwasher safe. For hand washing, rinse all parts under warm running water. Use the provided cleaning brush to remove any food residues from crevices and holes in the cutting discs and auger.
- Wysuszenie: Thoroughly dry all components immediately after washing to prevent water spots and potential rust.
- Składowanie: Store the clean and dry components in a dry place. If the machine will not be used for a long period, apply a thin layer of cooking oil to the cross blade and cutting discs before storage to further prevent rust. While stainless steel is rust-resistant, proper care is crucial for long-term durability.
8. Rozwiązywanie Problemów
This section addresses common issues you might encounter with your meat grinder.
| Problem | Możliwa przyczyna | Rozwiązanie |
|---|---|---|
| Trudno jest obrócić młynek. |
|
|
| Food is not grinding effectively. |
|
|
| Grinder is not stable on the countertop. |
|
|
9. Gwarancja i wsparcie
For warranty information or technical support, please refer to the purchase documentation or contact Hanchen customer service directly. Keep your proof of purchase for any warranty claims.
For further assistance, please visit the official Hanchen website or contact their support team through the details provided at the point of purchase.


