1. Wprowadzenie
Dziękujemy za zakupasing the E58 Eachine JY019 Foldable RC Quadcopter. This manual provides essential information for the safe operation, setup, and maintenance of your drone. Please read it thoroughly before first use to ensure proper functionality and to avoid damage.
1.1 Zawartość opakowania
Po otwarciu opakowania należy sprawdzić, czy znajdują się w nim wszystkie poniższe elementy:
- 1 x RC Quadcopter (2MP Camera)
- 1 x Nadajnik (Pilot)
- 1 x akumulator LiPo 3.7 V 500 mAh (do drona)
- 1 x kabel ładujący USB
- 4 x Protection Covers (Propeller Guards)
- 4 x Spare Blades (Propellers)
- 1 x śrubokręt
- 1 x Instrukcja obsługi (ten dokument)

Rysunek 1.1: Nadview of the E58 Eachine JY019 drone and its included accessories. The image displays the folded drone, remote controller, propellers, propeller guards, USB charging cable, screwdriver, and the drone battery.

Rysunek 1.2: The retail packaging for the JY019 Pocket Drone, showing the drone in both folded and unfolded states, along with the remote controller. This image confirms the product model and its compact design.
2. Wytyczne bezpieczeństwa
Aby zapobiec obrażeniom lub uszkodzeniom, należy przestrzegać następujących środków ostrożności:
- Dronem należy zawsze posługiwać się na otwartej przestrzeni, z dala od ludzi, zwierząt, budynków i przeszkód.
- Nie lataj przy silnym wietrze lub niesprzyjających warunkach pogodowych.
- Keep a safe distance from the rotating propellers. Do not touch them during operation.
- Przed każdym lotem upewnij się, że akumulator drona jest w pełni naładowany.
- Nie przeładowuj akumulatora.
- Nadzoruj dzieci, gdy sterują dronem.
- Nie należy podejmować prób modyfikacji lub demontażu drona ani jego podzespołów.
- Turn off the drone and remote controller when not in use.
- Baterie należy utylizować zgodnie z lokalnymi przepisami.
3. Koniec produktuview
3.1 Funkcje drona
- Składana konstrukcja: Kompaktowy i przenośny, łatwy w transporcie.
- HD 2.0MP Camera: 120° Wide-Angle lens for high-resolution images and videos (720P).
- Tryb utrzymywania wysokości: Maintains a consistent altitude for stable flight and video recording.
- Trajektoria lotu: Allows drawing a flight path on your mobile device for the drone to follow.
- Jeden kluczowy start/lądowanie: Ułatwia rozpoczęcie i zakończenie lotu.
- Obrót o 360°: Performs aerial stunts with a single button.
- Żyroskop 6-osiowy: Provides stable and easy control.

Rysunek 3.1: Illustration of the drone's 120° wide-angle 720P HD camera, highlighting its field of view and image capture capabilities. A simulated phone screen shows the live video feed from the drone.

Rysunek 3.2: Dimensions of the E58 Eachine JY019 drone. The image shows the drone both folded (12.5cm x 7.5cm x 5cm) and unfolded (27cm x 19.5cm x 5cm), demonstrating its compact and portable design.
3.2 Układ pilota zdalnego sterowania
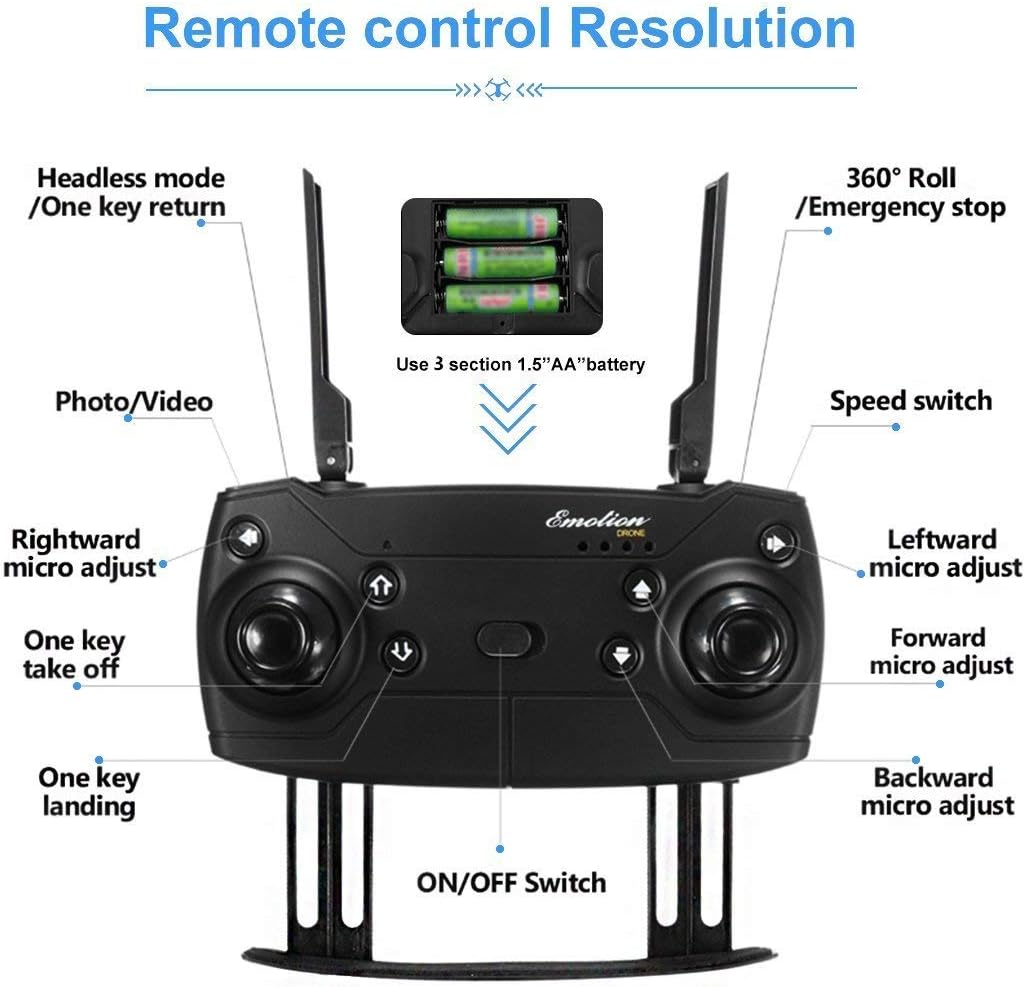
Rysunek 3.3: Detailed layout of the remote controller for the E58 Eachine JY019 drone. Key functions such as Headless mode/One key return, 360° Roll/Emergency stop, Photo/Video button, Speed switch, One key take off/landing, and various micro-adjustments (rightward, leftward, forward, backward) are clearly labeled. The battery compartment for 3 x 1.5V AA batteries is also indicated.
Familiarize yourself with the remote controller's buttons and joysticks:
- Lewy joystick: Kontroluje wysokość (w górę/w dół) i obrót (w lewo/w prawo).
- Prawy joystick: Controls forward/backward and left/right flight.
- One Key Take Off/Landing Button: Inicjuje automatyczny start lub lądowanie.
- Przycisk zdjęcia/wideo: Robienie zdjęć lub rozpoczynanie/zatrzymywanie nagrywania wideo.
- Przełącznik prędkości: Adjusts flight speed (e.g., low, medium, high).
- Headless Mode/One Key Return: Activates headless mode or returns the drone to the take-off point.
- 360° Roll/Emergency Stop: Performs a 360-degree flip or initiates an emergency stop.
- Przyciski przycinania: Fine-tune the drone's stability (forward/backward, left/right, rotation).
- Przycisk zasilania: Włącza/wyłącza kontroler.
4. Konfiguracja
4.1 Ładowanie akumulatora drona
- Connect the 3.7V 500mAh Lipo Battery to the USB Charging Cable.
- Plug the USB Charging Cable into a USB power source (e.g., computer USB port, USB wall adapter).
- The charging indicator light will show the charging status. Charging time is approximately 60-70 minutes.
- Po całkowitym naładowaniu odłącz akumulator od ładowarki.
4.2 Montaż akumulatora drona
- Upewnij się, że dron jest wyłączony.
- Znajdź komorę baterii w dronie.
- Carefully insert the charged 3.7V 500mAh Lipo Battery into the compartment.
- Zabezpiecz pokrywę baterii.

Rysunek 4.1: Z bliska view of the drone's battery compartment, showing the slot where the Lipo battery is inserted. The image illustrates the mechanism for securing the battery.
4.3 Instalowanie baterii nadajnika
- Otwórz pokrywę baterii z tyłu pilota.
- Włóż 3 baterii AA 1.5 V, zwracając uwagę na prawidłową polaryzację (+/-).
- Dokładnie zamknij pokrywę baterii.
4.4 Przygotowanie drona
- Carefully pull out all four arms of the drone until they are fully extended and locked into place.
- Umieść drona na płaskiej, poziomej powierzchni.
- (Optional) Attach the propeller protection covers for added safety, especially for beginners.

Rysunek 4.2: Quick start guide showing the initial steps for preparing the drone for flight. This includes unfolding the drone arms and placing it on a flat surface, as well as turning on the remote controller.
5. Instrukcja obsługi
5.1 Parowanie drona i kontrolera
- Włącz drona, naciskając przycisk zasilania. Diody kontrolne drona zaczną migać.
- Włącz pilota za pomocą wyłącznika zasilania.
- Push the left throttle joystick fully up and then pull it fully down. The drone's lights will stop flashing and become solid, indicating successful pairing.
- For more stable flight, it is recommended to calibrate the gyroscope after pairing. Push both joysticks 45 degrees towards the outside bottom corners simultaneously until the lights flash and then become solid again.
5.2 One Key Take Off / Landing

Rysunek 5.1: Visual guide demonstrating the One Key Take Off and One Key Landing functions. The drone is shown ascending from a launch pad for take-off and descending for landing, simplifying flight control.
- Jeden kluczowy start: After pairing and calibration, press the "One Key Take Off" button. The drone will automatically ascend and hover at a certain altitude.
- Jedno kluczowe lądowanie: During flight, press the "One Key Landing" button. The drone will slowly descend and land gently on the ground.
5.3 Podstawowe sterowanie lotem
- Wspinaczka/Spadanie: Przesuń lewy joystick do góry, aby wznieść się, lub pociągnij w dół, aby zejść.
- Skręć w lewo w prawo: Push the left joystick left to turn left, push right to turn right.
- Naprzód wstecz: Przesuń prawy joystick do góry, aby lecieć do przodu, lub pociągnij w dół, aby lecieć do tyłu.
- Lataj w lewo/prawo (bokiem): Przesuń prawy joystick w lewo, aby lecieć w lewo, przesuń go w prawo, aby lecieć w prawo.
5.4 Funkcje specjalne
- Tryb utrzymywania wysokości: The drone automatically maintains its current altitude, allowing for stable hovering and easier control, especially for photography and videography. This function is achieved by analyzing air pressure data.
- Obrót o 360°: To perform a 360-degree flip, press the "360° Roll" button and then push the right joystick in the desired flip direction (forward, backward, left, or right). Ensure sufficient altitude before attempting.
- Trajektoria lotu: (Requires mobile app connection) Open the dedicated mobile app and select the trajectory flight mode. Draw a desired flight path on your phone screen, and the drone will automatically follow the recorded route.
- Tryb bezgłowy: When activated, the drone's orientation becomes irrelevant to the controller's direction. The drone will move relative to the pilot's perspective, making it easier for beginners to control.
- Jeden kluczowy powrót: In headless mode, pressing the "One Key Return" button will cause the drone to fly back towards the take-off point.

Rysunek 5.2: Explanation of the 360° Flip and Altitude Hold features. The image illustrates the drone performing a flip and maintaining a stable height, emphasizing the benefits of the atmospheric pressure sensor for stable hovering.
5.5 Camera Operation (2MP HD)
The drone is equipped with a 2MP HD camera capable of 720P video recording. To utilize the camera features:
- Połączenie z aplikacją mobilną: Download and install the recommended mobile application (refer to the product packaging or quick start guide for app name/QR code). Connect your smartphone to the drone's Wi-Fi network.
- Transmisja na żywo FPV: Once connected, the live view from the drone's camera will be displayed directly on your phone screen (FPV Range: About 30m).
- Robienie zdjęć: Press the "Photo/Video" button on the remote controller once to take a photo. Photos will be saved to your phone's album via the app.
- Nagrywanie filmów wideo: Press and hold the "Photo/Video" button to start video recording. Press and hold again to stop recording. Videos will be saved to your phone's album via the app.
6. Konserwacja
- Czyszczenie: Do czyszczenia drona i pilota używaj miękkiej, suchej ściereczki. Nie używaj silnych środków chemicznych ani rozpuszczalników.
- Kontrola śmigła: Regularly check propellers for damage (bends, cracks). Replace any damaged propellers using the provided spare blades and screwdriver.
- Pielęgnacja baterii: Przechowuj baterie w chłodnym, suchym miejscu. Nie przechowuj w pełni naładowanych ani całkowicie rozładowanych baterii przez dłuższy czas. W przypadku długotrwałego przechowywania naładuj je do około 50%.
- Składowanie: When not in use, fold the drone arms and store it in a safe, dry place away from direct sunlight and extreme temperatures.
7. Rozwiązywanie Problemów
| Problem | Możliwa przyczyna | Rozwiązanie |
|---|---|---|
| Dron nie reaguje na polecenia kontrolera. | Not paired; low battery (drone/controller); interference. | Re-pair drone and controller. Charge/replace batteries. Fly in an open area away from other Wi-Fi signals. |
| Dron dryfuje w czasie lotu. | Brak skalibrowania; nierówna powierzchnia przy starcie; wiatr. | Perform gyroscope calibration on a flat surface. Use trim buttons to adjust. Avoid flying in windy conditions. |
| Śmigła się nie kręcą. | Obstruction; motor damage; battery not connected. | Check for tangled hair/debris. Ensure battery is properly connected. Contact support if motors are damaged. |
| Poor camera image/video quality. | Low light; camera lens dirty; unstable flight. | Ensure good lighting. Clean camera lens. Fly in Altitude Hold mode for stability. |
| Krótki czas lotu. | Akumulator nie jest w pełni naładowany; akumulator jest stary; latanie jest agresywne. | Upewnij się, że bateria jest w pełni naładowana. Rozważ wymianę starych baterii. Lataj bardziej delikatnie. |
8. Specyfikacje
| Funkcja | Szczegół |
|---|---|
| Typ przedmiotu | RC Quadcopter |
| Model | sbn (JY019) |
| Czas lotu | 7-9 minut |
| Odległość R / C | 80-100 metrów |
| Zasięg FPV | Około 30 metrów |
| Czas ładowania | 60-70 minut |
| Bateria Quadcopter | 3.7V 500mAh Lipo (Included) |
| Bateria nadajnika | 3 x 1.5V AA battery (NOT Included) |
| Częstotliwość | 2.4G |
| Kanał | 4 kanały |
| Żyroskop | 6 oś |
| Silnik | Silnik bezrdzeniowy 0720 |
| Masa startowa | Około 120g |
| Kolor | Czarny |
| Kamera | 2MP (720P HD) |
| Quadcopter Size (unfolded) | 27cm x 19.5cm x 5cm |
| Quadcopter Size (folded) | 12.5cm x 7.5cm x 5cm |
| Quadcopter Weight (with battery) | 96g |
| Quadcopter Weight (without battery) | 77.5g |
9. Gwarancja i wsparcie
Specific warranty information for this product is not provided in this manual. Please refer to the product packaging, the seller's website, or contact the retailer where you purchased the drone for details regarding warranty coverage and customer support.
For technical assistance or further inquiries, please contact the product's manufacturer or the authorized distributor.


