SUGON T3602
Instrukcja obsługi profesjonalnej stacji lutowniczej SUGON T3602
Model: T3602
1. Wprowadzenie
This user manual provides detailed instructions for the safe and efficient operation of the SUGON T3602 Professional Soldering Station. The T3602 is a high-performance, dual-channel soldering station designed for precision welding, featuring rapid heat-up times and independent temperature control for two soldering handles. Please read this manual thoroughly before using the device to ensure proper function and safety.
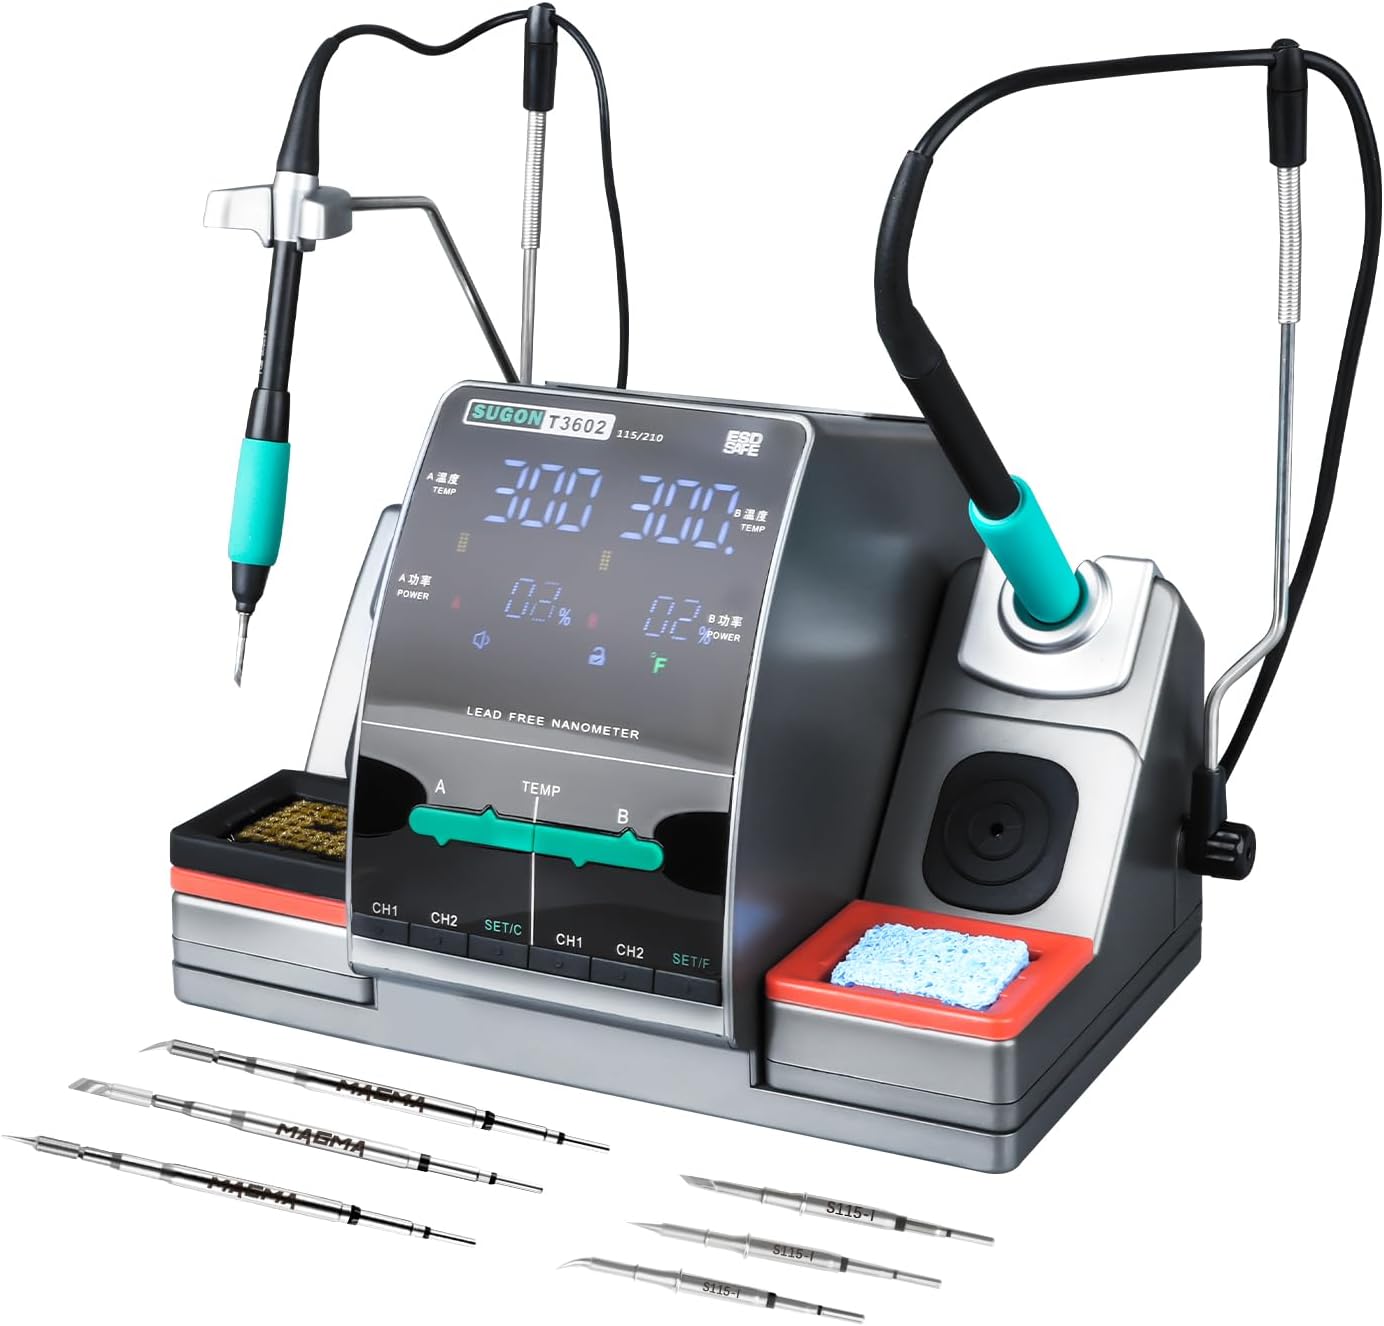
Figure 1.1: SUGON T3602 Professional Soldering Station with included tips.
This image displays the complete SUGON T3602 soldering station, showcasing its compact design, dual soldering iron handles, and the assortment of soldering tips provided with the unit. The station features a central display and control panel, flanked by two soldering iron holders with cleaning accessories.
2. Informacje dotyczące bezpieczeństwa
Always observe the following safety precautions to prevent injury or damage to the soldering station:
- Ensure the soldering station is connected to a properly grounded power outlet.
- Do not operate the station in damp lub w wilgotnych warunkach.
- Soldering irons reach very high temperatures. Avoid direct contact with the tip and allow it to cool before handling.
- Use adequate ventilation to disperse fumes generated during soldering.
- Always place the soldering iron in its designated holder when not in use.
- Unplug the unit from the power source before cleaning or maintenance.
- Przechowywać w miejscu niedostępnym dla dzieci.
3. Zawartość opakowania
Sprawdź, czy w przesyłce znajdują się wszystkie elementy wymienione poniżej:
- 1 x SUGON T3602 Soldering Station Unit
- 1 x 115 Soldering Handle
- 1 x 210 Soldering Handle
- 6 x Soldering Iron Tips (various models, including 115 and 210 types)
- 1 x przewód uziemiający
- 1 x kabel zasilający
- 1 x Wire Brush for tip cleaning
- 1 x Gąbka do czyszczenia

Figure 3.1: Included 115 and 210 model soldering iron tips.
This image illustrates the different types of soldering iron tips included with the SUGON T3602, specifically highlighting the 115 and 210 models, which are suitable for various precision welding applications.
4. Koniec produktuview
Familiarize yourself with the components of your SUGON T3602 Soldering Station:

Figure 4.1: Labeled components of the SUGON T3602.
Ten diagram przedstawia przejrzysty obrazview of the SUGON T3602 soldering station, labeling key components such as Handle A, Handle B, the display area, temperature adjustment controls, quick soldering tip changer, copper wire cleaning ball, cleaning sponge, save keys (CH1, CH2), and set keys (SET/C, SET/F).
- Obszar wyświetlania: Shows temperature, power, and status indicators.
- Handle A / Handle B: Connectors for the two soldering iron handles.
- Regulacja temperatury: Controls for setting the desired temperature for each channel.
- CH1 / CH2 Buttons: Memory channels for quick temperature recall.
- SET/C / SET/F Buttons: Used for setting parameters and switching temperature units.
- Quick Soldering Tip Changer: Mechanism for easy and safe tip replacement.
- Copper Wire Cleaning Ball / Cleaning Sponge: Integrated tools for soldering tip maintenance.
5. Konfiguracja
- Umieszczenie: Place the soldering station on a stable, heat-resistant, and non-flammable surface. Ensure adequate space for ventilation around the unit.
- Podłączenie zasilania: Connect the power cable to the station and then to a grounded 110V AC power outlet.
- Podłączenie przewodu uziemiającego: If applicable, connect the ground wire to an appropriate grounding point.
- Montaż klamki i końcówki:
- Insert the 115 handle into the designated port (e.g., Handle A) and the 210 handle into the other port (Handle B).
- Select the desired soldering tip (115 or 210 model) and insert it firmly into the corresponding soldering iron handle. Ensure the tip is securely seated.

Figure 5.1: Proper insertion of a soldering iron tip into the handle.
This image demonstrates the correct method for inserting a soldering iron tip into its handle, ensuring a secure and stable connection for optimal performance.
- Przygotuj akcesoria do czyszczenia: If using the cleaning sponge, dampen it slightly with water before use.
6. Instrukcja obsługi
- Włączanie: Press the power button to turn on the soldering station. The LCD display will illuminate.
- Regulacja temperatury:
The T3602 features independent temperature control for Handle A and Handle B. The temperature range is 212-842°F (100-450°C).
- Use the dedicated temperature adjustment controls for Area A and Area B on the front panel to set the desired temperature.
- The LCD touch screen allows for precise temperature input and monitoring.

Figure 6.1: Independent temperature control for A/B zones.
This image highlights the independent temperature adjustment capability for both A and B zones on the soldering station, allowing users to set and recall specific temperatures for each handle without interference.

Figure 6.2: Adjusting temperature via the touch interface.
This image shows a finger interacting with the touch-sensitive temperature adjustment bar on the display, illustrating how users can precisely control the heat settings for their soldering tasks.
- Przełączanie jednostek temperatury:
The station supports switching between Fahrenheit (°F) and Celsius (°C).
- Press the SET/C or SET/F button to toggle between the temperature units.

Figure 6.3: Display showing temperature unit switching.
This image illustrates the soldering station's display as it switches between Celsius (°C) and Fahrenheit (°F) temperature units, demonstrating the user's ability to select their preferred measurement system.
- Memory Channels (CH1, CH2):
The station allows you to save and recall frequently used temperature settings.
- Ustaw żądaną temperaturę.
- Press and hold the CH1 or CH2 button for a few seconds to save the current temperature to that channel.
- Press the CH1 or CH2 button briefly to recall the saved temperature.

Figure 6.4: Saving and recalling temperature settings using CH1 and CH2 buttons.
This image shows a finger pressing the CH1 and CH2 buttons, indicating the process of saving or recalling preset temperature settings for quick access during soldering operations.
- Automatyczny tryb uśpienia:
When a soldering handle is placed in its corresponding holder, the station will automatically enter a sleep state to conserve energy and prolong tip life. The corresponding area will quickly resume operation when the handle is lifted.
- Jednoczesna praca:
The T3602 allows both soldering handles (A and B) to operate simultaneously, each with its independently set temperature, significantly improving work efficiency for tasks requiring different temperature settings or multiple users.

Figure 6.5: Dual soldering handles in simultaneous operation.
This image demonstrates the SUGON T3602's capability to operate two soldering handles concurrently, each maintaining its own temperature, which is ideal for complex tasks or collaborative work.
- Szybkie ogrzewanie:
The station features 240 watts of high power, enabling rapid heating of the soldering tips. This allows the station to reach operational temperature quickly, minimizing waiting time.

Figure 6.6: Illustration of rapid heating capability.
This image visually represents the rapid heating feature of the soldering station, showing the quick temperature rise to 716°F in approximately 2 seconds, highlighting its efficiency.
- Wyłączanie: Press and hold the power button to turn off the station. Allow soldering tips to cool completely before storing.
7. Konserwacja
- Czyszczenie grotu lutowniczego:
- Regularly clean soldering tips using the provided copper wire cleaning ball or the damp cleaning sponge. This removes excess solder and oxidation, ensuring optimal performance and tip longevity.
- For stubborn residue, use a tip tinner or activator.
- Ogólne sprzątanie:
Wipe the exterior of the soldering station with a soft, dry cloth. Do not use abrasive cleaners or solvents. Ensure the unit is unplugged and cool before cleaning.
- Składowanie:
Store the soldering station in a dry, dust-free environment when not in use. Ensure all components are cool before storage.
8. Rozwiązywanie Problemów
| Problem | Możliwa przyczyna | Rozwiązanie |
|---|---|---|
| Stacja nie włącza się. | Brak zasilania, uszkodzony kabel zasilający, usterka wewnętrzna. | Check power cable connection and outlet. Try a different outlet. If problem persists, contact customer support. |
| Lutownica się nie nagrzewa. | Handle not properly connected; faulty tip; internal fault. | Ensure handle is fully inserted. Try replacing the soldering tip. If issue continues, contact customer support. |
| Temperatura niestabilna lub niedokładna. | Tip not properly seated; dirty tip; sensor issue. | Re-seat the tip. Clean the tip thoroughly. Ensure the station is on a stable surface away from drafts. |
| Wyświetlacz nie działa prawidłowo. | Błąd oprogramowania; problem sprzętowy. | Try restarting the station. If the problem persists, contact customer support. |
9. Specyfikacje
| Funkcja | Szczegół |
|---|---|
| Numer modelu | T3602 |
| Producent | SUGON |
| Moc wejściowa | 110 V prądu zmiennego |
| Cotage | 240 watów |
| Liczba kanałów | 2 |
| Zakres temperatur | 212 - 842°F (100 - 450°C) |
| Stabilność temperatury | Maintains stable temperature up to 842°F |
| Typ wyświetlacza | LCD |
| Tworzywo | Stal nierdzewna |
| Wymiary produktu (dł. x szer. x wys.) | 8.7 x 7 x 9.6 cala |
| Waga przedmiotu | 10.73 funta |
| Zawarte komponenty | 1 x 115 Handle, 1 x 210 Handle, 1 x Ground Wire, 1 x Power Cable, 1 x wire brush |
| UPC | 784121417069 |
10. Gwarancja
The SUGON T3602 Professional Soldering Station comes with a 12-miesięczna gwarancja od daty zakupu. Niniejsza gwarancja obejmuje wady produkcyjne i usterki powstałe w wyniku normalnego użytkowania. Prosimy zachować dowód zakupu na wypadek roszczeń gwarancyjnych. Gwarancja nie obejmuje uszkodzeń spowodowanych niewłaściwym użytkowaniem, wypadkami, nieautoryzowanymi modyfikacjami lub niewłaściwą konserwacją.
11. Obsługa klienta
For technical assistance, troubleshooting beyond this manual, or warranty inquiries, please contact SUGON customer support. Refer to the product packaging or the manufacturer's official webna tej stronie znajdziesz najbardziej aktualne dane kontaktowe.
Naszym celem jest dostarczanie wysokiej jakości produktów i wsparcia, aby zagwarantować Państwu satysfakcję.