1. Wprowadzenie
This manual provides detailed instructions for the setup, operation, and maintenance of your WISE TIGER LED Digital Alarm Clock (Model CK-LED1302). Please read this manual thoroughly before use to ensure proper functionality and to maximize your product experience.

Image 1.1: WISE TIGER LED Digital Alarm Clock and its remote control.
2. Zawartość opakowania
Sprawdź, czy w przesyłce znajdują się wszystkie elementy:
- WISE TIGER LED Digital Alarm Clock (Model CK-LED1302)
- Zdalne sterowanie
- Kabel zasilający USB
- Instrukcja obsługi (ten dokument)
- Fixed Bracket (for desk placement)
3. Koniec produktuview
The WISE TIGER LED Digital Alarm Clock features a modern 3D design, offering clear time display and multiple functions for various environments.
3.1 Główne cechy
- Wyświetlacz czasu: Format 12-godzinny lub 24-godzinny.
- Wyświetlanie kalendarza: Shows date.
- Budzik: With snooze function.
- Wyświetlacz temperatury: Pokazuje temperaturę otoczenia.
- Regulowana jasność: Automatic brightness sensor and manual adjustment via remote control.
- Funkcja nocnego światła: Zapewnia łagodne oświetlenie.
- Funkcja pamięci: Built-in battery retains time settings for 4-8 hours during power disconnection.
- Wszechstronne rozmieszczenie: Suitable for desk or wall mounting.

Image 3.1: Visual representation of the clock's main functions.
3.2 Składniki
Aby uzyskać więcej informacji, zapoznaj się z poniższym schematemview of the clock's components and connection points.
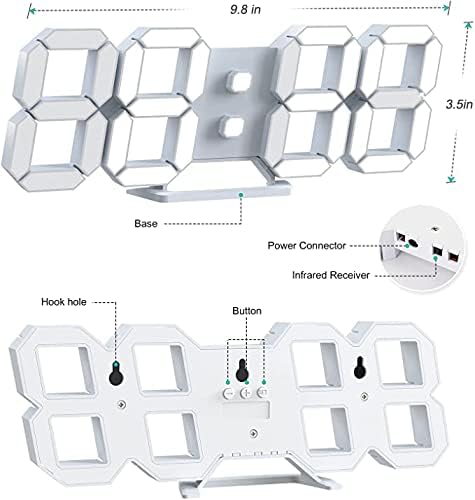
Obraz 3.2: Tył view and dimensions of the clock, highlighting the power connector, infrared receiver, and mounting options.
- Wyświetlacz: Large 3D LED digits for time, date, and temperature.
- Opierać: Removable stand for desk placement.
- Złącze zasilania: Port USB do zasilania.
- Odbiornik podczerwieni: Do sygnałów zdalnego sterowania.
- Hook Holes: Do montażu na ścianie.
- Przyciski sterujące: Located on the back for basic settings (Power, Up, Down, Set).
4. Konfiguracja
4.1 Połączenie zasilania
- Connect the provided USB power cable to the power connector on the back of the clock.
- Podłącz drugi koniec kabla USB do standardowego zasilacza USB (nie ma go w zestawie) lub do portu USB komputera.
- Zegar włączy się i wyświetli godzinę.
The clock is powered by the USB cable only. A built-in battery serves to record time settings when power is disconnected, ensuring settings are retained for 4-8 hours.

Image 4.1: Explanation of the clock's power and memory function.
4.2 Opcje rozmieszczenia
The clock can be used as a desk clock or a wall clock.
- Umiejscowienie biurka: Attach the fixed bracket to the bottom of the clock. The angle of the bracket can be adjusted for optimal viewing.
- Montaż na ścianie: Remove the fixed bracket if attached. Use the installation slots (hook holes) on the back of the clock to hang it securely on a wall using appropriate fasteners (not included).

Image 4.2: The clock configured for wall mounting and desk placement.
5. Instrukcja obsługi
The clock's functions are primarily controlled using the included remote control. Basic settings can also be adjusted via the buttons on the back of the clock.
5.1 Ustawianie czasu i daty
- Naciśnij CZAS button on the remote control to enter time setting mode.
- Użyj UP I W DÓŁ strzałki, aby ustawić godzinę.
- Naciskać CZAS again to move to minute setting, then use UP I W DÓŁ dostosować.
- Kontynuuj naciskanie CZAS aby przełączać się między ustawieniami roku, miesiąca i dnia, dostosowując każde z nich UP I W DÓŁ.
- Naciskać CZAS ostatni raz lub poczekaj kilka sekund, aż ustawienia zostaną zapisane automatycznie.
5.2 Format 12/24-godzinny
Aby przełączać się między formatem czasu 12-godzinnym i 24-godzinnym, naciśnij przycisk 12/24 godziny przycisk na pilocie.

Obraz 5.1: Example of 12-hour and 24-hour time display.
5.3 Ustawianie alarmu
- Naciśnij ALARM button on the remote control to enter alarm setting mode.
- Użyj UP I W DÓŁ strzałki, aby ustawić żądaną godzinę alarmu.
- Naciskać ALARM again to move to minute setting, then use UP I W DÓŁ dostosować.
- Naciskać ALARM one last time or wait for the settings to save.
- Aby aktywować/dezaktywować alarm, naciśnij przycisk ALARM button briefly outside of setting mode. An alarm icon will appear/disappear on the display.
5.4 Funkcja drzemki
Gdy zabrzmi alarm, naciśnij DRZEMKA button on the remote control to temporarily silence the alarm. The alarm will sound again after a set interval (typically 5-10 minutes).

Image 5.2: The snooze alarm function in use.
5.5 Regulacja jasności
Zegar posiada automatyczną i ręczną regulację jasności.
- Automatyczna jasność: The built-in sensor automatically adjusts the display brightness based on ambient light conditions.
- Ręczna jasność: Naciśnij JASNY button on the remote control to cycle through different brightness levels (e.g., high, medium, low).

Image 5.3: Automatic brightness adjustment based on ambient light.

Image 5.4: Manual adjustment through three brightness levels.
5.6 Wyświetlacz temperatury
The clock automatically displays the ambient temperature. No manual adjustment is typically required for this function.
6. Konserwacja
To ensure the longevity and optimal performance of your WISE TIGER LED Digital Alarm Clock, follow these maintenance guidelines:
- Czyszczenie: Do wycierania wyświetlacza i ekranu należy używać miękkiej, suchej ściereczki.asing. Avoid abrasive cleaners, solvents, or spray cleaners directly on the clock.
- Moc: Zawsze używaj dołączonego kabla USB do zasilania. Upewnij się, że źródło zasilania jest stabilne.
- Środowisko: Trzymaj zegar z dala od ekstremalnych temperatur, bezpośredniego światła słonecznego i wysokiej wilgotności.
- Zdalne sterowanie: Store the remote control in a safe place to prevent loss or damage. Ensure batteries are replaced when needed (typically 2 Lithium Ion batteries, included).
7. Rozwiązywanie Problemów
Jeśli masz problemy z zegarem, zapoznaj się z poniższymi typowymi problemami i ich rozwiązaniami:
| Problem | Możliwa przyczyna | Rozwiązanie |
|---|---|---|
| Zegar nie włącza się | Brak zasilania lub luźne połączenie | Ensure USB cable is securely connected and power source is active. Try a different USB port or adapter. |
| Pilot nie działa | Remote batteries are dead or remote is out of range/blocked | Replace remote control batteries. Ensure remote is pointed at the clock's infrared receiver (refer to Image 3.2) and within 8 meters. Remove any obstructions. |
| Czas jest niedokładny | Time was not set precisely | Reset the time carefully, ensuring you set it at the exact second of the desired time. |
| Wyświetlacz jest zbyt ciemny lub zbyt jasny | Brightness setting needs adjustment | Naciśnij JASNY button on the remote to cycle through manual brightness levels. Check if automatic brightness is functioning correctly in different light conditions. |
| Alarm nie włącza się | Alarm nie jest aktywowany lub jest nieprawidłowo ustawiony | Ensure the alarm is set and activated (alarm icon visible). Verify the alarm time is correct. |
8. Specyfikacje
| Funkcja | Szczegół |
|---|---|
| Marka | MĄDRY TYGRYS |
| Numer modelu | CK-LED1302 |
| Typ wyświetlacza | Cyfrowy |
| Kolor | Biały |
| Wymiary produktu | 9.7" szer. x 3.5" wys. |
| Źródło zasilania | Elektryczny przewodowy (USB) |
| Bateria pamięci | 2 Lithium Ion batteries (included), retains settings for 4-8 hours |
| Typ montażu | Uchwyt ścienny, uchwyt na biurko |
| Cechy specjalne | Adjustable Brightness, Alarm Clock, Temperature Display, Date Display, 12/24 Hour Format |
| Tworzywo | Akrylonitryl Butadienowo-styrenowy |
| Waga przedmiotu | 0.317 uncji (około 9 gramów) |
| UPC | 728990655931 |
9. Gwarancja i wsparcie
Aby uzyskać informacje o gwarancji lub pomocy technicznej, zapoznaj się z opakowaniem produktu lub skontaktuj się ze sprzedawcą, u którego produkt został zakupiony. Zachowaj paragon jako dowód zakupu.