
1. Wprowadzenie
This manual provides essential information for the safe and efficient operation of your GIGABYTE AORUS FO48U 48" 4K OLED Gaming Monitor. Please read this manual thoroughly before using the product and retain it for future reference. The AORUS FO48U is designed to deliver a high-performance visual experience with its 4K OLED display, fast refresh rate, and advanced features.
2. Informacje dotyczące bezpieczeństwa
Aby zapobiec uszkodzeniu monitora i zapewnić bezpieczeństwo użytkownika, należy przestrzegać następujących środków ostrożności:
- Nie wystawiaj monitora na działanie deszczu i wilgoci, aby uniknąć ryzyka pożaru lub porażenia prądem.
- Nie otwierać monitora casing. Wewnątrz nie ma żadnych części, które mogłyby być naprawiane przez użytkownika. Wszelkie prace serwisowe należy zlecać wykwalifikowanemu personelowi.
- Aby zapobiec jego upadkowi, ustaw monitor na stabilnej, płaskiej powierzchni.
- Zapewnij odpowiednią wentylację wokół monitora. Nie blokuj otworów wentylacyjnych.
- Należy używać wyłącznie zasilacza i kabli dostarczonych lub określonych przez producenta.
- Odłączaj monitor od gniazdka elektrycznego podczas burzy z piorunami lub jeśli nie używasz go przez dłuższy czas.
- Unikaj dotykania ekranu ostrymi przedmiotami, aby zapobiec uszkodzeniu.
3. Zawartość opakowania
Sprawdź, czy w przesyłce znajdują się wszystkie elementy wymienione poniżej:
- GIGABYTE AORUS FO48U 48" 4K OLED Gaming Monitor
- Kabel zasilający
- Kabel HDMI 2.1
- Kabel DP 1.4
- USB 3.0 B to A cable
- Skrócona instrukcja obsługi (QSG)
- Karta gwarancyjna
- AORUS Remote Control
4. Konfiguracja
4.1 Konfiguracja fizyczna
The monitor can be set up using its included stand or a VESA-compatible wall mount.
Montaż stojaka:
Follow the instructions in the Quick Start Guide to securely attach the stand to the monitor base. Ensure all screws are tightened.
Montaż na ścianie za pomocą uchwytu VESA:
The AORUS FO48U supports VESA wall mounts with a 300 x 300mm pattern. Remove the stand if already attached. Use appropriate screws and a VESA-compatible bracket (not included) to mount the monitor. Refer to your wall mount's instructions for specific installation steps.

Obraz: Tył view of the AORUS FO48U monitor, highlighting the VESA 300x300mm mounting points for wall installation.
4.2 Kable połączeniowe
Connect the necessary cables to the monitor's I/O ports. Ensure the monitor is powered off before connecting or disconnecting cables.

Obraz: Szczegółowa strona view of the monitor's I/O ports, including USB 3.0, USB Upstream, USB Type-C (KVM), DisplayPort 1.4, HDMI 2.1, Headphone Jack, and Audio Line-Out.
- Podłączenie zasilania: Podłącz kabel zasilający do wejścia zasilania monitora, a następnie do gniazdka sieciowego.
- Wejście wideo: Connect your PC or gaming console using either the provided HDMI 2.1 cable or DisplayPort 1.4 cable. The monitor features two HDMI 2.1 ports and one DisplayPort 1.4.
- Połączenia USB: Connect the USB 3.0 B to A cable from your PC to the monitor's USB Upstream port to enable the monitor's USB 3.0 ports and KVM functionality.
- USB Type-C (KVM): For KVM functionality, connect a USB Type-C cable (10Gbps Type-C cable required, not always included) from your device to the monitor's USB Type-C port. This allows control of multiple devices with a single keyboard and mouse connected to the monitor.
- Wyjście audio: Use the Headphone Jack or Audio Line-Out for external audio devices.
4.3 Pierwsze włączenie zasilania
After connecting all necessary cables, press the power button on the monitor to turn it on. The monitor will automatically detect the active input source. If no signal is detected, ensure your source device is powered on and correctly connected.
5. Instrukcja obsługi
5.1 Nawigacja na ekranie (OSD)
The monitor's settings can be adjusted using the OSD menu, typically accessed via a joystick or buttons on the monitor's rear or bottom edge, or with the included AORUS Remote Control.
- Use the joystick/buttons or remote to navigate through menu options.
- Press to select an option or enter a sub-menu.
- Move left/right or up/down to adjust values or select different settings.
- Press the back button or move the joystick in a specific direction (as indicated on-screen) to exit menus.
5.2 Główne cechy
The AORUS FO48U offers several features for an enhanced viewdoświadczenie w grach i jeździe:
- Rozdzielczość 4K UHD (3840x2160): Provides crisp, detailed visuals.
- Częstotliwość odświeżania 120 Hz: Ensures smooth motion for gaming and fast-paced content.
- Czas reakcji 1 ms (GTG): Minimalizuje efekt smużenia i rozmycie ruchu.
- FreeSync Premium Support: Synchronizuje częstotliwość odświeżania monitora z procesorem graficznym, zapewniając płynną rozgrywkę.
- 10-bit Color / 98% DCI-P3 / 130% sRGB: Delivers accurate and vibrant color reproduction.

Image: Visual comparison demonstrating the difference between 1ms response time at 120Hz refresh rate and 5ms response time at 60Hz, illustrating smoother motion with higher specifications.
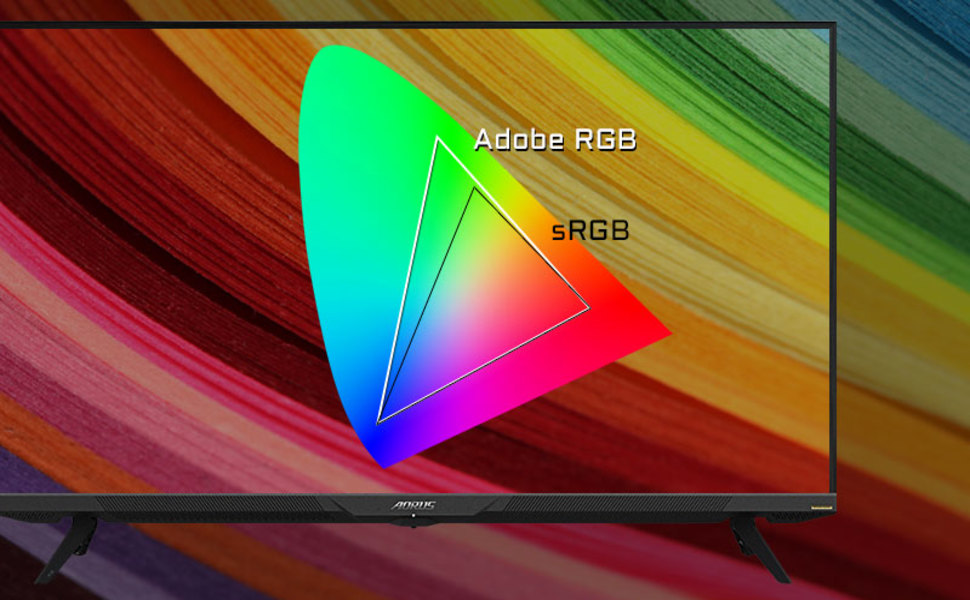
Image: A visual representation of color gamut, comparing Adobe RGB and sRGB color spaces, indicating the monitor's wide color coverage.
5.3 Funkcje specjalne
The monitor includes several advanced features accessible via the OSD or OSD Sidekick software:
- OSD Sidekick: A software utility that allows you to control OSD settings directly from your desktop.
- Picture-in-Picture (PiP) / Picture-by-Picture (PbP): Display content from multiple sources simultaneously on the screen.
- Panel: Real-time hardware information display (e.g., CPU/GPU temperature, fan speed).
- Korektor czerni: Poprawia widoczność w ciemnych obszarach bez nadmiernego naświetlania jasnych obszarów.
- Asystent gry: Provides in-game enhancements like crosshairs, timers, and refresh rate counters.
- Space Audio: Offers 5 modes of audio experiences for immersive sound.
- KVM Feature: Allows you to control multiple devices (e.g., two PCs) connected to the monitor using a single keyboard and mouse. Connect devices via USB Type-C and USB 3.0 Upstream ports.

Image: A diagram showing how the Type-C KVM feature allows switching between a desktop PC and a laptop connected to the monitor using one keyboard and mouse.
6. Konserwacja
6.1 Czyszczenie monitora
To clean the monitor, first unplug the power cord. Use a soft, lint-free cloth lightly dampened with water or a mild, non-abrasive screen cleaner. Do not spray cleaner directly onto the screen. Avoid using alcohol, ammonia, or abrasive cleaners, as they can damage the screen surface.
6.2 Pielęgnacja wyświetlacza OLED i zapobieganie jego wypaleniu
OLED displays are susceptible to image retention (burn-in) if static images are displayed for extended periods. To prolong the life of your OLED panel:
- Avoid displaying static images (e.g., desktop icons, taskbars, logos) for long durations.
- Wykorzystaj wygaszacze ekranu i dynamiczne tapety.
- Enable the monitor's built-in OLED care features (e.g., pixel shift, pixel refresh, logo luminance adjustment) through the OSD menu.
- Reduce screen brightness when not needed.
- Wyłączaj monitor, gdy go nie używasz.
7. Rozwiązywanie Problemów
Jeśli masz problemy z monitorem, zapoznaj się z poniższymi typowymi problemami i ich rozwiązaniami:
| Problem | Możliwa przyczyna | Rozwiązanie |
|---|---|---|
| Brak obrazu na ekranie | Power cable disconnected; Video cable disconnected or loose; Incorrect input source selected; Source device off. | Check power and video cable connections; Ensure source device is on; Select correct input source via OSD. |
| Obraz jest niewyraźny lub zniekształcony | Incorrect resolution; Video cable quality; Graphics card driver issues. | Set display resolution to 3840x2160; Use high-quality HDMI 2.1 or DP 1.4 cables; Update graphics drivers. |
| Screen randomly turns off/on | Loose video cable; Power supply issue; Monitor firmware issue; Source device instability. | Ensure video cables are securely connected; Try a different power outlet; Check for and install the latest monitor firmware updates from GIGABYTE's website; Test with a different source device. |
| Brak dźwięku | Volume too low or muted; Incorrect audio output selected; Audio cable disconnected. | Adjust monitor volume; Select correct audio output in PC settings; Ensure external speakers/headphones are connected. |
| KVM feature not working | Incorrect USB cable; USB Upstream cable not connected; Devices not properly configured. | Ensure a 10Gbps USB Type-C cable is used for Type-C connection; Connect the USB 3.0 B to A cable to your primary PC; Refer to the OSD Sidekick software for KVM setup. |
8. Specyfikacje
Key technical specifications for the GIGABYTE AORUS FO48U monitor:
| Funkcja | Szczegół |
|---|---|
| Rozmiar ekranu | 48 cali |
| Typ panelu | OLED |
| Rezolucja | 3840 x 2160 (4K UHD) |
| Częstotliwość odświeżania | 120 Hz |
| Czas reakcji | 1 ms (GTG) |
| Gama kolorów | 98% DCI-P3 / 130% sRGB |
| Głębia koloru | 10-bit |
| Viewing kąt | 178°(poziomo)/178°(pionowo) |
| Łączność | 2x HDMI 2.1, 1x DisplayPort 1.4, 1x USB Type-C (KVM), 2x USB 3.0, 1x USB 3.0 Upstream, Earphone Jack, Audio Line-Out |
| Głośniki | 2x 15W, 1x 20W (Space Audio) |
| Mocowanie VESA | 300 x 300mm |
| Wymiary (szer. x wys. x gł.) | 26.58 x 42.07 x 9.89 cala (z podstawką) |
| Waga | 39.8 funta (z podstawą) |
9. Gwarancja i wsparcie
For detailed warranty information, please refer to the warranty card included in your product package or visit the official GIGABYTE website. For technical support, driver downloads, and further assistance, please visit the GIGABYTE support page or contact their customer service.
Oficjalny GIGABYTE Webstrona: www.gigabyte.com