CREATE THERA RETRO PRO
Instrukcja obsługi ekspresu do kawy CREATE THERA RETRO PRO
Model: THERA RETRO PRO
1. Wprowadzenie
Thank you for choosing the CREATE THERA RETRO PRO Semi-Automatic Espresso Machine. This machine is designed to provide you with high-quality espresso, cappuccino, and latte beverages using ground coffee. Featuring a 20-bar high-pressure pump, NTC temperature control, and an integrated milk tank, it offers convenience and excellent results. Please read this manual carefully before first use to ensure proper operation and maintenance.

Obraz 1.1: Przód view of the CREATE THERA RETRO PRO Espresso Machine in Cream White.
2. Instrukcje bezpieczeństwa
Aby zminimalizować ryzyko pożaru, porażenia prądem i/lub obrażeń ciała, należy zawsze przestrzegać podstawowych zasad bezpieczeństwa podczas korzystania z urządzeń elektrycznych, w tym:
- Przed użyciem urządzenia należy przeczytać całą instrukcję.
- Nie dotykaj gorących powierzchni. Używaj uchwytów lub gałek.
- Aby zabezpieczyć się przed pożarem, porażeniem prądem elektrycznym i obrażeniami ciała, nie zanurzaj przewodu, wtyczek ani urządzenia w wodzie lub innym płynie.
- Należy zachować ścisły nadzór, jeżeli z urządzenia korzystają dzieci lub w ich pobliżu.
- Odłącz od gniazdka, gdy nie jest używane i przed czyszczeniem. Pozostaw do ostygnięcia przed założeniem lub zdjęciem części oraz przed czyszczeniem urządzenia.
- Nie używaj żadnego urządzenia, jeśli przewód lub wtyczka są uszkodzone, ani po wystąpieniu awarii urządzenia lub jeśli zostało ono w jakikolwiek sposób uszkodzone.
- Użycie akcesoriów niezalecanych przez producenta urządzenia może spowodować pożar, porażenie prądem lub obrażenia ciała.
- Nie stosować na zewnątrz.
- Nie pozwól, aby przewód zwisał z krawędzi stołu lub blatu i dotykał gorących powierzchni.
- Nie umieszczać na gorącym palniku gazowym lub elektrycznym ani w jego pobliżu, a także w nagrzanym piekarniku.
- Zawsze najpierw podłącz wtyczkę do urządzenia, a następnie podłącz przewód do gniazdka ściennego. Aby odłączyć, przestaw dowolne pokrętło w położenie „off”, a następnie wyjmij wtyczkę z gniazdka ściennego.
- Nie używaj urządzenia niezgodnie z jego przeznaczeniem.
3. Składniki produktu
Familiarize yourself with the parts of your CREATE THERA RETRO PRO Espresso Machine.
- Jednostka główna z panelem sterowania
- Zbiornik na wodę (pojemność 1.5 l)
- Zbiornik na mleko
- Portafiltr
- Filter Baskets (for 1 and 2 cups)
- Miarka z literą Tamper
- Regulowana tacka ociekowa
- Taca do podgrzewania filiżanek

Image 3.1: Included accessories: Portafilter, two filter baskets, and a measuring scoop with integrated tampeee.

Image 3.2: Detail of the control panel, showing beverage selection buttons and the temperature gauge.
4. Konfiguracja
4.1 Rozpakowanie i wstępne czyszczenie
- Ostrożnie usuń wszystkie materiały opakowaniowe i umieść urządzenie na stabilnej, płaskiej i odpornej na ciepło powierzchni.
- Wash the water tank, milk tank, portafilter, filter baskets, and drip tray with warm, soapy water. Rinse thoroughly and dry.
- Wytrzyj zewnętrzną część urządzenia za pomocąamp płótno.
4.2 Napełnianie zbiornika na wodę
Wyjmij zbiornik na wodę z tyłu urządzenia. Napełnij go świeżą, zimną wodą do linii MAX. Dokładnie zamontuj zbiornik.
4.3 Preparing the Milk Tank
If making milk-based drinks, fill the milk tank with desired milk (dairy or plant-based) between the MIN and MAX lines. Ensure the milk frothing tube is properly inserted into the tank.

Image 4.1: Removing the milk tank for filling or cleaning.
4.4 Pierwsze użycie / Przygotowanie maszyny
Before first use, or if the machine has not been used for a long time, it needs to be primed:
- Sprawdź, czy zbiornik na wodę jest pełny.
- Place a large container under the coffee spout and milk frothing nozzle.
- Turn on the machine. It will start heating up.
- Once heated, press the Espresso button and let water flow through until the tank is almost empty. Repeat this process with the milk frothing function (if applicable, by selecting a milk-based drink without coffee grounds) to prime the milk system.
5. Instrukcja obsługi
5.1 Preparing Ground Coffee
Use freshly ground coffee for best results. We recommend using naturally roasted ground coffee. Avoid sugar-roasted mixed coffee as it can clog the filters over time.
- Wybierz odpowiedni filtr (pojedynczy lub podwójny) i umieść go w uchwycie filtra.
- Fill the filter basket with ground coffee. Use the measuring scoop provided.
- Tamp kawę dokładnie i równomiernie za pomocą tamper end of the scoop.
- Wytrzyj nadmiar kawy z krawędzi uchwytu filtra.
- Włóż uchwyt filtra do głowicy zaparzającej i przekręć go w prawo, aż do bezpiecznego zablokowania.
5.2 Przygotowanie espresso
- Ensure the machine is heated and ready (temperature gauge indicates optimal temperature).
- Place your cup(s) on the drip tray under the portafilter spouts.
- Naciśnij Espresso button. The machine will dispense the programmed amount of espresso.
- To adjust the volume, press and hold the Espresso button until the desired volume is reached, then release. The machine will remember this setting for future use.

Image 5.1: Preparing two cups of espresso simultaneously.
5.3 Przygotowanie cappuccino lub latte
The machine features an integrated milk tank for automatic milk frothing.
- Ensure the milk tank is filled with milk and properly attached.
- Place your cup under both the coffee spout and the milk frothing nozzle.
- For Cappuccino, press the Cappuccino button. The machine will first dispense frothed milk, then coffee.
- For Latte, press the Latte button. The machine will dispense frothed milk, then coffee, with a different milk-to-coffee ratio.
- To adjust the volume of milk foam, use the foam adjustment dial on the milk tank.
- To adjust the total volume of the drink, press and hold the respective button until the desired volume is reached, then release.
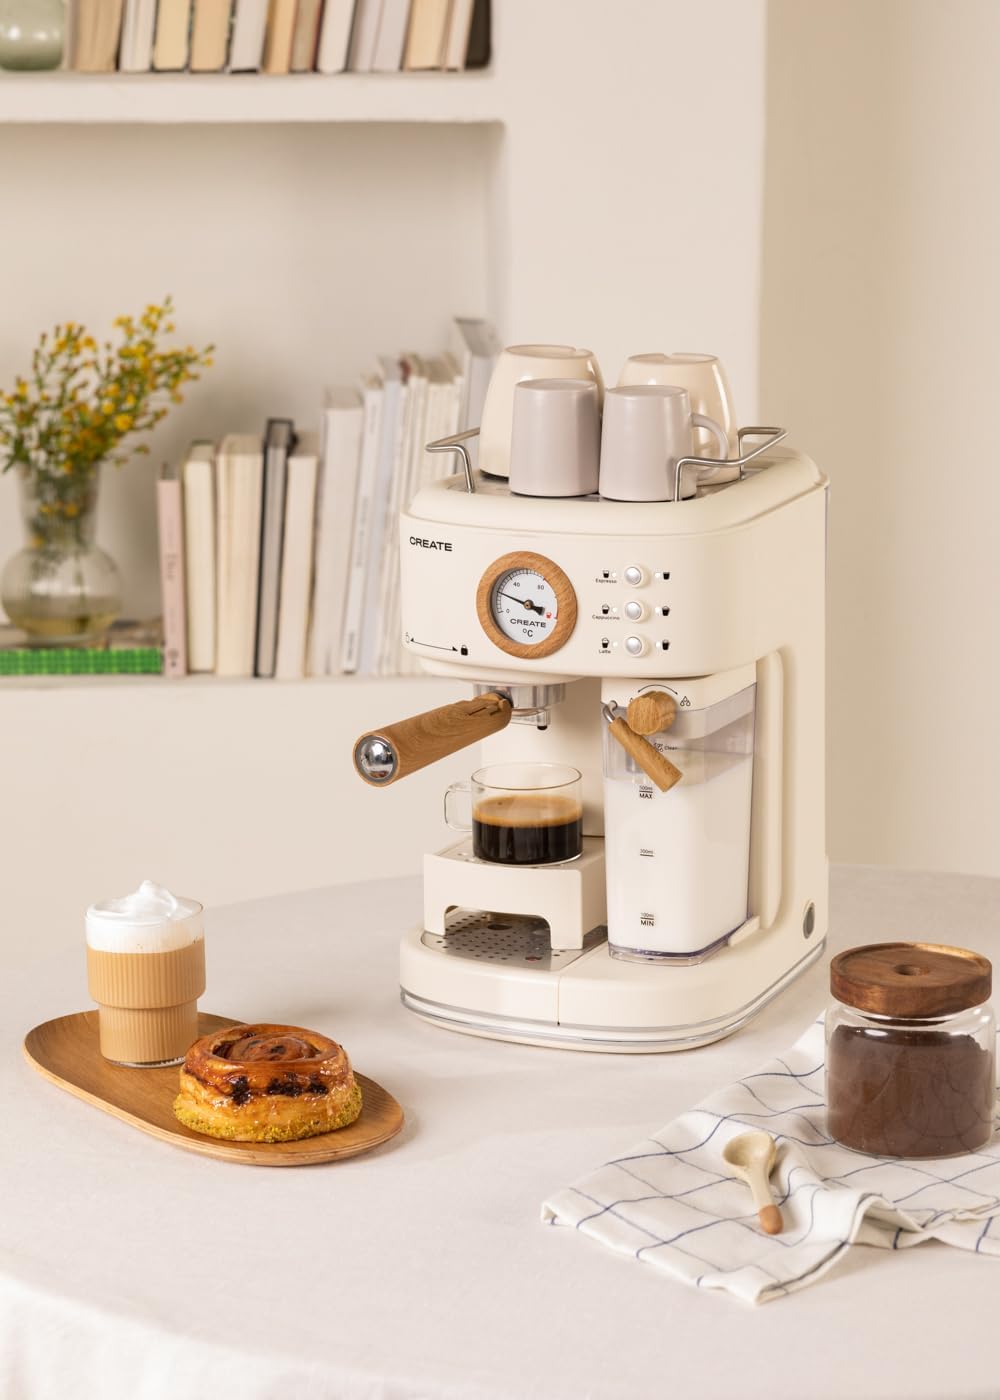
Image 5.2: User interacting with the control panel to select a beverage.
5.4 Adjustable Drip Tray
The drip tray can be adjusted to accommodate different cup sizes. Simply lift or lower the tray as needed to fit your cup comfortably and minimize splashing.

Image 5.3: The adjustable drip tray, designed to fit various cup sizes.
6. Konserwacja
6.1 Codzienne czyszczenie
- Taca ociekowa: Opróżniaj i czyść tackę ociekową codziennie lub gdy wskaźnik pokaże, że jest pełna. Umyj ją ciepłą wodą z mydłem i opłucz.
- Milk Tank and Frothing Nozzle: After each use, remove the milk tank and clean it thoroughly. Run the "Clean" function (if available, or dispense hot water through the nozzle) to clear any milk residue from the frothing system. This is crucial to prevent blockages and maintain hygiene.
- Uchwyt filtra i koszyki filtracyjne: Remove spent coffee grounds. Rinse the portafilter and filter baskets under running water. Use a brush to remove any stubborn coffee residue.
- Zewnętrzny: Wytrzyj obudowę urządzenia miękką, damp płótno. Nie używaj ściernych środków czyszczących ani szorstkich gąbek.
6.2 Odkamienianie
Regular descaling is essential to maintain machine performance and extend its lifespan, especially in areas with hard water. The frequency depends on water hardness and usage. Refer to the machine's indicator (if any) or descale every 2-3 months.
- Use a descaling solution specifically designed for coffee machines. Follow the instructions on the descaling solution packaging.
- Empty the water tank and fill it with the descaling solution mixed with water according to the solution's instructions.
- Place a large container under the coffee spout and milk frothing nozzle.
- Run the descaling cycle as per your machine's specific instructions (often involves pressing and holding certain buttons, or a dedicated descaling program).
- After the descaling solution has run through, rinse the water tank and fill it with fresh water. Run several cycles of plain water through the machine to thoroughly rinse out any descaling solution.
7. Rozwiązywanie Problemów
| Problem | Możliwa przyczyna | Rozwiązanie |
|---|---|---|
| Brak dozowania kawy lub wolny przepływ. | Zbiornik na wodę jest pusty; maszyna nie jest zalana; kawa jest zbyt drobno zmielona lub zbyt gruba.amped; brewing head clogged. | Fill water tank; prime the machine; use coarser grind or less coffee; clean brewing head. |
| Milk not frothing properly or no milk dispensed. | Milk tank empty; milk frothing nozzle clogged; milk too cold/warm or type of milk. | Fill milk tank; clean frothing nozzle thoroughly; use cold milk (4-6°C); try different milk types. |
| Kawa nie jest wystarczająco gorąca. | Machine not fully preheated; cups not preheated. | Allow machine to fully preheat; preheat cups using hot water or the cup warming tray. |
| Z urządzenia wycieka woda. | Zbiornik na wodę nie jest prawidłowo osadzony; tacka ociekowa jest pełna; występują problemy z uszczelką. | Ensure water tank is correctly inserted; empty drip tray; contact support if problem persists. |
| Small coffee portions. | Programmed volume is too low. | Reprogram the desired volume by holding the button until the cup is filled to your preference. |
8. Specyfikacje
| Funkcja | Szczegół |
|---|---|
| Marka | TWORZYĆ |
| Model | THERA RETRO PRO |
| Kolor | Kremowy biały |
| Wymiary produktu (dł. x szer. x wys.) | Wymiary 22.8 x 32.5 x 36 cm |
| Waga przedmiotu | 5 kilograma |
| Volume (Water Tank) | 1.5 litrów |
| Tomtage | 240 wolty |
| Ciśnienie | 20 bar |
| Rodzaj kawy | Kawa mielona |
| Funkcja specjalna | Integrated Milk Frother, Adjustable Drip Tray, NTC Temperature Control, Quick Heating |

Image 8.1: Product dimensions: 36cm height, 22.81cm width, 32.51cm depth.
9. Gwarancja i wsparcie
Your CREATE THERA RETRO PRO Espresso Machine comes with a standard manufacturer's warranty. For detailed warranty information, please refer to the warranty card included with your product or visit the official CREATE website. For technical support, spare parts, or service inquiries, please contact CREATE customer service directly. Ensure you have your model number (THERA RETRO PRO) and purchase details ready when contacting support.
For further assistance, please visit the official CREATE brand store: Sklep marki CREATE
Powiązane dokumenty - THERA RETRO PRO
 |
Instrukcja obsługi ekspresu do kawy CREATE Thera Retro Matt Espresso User manual for the CREATE Thera Retro Matt espresso coffee machine. Contains important safety instructions, part lists, operating procedures for making espresso and cappuccino, cleaning, maintenance, and troubleshooting. |
 |
CREATE Instrukcja obsługi ekspresu do kawy Thera Retro Espresso Instrukcja obsługi ekspresu do kawy CREATE Thera Retro Espresso. Dowiedz się, jak skonfigurować, obsługiwać, czyścić i konserwować ekspres do kawy w stylu retro, aby uzyskać idealne espresso i cappuccino. |
 |
Instrukcja obsługi ekspresu do kawy CREATE THERA ADVANCE Kompleksowa instrukcja obsługi ekspresu do kawy CREATE THERA ADVANCE, obejmująca zagadnienia bezpieczeństwa, obsługi, czyszczenia i rozwiązywania problemów. |
 |
Instrukcja obsługi ekspresu do kawy CREATE Thera Retro Matt Espresso Kompleksowa instrukcja obsługi ekspresu do kawy CREATE Thera Retro Matt Espresso, obejmująca informacje na temat konfiguracji, obsługi, konserwacji i rozwiązywania problemów, dostępna w wielu językach. |
 |
CREATE Instrukcja obsługi ekspresu do kawy Thera Retro Espresso Comprehensive user manual for the CREATE Thera Retro Espresso Coffee Machine, covering important safeguards, parts list, control panel operation, brewing instructions for espresso and cappuccino, steam wand usage, cleaning, maintenance, descaling, and troubleshooting. |
 |
Utwórz przewodnik konserwacji ekspresu do kawy Kompleksowy poradnik dotyczący konserwacji ekspresu do kawy Create, obejmujący odkamienianie, czyszczenie dyszy pary, filtra i uchwytu filtra, a także prawidłowe procedury wyłączania i przechowywania. |
Ask a question about this manual
Ask about setup, troubleshooting, compatibility, parts, safety, or missing instructions. Manuals+ will review the question and use this page’s manual context to help answer it.