1. Wprowadzenie
Thank you for choosing the PACIFIC PR9930AS Wall-mount Range Hood. This manual provides essential information for the safe installation, operation, and maintenance of your new appliance. Please read this manual thoroughly before installation and use, and keep it for future reference.
The PACIFIC PR9930AS is a 30-inch wall-mount range hood featuring a Euro design with a glass chimney, 750 CFM powerful suction, 3-speed touch control, and a 5-minute auto delay-off function. It is designed to efficiently remove smoke, odors, and grease from your kitchen environment.

Obraz 1.1: Przód view of the PACIFIC PR9930AS Wall-mount Range Hood.
2. Informacje dotyczące bezpieczeństwa
Aby zmniejszyć ryzyko pożaru, porażenia prądem lub obrażeń ciała, należy przestrzegać następujących zasad:
- Przed przystąpieniem do użytkowania urządzenia należy przeczytać wszystkie instrukcje.
- Prace instalacyjne i okablowanie elektryczne muszą być wykonywane przez wykwalifikowaną osobę(-y) zgodnie ze wszystkimi obowiązującymi przepisami i normami, w tym dotyczącymi konstrukcji przeciwpożarowych.
- Sufficient air is needed for proper combustion and exhausting of gases through the chimney of fuel-burning equipment to prevent back-drafting. Follow the heating equipment manufacturer’s guideline and safety standards such as those published by the National Fire Protection Association (NFPA), and the American Society for Heating, Refrigeration and Air Conditioning Engineers (ASHRAE), and the local code authorities.
- Podczas cięcia lub wiercenia otworów w ścianie lub suficie należy uważać, aby nie uszkodzić przewodów elektrycznych i innych ukrytych instalacji.
- Wentylatory kanałowe zawsze muszą być skierowane na zewnątrz.
- Nie należy używać tego urządzenia z żadnym zewnętrznym półprzewodnikowym urządzeniem sterującym prędkością.
- Aby ograniczyć ryzyko pożaru, należy stosować wyłącznie kanały wentylacyjne wykonane z metalu.
- Nigdy nie pozostawiaj jednostek powierzchniowych bez nadzoru na wysokich ustawieniach. Wykipienie powoduje dymienie i tłuste wycieki, które mogą się zapalić. Podgrzewaj oleje powoli na niskich lub średnich ustawieniach.
- Często czyść wentylatory. Nie należy dopuścić do gromadzenia się tłuszczu na wentylatorze lub filtrze.
- Używaj odpowiedniego rozmiaru patelni. Zawsze używaj naczyń kuchennych odpowiednich do wielkości elementu powierzchni.
3. Zawartość opakowania
Przed rozpoczęciem instalacji sprawdź, czy wszystkie komponenty są obecne i nieuszkodzone.
- PACIFIC PR9930AS Range Hood Assembly
- Glass Chimney Sections
- 5-Layer Aluminum Mesh Filters (Quantity: 2)
- Sprzęt montażowy (śruby, kotwy ścienne)
- Adapter kanałowy
- Instrukcja obsługi

Image 3.1: The included 5-layer aluminum mesh filter.
4. Specyfikacje
| Funkcja | Specyfikacja |
|---|---|
| Numer modelu | PR9930AS |
| Typ montażu | Montaż ścienny |
| Tworzywo | Stal nierdzewna |
| Przepływ powietrza | 750 CFM (stopy sześcienne na minutę) |
| Liczba prędkości | 3 |
| Typ formantów | Sterowanie dotykowe |
| Oświetlenie | 2-Level 5W LED |
| Typ filtra | 5-Layer Aluminum Mesh Filter |
| Cechy specjalne | 5-Min Auto Delay Off |
| Wymiary produktu | 29.87 x 19.75 x 45 inches (Width x Depth x Max Height) |
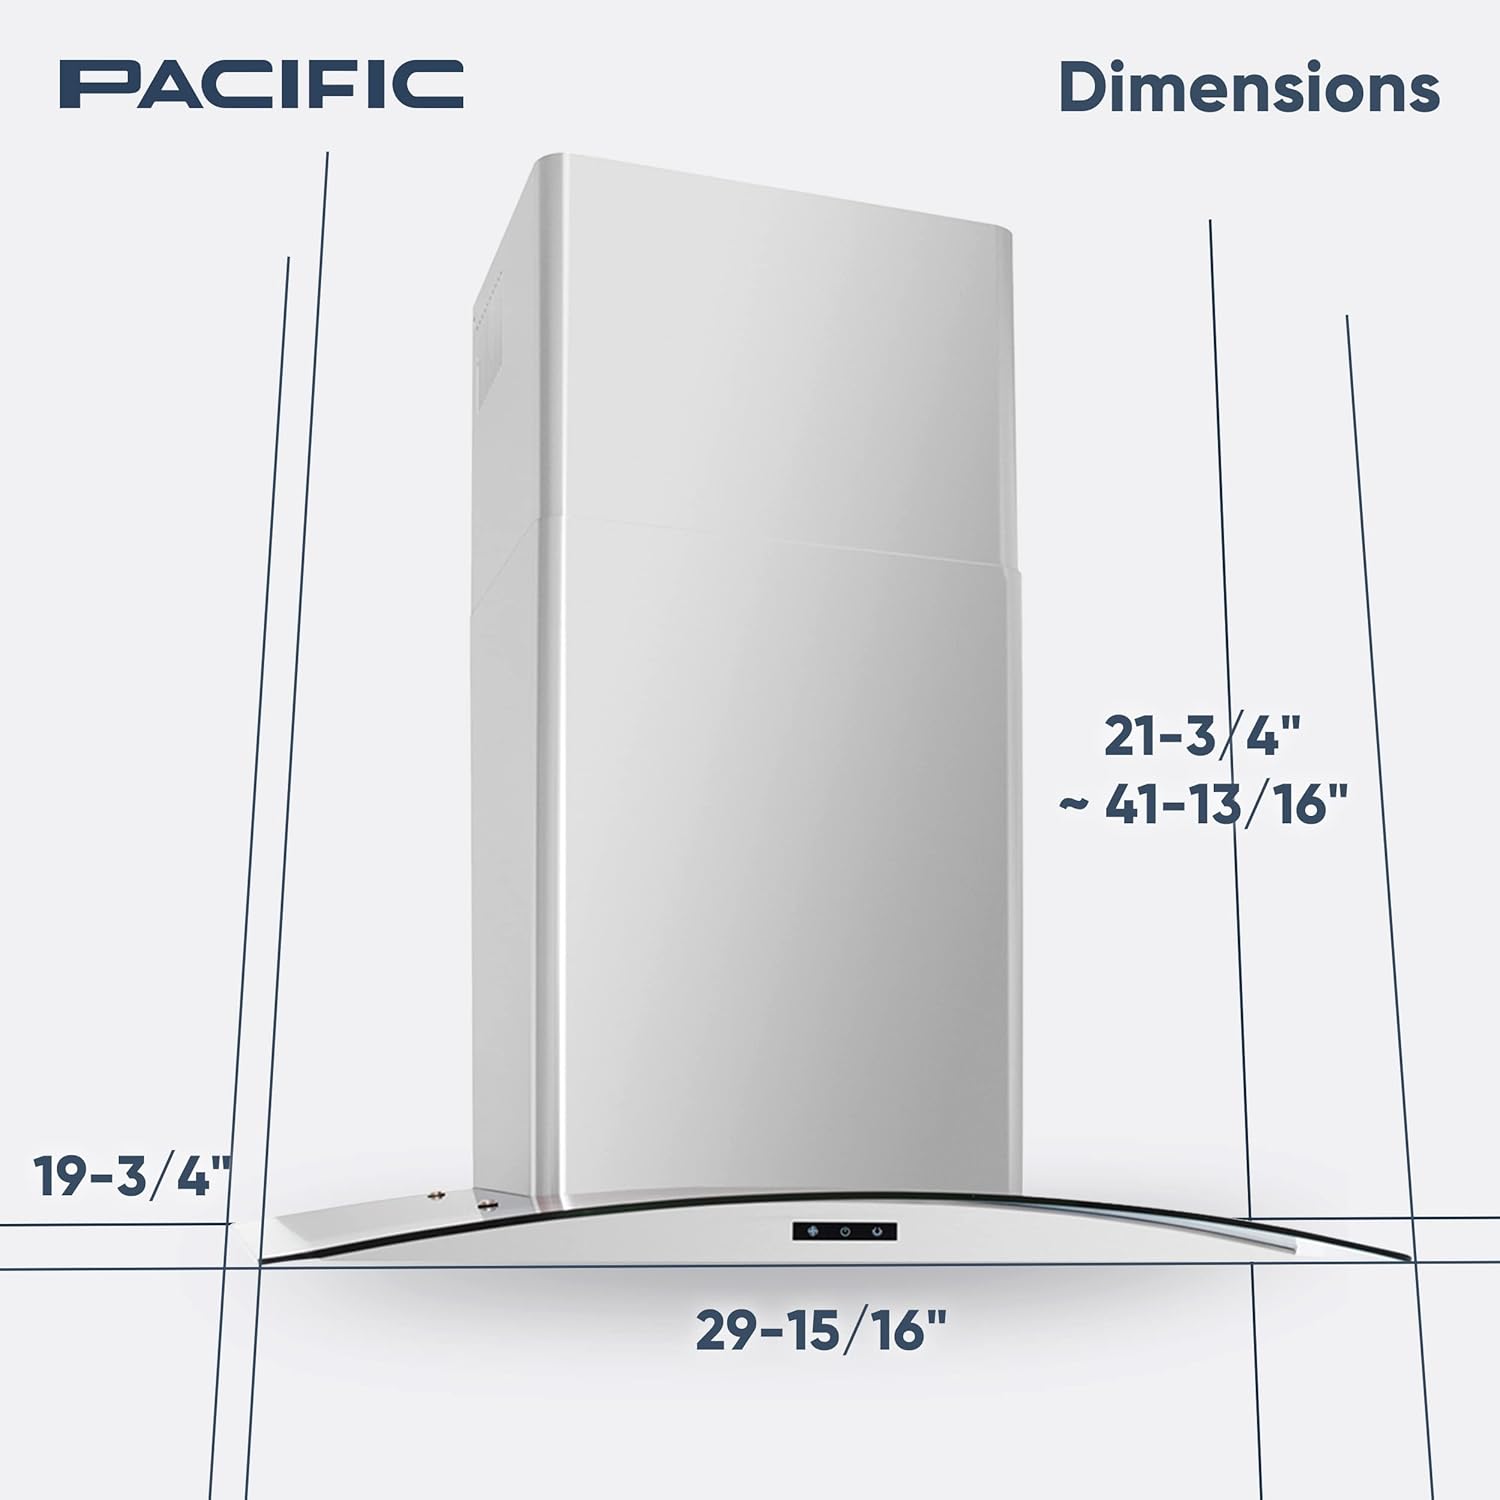
Image 4.1: Dimensional diagram of the range hood.
5. Instalacja
Professional installation is recommended. Ensure all local building codes and electrical regulations are followed.
5.1 Wymagane narzędzia i materiały
- Wiertła i wiertła
- Miarka i ołówek
- Poziom
- Zestaw śrubokrętów
- Taśma klejąca lub clamps for ductwork
- Okulary i rękawice ochronne
5.2 Miejsce montażu
- The range hood should be mounted directly above the cooking surface.
- Ensure there is adequate clearance between the cooking surface and the bottom of the range hood (typically 24-30 inches, refer to local codes).
- Locate wall studs for secure mounting. If studs are not available, use appropriate wall anchors for the weight of the unit.
5.3 Kroki instalacji
- Przygotuj ścianę: Mark the desired mounting height and the locations for mounting screws based on the hood's mounting bracket. Ensure the marks are level.
- Zainstaluj wspornik montażowy: Przymocuj uchwyt montażowy do ściany za pomocą odpowiednich śrub i kołków.
- Mount the Hood Body: Carefully lift the range hood body and hang it onto the installed mounting bracket. Ensure it is securely seated.
- Podłącz kanały wentylacyjne: Attach the ducting adapter to the top of the hood. Connect the ductwork (not included) from the hood to the exterior vent opening. Ensure all connections are sealed to prevent air leaks.
- Podłączenie elektryczne: Have a qualified electrician connect the range hood to a dedicated electrical circuit in accordance with local electrical codes. Ensure the power is off at the circuit breaker before wiring.
- Install Chimney Sections: Assemble and attach the upper and lower chimney sections to cover the ductwork and mounting hardware.
- Install Mesh Filters: Insert the aluminum mesh filters into their designated slots on the underside of the hood.
6. Działanie
The PACIFIC PR9930AS features intuitive touch controls for easy operation.

Image 6.1: Touch control panel and LED lighting.
6.1 Funkcje panelu sterowania
- Przycisk zasilania (⏻): Naciśnij, aby włączyć lub wyłączyć okap.
- Fan Speed Control (🌬): Press repeatedly to cycle through 3 fan speeds (Low, Medium, High). The current speed will be indicated on the display.
- Light Control (💡): Press to turn the LED lights on or off. The lights have two brightness levels.
- Funkcja opóźnionego wyłączania: While the fan is running, press and hold the fan speed button for a few seconds to activate the 5-minute auto delay-off timer. The fan will continue to run for 5 minutes and then automatically shut off.
6.2 Optymalne wykorzystanie
- Turn on the range hood a few minutes before cooking to establish airflow.
- Use higher fan speeds for heavy cooking, frying, or grilling.
- Use lower fan speeds for simmering or light cooking.
- Allow the hood to run for a few minutes after cooking to clear any remaining smoke or odors. The delay-off function is useful for this purpose.

Image 6.2: The range hood in operation, demonstrating effective steam extraction.
7. Konserwacja i czyszczenie
Regularna konserwacja zapewnia optymalną wydajność i wydłuża żywotność okapu kuchennego.
7.1 Cleaning the Mesh Filters
The 5-layer aluminum mesh filters should be cleaned regularly, depending on cooking frequency. They are dishwasher safe.
- Usuń filtry: Locate the release latches on each filter. Push or pull the latch to release the filter and carefully remove it.
- Filtry myjące:
- Pomywaczka: Place the filters in a dishwasher on a normal cycle. Avoid using harsh detergents.
- Pranie ręczne: Soak filters in hot water with a mild detergent. Use a soft brush to gently scrub away grease and residue. Rinse thoroughly.
- Wysuszyć i zainstalować ponownie: Allow filters to dry completely before reinstalling them. Ensure they click securely into place.
7.2 Czyszczenie powierzchni zewnętrznej
- Przetrzyj powierzchnie ze stali nierdzewnej miękką szmatką.ampzmyć ciepłą wodą i łagodnym detergentem.
- Do czyszczenia powierzchni szklanych należy używać środka do czyszczenia szkła i miękkiej ściereczki.
- Avoid abrasive cleaners, steel wool, or scouring pads, as these can scratch the surfaces.
- Zawsze wycieraj zgodnie z kierunkiem włókien stali nierdzewnej.
8. Rozwiązywanie Problemów
Before contacting customer service, refer to the following troubleshooting guide for common issues.
| Problem | Możliwa przyczyna | Rozwiązanie |
|---|---|---|
| Okap się nie włącza | Brak zasilania Przewód zasilający nie jest podłączony Zadziałał wyłącznik automatyczny | Sprawdź podłączenie zasilania Upewnij się, że przewód zasilający jest prawidłowo podłączony Zresetuj wyłącznik automatyczny |
| Niska moc ssania | Dirty mesh filters Zatkanie kanałów wentylacyjnych Improper duct size | Wyczyść lub wymień filtry Check ductwork for blockages Ensure ductwork meets specifications |
| Światła nie działają | LED bulbs faulty Luźne okablowanie | Contact customer service for replacement bulbs Check electrical connections (by qualified personnel) |
| Nadmierny hałas | Luźne części Nierównowaga silnika Wibracje kanałów wentylacyjnych | Sprawdź, czy nie ma luźnych śrub lub elementów. Skontaktuj się z obsługą klienta Ensure ductwork is securely installed and insulated |
9. Gwarancja i wsparcie
The PACIFIC PR9930AS Wall-mount Range Hood comes with a 10-roczna ograniczona gwarancja na częściNiniejsza gwarancja obejmuje wady materiałowe i wykonawcze powstałe w wyniku normalnego użytkowania.
For warranty claims, technical support, or to order replacement parts, please contact PACIFIC customer service. Keep your proof of purchase and model number (PR9930AS) readily available when contacting support.
Kontakt z obsługą klienta: Please refer to the PACIFIC official webAby uzyskać najaktualniejsze dane kontaktowe, odwiedź witrynę lub dokumentację zakupu.