1. Wprowadzenie
Dziękujemy za zakupasing the Soundsation MIOMIX 404FXM 6-Channel Mixer. This versatile mixer is designed for a wide range of audio applications, including home recording, live performances, and podcasting. It combines professional audio quality with portability, featuring low-noise preamplifiers, digital effects, a USB media player/recorder, and Bluetooth connectivity. This manual provides essential information for safe operation, setup, and optimal use of your MIOMIX 404FXM mixer.
2. Instrukcje bezpieczeństwa
OSTRZEŻENIE: Aby ograniczyć ryzyko pożaru lub porażenia prądem, nie należy narażać urządzenia na działanie deszczu i wilgoci.
- Przed przystąpieniem do użytkowania urządzenia należy uważnie przeczytać niniejszą instrukcję.
- Zachowaj tę instrukcję do wykorzystania w przyszłości.
- Należy przestrzegać wszystkich ostrzeżeń i postępować zgodnie ze wszystkimi instrukcjami.
- Nie należy używać tego urządzenia w pobliżu wody.
- Czyścić wyłącznie suchą szmatką.
- Nie zasłaniaj żadnych otworów wentylacyjnych. Montaż należy wykonać zgodnie z instrukcją producenta.
- Nie należy instalować w pobliżu źródeł ciepła, takich jak grzejniki, kratki wentylacyjne, piece lub inne urządzenia (w tym amp(lifiers) wytwarzające ciepło.
- Nie lekceważ celu bezpieczeństwa wtyczki spolaryzowanej lub uziemiającej. Wtyczka spolaryzowana ma dwa bolce, z których jeden jest szerszy od drugiego. Wtyczka uziemiająca ma dwa bolce i trzeci bolec uziemiający. Szeroki bolec lub trzeci bolec są dostarczane dla Twojego bezpieczeństwa. Jeśli dostarczona wtyczka nie pasuje do Twojego gniazdka, skonsultuj się z elektrykiem w celu wymiany przestarzałego gniazdka.
- Chroń przewód zasilający przed deptaniem i przytrzaśnięciem, zwłaszcza przy wtyczkach, gniazdkach i miejscach, w których wychodzi z urządzenia.
- Stosować wyłącznie dodatki/akcesoria wskazane przez producenta.
- Odłączaj urządzenie od zasilania podczas burzy z piorunami lub jeśli nie używasz go przez dłuższy czas.
- Wszelkie prace serwisowe należy zlecać wykwalifikowanemu personelowi serwisowemu. Serwisowanie jest wymagane, gdy urządzenie zostało w jakikolwiek sposób uszkodzone, np. przewód zasilający lub wtyczka są uszkodzone, płyn został wylany lub przedmioty wpadły do urządzenia, urządzenie zostało wystawione na działanie deszczu lub wilgoci, nie działa normalnie lub zostało upuszczone.
3. Zawartość opakowania
Sprawdź, czy w przesyłce znajdują się wszystkie wymienione poniżej elementy:
- Soundsation MIOMIX 404FXM Mixer
- Zasilacz
- Instrukcja obsługi
4. Funkcje produktu
- 6-channel mixer with digital multi-effect processor.
- Integrated USB player/recorder supporting WAV, MP3, WMA, and FLAC formats.
- Wireless Bluetooth audio streaming.
- 4 Mic/Line channels with low-noise preamps and Combo connectors.
- Selectable Hi-Z inputs for guitars and other high-impedance instruments.
- +48V Phantom Power for condenser microphones.
- Peak indicators on input channels.
- 1 stereo line channel with 6.3mm jacks and +4/-10 dB pad adapter.
- 2-band EQ on channels 1-4.
- 24-bit/48 kHz digital effects processor with 16 presets (Reverb, Delay, Echo, Chorus, etc.) and TAP-Tempo function.
- USB player level control.
- Wyjście słuchawkowe z kontrolą poziomu.
- XLR main outputs with volume control.
- Stereo VU Meter with 2 x 6 LED bars.
5. Sterowanie i funkcje
5.1 Zakończenie panelu przedniegoview

Image: Front panel of the Soundsation MIOMIX 404FXM mixer, showing all input channels, EQ controls, effect section, USB/Bluetooth media player, and main output controls.
Input Channels (MIC/INST 1-4)
- MIC/INST Input (Combo Jack): Connect XLR microphones or 1/4" instrument/line cables.
- Zasilanie fantomowe +48 V: Activates phantom power for condenser microphones. Use with caution.
- Przełącznik Hi-Z: Engages high impedance input for direct connection of guitars or basses.
- Gałka GAIN: Reguluje czułość wejściową podłączonego mikrofonu lub instrumentu.
- Gałka HIGH: Adjusts the high-frequency equalization (treble).
- Gałka LOW: Adjusts the low-frequency equalization (bass).
- Gałka efektów: Controls the amount of signal sent to the internal digital effects processor.
- Gałka PAN: Adjusts the stereo position (left/right) of the channel.
- Pokrętło VOL: Adjusts the output volume of the individual channel.
- Dioda LED PK (szczytowa): Zapala się, gdy sygnał wejściowy jest zbyt wysoki, wskazując na potencjalne przesterowanie.
Stereo Line Input (CH 5-6)
- L/Mono, R Inputs (1/4" Jacks): Connect stereo line-level devices (keyboards, CD players, DJ consoles, etc.). The L/Mono input can be used alone for a mono signal.
- +4/-10dB Switch: Adjusts input sensitivity for different line-level devices.
- Gałka PAN: Dostosowuje pozycję stereo kanału.
- Pokrętło VOL: Adjusts the output volume of the stereo channel.
- Dioda LED PK (szczytowa): Illuminates when the input signal is too high.
USB & Bluetooth Media Player
- Port USB: Connect a USB drive for playing audio files or recording.
- Ekran wyświetlacza: Pokazuje aktualny tryb, informacje o utworze i ustawienia.
- Up/Rewind Button: Navigates up in menus or rewinds current track.
- Down/Forward Button: Navigates down in menus or fast-forwards current track.
- Play/Pause/Enter Button: Plays/pauses audio or confirms menu selections.
- Przycisk MENU: Accesses media player menu options (BT streaming, music player, audio recorder, selection).
- MP3 PLAYER LVL Knob: Controls the output level of the USB/Bluetooth media player.
Digital Effects Processor (24-bit/48 kHz)
- Wyświetlanie efektów: Shows the selected effect number and parameter values.
- Pokrętło PROGRAM: Rotates to select one of the 16 built-in digital effects. Press to confirm selection.
- Przycisk TAP TEMPO: Tap multiple times to set the tempo for time-based effects (e.g., Delay).
- Pokrętło POZIOM: Adjusts the overall wet/dry mix of the effects.
Output & Monitoring Section
- PHONES Jack (1/4"): Podłącz słuchawki w celu monitorowania.
- PHONES LVL Knob: Reguluje głośność wyjścia słuchawkowego.
- MAIN OUT L/R (XLR): Balanced XLR outputs for connecting to powered speakers, ampurządzenia rejestrujące, czyli urządzenia nagrywające.
- MAIN OUT Knob: Steruje ogólną głośnością wyjściową głównego miksu.
- VU Meter (LED): Displays the stereo output level of the main mix.
5.2 Tylny panel ponadview
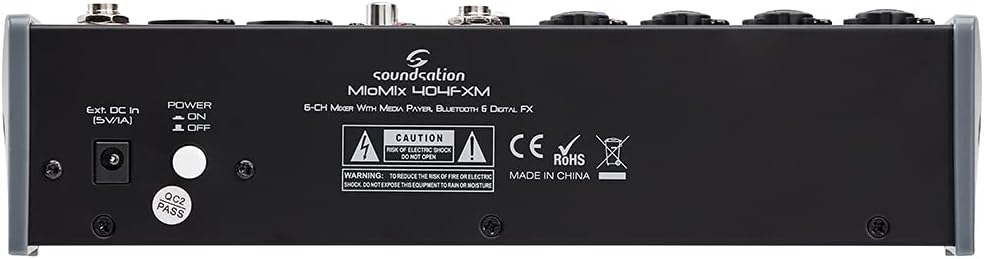
Image: Rear panel of the Soundsation MIOMIX 404FXM mixer, showing the power input, power switch, and main output connections.
- Ext. DC In (5V/1A): Power input for connecting the provided external power adapter.
- Przełącznik WŁ./WYŁ. ZASILANIA: Turns the mixer's power on or off.
- REC OUT L/R (RCA): Unbalanced RCA outputs for connecting to recording devices.
6. Konfiguracja
- Rozpakuj mikser: Carefully remove the MIOMIX 404FXM from its packaging.
- Umieszczenie: Ustaw mikser na stabilnej, płaskiej powierzchni, zapewniając odpowiednią wentylację wokół urządzenia.
- Podłączenie zasilania: Ensure the mixer's POWER switch is in the OFF position. Connect the provided power adapter to the "Ext. DC In (5V/1A)" port on the rear panel, then plug the adapter into a suitable power outlet.
- Pierwsze włączenie: Flip the POWER switch to the ON position. The mixer's indicators should light up, and the display should activate.
- Podłącz wyjścia: Connect the MAIN OUT XLR outputs to your powered speakers, amplifier, or audio interface. Connect headphones to the PHONES jack for monitoring.
- Podłącz wejścia: Connect your microphones, instruments, and line-level devices to the appropriate input channels.
7. Instrukcja obsługi
7.1 Podłączanie źródeł dźwięku
- Mikrofony: Connect dynamic microphones via XLR cables to the MIC/INST Combo jacks. For condenser microphones, connect via XLR and activate the +48V Phantom Power switch for the respective channel.
- Instruments (Guitars/Basses): Connect directly using a 1/4" TS cable to the MIC/INST Combo jack and engage the Hi-Z switch for that channel.
- Line-Level Devices (Keyboards, CD Players): Connect using 1/4" TS cables to the MIC/INST Combo jacks (for mono) or to the CH 5-6 L/Mono and R inputs (for stereo). Adjust the +4/-10dB switch on CH 5-6 as needed.
7.2 Adjusting Channel Levels and EQ
- Set all GAIN, VOL, and MAIN OUT knobs to their minimum positions before starting.
- Speak into the microphone or play your instrument. Slowly increase the GAIN knob for the respective channel until the PK LED flashes only occasionally during the loudest parts.
- Adjust the HIGH and LOW EQ knobs to shape the tone of your sound.
- Use the PAN knob to position the sound in the stereo field.
- Slowly increase the channel's VOL knob to blend it into the overall mix.
7.3 Using the USB Media Player/Recorder
- Odtwarzanie nagranego dźwięku: Insert a USB drive containing WAV, MP3, WMA, or FLAC files into the USB port. The display will show the file list. Use the Up/Down buttons to navigate and Play/Pause/Enter to select and play. Adjust the MP3 PLAYER LVL knob to control its volume in the mix.
- Nagranie: In the media player menu (accessed via MENU button), select the 'Audio Recorder' function. Ensure your USB drive has enough free space. Press Play/Pause/Enter to start and stop recording. The mixer records the main stereo mix.
7.4 Łączność Bluetooth
- Press the MENU button on the media player and select 'BT Streaming'. The display will show 'Bluetooth' and indicate it's searching.
- On your smartphone or Bluetooth device, search for available devices and select 'MIOMIX 404FXM'.
- Once paired, you can stream audio from your device to the mixer. Control the volume using your device and the MP3 PLAYER LVL knob on the mixer.
7.5 Applying Digital Effects
- Turn the FX knob on the desired input channel to send signal to the effects processor.
- Rotate the PROGRAM knob to browse through the 16 available effects. Press the PROGRAM knob to select an effect.
- Adjust the LEVEL knob in the FX section to control the overall amount of effect applied to the mix.
- For time-based effects, use the TAP TEMPO button to synchronize the effect to your music.
7.6 Monitoring and Main Output
- Słuchawki: Connect headphones to the PHONES jack and adjust the PHONES LVL knob for comfortable monitoring.
- Główne wyjście: Slowly increase the MAIN OUT knob to send the mixed audio to your connected speakers or amplifier. Monitor the VU Meter to ensure levels are not clipping (avoiding red LEDs).
8. Konserwacja
- Czyszczenie: Do czyszczenia powierzchni miksera należy używać miękkiej, suchej ściereczki. Nie należy używać płynnych środków czyszczących ani rozpuszczalników.
- Składowanie: Jeśli mikser nie będzie używany przez dłuższy czas, należy przechowywać go w chłodnym i suchym miejscu, z dala od bezpośredniego światła słonecznego i ekstremalnych temperatur.
- Wentylacja: Aby zapobiec przegrzaniu, upewnij się, że otwory wentylacyjne nie są zablokowane.
9. Rozwiązywanie Problemów
- Brak dźwięku:
- Sprawdź wszystkie połączenia zasilania i upewnij się, że mikser jest włączony.
- Verify that all channel VOL knobs, MAIN OUT knob, and PHONES LVL knob are turned up.
- Ensure your speakers/amplifier są włączone i prawidłowo podłączone.
- Check input source connections and ensure GAIN knobs are set appropriately.
- Zniekształcony dźwięk:
- Reduce the GAIN knob for the input channel.
- Check if the PK LED is constantly lit; if so, reduce the input level.
- Lower the MAIN OUT volume if the VU Meter is consistently in the red.
- Zasilanie Phantom nie działa:
- Ensure the +48V switch is engaged for the specific channel.
- Verify that you are using an XLR cable, as phantom power is only supplied via XLR.
- Brak połączenia Bluetooth:
- Ensure the mixer's media player is in 'BT Streaming' mode.
- Make sure your device's Bluetooth is enabled and it's searching for devices.
- Spróbuj rozparować i ponownie sparować urządzenie.
- Problemy z odtwarzaniem/nagrywaniem przez USB:
- Ensure the USB drive is formatted correctly (FAT32 is generally recommended).
- Sprawdź, czy dźwięk files are in a supported format (WAV, MP3, WMA, FLAC).
- For recording, ensure the USB drive has sufficient free space.
10. Specyfikacje
| Funkcja | Specyfikacja |
|---|---|
| Producent | Soundsation |
| Numer modelu | E923E |
| Liczba kanałów | 6 |
| Waga przedmiotu | 1900 gram |
| Technologia łączności | USB, Bluetooth |
| Źródło zasilania | Kabel elektryczny |
| Typ złącza wyjściowego | XLR |
| Wejście audio | XLR, gniazdo 1/4" |
| Tomtage | 48 V (zasilanie fantomowe) |
| Efekty cyfrowe | 16 Presets, 24-bit/48 kHz |
| Obsługiwane formaty audio USB | WAV, MP3, WMA, FLAC |
11. Gwarancja i wsparcie
Soundsation products are designed and manufactured to the highest quality standards. For information regarding warranty coverage, service, or technical support, please refer to the warranty card included with your product or visit the official Soundsation webZachowaj paragon jako dowód zakupu na wypadek ewentualnych roszczeń gwarancyjnych.