1. Wprowadzenie
This instruction manual provides comprehensive guidance for the installation, operation, and maintenance of your AKAMATE Dual Din Car Stereo. Please read this manual thoroughly before using the product to ensure proper function and safety. Keep this manual for future reference.
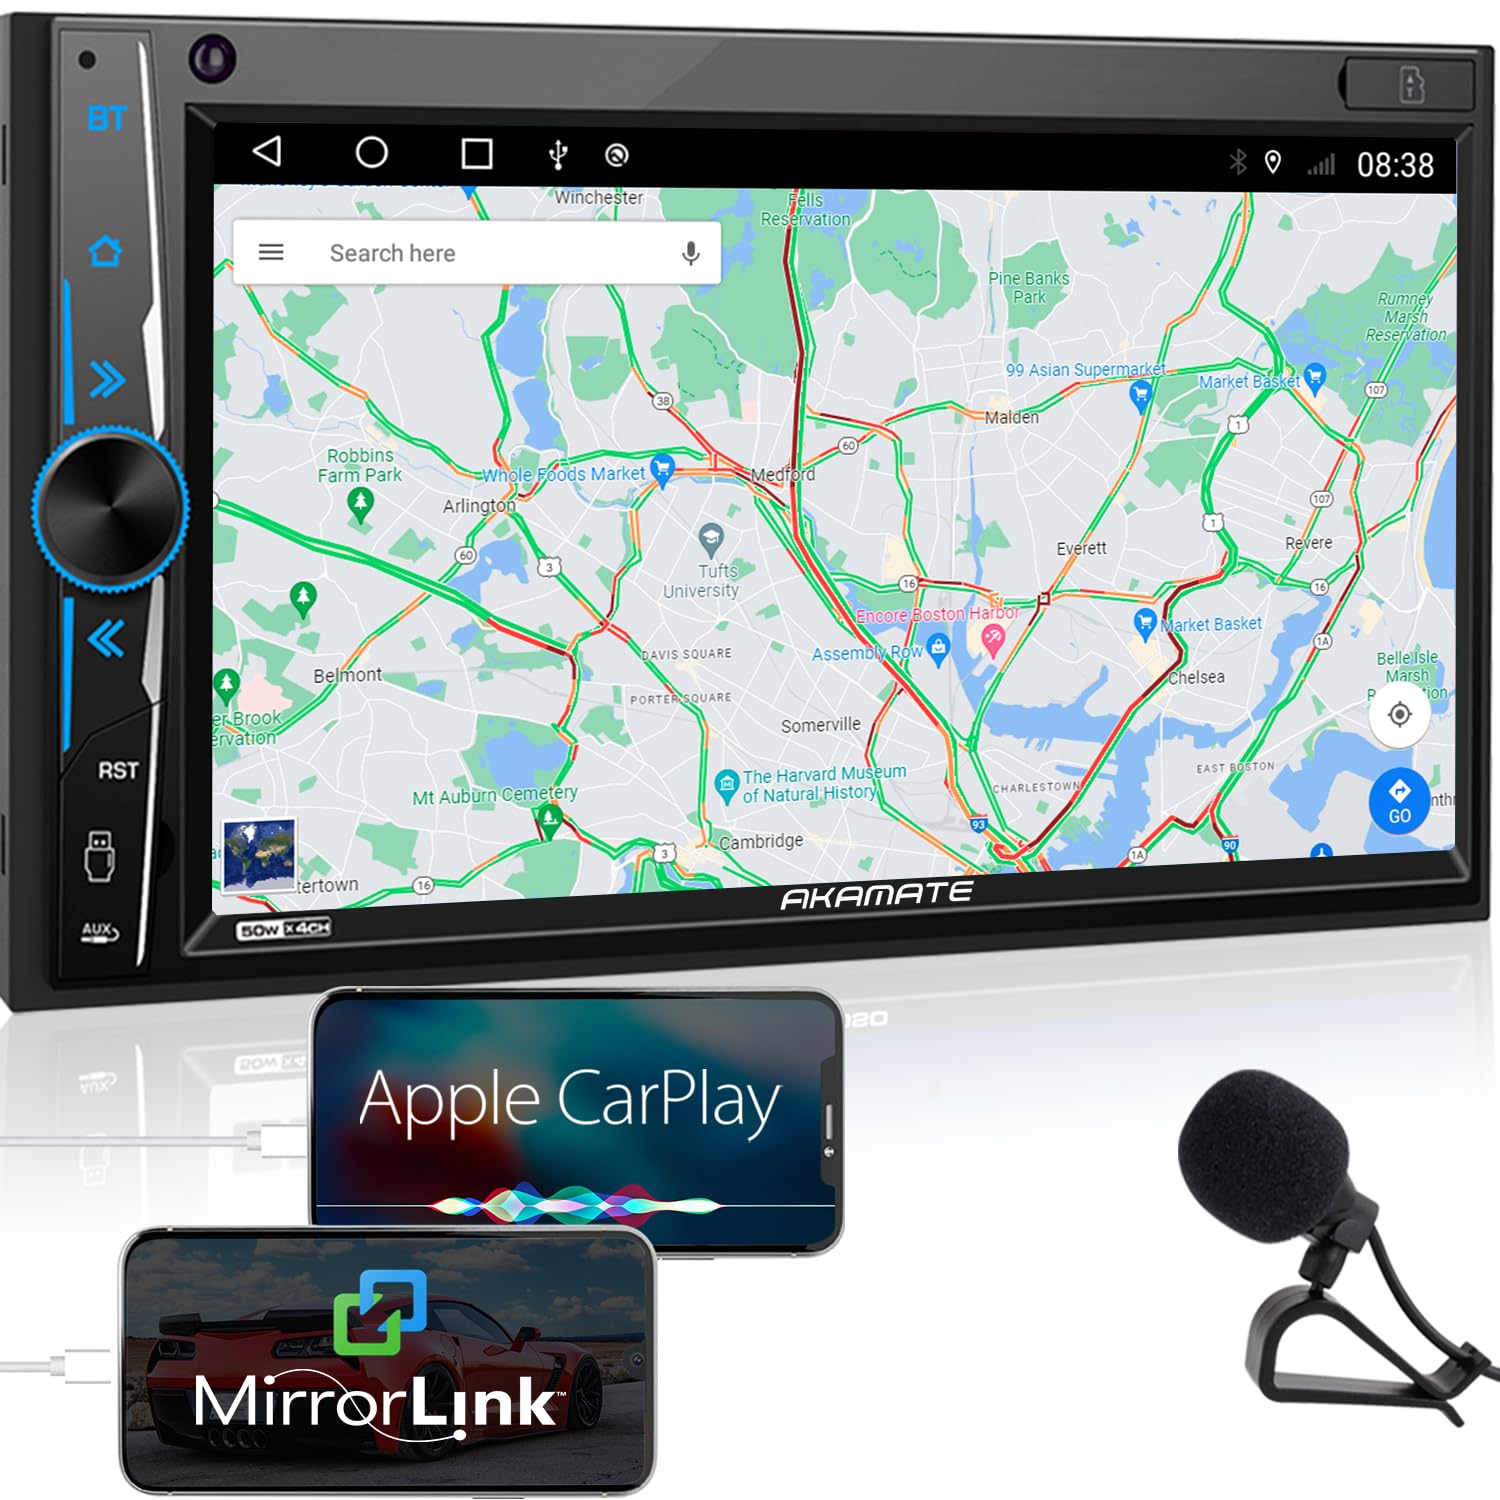
Image 1.1: AKAMATE Dual Din Car Stereo main unit. This image shows the front view of the car stereo with its 7-inch touchscreen and physical buttons on the left side.
2. Informacje dotyczące bezpieczeństwa
WARNING: Improper installation or operation can lead to serious injury or damage. Always consult a qualified professional for installation if you are unsure.
- Nie używaj urządzenia w sposób, który odwraca Twoją uwagę od prowadzenia pojazdu. Zawsze priorytetowo traktuj bezpieczeństwo na drodze.
- Aby zapobiec zwarciom i zagrożeniom elektrycznym, należy upewnić się, że wszystkie przewody są prawidłowo podłączone.
- Do not disassemble or modify the unit. This may cause damage, electric shock, or fire.
- Utrzymuj głośność na poziomie pozwalającym usłyszeć odgłosy ruchu ulicznego.
- Unikaj wystawiania urządzenia na działanie ekstremalnych temperatur, długotrwałego bezpośredniego światła słonecznego i nadmiernej wilgoci.
3. Zawartość opakowania
Sprawdź, czy w opakowaniu znajdują się wszystkie elementy:
- 1 × Dual Din Car Stereo with Frame
- 1 × Power and Audio Cable
- 1 × pilot zdalnego sterowania na podczerwień
- 1 × External Microphone
- 1 × Steering Wheel Control (SWC) Interface
- 1 × Backup Camera and Camera Cable
- 2 × Installation Brackets and Screws
- 2 × User Manuals (This document is one of them)
4. Konfiguracja
4.1. Instalacja
Before beginning installation, ensure the vehicle's battery is disconnected to prevent electrical damage. This unit is designed for a standard Dual Din opening. Please measure your dash opening before installation.

Image 4.1: Wiring diagram and dimensions for the AKAMATE car stereo. This image illustrates the physical dimensions of the head unit and provides a detailed wiring diagram for power, speakers, external microphone, steering wheel control, and camera inputs.
- Przygotuj pulpit nawigacyjny: Remove the existing car stereo and any necessary trim panels to access the wiring harness and mounting area.
- Podłącz okablowanie: Refer to the provided wiring diagram (Image 4.1). Connect the power, ground, accessory, speaker, and other necessary wires from your vehicle's harness to the stereo's harness. Ensure secure connections.
- Mikrofon zewnętrzny: Connect the external microphone to the designated input on the stereo. Position the microphone in a suitable location for clear voice pickup, such as near the sun visor.
- Backup Camera (Optional): If installing the backup camera, connect its video cable to the "Rear Camera Input" on the stereo and its power cable to the vehicle's reverse light circuit.
- Sterowanie z kierownicy (SWC): Connect the SWC wires according to your vehicle's specifications. Configuration may be required in the stereo's settings menu.
- Montaż urządzenia: Secure the stereo into the dashboard opening using the provided brackets and screws. Reinstall any removed trim panels.
- Podłącz ponownie akumulator: Podłącz ponownie akumulator pojazdu.
4.2. Pierwsze włączenie i ustawienia podstawowe
Po instalacji włącz zapłon pojazdu. Radioodtwarzacz powinien się włączyć. Postępuj zgodnie z instrukcjami wyświetlanymi na ekranie, aby przeprowadzić konfigurację początkową, taką jak wybór języka i ustawienie daty/godziny.
5. Instrukcja obsługi
5.1. Touchscreen and General Controls
The unit features a 7-inch 1024x600 HD capacitive touchscreen for intuitive control. Use gestures like tapping, swiping, and pinching (where applicable) to navigate menus and control functions.

Image 5.1: Demonstration of the 7-inch HD Capacitive Touchscreen. This image shows the stereo displaying a high-resolution image of dolphins, with finger gestures indicating touch and swipe functionality.
The physical knob on the left typically controls volume and can be pressed for mute or power functions. Other physical buttons provide quick access to common features like Bluetooth, Home, or Reset.
5.2 Apple CarPlay
Connect your iPhone to the stereo using an original USB cable. The unit will automatically detect your phone and launch Apple CarPlay. You can then access familiar iPhone features directly on the stereo's screen, including:
- Rozmowy telefoniczne
- Navigation (Maps)
- Odtwarzanie muzyki
- Wiadomości
- Asystent głosowy (Siri)

Image 5.2: Apple CarPlay interface showing navigation and call functions. This image displays the car stereo screen with a navigation map and a phone call interface, demonstrating Apple CarPlay functionality.
5.3. Mirror Link (for Android & iOS)
The Mirror Link function allows you to display your smartphone's screen content directly on the stereo. This feature is compatible with iPhone 12 Pro/12 and earlier models, and most Android 11 phones.
- Connect your smartphone to the stereo via a USB cable.
- Select the "Mirror Link" or "Phone Link" option on the stereo's interface.
- Postępuj zgodnie ze wskazówkami wyświetlanymi na ekranie telefonu i zestawu stereo, aby nawiązać połączenie.
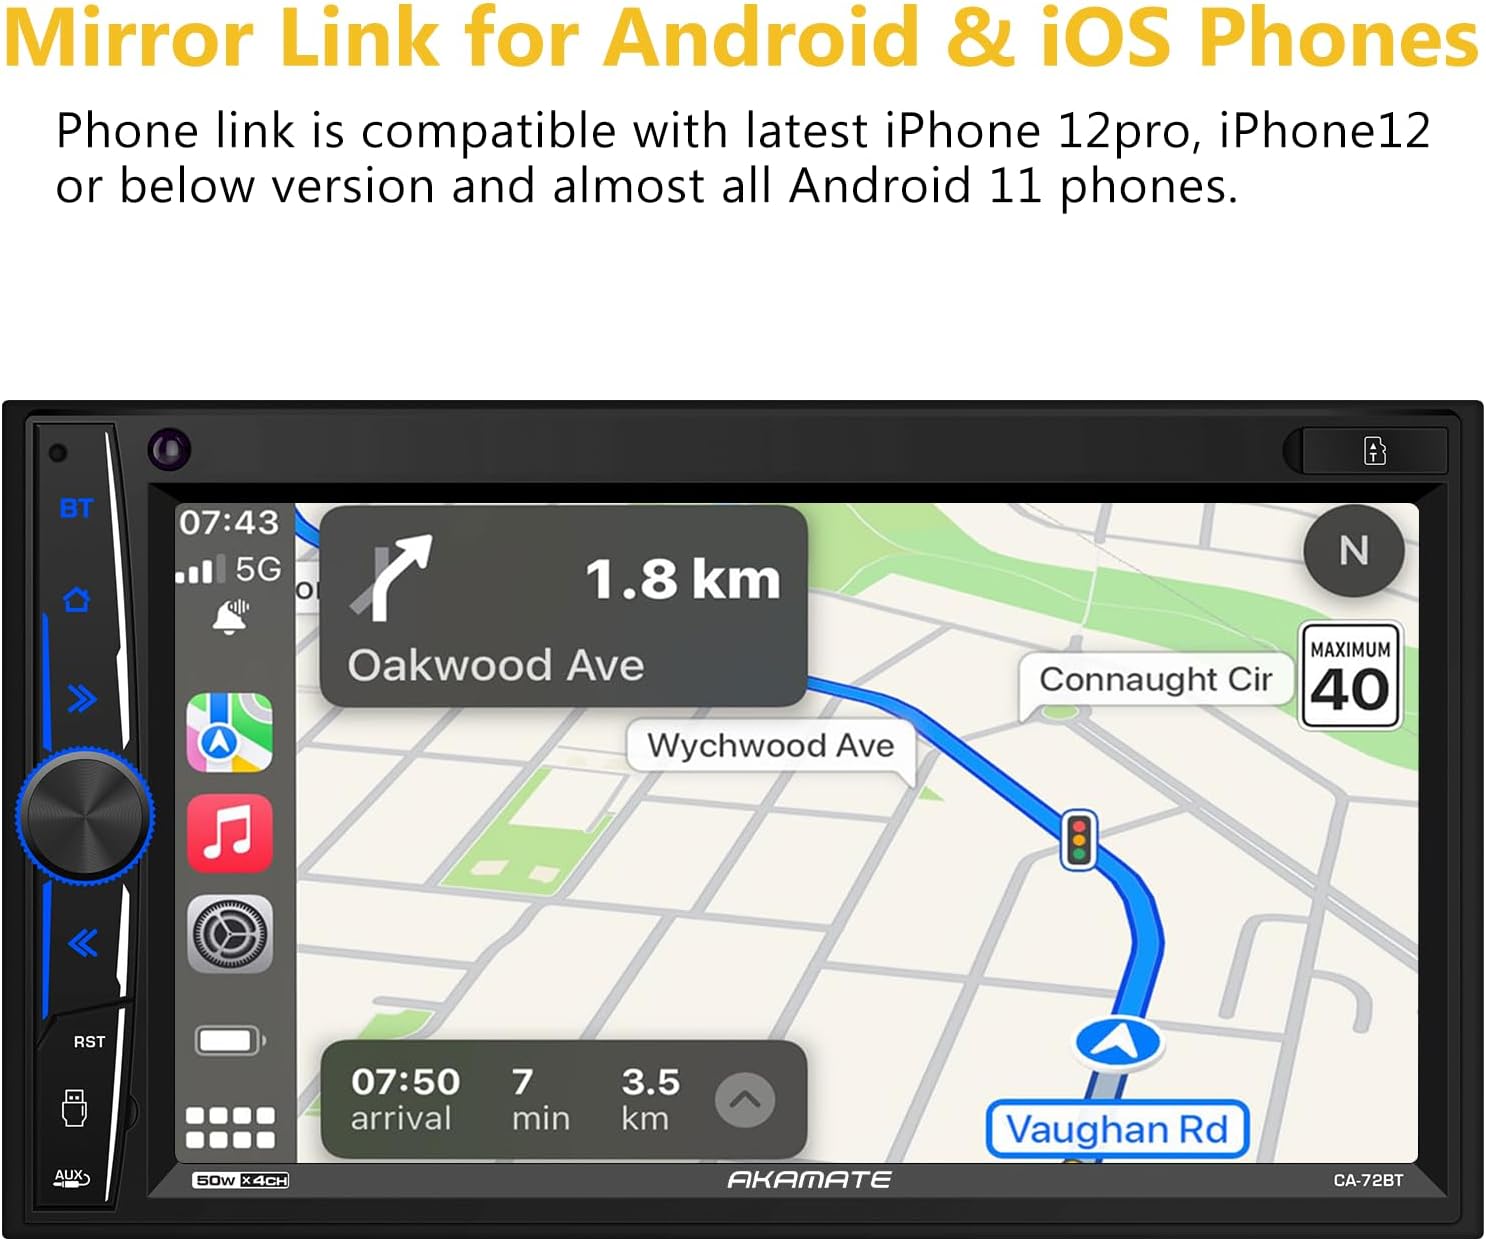
Image 5.3: Mirror Link feature displaying a phone's navigation screen on the car stereo. This image shows the stereo screen mirroring a navigation application from a connected smartphone.
5.4. Łączność Bluetooth 5.0
The unit supports Bluetooth 5.0 for stable wireless connections, enabling hands-free calling and audio streaming.
- Łączenie w pary: On the stereo, navigate to the Bluetooth menu. On your smartphone, search for available Bluetooth devices and select "AKAMATE" (or similar device name). Enter the PIN (usually "0000") if prompted.
- Rozmowy bez użycia rąk: Once paired, you can make and receive calls directly through the stereo. The dual microphone design ensures clear audio for conversations.
- Strumieniowe przesyłanie dźwięku: Stream music from your phone or apps like Spotify and Pandora to the car stereo. Use the stereo's controls to manage playback (play/pause, skip tracks, adjust volume).

Image 5.4: Bluetooth 5.0 interface showing a phone dialer and indicating dual microphone functionality. This image displays the stereo screen with a phone keypad for dialing and highlights the Bluetooth connection and dual microphone feature.
5.5. Radio (FM/AM)
Access the Radio function from the main menu. Use the touchscreen to scan for stations, save presets, and switch between FM and AM bands.
5.6. Odtwarzanie z USB/SD
Insert a USB drive or SD card containing media files into the designated ports. The stereo will automatically detect the media and allow you to browse and play audio or video files.
5.7. Audio Settings (16-Band EQ)
Navigate to the Audio or EQ settings menu. The 16-band customizable equalizer allows for precise adjustment of audio frequencies to suit your preferences. Preset EQ modes (Rock, Pop, Jazz, etc.) are also available.
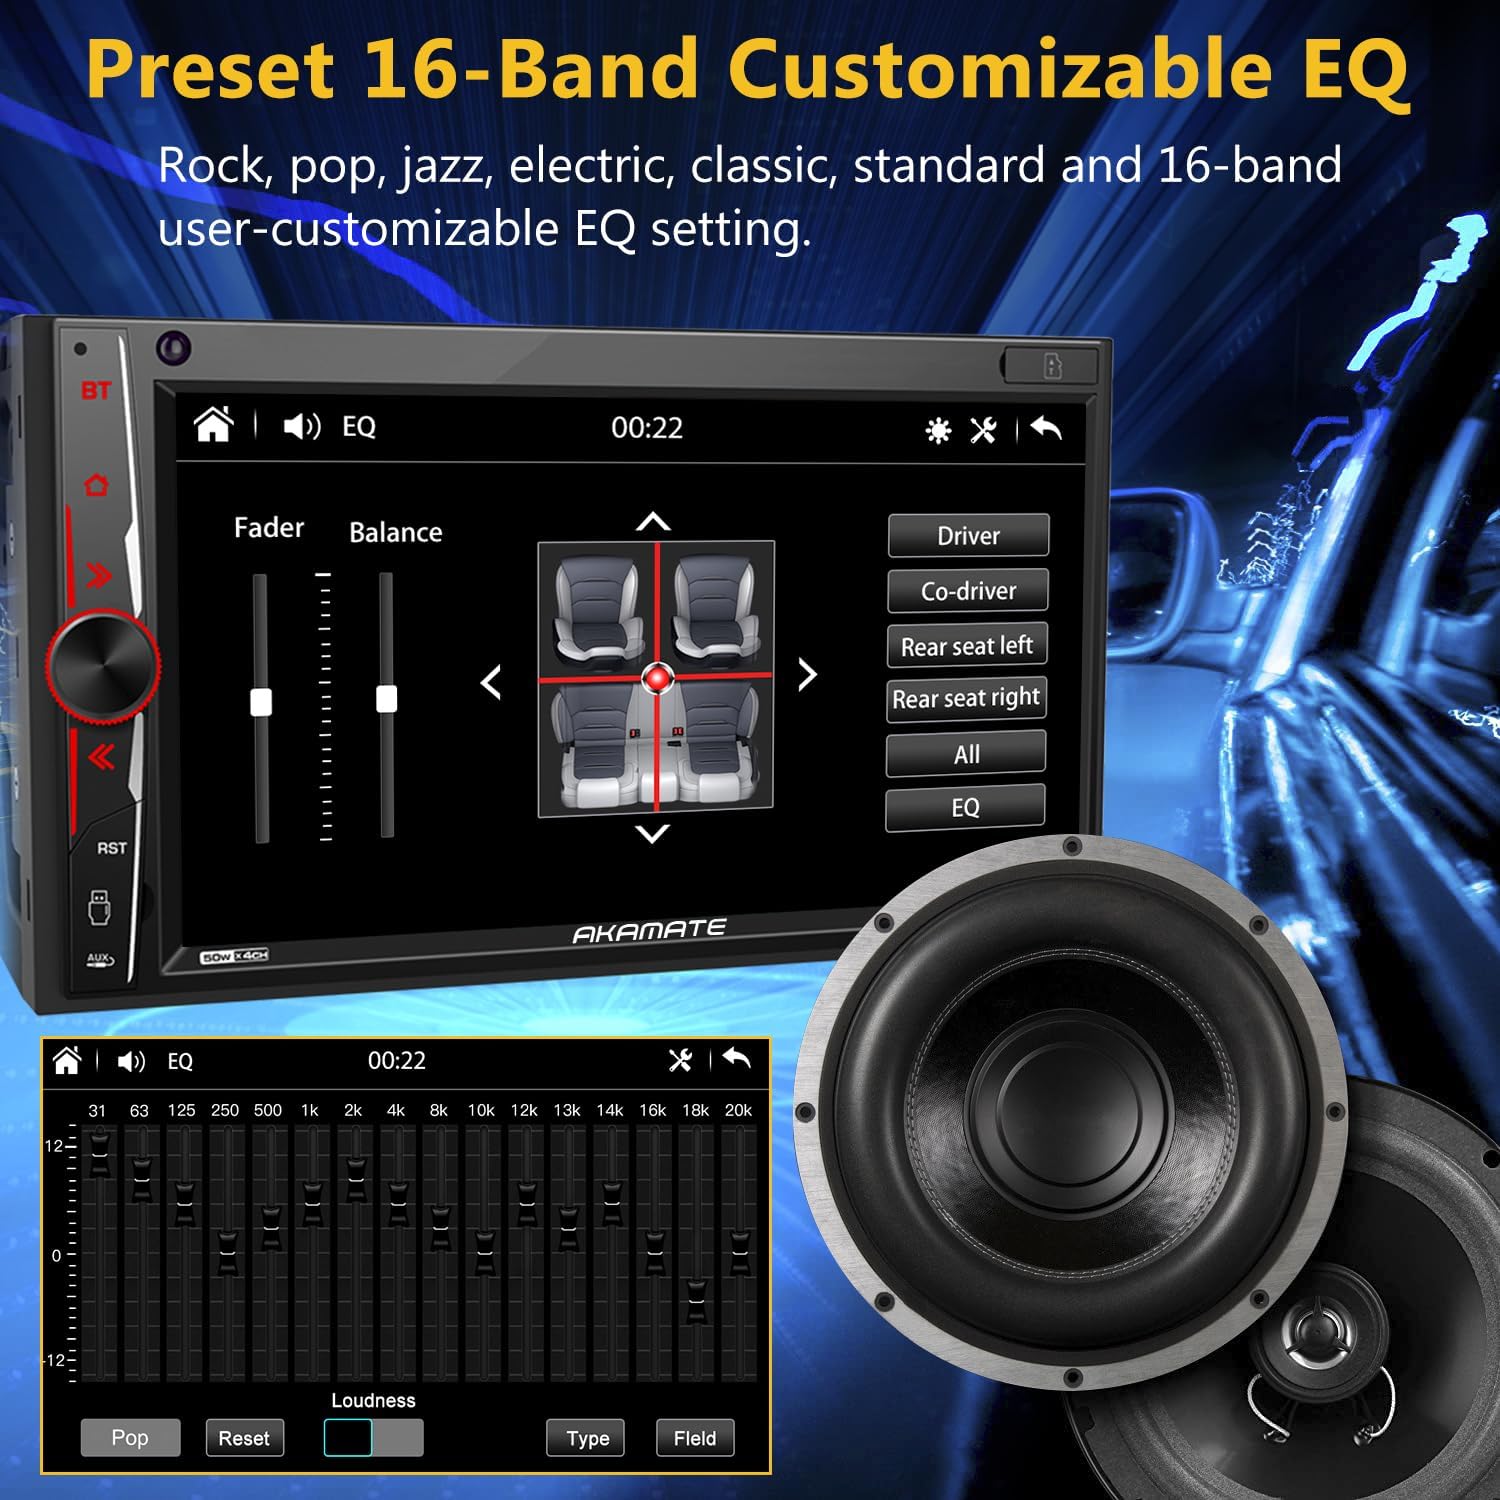
Image 5.5: 16-Band Customizable EQ settings interface. This image shows the stereo screen displaying the equalizer settings, allowing users to adjust audio frequencies and select preset sound modes.
5.8. Tyłview Wejście kamery
When the vehicle is shifted into reverse, the stereo automatically displays the video feed from the connected rearview camera. The included camera provides 720P HD night vision for improved visibility.

Obraz 5.6: Tyłview camera display showing 720P quality. This image compares the clarity of a 720P rearview camera feed with a lower resolution one, highlighting the enhanced detail provided by the included camera.
5.9. Sterowanie z kierownicy (SWC)
If your vehicle supports steering wheel controls, you can configure them through the stereo's settings menu. This allows you to control functions like volume, track changes, and mode selection directly from your steering wheel.
6. Konserwacja
- Czyszczenie ekranu: Delikatnie przetrzyj ekran dotykowy miękką, niepozostawiającą włókien ściereczką. W przypadku uporczywych plam delikatnie przetrzyj.ampPrzetrzyj ściereczkę wodą lub środkiem do czyszczenia ekranów. Unikaj silnych środków chemicznych i materiałów ściernych.
- Ogólne sprzątanie: Utrzymuj urządzenie w czystości, usuwając kurz i zanieczyszczenia. Do czyszczenia okolic przycisków i portów używaj miękkiej szczotki lub sprężonego powietrza.
- Temperatura: Unikaj wystawiania urządzenia na bezpośrednie działanie promieni słonecznych lub ekstremalnych temperatur przez dłuższy czas, ponieważ może to wpłynąć na wydajność i żywotność urządzenia.
7. Rozwiązywanie Problemów
| Problem | Możliwa przyczyna | Rozwiązanie |
|---|---|---|
| Brak zasilania / Urządzenie nie włącza się. | Incorrect wiring (power/ground), blown fuse, vehicle battery issue. | Check all power connections (yellow, red, black wires). Verify vehicle fuses. Ensure battery is charged. |
| Brak dźwięku. | Zbyt niska głośność, wyciszenie włączone, nieprawidłowe okablowanie głośników, ampproblem z lifierem. | Zwiększ głośność. Sprawdź, czy wyciszenie jest aktywne. Sprawdź połączenia głośników. Upewnij się, że głośniki są podłączone. amplifier (jeśli jest używany) jest zasilany. |
| Problemy z połączeniem Bluetooth. | Device not in pairing mode, incorrect PIN, interference, device already connected. | Ensure both devices are in pairing mode. Re-enter PIN. Move closer to the unit. Disconnect other Bluetooth devices. |
| Apple CarPlay / Mirror Link not working. | Non-original USB cable, phone not compatible, software glitch. | Use an original USB cable. Check phone compatibility. Restart both phone and stereo. |
| Tyłview kamera nie wyświetla obrazu. | Nieprawidłowe okablowanie kamery, problem z zasilaniem kamery, przewód wyzwalacza biegu wstecznego niepodłączony. | Verify camera video and power connections. Ensure the reverse trigger wire (usually pink/brown) is correctly connected to the vehicle's reverse light. |
| Touchscreen unresponsive or slow. | Tymczasowy problem z oprogramowaniem, konieczna kalibracja ekranu. | Perform a system reset (locate the RST button, often a small pinhole). Check for firmware updates if available. |
8. Specyfikacje
- Marka: AKAMAT
- Model: B093B9ZPS5
- ASIN: B093B9ZPS5
- GTIN/UPC: 759337201146
- Wyświetlacz: 7-inch HD Capacitive Touchscreen (1024x600 resolution, 178° viewkąt)
- Łączność: Bluetooth 5.0, USB, SD Card, A/V Input
- Cechy: Apple CarPlay, Mirror Link (Android/iOS), FM/AM Radio Tuner, RDS, 16-Band EQ, Rearview Camera Input (720P HD), Steering Wheel Control (SWC) support, Dual Microphone (built-in & external)
- Wyjście audio: Stereo, 4 Channels
- Moc wyjściowa: 200 watów
- Obsługiwane usługi internetowe: Pandora, Spotify (via connected smartphone)
- Metody kontroli: Touchscreen, Mechanical Knob, Voice (via CarPlay/Mirror Link), IR Remote Control
- Obsługiwane formaty: Audio and Video Interleave (AVI), WMA, WAV (and others for video playback up to 1920x1080P)
- Ładowanie przez USB: 1.5A for phone charging
- Podświetlenie przycisków: 7 different LED colors
9. Gwarancja i pomoc techniczna
AKAMATE products are designed for reliability and performance. For specific warranty details, please refer to the warranty card included with your purchase or contact AKAMATE customer support.
If you encounter any issues during installation or operation that are not covered in this manual, please contact AKAMATE customer service for assistance. Our support team is available to help and will respond within 24 hours.
Informacje kontaktowe: Refer to your product packaging or the official AKAMATE webna naszej stronie znajdziesz najnowsze dane kontaktowe.