
1. Wprowadzenie
Thank you for choosing the Qlima PH635 Portable Reversible Air Conditioner. This manual provides essential information for the safe and efficient operation, maintenance, and troubleshooting of your appliance. Please read it thoroughly before use and keep it for future reference.
The Qlima PH635 is a versatile unit designed to provide comfort in various conditions, offering cooling, heating, dehumidification, and fan functions. It features automatic stop, programming backup in case of power interruption, and adjustable ventilation.
2. Instrukcje bezpieczeństwa
Aby zapobiec obrażeniom użytkownika lub innych osób oraz uszkodzeniom mienia, należy postępować zgodnie z poniższymi instrukcjami. Nieprawidłowa obsługa spowodowana ignorowaniem instrukcji może spowodować szkody lub uszkodzenia.
- Always ensure the unit is placed on a flat, stable surface to prevent tipping.
- Do not operate the unit with a damaged power cord or plug. If the supply cord is damaged, it must be replaced by the manufacturer, its service agent, or similarly qualified persons to avoid a hazard.
- Nie wkładaj palców ani ciał obcych do wlotów i wylotów powietrza.
- Trzymaj urządzenie z dala od materiałów łatwopalnych i otwartego ognia.
- Należy zapewnić odpowiednią wentylację wokół urządzenia. Nie należy blokować otworów wentylacyjnych.
- Przed czyszczeniem lub jakąkolwiek konserwacją należy odłączyć urządzenie od zasilania.
- Z urządzenia mogą korzystać dzieci w wieku od 8 lat oraz osoby o ograniczonej sprawności fizycznej, sensorycznej lub umysłowej, a także osoby nieposiadające odpowiedniego doświadczenia lub wiedzy, jeśli znajdują się pod nadzorem lub zostały poinstruowane na temat bezpiecznego korzystania z urządzenia i rozumieją związane z tym zagrożenia.
- Dzieci powinny znajdować się pod nadzorem, aby mieć pewność, że nie bawią się urządzeniem.
3. Zawartość opakowania
Sprawdź, czy po rozpakowaniu znajdują się wszystkie elementy:
- Qlima PH635 Portable Air Conditioner Unit
- Wąż wydechowy
- Window Sealing Kit (adaptor, window slide bar)
- Zdalne sterowanie
- Instrukcja obsługi (ten dokument)
4. Koniec produktuview
4.1 Składniki
Familiarize yourself with the main parts of your Qlima PH635 unit:
- Control Panel (top of unit)
- Air Outlet (front, adjustable louvers)
- Air Inlet (rear/sides, with air filter)
- Exhaust Air Outlet (rear, for hose connection)
- Continuous Drainage Port (rear, for dehumidification)
- Casters (bottom, for mobility)
- Przewód zasilający
4.2 Zdjęcie produktu
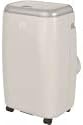
Image showing the Qlima PH635 portable reversible air conditioner from a slight angle, highlighting its compact, rectangular design with a light-colored casing and top control panel. The unit is equipped with casters for easy movement.
5. Konfiguracja
5.1 Rozpakowanie
- Ostrożnie wyjmij urządzenie z opakowania.
- Usuń wszystkie materiały opakowaniowe i pozbądź się ich w sposób odpowiedzialny.
- Ensure no parts are missing or damaged.
5.2 Umieszczenie
- Place the air conditioner on a firm, level surface in a location that allows for proper air circulation.
- Maintain a minimum distance of 30 cm (12 inches) from walls or other objects to ensure adequate airflow.
- Unikać umieszczania urządzenia w bezpośrednim świetle słonecznym lub w pobliżu źródeł ciepła.
5.3 Montaż przewodu wydechowego
- Attach one end of the exhaust hose to the exhaust air outlet on the rear of the unit. Twist clockwise until secure.
- Extend the exhaust hose to the nearest window or vent opening. Keep the hose as short and straight as possible to maximize efficiency.
5.4 Montaż zestawu okiennego
For optimal performance, use the provided window sealing kit to prevent hot air from re-entering the room.
- Adjust the window slide bar to fit your window opening.
- Secure the slide bar in the window.
- Connect the other end of the exhaust hose to the adaptor on the window kit.
- Ensure all connections are sealed to prevent air leakage.
5.5 Drainage Setup (Dehumidification Mode)
When using the dehumidification function, continuous drainage is recommended. Connect a drainage hose (not supplied) to the continuous drainage port on the rear of the unit and lead it to a suitable drain or container.
6. Instrukcja obsługi
6.1 Panel sterowania i pilot zdalnego sterowania
The unit can be operated via the control panel on top of the unit or the supplied remote control. The functions are generally identical.
6.2 Włączanie/wyłączanie zasilania
Naciśnij MOC przycisk, aby włączyć lub wyłączyć urządzenie.
6.3 Wybór trybu
Naciśnij TRYB przycisk umożliwiający przełączanie się między dostępnymi trybami:
- Tryb chłodzenia: Aby schłodzić pomieszczenie. Ustaw żądaną temperaturę.
- Tryb ogrzewania: Do ogrzewania pomieszczenia. Ustaw żądaną temperaturę.
- Tryb osuszania: Removes moisture from the air. Fan speed is typically fixed in this mode.
- Tryb wentylatora: Cyrkuluje powietrze bez chłodzenia i ogrzewania.
6.4 Regulacja temperatury
W trybie chłodzenia lub grzania użyj UP I W DÓŁ arrow buttons to set your desired temperature. The temperature range is typically 16°C to 30°C (61°F to 86°F).
6.5 prędkości wentylatora
Naciśnij PRĘDKOŚĆ WIATRAKA button to select between Low, Medium, or High fan speeds. This function is available in Cooling, Heating, and Fan modes.
6.6 Funkcja timera
The timer allows you to set a specific time for the unit to turn on or off automatically.
- Naciśnij REGULATOR CZASOWY przycisk.
- Użyj UP I W DÓŁ arrow buttons to set the desired time (in hours).
- Naciskać REGULATOR CZASOWY jeszcze raz, aby potwierdzić.
6.7 Tryb uśpienia
Activate Sleep Mode for quieter operation and gradual temperature adjustment during sleep. Press the SPAĆ przycisk.
6.8 Automatic Stop and Programming Backup
The Qlima PH635 features an automatic stop function when the desired temperature is reached or the water tank is full (in dehumidification mode). In case of a power cut, the unit will automatically resume operation with the last settings once power is restored, thanks to its programming backup feature.
7. Konserwacja
Regularna konserwacja zapewnia optymalną wydajność i wydłuża żywotność klimatyzatora.
7.1 Czyszczenie urządzenia
- Zawsze odłączaj urządzenie od zasilania przed czyszczeniem.
- Przetrzyj powierzchnię zewnętrzną miękką,amp płótno. Nie używaj ostrych środków chemicznych ani ściernych środków czyszczących.
- Upewnij się, że do podzespołów elektrycznych nie dostanie się woda.
7.2 Czyszczenie filtrów powietrza
Filtry powietrza należy czyścić co dwa tygodnie lub częściej, w zależności od intensywności użytkowania i jakości powietrza.
- Wyłącz urządzenie i odłącz je od zasilania.
- Locate and remove the air filters from the rear/sides of the unit.
- Umyj filtry pod bieżącą wodą (ciepłą, nie gorącą) lub usuń kurz odkurzaczem.
- Przed ponownym zamontowaniem należy poczekać, aż filtry całkowicie wyschną.
7.3 Magazynowanie sezonowe
Jeżeli urządzenie nie będzie używane przez dłuższy okres:
- Spuść nagromadzoną wodę z urządzenia.
- Clean the air filters and the exterior.
- Przechowuj urządzenie w suchym i chłodnym miejscu, przykryte, aby chronić je przed kurzem.
8. Rozwiązywanie Problemów
Przed skontaktowaniem się z obsługą klienta zapoznaj się z poniższą tabelą zawierającą listę typowych problemów i ich rozwiązania.
| Problem | Możliwa przyczyna | Rozwiązanie |
|---|---|---|
| Jednostka się nie włącza | No power supply; Power cord not plugged in; Fuse blown; Water tank full (in dehumidification) | Check power outlet; Plug in power cord firmly; Replace fuse; Empty water tank. |
| Brak chłodzenia/ogrzewania | Air filter clogged; Exhaust hose blocked or disconnected; Room temperature already reached; Doors/windows open; Room too large | Clean air filter; Check exhaust hose connection and ensure it's not blocked; Adjust desired temperature; Close doors/windows; Consider room size limitations. |
| Wyciek wody | Drainage plug loose; Unit not level; Continuous drainage hose blocked | Ensure drainage plug is secure; Place unit on a level surface; Check and clear continuous drainage hose. |
| Hałaśliwa praca | Unit not on a level surface; Air filter clogged; Foreign object in fan | Ensure unit is on a level surface; Clean air filter; Turn off and unplug, then check for obstructions (if safe to do so). |
9. Specyfikacje
Key technical specifications for the Qlima PH635 Portable Reversible Air Conditioner:
| Funkcja | Specyfikacja |
|---|---|
| Marka | Qlima |
| Nazwa modelu | PH635 |
| Wymiary (dł. x szer. x wys.) | Wymiary 71 x 33 x 44 cm |
| Waga | 31 kilograma |
| Wydajność chłodzenia | 3200 Watts (approx. 12000 BTU) |
| Moc grzewcza | 3500 watów (zgodnie z tytułem produktu) |
| Poziom hałasu | 55 decybeli |
| Tomtage | 240 wolty |
| Cechy specjalne | Heating and Cooling Function, Programmable, Automatic Stop, Programming Backup |
| Sezonowy współczynnik efektywności energetycznej (SEER) | 6.1 |
| Typ instalacji | Przenośny |
| Źródło zasilania | Elektryczny przewodowy |
10. Gwarancja i wsparcie
For warranty information and customer support, please refer to the documentation provided with your purchase or contact your retailer. Information regarding the availability of spare parts is currently unavailable.
When contacting support, please have your model number (PH635) and purchase details ready.