
1. Wprowadzenie
This manual provides essential instructions for the safe and efficient operation, installation, maintenance, and troubleshooting of your Euhomy Commercial Ice Maker. Please read this manual thoroughly before using the appliance and retain it for future reference.
The Euhomy Commercial Ice Maker is designed to produce up to 84 pounds of ice per 24 hours, with an ice storage capacity of 8.8 pounds. It is suitable for various settings including homes, small businesses, bars, and parties.
2. Instrukcje bezpieczeństwa
- Ensure the ice maker is connected to a grounded power outlet with the correct voltage (115 woltów).
- Nie używaj urządzenia z uszkodzonym przewodem lub wtyczką. W przypadku uszkodzenia skontaktuj się z wykwalifikowanym serwisantem.
- Utrzymuj otwory wentylacyjne drożne.
- W tym urządzeniu nie należy przechowywać substancji wybuchowych, takich jak puszki aerozolowe z łatwopalnym paliwem.
- Urządzenie to nie jest przeznaczone do użytku przez osoby (w tym dzieci) o ograniczonej sprawności fizycznej, sensorycznej lub umysłowej, a także osoby nieposiadające odpowiedniego doświadczenia lub wiedzy, chyba że znajdują się one pod nadzorem osoby odpowiedzialnej za ich bezpieczeństwo lub otrzymały od niej instrukcje dotyczące korzystania z urządzenia.
- Zawsze odłączaj kostkarkę do lodu od zasilania przed czyszczeniem lub jakąkolwiek konserwacją.
- Nie zanurzaj urządzenia, przewodu ani wtyczki w wodzie lub innych płynach.
- Do produkcji lodu należy używać wyłącznie wody pitnej.
3. Konfiguracja i instalacja
Before first use, ensure the ice maker is placed on a stable, level surface away from direct sunlight and heat sources. Allow at least 4 inches of space around the unit for proper ventilation.
3.1 Przyłącze zasilania wodą
Your Euhomy ice maker supports two methods for water supply: manual addition or direct connection to a water inlet pipe.

Rysunek 3.1: Illustration of the two water supply methods for the ice maker. Water can be added manually from the top or connected via a water inlet pipe at the rear.
For direct water inlet pipe connection, follow these steps:

Rysunek 3.2: Detailed steps for connecting the water inlet pipe. This involves removing a plug, inserting the pipe, and securing it with a blue ring.
- Remove Blue Ring and Plug: Locate the water inlet port at the back of the machine. Carefully remove the blue retaining ring and the plug.
- Włóż rurę: Insert the water inlet pipe firmly into the port.
- Secure Blue Ring: Push the blue retaining ring back into place to secure the pipe connection.
3.2 Wymiary produktu
Ensure adequate space for the ice maker. The dimensions are approximately 13.4 inches (D) x 13.6 inches (W) x 24 inches (H).

Rysunek 3.3: Nadview of the ice maker's dimensions and included accessories like the ice scoop and water hoses.
3.3 regulowane nóżki
The ice maker is equipped with adjustable feet to ensure stability on uneven surfaces.

Rysunek 3.4: Adjustable foot for leveling the appliance.
4. Instrukcja obsługi
4.1 Panel sterowania ponadview
Maszyna do lodu jest wyposażona w intuicyjny panel sterowania LCD, który zapewnia łatwą obsługę.

Rysunek 4.1: LCD Control Panel with indicators and buttons.
- ŚWIATŁO: Activates the internal light.
- REGULATOR CZASOWY: Sets a timer for operation.
- CZYSTY: Initiates the self-cleaning program.
- WŁ./WYŁ.: Włącza i wyłącza urządzenie.
- Przyciski +/-: Used for adjusting settings, such as ice thickness or timer duration.
Indicator Symbols:
- Flashing Snowflake: Indicates the de-icing process is active.
- Rotating Fan: Indicates the self-cleaning program is running.
- Full Ice Bucket: Indicates the ice storage bin is full, and the machine has stopped ice production.
To switch between water tank supply and faucet connection, press the ON/OFF button for 5 seconds.
4.2 Produkcja lodu
The ice maker produces 32 ice cubes per cycle and has an automatic overflow feature to prevent overfilling.

Rysunek 4.2: Ice production capacity and automatic overflow mechanism.
The machine is designed for high efficiency and low noise operation.

Rysunek 4.3: Ice maker in a kitchen environment, demonstrating its quiet operation.
4.3 Ice Cube Characteristics
The ice maker produces cube-type ice that is easy to break and crystal clear. An average cycle produces 32 ice cubes in approximately 13 minutes.
Rysunek 4.4: Features of the ice cubes and production process.
4.4 Curved Flip Cover Design
The ice maker features a curved flip cover for easy access to the ice bin.

Rysunek 4.5: Curved flip cover for convenient access.
4.5 Nano Blue Light
The interior of the ice maker is equipped with a Nano Blue Light.

Rysunek 4.6: Interior with Nano Blue Light.
5. Konserwacja
Regularne czyszczenie i konserwacja są kluczowe dla długowieczności i optymalnej pracy Twojej kostkarki do lodu.
5.1 Procedura czyszczenia

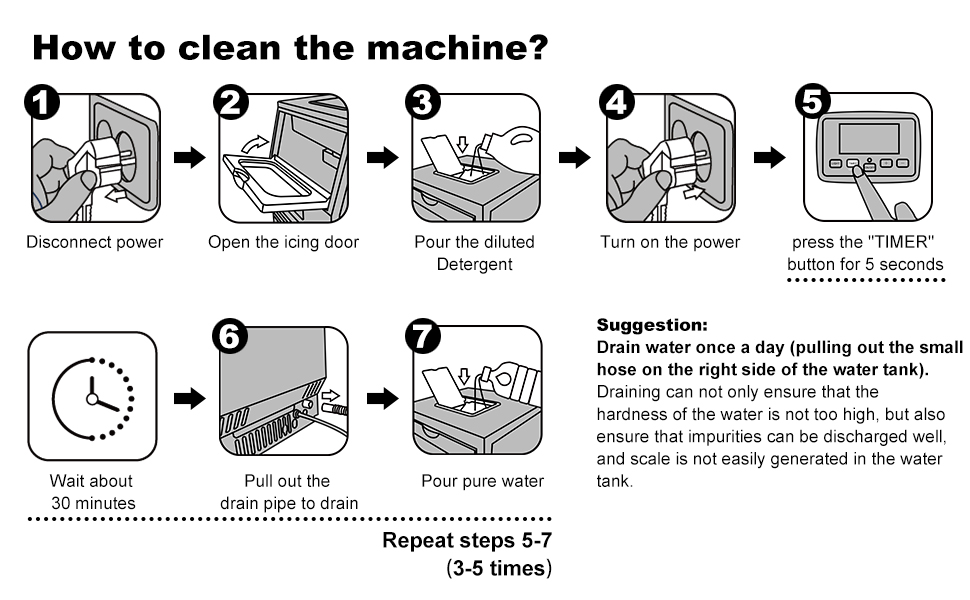
Rysunek 5.1: Step-by-step guide for cleaning the ice maker.
- Odłącz zasilanie: Odłącz kostkarkę do lodu od gniazdka elektrycznego.
- Open Icing Door: Open the front door to access the ice-making components.
- Pour Diluted Detergent: Pour a diluted cleaning solution (e.g., food-grade citric acid solution) into the water tank.
- Włącz zasilanie: Plug the ice maker back in.
- Rozpocznij czyszczenie: Press the "TIMER" button for 5 seconds to start the self-cleaning cycle.
- Czekać: Allow the cleaning cycle to run for approximately 30 minutes.
- Drenaż: Pull out the drain pipe located on the right side of the water tank to drain the cleaning solution.
Sugestia: Drain water once a day by pulling out the small hose on the right side of the water tank. Regular draining helps prevent the buildup of impurities and scale, ensuring optimal ice quality and machine performance. After draining, pour pure water into the tank and repeat steps 5-7 (3-5 times) to thoroughly rinse the system.
6. Rozwiązywanie Problemów
If you encounter issues with your ice maker, refer to the following common troubleshooting steps:
| Problem | Możliwa przyczyna | Rozwiązanie |
|---|---|---|
| Kostkarka do lodu nie produkuje lodu | No water supply; Water pump malfunction; Refrigerant leak; Ambient temperature too high. | Check water connection/fill water tank; Contact customer support; Ensure proper ventilation. |
| Kostki lodu są za małe lub za miękkie | Water temperature too high; Ambient temperature too high; Insufficient water flow. | Use colder water; Ensure proper ventilation; Check water supply. |
| Maszyna jest głośna | Unit not level; Fan obstruction; Normal operating sounds. | Adjust leveling feet; Clear obstructions from fan; Some noise is normal during operation. |
| "Ice Full" indicator is on, but bin is not full | Czujnik lodu jest zablokowany lub brudny. | Wyczyść czujnik lodu. |
| Wyciek wody | Loose water connections; Damaged drain pipe. | Tighten all water connections; Inspect and replace drain pipe if damaged. |
If the problem persists after attempting these solutions, please contact Euhomy customer support.
7. Specyfikacje
| Funkcja | Specyfikacja |
|---|---|
| Marka | EUHOMIA |
| Nazwa modelu | Komercyjny kostkarka do lodu |
| Wymiary produktu (Gł. x Szer. x Wys.) | 13.4" x 13.6" x 24" |
| Zdolność produkcji lodu | 84 lbs / 24 Hours |
| Pojemność przechowywania lodu | 8.8 funtów |
| Tomtage | 115 wolty |
| Chłodziwo | R134a |
| Typ materiału | Stal nierdzewna |
| ASIN | B0912YPBL1 |
8. Gwarancja i wsparcie
For warranty information and customer support, please refer to the documentation included with your product or visit the official Euhomy brand store.

Rysunek 8.1: Customer Support Icon.
Odwiedź EUHOMY Store Aby uzyskać więcej informacji.