1. Wprowadzenie
Thank you for choosing the Orbegozo DH 1250 Dehumidifier. This manual provides essential information for the safe and efficient operation, maintenance, and troubleshooting of your appliance. Please read it thoroughly before use and keep it for future reference. This dehumidifier is designed to reduce humidity levels in indoor spaces up to 40 square meters, helping to prevent mold, mildew, and other moisture-related issues.
2. Instrukcje bezpieczeństwa
Aby zapewnić bezpieczną obsługę, należy zawsze przestrzegać następujących środków ostrożności:
- Upewnij się, że zasilanie jest zgodne z objtage specified on the appliance's rating label (230V).
- Nie należy używać osuszacza powietrza, jeśli przewód lub wtyczka są uszkodzone.
- Place the unit on a stable, level surface to prevent water spillage.
- Maintain at least 20 cm (8 inches) clearance around the air inlet and outlet for proper airflow.
- Nie wkładaj żadnych przedmiotów do otworów wentylacyjnych.
- Przed czyszczeniem, przenoszeniem lub wykonywaniem prac konserwacyjnych należy odłączyć urządzenie od zasilania.
- This appliance uses R290 refrigerant, which is flammable. Handle with care and ensure proper ventilation during maintenance or repair.
- Przechowywać urządzenie w miejscu niedostępnym dla dzieci i zwierząt domowych.
- Nie należy używać urządzenia w miejscach, w których przechowywane są łatwopalne gazy lub ciecze.
- Nie zanurzaj urządzenia w wodzie ani innych płynach.
3. Koniec produktuview
Familiarize yourself with the components of your Orbegozo DH 1250 Dehumidifier.
Główne składniki:
- Jednostka główna: Houses the compressor, fan, and control electronics.
- Panel sterowania: Located on the top, for setting operation modes and monitoring status.
- Zbiornik na wodę: Wyjmowany zbiornik na skroploną wodę.
- Filtr powietrza: Reusable filter located at the air inlet.
- Uchwyty i koła: Dla łatwego przenoszenia.
- Ciągły wylot spustowy: For connecting a hose for continuous water drainage.
Panel sterowania:
The control panel features various buttons and indicator lights:
- Przycisk zasilania: Aby włączyć lub wyłączyć urządzenie.
- Przycisk ustawiania wilgotności: To cycle through desired humidity levels (40%, 50%, 60%, Continuous).
- Kontrolka działania: Świeci się, gdy urządzenie pracuje.
- Full Tank Indicator Light: Zapala się, gdy zbiornik na wodę jest pełny i należy go opróżnić.
- Kontrolka rozmrażania: Świeci się, gdy urządzenie jest w trybie odszraniania.
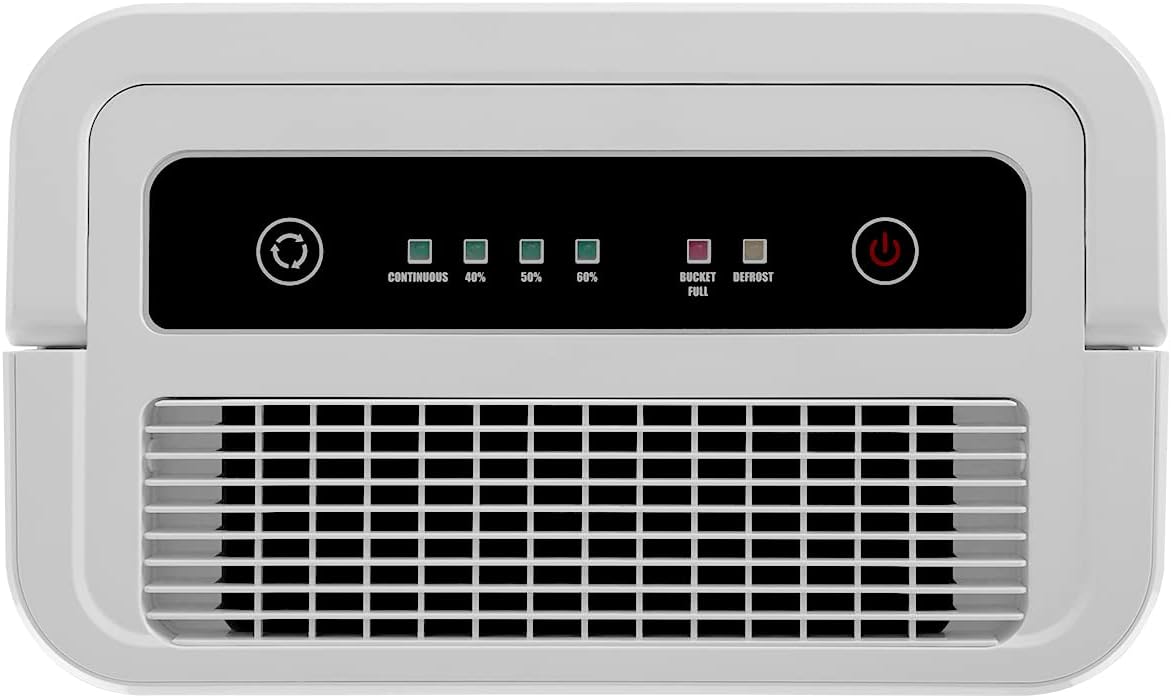
Figure 1: Control Panel of the DH 1250 Dehumidifier. This image shows the top-mounted control panel with buttons for power and humidity settings, along with indicator lights for continuous operation, 40%, 50%, 60% humidity, bucket full, and defrost.

Rysunek 2: Góra view of the DH 1250 Dehumidifier. This image displays the top of the unit, highlighting the integrated handle for portability and the control panel.

Rycina 3: Przód view of the DH 1250 Dehumidifier. The image shows the front of the white dehumidifier, featuring its compact design and bottom-mounted wheels for easy movement.

Rysunek 4: Strona view of the DH 1250 Dehumidifier. This image illustrates the side of the unit, clearly showing the removable water tank with its viewokno.
4. Konfiguracja
Aby skonfigurować osuszacz powietrza, wykonaj następujące czynności:
- Rozpakowywanie: Ostrożnie wyjmij osuszacz powietrza z opakowania. Zachowaj opakowanie do późniejszego przechowywania lub transportu.
- Umieszczenie: Place the unit upright on a firm, level surface in the room where dehumidification is desired. Ensure there is at least 20 cm (8 inches) of space around all sides of the unit for proper air circulation. The recommended application area is up to 40 square meters.
- Podłączenie zasilania: Podłącz przewód zasilający do uziemionego gniazdka elektrycznego (230 V).
- Zbiornik na wodę: Upewnij się, że zbiornik na wodę jest prawidłowo włożony do urządzenia. Urządzenie nie będzie działać, jeśli zbiornik nie będzie prawidłowo osadzony lub będzie pełny.
- Ciągły drenaż (opcjonalnie): For continuous operation without needing to empty the water tank, connect a suitable drainage hose (not included) to the continuous drain outlet. Ensure the hose is sloped downwards to allow gravity drainage into a floor drain or larger container.
5. Instrukcja obsługi
Operating your Orbegozo DH 1250 Dehumidifier is straightforward:
- Włączanie: Press the Power button on the control panel. The operation indicator light will illuminate, and the unit will begin to operate.
- Ustaw poziom wilgotności: Press the Humidity Setting button repeatedly to cycle through the desired humidity levels: 40%, 50%, 60%, or Continuous. The corresponding indicator light will illuminate.
- 40%, 50%, 60%: The unit will operate until the room's humidity reaches the set level, then it will cycle on and off to maintain it.
- Ciągły: The unit will operate continuously, regardless of the humidity level, until the water tank is full or the unit is turned off. This mode is ideal for very damp conditions or for use with continuous drainage.
- Opróżnianie zbiornika na wodę: When the water tank is full, the Full Tank indicator light will illuminate, and the unit will stop operating. Carefully remove the water tank, empty it, and reinsert it firmly into the unit. The dehumidifier will resume operation automatically.
- Układ zapobiegający zamarzaniu: The unit is equipped with an automatic anti-freeze system. If the coil temperature drops too low, the defrost indicator light will illuminate, and the unit will temporarily stop dehumidifying to melt any ice buildup. This is normal operation and ensures efficient performance in cooler environments.
- Wyłączone: Aby wyłączyć urządzenie, naciśnij ponownie przycisk zasilania.
6. Konserwacja
Regularna konserwacja gwarantuje optymalną wydajność i długą żywotność osuszacza powietrza.
Czyszczenie filtra powietrza:
The reusable anti-dust filter should be cleaned every two weeks or more frequently depending on usage and air quality.
- Wyłącz urządzenie i odłącz je od gniazdka zasilania.
- Znajdź pokrywę filtra powietrza, zazwyczaj z tyłu lub z boku urządzenia.
- Delikatnie wyciągnij filtr.
- Wyczyść filtr odkurzaczem lub umyj go ciepłą wodą z mydłem. Dokładnie wypłucz i pozostaw do całkowitego wyschnięcia na powietrzu przed ponownym włożeniem.
- Ponownie włóż suchy filtr i zamknij pokrywę.

Figure 5: Removing the Air Filter. This image shows a hand pulling out the reusable anti-dust filter from the side of the dehumidifier for cleaning.
Czyszczenie zbiornika na wodę:
Regularnie czyść zbiornik na wodę, aby zapobiec rozwojowi pleśni i bakterii.
- Wyłącz urządzenie i odłącz je od zasilania.
- Wyjmij zbiornik na wodę.
- Umyj zbiornik łagodnym detergentem i ciepłą wodą. Dokładnie wypłucz.
- Przed ponownym włożeniem zbiornika do urządzenia należy go dokładnie wysuszyć.
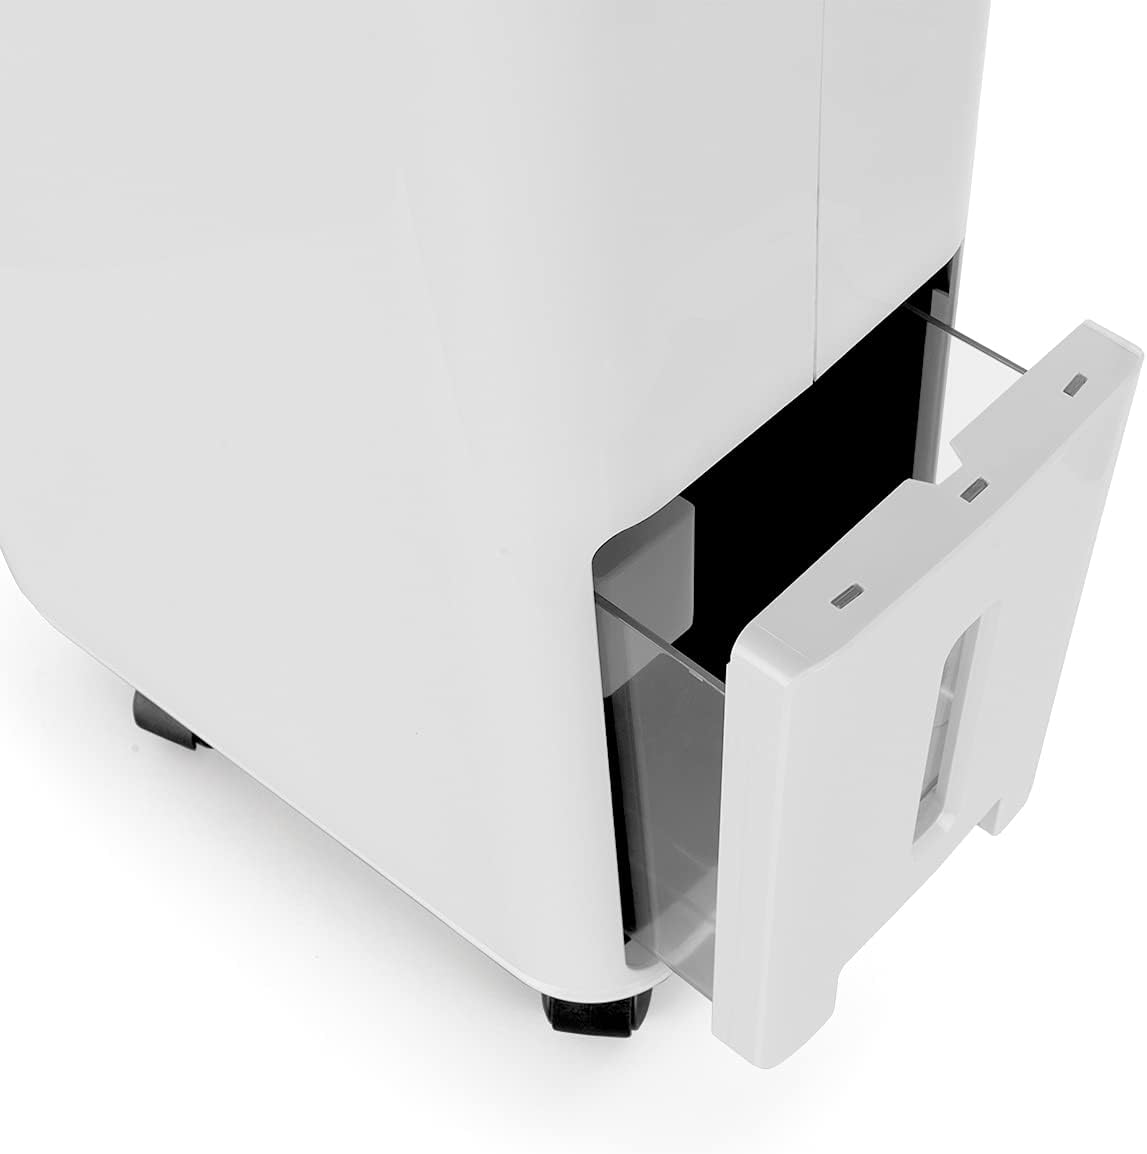
Figure 6: Removing the Water Tank. This image shows the water tank being pulled out from the front-lower section of the dehumidifier.
Czyszczenie powierzchni zewnętrznej:
Wytrzyj obudowę urządzenia miękką, damp płótno. Nie używaj ostrych środków chemicznych ani ściernych środków czyszczących.
Składowanie:
W przypadku dłuższego przechowywania urządzenia należy upewnić się, że zbiornik na wodę jest pusty i czysty, a filtr czysty i suchy. Przechowuj urządzenie w pozycji pionowej w chłodnym, suchym miejscu, najlepiej w oryginalnym opakowaniu.
7. Rozwiązywanie Problemów
Przed skontaktowaniem się z obsługą klienta wypróbuj poniższe rozwiązania typowych problemów:
| Problem | Możliwa przyczyna | Rozwiązanie |
|---|---|---|
| Jednostka się nie włącza. | Brak zasilania; Przewód zasilający nie jest podłączony; Zbiornik na wodę jest pełny lub nie jest prawidłowo włożony. | Sprawdź podłączenie do zasilania; opróżnij i ponownie włóż prawidłowo zbiornik na wodę. |
| Brak osuszania. | Air filter clogged; Room temperature too low; Humidity level already reached; Defrost mode active. | Clean the air filter; Ensure room temperature is above 5°C; Adjust desired humidity setting; Wait for defrost cycle to complete. |
| Wskaźnik zapełnienia zbiornika na wodę świeci się, ale zbiornik nie jest pełny. | Zbiornik na wodę nie jest prawidłowo osadzony; awaria wyłącznika pływakowego. | Remove and reinsert the water tank firmly; If problem persists, contact support. |
| Urządzenie jest głośne. | Jednostka nie stoi na równej powierzchni; Filtr powietrza jest zatkany; Wewnętrzne elementy wibrują. | Place on a level surface; Clean the air filter; If noise is excessive or unusual, contact support. |
| Defrost indicator is on. | Coil temperature is too low, unit is defrosting. | To normalna praca. Urządzenie wznowi osuszanie po zakończeniu odszraniania. |
8. Specyfikacje
Technical specifications for the Orbegozo DH 1250 Dehumidifier:
| Funkcja | Specyfikacja |
|---|---|
| Model | DH 1250 |
| Marka | Orbegozo |
| Wydajność osuszania | 12 litrów/dzień |
| Chłodziwo | R290 |
| Pojemność zbiornika na wodę | 3 litrów |
| Zalecany obszar | Do 40 m² |
| Pobór mocy | 265 W |
| Tomtage | 230 V |
| Poziom hałasu | 40dB |
| Wymiary (gł. x szer. x wys.) | Wymiary: 19.5 cm x 31.5 cm x 50 cm |
| Waga | 10 kilogramów |
| Cechy specjalne | Anti-freeze system, Reusable anti-dust filter, Humidity adjustment (40%, 50%, 60%, Continuous) |

Figure 7: Product Dimensions. This diagram illustrates the height (50.01 cm), width (31.5 cm), and depth (19.51 cm) of the Orbegozo DH 1250 dehumidifier.
9. Gwarancja i wsparcie
Your Orbegozo DH 1250 Dehumidifier comes with a manufacturer's warranty. Please refer to the warranty card included with your purchase or the retailer's terms and conditions for specific details regarding coverage and duration.
For technical assistance, troubleshooting beyond this manual, or to inquire about warranty service, please contact your retailer or the Orbegozo customer support line. Keep your proof of purchase handy when contacting support.