
1. Koniec produktuview
The TEKMAGIC W60-OUS-WT is a robust digital watch designed for various activities, including swimming, snorkeling, and scuba diving, with a water resistance rating of 10 ATM (up to 100 meters). It features a clear digital display and multiple functions to assist with daily timekeeping and sports activities.
Key features include precise time, date, and day display, a chronograph (stopwatch), countdown timer, dual time zone functionality, alarm clock, hourly chime, and an electro luminescent backlight for visibility in low light conditions. The watch is also shock resistant and comes with a comfortable TPU band.

Obraz 1.1: Przód view of the TEKMAGIC W60-OUS-WT digital watch, showcasing its robust design and digital display with water splashes, indicating its water-resistant nature.
2. Funkcje przycisków
Familiarize yourself with the watch buttons to operate its various functions:
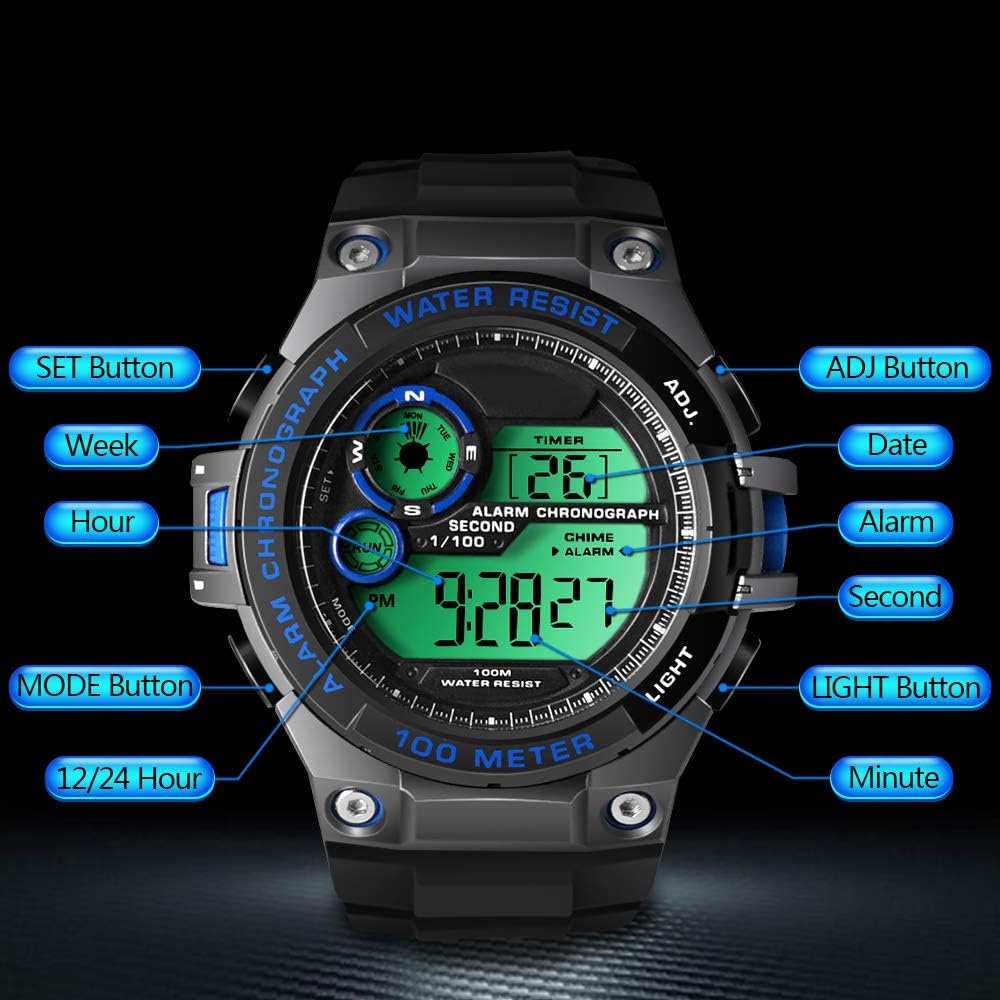
Image 2.1: Diagram illustrating the button layout and their respective functions on the TEKMAGIC W60-OUS-WT watch. Buttons include SET, MODE, 12/24 Hour, ADJ, Date, Alarm, Second, Light, and Minute.
- Przycisk SET: Służy do wchodzenia w tryby ustawień i potwierdzania wyborów.
- Przycisk ADJ: Służy do dostosowywania wartości w trybach ustawień.
- Przycisk TRYB: Cycles through different operational modes (Time, Chronograph, Countdown, Alarm, Dual Time).
- Przycisk ŚWIATŁA: Activates the electro luminescent backlight.
- 12/24 Hour Button: Przełącza między 12-godzinnym i 24-godzinnym formatem czasu.
3. Konfiguracja początkowa
3.1 Ustawianie czasu i daty
- W trybie pomiaru czasu naciśnij i przytrzymaj USTAWIĆ Naciskaj przycisk, aż sekundy zaczną migać. Oznacza to, że jesteś w trybie ustawień.
- Naciśnij TRYB button to cycle through the setting options: Seconds → Hours → Minutes → Year → Month → Day.
- Użyj PRZYMIOT button to increase the flashing value. For seconds, pressing PRZYMIOT zresetuje je do 00.
- Po dostosowaniu wszystkich ustawień naciśnij przycisk USTAWIĆ ponownie, aby wyjść z trybu ustawień.
3.2 Format 12/24-godzinny
W trybie pomiaru czasu naciśnij 12 / 24 Hour przycisk umożliwiający przełączanie między formatem 12-godzinnym (ze wskaźnikiem AM/PM) i 24-godzinnym.
4. Funkcje operacyjne
4.1 Tryb pomiaru czasu
Jest to tryb domyślny, wyświetlający aktualny czas (godzinę, minuty, sekundy), datę i dzień tygodnia.
4.2 Tryb chronografu (stopera)
Aby użyć funkcji stopera:
- Naciśnij TRYB Naciskaj przycisk, aż na wyświetlaczu pojawi się napis „CHRONO” lub „STW”.
- Naciśnij PRZYMIOT przycisk, aby uruchomić stoper.
- Naciśnij PRZYMIOT naciśnij przycisk ponownie, aby wstrzymać/wznowić.
- To reset the stopwatch, ensure it is paused, then press the USTAWIĆ przycisk.

Image 4.1: The TEKMAGIC watch displaying the stopwatch function, with a runner in the background, illustrating its use for timing sports activities.
4.3 Tryb odliczania czasu
Aby ustawić i używać timera odliczającego:
- Naciśnij TRYB button repeatedly until 'TIMER' or 'CD' appears.
- Naciśnij i przytrzymaj USTAWIĆ przycisk, aż godziny zaczną migać.
- Użyj TRYB button to select hours, minutes, or seconds, and the PRZYMIOT przycisk, aby dostosować wartości.
- Naciskać USTAWIĆ aby potwierdzić czas odliczania.
- Naciskać PRZYMIOT Aby rozpocząć lub wstrzymać odliczanie.
- Gdy odliczanie dojdzie do zera, włączy się alarm.
4.4 Alarm Clock and Hourly Dzwonek
Aby ustawić alarm:
- Naciśnij TRYB button repeatedly until 'ALARM' appears.
- Naciśnij i przytrzymaj USTAWIĆ Naciskaj przycisk, aż zaczną migać cyfry godziny.
- Użyj PRZYMIOT przycisk, aby ustawić godzinę, a następnie naciśnij TRYB to select minutes and use PRZYMIOT aby je ustawić.
- Naciskać USTAWIĆ aby potwierdzić godzinę alarmu.
- Naciśnij PRZYMIOT button in Alarm Mode to toggle the alarm ON/OFF. An alarm icon will appear when activated.
Aby aktywować/dezaktywować hourly dzwonek, naciśnij USTAWIĆ button in Alarm Mode. A chime icon will appear when activated.

Image 4.2: The TEKMAGIC watch displaying its alarm and calendar functions, with visual cues for waking up and checking dates.
4.5 Dual Time Zone
The watch allows you to set a second time zone:
- Naciśnij TRYB button repeatedly until 'DUAL TIME' or 'DT' appears.
- Naciśnij i przytrzymaj USTAWIĆ Naciskaj przycisk, aż zaczną migać cyfry godziny.
- Użyj PRZYMIOT przycisk, aby ustawić godzinę, a następnie naciśnij TRYB to select minutes and use PRZYMIOT aby je ustawić.
- Naciskać USTAWIĆ to confirm the dual time zone setting.

Image 4.3: The TEKMAGIC watch displaying its dual time zone feature, superimposed over an image of a bridge and a rock formation, suggesting travel and global timekeeping.
4.6 Podświetlenie
Naciśnij ŚWIATŁO button to illuminate the display for a few seconds, enhancing visibility in dark environments.

Image 4.4: The TEKMAGIC watch with its backlight activated, shown in a dimly lit setting, highlighting its visibility feature.
4.7 Water Resistance (100m / 10 ATM)
This watch is designed to withstand water pressure up to 100 meters (10 ATM), making it suitable for swimming, snorkeling, and recreational scuba diving. It is important to note the following:
- Nie używaj przycisków pod wodą. Operating buttons while submerged can compromise the watch's water resistance.
- Unikaj narażania zegarka na działanie gorącej wody, pary lub gwałtownych zmian temperatur, gdyż może to spowodować uszkodzenie uszczelek.
- Po kontakcie z wodą morską należy przepłukać zegarek czystą wodą, aby zapobiec korozji.

Image 4.5: The TEKMAGIC watch displayed in an underwater scuba diving scene, emphasizing its suitability for deep-water activities.
Video 4.1: A demonstration of the TEKMAGIC watch being submerged in water, showcasing its water resistance capabilities. The watch remains functional and readable while wet.
5. Konserwacja
5.1 Czyszczenie
Regularnie przecieraj zegarek miękką,amp cloth. For stubborn dirt, use a mild soap solution and rinse thoroughly with fresh water. Ensure the watch is completely dry before storage.
5.2 Wymiana baterii
The watch uses a CR2025 battery, which typically lasts 1.5 to 2 years. When the display becomes dim or functions become erratic, it may be time to replace the battery. Battery replacement should ideally be performed by a qualified watch technician to ensure proper sealing and maintain water resistance.
5.3 Przechowywanie
Store the watch in a cool, dry place away from direct sunlight and extreme temperatures. Avoid exposing it to strong magnetic fields.
6. Rozwiązywanie Problemów
- Wyświetlacz jest pusty lub przyciemniony: Check the battery. If the battery is low, replace it.
- Przyciski nie reagują: Ensure the watch is not in a locked mode (if applicable, though this model does not specify one). Try a soft reset by allowing the battery to drain completely and then replacing it, or consult a technician.
- Woda wewnątrz zegarka: Natychmiast zanieś zegarek do specjalisty w celu sprawdzenia i naprawy, aby zapobiec dalszym uszkodzeniom. Nie próbuj suszyć go samodzielnie.
- Nieprawidłowa godzina/data: Wprowadź ponownie ustawienia czasu i daty, tak jak opisano w rozdziale 3.1.
7. Specyfikacje

Image 7.1: Visual representation of the TEKMAGIC watch's dimensions, including case diameter (55mm), case thickness (18mm), band width (22mm), total length (258mm), and wrist circumference range (160mm-215mm).
| Funkcja | Specyfikacja |
|---|---|
| Numer modelu | W60-OUS-WT |
| Głębokość wodoodporności | 100m (10 ATM) |
| Ruch | Cyfrowy |
| Dokładność czasu | ±30 sekund miesięcznie |
| Kod baterii | CR2025 |
| Czas pracy baterii | 1.5 do 2 lat |
| Materiał okna tarczy | Żywica o wysokiej przejrzystości |
| Materiał koperty zegarka | Tworzywo ABS |
| Kolor tarczy | Black + Gray + Blue |
| Średnica koperty | 55 mm |
| Grubość obudowy | 18 mm |
| Materiał paska zegarka | TPU Band |
| Kolor paska | Czarny |
| Rodzaj zapięcia | Klamra szpilkowa |
| Przepustowość łącza | 22mm |
| Maksymalny obwód nadgarstka | 215mm |
| Minimalny obwód nadgarstka | 160mm |
| Waga produktu | 62g |
8. Gwarancja i wsparcie
For warranty information, technical support, or service inquiries, please refer to the documentation included with your purchase or contact TEKMAGIC customer service directly. Keep your proof of purchase for warranty claims.


