
1. Wprowadzenie
This manual provides detailed instructions for the installation, operation, and maintenance of your SECULINK 16-Channel 4K/8MP Network Video Recorder (NVR). This NVR is designed to provide a comprehensive security solution, supporting up to 16 channels of 4K (8MP) video recording from ONVIF-compliant IP cameras. It features advanced H.265+ compression, motion detection recording, and P2P remote access for convenient monitoring.
2. Koniec produktuview
Główne cechy
- Ultra HD Video: Full 4K (3840x2160P) video viewing and recording on all 16 channels, supporting 8MP/5MP/4MP/3MP/1080p ONVIF IP cameras.
- Kompresja H.265+: Enhances bandwidth and storage efficiency, providing smaller file sizes, higher definition, and longer recording times. Supports simultaneous network transmission and playback.
- Nagrywanie z wykrywaniem ruchu: Configurable to record only when motion is detected, optimizing storage space.
- Łatwa konfiguracja: Requires a wired connection to your router for operation and manages all connected IP cameras on your network.
- Wiele opcji przechowywania: Supports up to 6TB internal SATA HDD (sold separately) and cloud storage service (sold separately). Backup options include USB flash disk, USB DVR writer, and network.
- Zdalny dostęp P2P: Cloud P2P function for remote viewing on smartphones, tablets, and PCs via the XMeye app.
Zawartość opakowania
- 1x SECULINK 16-Channel Network Video Recorder (NVR1616PF-4K)
- 1x Zasilacz
- 1x mysz USB
3. Przewodnik konfiguracji
3.1 Połączenia fizyczne
Before powering on the NVR, ensure all necessary connections are made.
- Podłącz monitor: Podłącz rejestrator NVR do monitora lub telewizora za pomocą kabla HDMI lub VGA.
- Podłącz mysz: Podłącz dołączoną mysz USB do jednego z portów USB w rejestratorze NVR.
- Połączenie internetowe: Connect the NVR's LAN port to your router using an Ethernet cable. This NVR requires a wired network connection.
- Podłączenie zasilania: Connect the power adapter to the NVR's DC 12V input and then plug it into a power outlet.

Rysunek 3.1: Połączenia tylnego panelu rejestratora NVR
3.2 Instalacja dysku twardego (dysk twardy nie jest dołączony)
The NVR supports a single SATA hard drive up to 6TB for local storage. Follow these steps to install an HDD:
- Unscrew the top cover of the NVR chassis.
- Connect the SATA data and power cables from the NVR to the corresponding ports on the hard drive.
- Przymocuj dysk twardy do obudowy rejestratora NVR za pomocą dołączonych śrub.
- Załóż górną pokrywę i przykręć ją śrubami.
After installation, the NVR will typically detect the new HDD. You may need to format the HDD through the NVR's system settings before recording can begin.
3.3 Konfiguracja sieci
The NVR connects to your network via an Ethernet cable. Ensure your router is functioning correctly. The NVR will typically obtain an IP address automatically via DHCP. For remote access, ensure your network allows outbound connections for the NVR's P2P service.
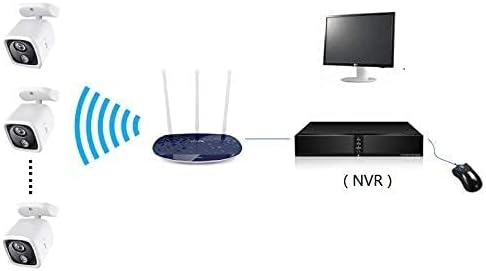
Figure 3.2: NVR Network Connection Diagram
3.4 Integracja kamery
The NVR supports ONVIF-compliant IP cameras. To add cameras:
- Ensure your IP cameras are powered on and connected to the same network as the NVR.
- Access the NVR's main menu using the connected monitor and mouse.
- Navigate to the Camera Management or Channel Setup section.
- The NVR should automatically detect ONVIF cameras on the network. Select and add them, providing credentials if required.
4. Instrukcja obsługi
4.1 Nawigacja w interfejsie użytkownika
Use the connected USB mouse to navigate the NVR's graphical user interface (GUI). Right-click to access the main menu, and left-click to select options or open sub-menus.
4.2 Zarządzanie nagraniami
The NVR offers flexible recording options:
- Ciągłe nagrywanie: Nagrywa 24/7 bez przerwy.
- Nagrywanie z wykrywaniem ruchu: Records only when motion is detected by the cameras, saving storage space. Configure motion detection zones and sensitivity in the NVR settings.
- Zaplanowane nagrywanie: Ustaw konkretne godziny, w których ma nastąpić nagranie.
These modes can be configured per channel in the NVR's recording settings.

Figure 4.1: Recording Modes
4.3 Dostęp zdalny (P2P)
Do view Twoje kamery zdalnie:
- Pobierz XMeye aplikację na smartfonie lub tablecie.
- Zarejestruj konto i zaloguj się.
- Add your NVR device by scanning the QR code displayed on the NVR's monitor (usually found in the P2P or Cloud settings) or by manually entering the device ID.
- Po dodaniu możesz view transmisje na żywo i odtwarzanie nagranych utworówtage z dowolnego miejsca z dostępem do Internetu.

Figure 4.2: P2P Remote Access
4.4 Odtwarzanie i tworzenie kopii zapasowych wideo
Aby ponownieview nagrano footage, access the Playback menu from the NVR's main interface. You can search by time, date, event, or channel. To back up footage, connect a USB flash drive to the NVR's USB port and use the backup function in the menu.
5. Konserwacja
5.1 Zarządzanie dyskiem twardym
Regularly check the status of your hard drive through the NVR's system settings. Consider backing up critical footage periodically to an external device or cloud storage. If the HDD fails, replace it following the installation steps in Section 3.2.
5.2 Aktualizacje systemu
Okresowo sprawdzaj producenta website for firmware updates. Keeping your NVR's firmware updated can improve performance, add new features, and enhance security. Follow the provided instructions carefully when performing firmware updates.
5.3 Czyszczenie
Ensure the NVR unit is kept in a clean, dry, and well-ventilated area. Dust can accumulate and affect performance. Use a soft, dry cloth to clean the exterior of the NVR. Do not use liquid cleaners or aerosols.
6. Rozwiązywanie Problemów
- Brak wyjścia wideo na monitorze:
- Check HDMI/VGA cable connections to both NVR and monitor.
- Ensure the monitor is set to the correct input source.
- Verify the NVR is powered on (power indicator light should be active). - Brak połączenia sieciowego:
- Ensure the Ethernet cable is securely connected to both the NVR and the router.
- Check if your router is functioning correctly.
- Verify network settings in the NVR's menu (e.g., DHCP enabled). - Kamery nie wyświetlają/nie nagrywają:
- Confirm IP cameras are powered on and connected to the network.
- Check camera IP addresses and ensure they are discoverable by the NVR.
- Verify camera credentials (username/password) are correctly entered in the NVR's camera management.
- Ensure the HDD is installed and formatted correctly for recording. - Zdalny dostęp nie działa:
- Ensure the NVR has an active internet connection.
- Verify the P2P function is enabled in the NVR's network settings.
- Check your smartphone/tablet's internet connection.
- Ensure the correct device ID is entered in the XMeye app. - Słaba jakość wideo:
- Ensure cameras are set to their highest resolution (e.g., 4K/8MP).
- Check network bandwidth if experiencing lag or pixelation, especially for remote viewing.
7. Specyfikacje
| Funkcja | Specyfikacja |
|---|---|
| Numer modelu | NVR1616PF-4K |
| Liczba kanałów | 16 |
| Rezolucja | 16*4K 8MP |
| Wyjście wideo | 1x VGA, 1x HDMI |
| Wyjście audio | 1xRCA |
| Port sieciowy | 1x RJ45 10M/100M |
| Port USB | 2x USB2.0 |
| Streaming Specification | ONVIF |
| Tryb nagrywania | Manual > Alarm > Motion Detection > Timing |
| Wyszukiwanie wideo | Time, Date, Event, Channel Search |
| Moc | Prąd stały 12 V |
| Rozmiar obudowy | 260 mm x 43 mm x 190 mm (10.24" dł. x 7.48" szer. x 1.69" wys.) |
| Interfejs HDD | SATA (Max 6TB) |
| Aplikacja | XMeye |
| Technologia łączności | Ethernet, HDMI, USB, VGA |
| Wejście audio | Mikrofon |
| Waga przedmiotu | 1.01 kilograma |
8. Gwarancja i wsparcie
For warranty information, please refer to the documentation provided with your purchase or contact SECULINK customer support directly. Technical support is available through the manufacturer's official channels. Please visit the SECULINK webwitryna zawierająca najnowsze zasoby pomocy technicznej, odpowiedzi na często zadawane pytania i informacje kontaktowe.