MONTAŻ MU0034
Instrukcja obsługi uchwytu biurkowego MOUNTUP MU0034 z jednym monitorem
Marka: MOUNTUP | Model: MU0034
1. Wprowadzenie
This manual provides detailed instructions for the installation, operation, and maintenance of your MOUNTUP MU0034 Single Monitor Desk Mount. Please read this manual thoroughly before installation to ensure correct setup and safe operation. This monitor mount is designed to enhance your workspace ergonomics by providing adjustable positioning for a single monitor.
2. Informacje dotyczące bezpieczeństwa
- Przed montażem upewnij się, że wszystkie elementy są kompletne i nieuszkodzone. Nie używaj, jeśli brakuje którejkolwiek części lub jest ona uszkodzona.
- This product is intended for monitors weighing up to 17.6 lbs (8 kg) and screen sizes from 17 to 32 inches. Do not exceed the maximum weight capacity.
- Compatible VESA patterns are 75x75mm and 100x100mm. Verify your monitor's VESA pattern before proceeding.
- Ensure the desk surface is stable and strong enough to support the combined weight of the mount and monitor.
- Dokręć wszystkie śruby mocno, ale nie dokręcaj ich zbyt mocno, aby uniknąć zerwania gwintów lub uszkodzenia elementów.
- Podczas instalacji należy trzymać dzieci i zwierzęta z daleka.
- Jeśli masz jakiekolwiek wątpliwości odnośnie procesu instalacji, skonsultuj się z wykwalifikowanym specjalistą.
3. Zawartość opakowania
Sprawdź, czy w przesyłce znajdują się wszystkie części:
- Zespół ramienia monitora
- Biurko Clamp Opierać
- Komponenty podstawy przelotki
- Płyta VESA
- Zestaw narzędzi (śruby, podkładki, klucze imbusowe)
- Instrukcja obsługi
4. Specyfikacje
| Funkcja | Specyfikacja |
|---|---|
| Numer modelu | MU0034 |
| Tworzywo | Polerowane aluminium |
| Kompatybilność z rozmiarem ekranu | 17" to 32" (flat or curved) |
| Nośność | Do 17.6 funtów (8 kg) |
| Zgodność ze standardem VESA | 75x75mm, 100x100mm |
| Regulacja wysokości | Up to 11" (16.3" total height adjustment range) |
| Zakres pochylenia | +45° do -45° |
| Zakres obrotu | 360° (arm), 180° (monitor plate) |
| Obrót | 360° (landscape to portrait) |
| Max Desk Thickness (C-clamp) | 3.35" |
| Średnica otworu przelotki | 0.39" - 3.1" |
5. Konfiguracja i instalacja
The MOUNTUP MU0034 offers two installation options: C-clamp mounting and Grommet mounting. Choose the method suitable for your desk.
5.1. C-Clamp Montowanie
This method is for desks without existing grommet holes, or if you prefer clamping to the edge of your desk. Ensure your desk thickness is no more than 3.35 inches.
- Dołącz C-klamp: Assemble the C-clamp components to the base of the monitor arm. Position the base on the edge of your desk and tighten the clamp screw until it is secure.
- Zamontuj płytkę VESA do monitora: Secure the VESA plate to the back of your monitor using the appropriate screws from the hardware kit. Ensure the screws are tightened securely.
- Slide Monitor onto Arm: Carefully slide the monitor (with the attached VESA plate) onto the monitor arm's VESA head. Ensure it clicks into place or is secured with the provided locking mechanism.
- Regulacja napięcia: Refer to Section 6.1 for adjusting the gas spring tension to match your monitor's weight.

Rysunek 1: Ilustracja C-clamp and Grommet mounting options. The C-clamp is shown securing the mount to the desk edge, while the grommet mount uses a desk hole.
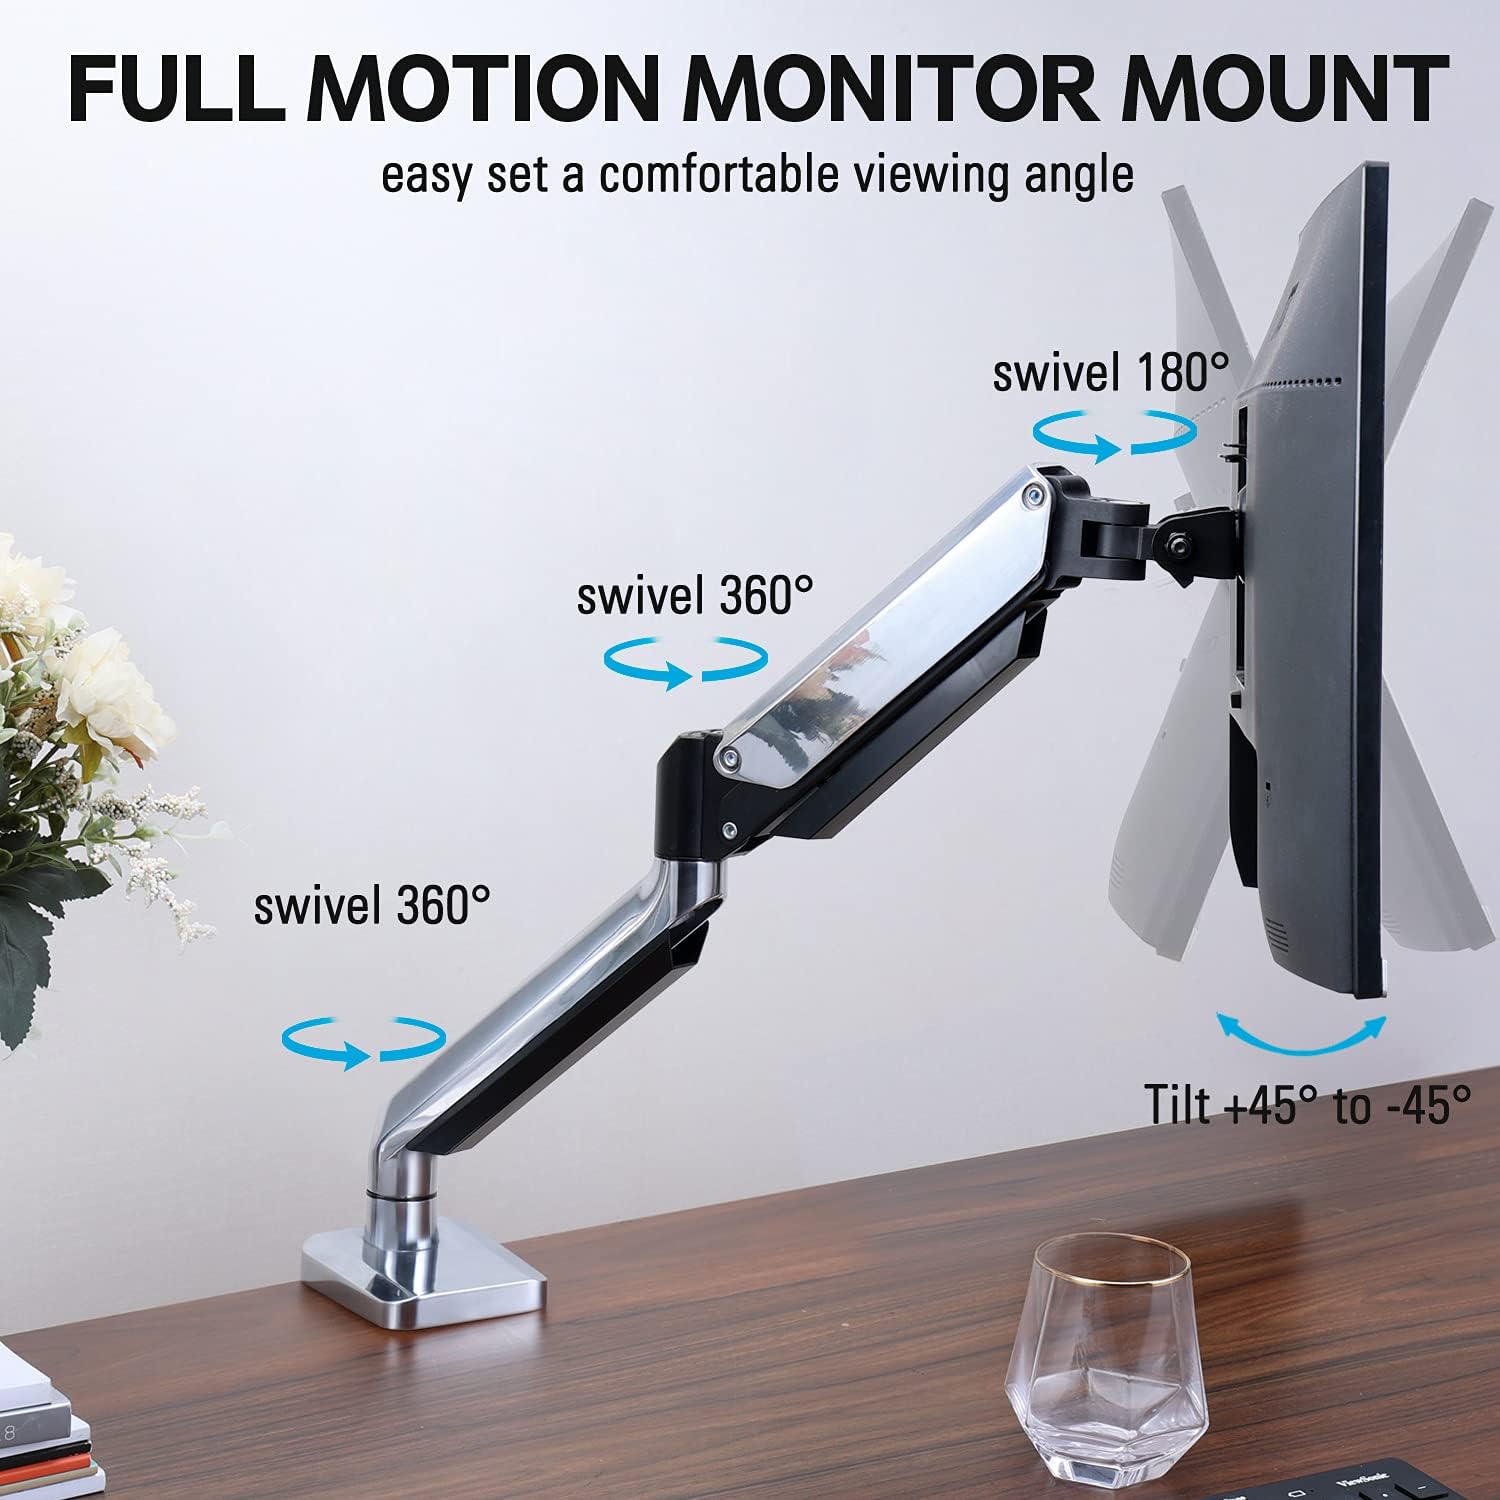
Figure 2: The removable VESA plate being attached to the back of a monitor, then sliding onto the monitor arm for easier installation.
5.2. Montaż przelotki
This method utilizes an existing hole in your desk. Ensure your desk thickness is no more than 3.35 inches and the grommet hole diameter is between 0.39 and 3.1 inches.
- Assemble Grommet Base: Insert the grommet base components through the desk hole and secure them from underneath the desk using the provided plate and nut.
- Zamontuj płytkę VESA do monitora: Secure the VESA plate to the back of your monitor using the appropriate screws from the hardware kit. Ensure the screws are tightened securely.
- Slide Monitor onto Arm: Carefully slide the monitor (with the attached VESA plate) onto the monitor arm's VESA head. Ensure it clicks into place or is secured with the provided locking mechanism.
- Regulacja napięcia: Refer to Section 6.1 for adjusting the gas spring tension to match your monitor's weight.
6. Obsługa i regulacje
The MOUNTUP MU0034 monitor arm offers various adjustments for optimal viewkomfort.
6.1. Regulacja napięcia sprężyny gazowej
The gas spring tension needs to be adjusted to match the weight of your monitor. This ensures the monitor stays in position once adjusted.
- If the monitor drifts down, turn the adjustment screw (usually located on the arm joint) clockwise ("+") to increase tension.
- If the monitor floats up, turn the adjustment screw counter-clockwise ("-") to decrease tension.
- Adjust gradually until the monitor remains stable at any height.
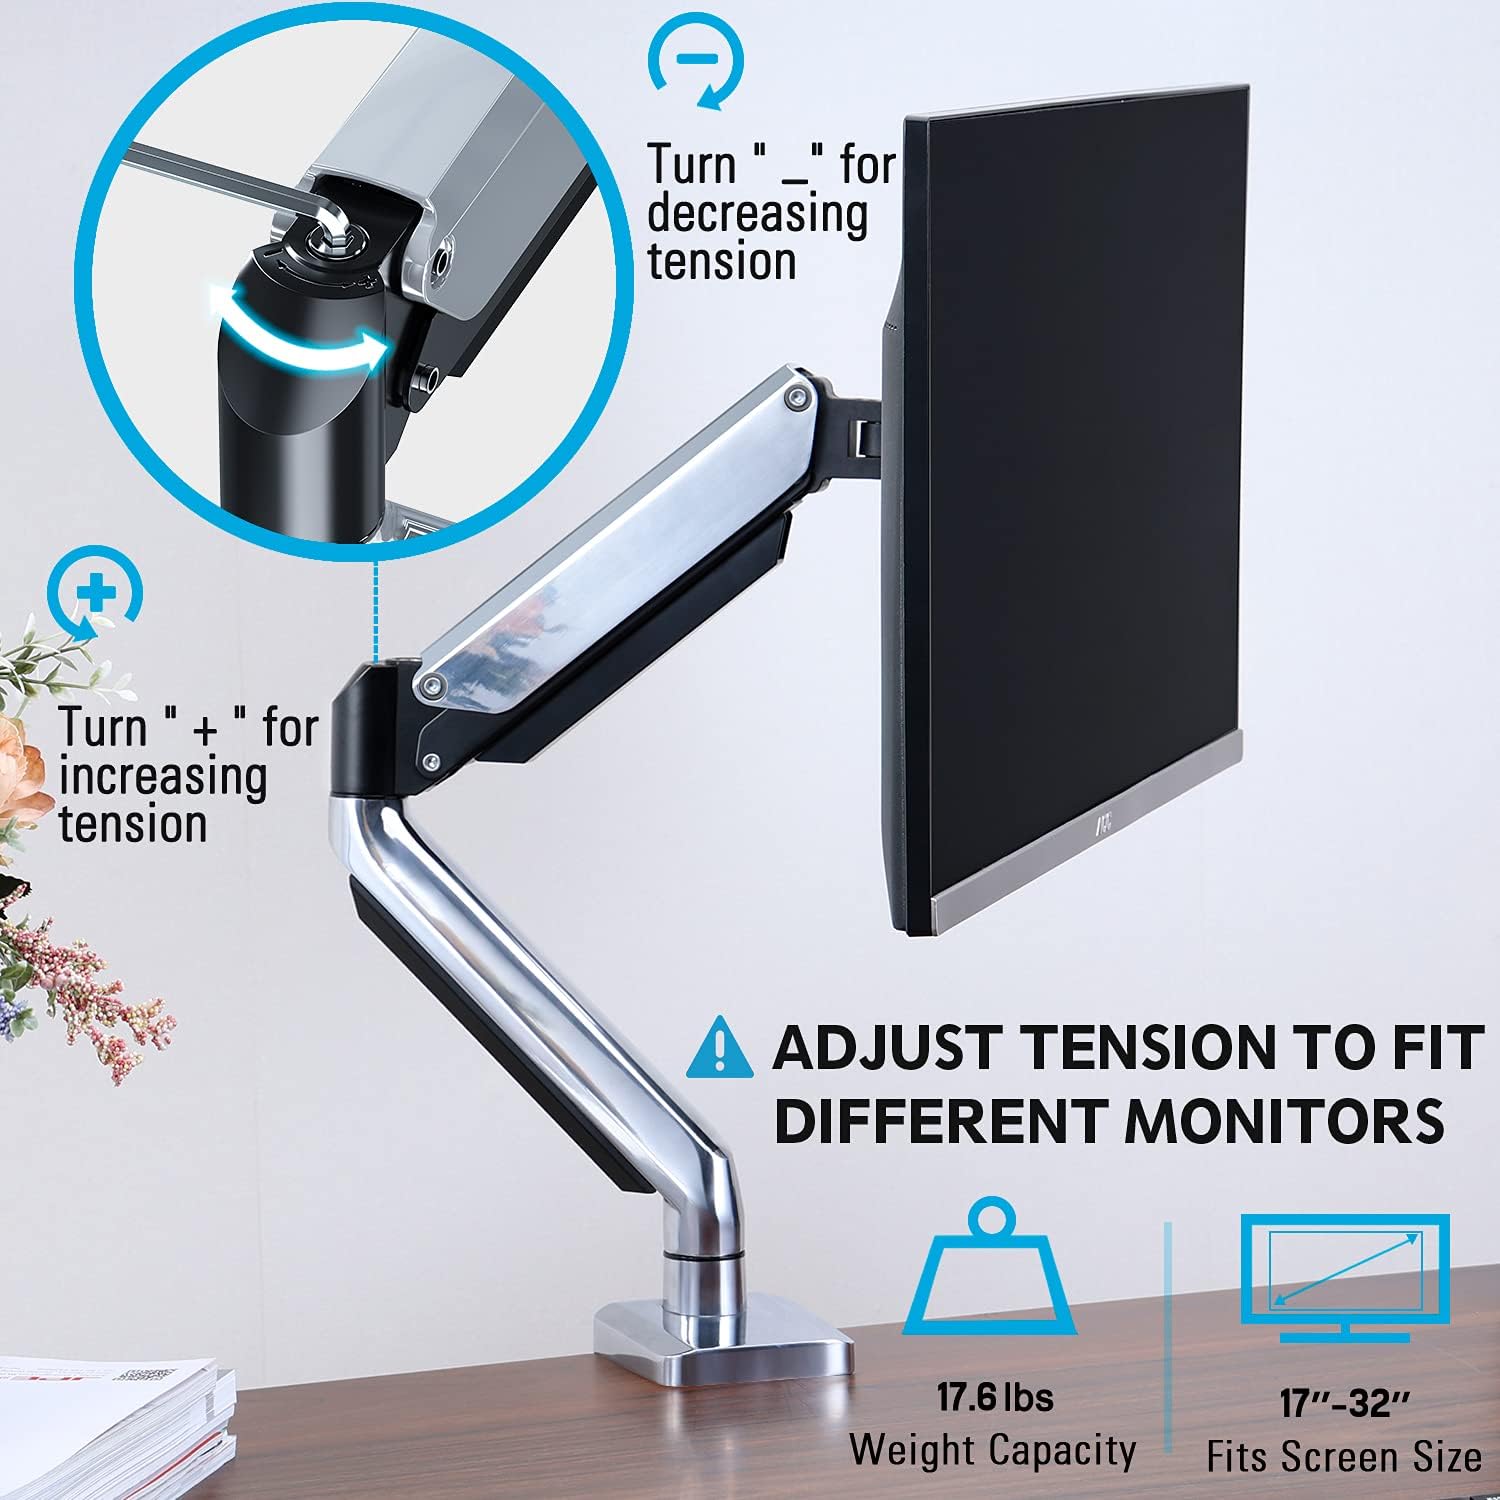
Figure 3: Instructions for adjusting the gas spring tension using an Allen key. Turning clockwise increases tension, counter-clockwise decreases it.
6.2. Regulacja wysokości
Once the gas spring tension is correctly set, you can easily raise or lower your monitor to your desired ergonomic height. The arm allows for up to 11 inches of vertical adjustment.

Figure 4: Diagram illustrating the maximum height adjustment of 11 inches and maximum extension of 17.5 inches.
6.3. Tilt, Swivel, and Rotation
The monitor arm provides full motion capabilities:
- Przechylenie: Adjust the monitor screen +45° to -45° to reduce glare or find a comfortable viewkąt.
- Obracać: The arm can swivel 360° at the base and 360° at the middle joint. The monitor plate itself can swivel 180°. This allows for easy screen sharing or repositioning.
- Obrót: Obróć monitor o 360°, aby przełączać się między orientacją poziomą i pionową.

Figure 5: Visual representation of the monitor arm's full motion capabilities, including 360° swivel, 180° swivel at the monitor plate, and +45° to -45° tilt.

Figure 6: An image demonstrating the monitor's ability to rotate 360 degrees, allowing for both landscape and portrait viewtryby.
7. Zarządzanie kablami
The MOUNTUP MU0034 features integrated cable management to keep your workspace tidy.
- Route your monitor cables (power, video, etc.) along the underside of the arm.
- Use the provided cable clips or covers to secure the cables within the arm channels.
- Upewnij się, że kable mają wystarczająco dużo luzu, aby umożliwić pełen zakres ruchu bez naprężeń.

Figure 7: Illustration of how cables are routed and organized through the integrated channels on the monitor arm, keeping the desk clear.
8. Konserwacja
- Regularnie sprawdzaj wszystkie śruby i połączenia, aby mieć pewność, że są dobrze dokręcone.
- Wyczyść uchwyt miękką ściereczką.amp szmatką. Unikaj środków czyszczących o działaniu ściernym i rozpuszczalników.
- Nie należy smarować mechanizmu sprężyny gazowej.
9. Rozwiązywanie Problemów
| Problem | Możliwa przyczyna | Rozwiązanie |
|---|---|---|
| Monitor sags or won't stay up | Napięcie sprężyny gazowej jest zbyt słabe w stosunku do ciężaru monitora. | Increase gas spring tension by turning the adjustment screw clockwise ("+"). |
| Monitor floats up or is hard to push down | Napięcie sprężyny gazowej jest zbyt duże w stosunku do ciężaru monitora. | Decrease gas spring tension by turning the adjustment screw counter-clockwise ("-"). |
| Monitor is wobbly | Mount not securely fastened to desk or VESA plate not tight. | Sprawdź i dokręć wszystkie klamp/grommet screws and VESA plate screws. |
| Difficulty rotating/tilting monitor | Stawy są zbyt ciasne. | Loosen the corresponding joint screws slightly (do not remove). |
10. Gwarancja i wsparcie
The MOUNTUP MU0034 Single Monitor Desk Mount is backed by a 3-year support period. For technical assistance, missing parts, or warranty claims, please contact MOUNTUP customer support through their official channels or the retailer where the product was purchased.
Prosimy zachować dowód zakupu w celach gwarancyjnych.