
Ważne instrukcje bezpieczeństwa
Podczas korzystania z urządzeń elektrycznych należy zawsze przestrzegać podstawowych zasad bezpieczeństwa, w tym:
- Przeczytaj wszystkie instrukcje przed użyciem tej maszyny do szycia.
- Przechowuj niniejszą instrukcję w odpowiednim miejscu w pobliżu urządzenia.
- Trzymaj palce z dala od wszystkich ruchomych części. Należy zachować szczególną ostrożność wokół igły maszyny do szycia.
- Zawsze używaj właściwej płytki ściegowej. Niewłaściwa płytka może spowodować złamanie igły.
- Nie używaj wygiętych igieł.
- Nie ciągnij ani nie popychaj materiału podczas szycia. Może to spowodować odchylenie igły i jej złamanie.
- Wyłącz maszynę do szycia podczas dokonywania jakichkolwiek regulacji w obrębie igły, takich jak nawlekanie igły, wymiana igły, nawlekanie szpulki lub wymiana stopki dociskowej.
- Zawsze odłączaj maszynę od gniazdka elektrycznego podczas zdejmowania osłon, smarowania lub wykonywania innych czynności serwisowych opisanych w instrukcji obsługi.
- Nigdy nie wrzucaj i nie wkładaj żadnych przedmiotów do otworów.
- Nie stosować na zewnątrz.
- Nie należy pracować w miejscach, w których stosuje się produkty w formie aerozolu (sprayu) lub podaje się tlen.
Produkt ponadview
The SINGER M1155 is a versatile sewing machine designed for various sewing projects. It features a compact design and user-friendly controls.
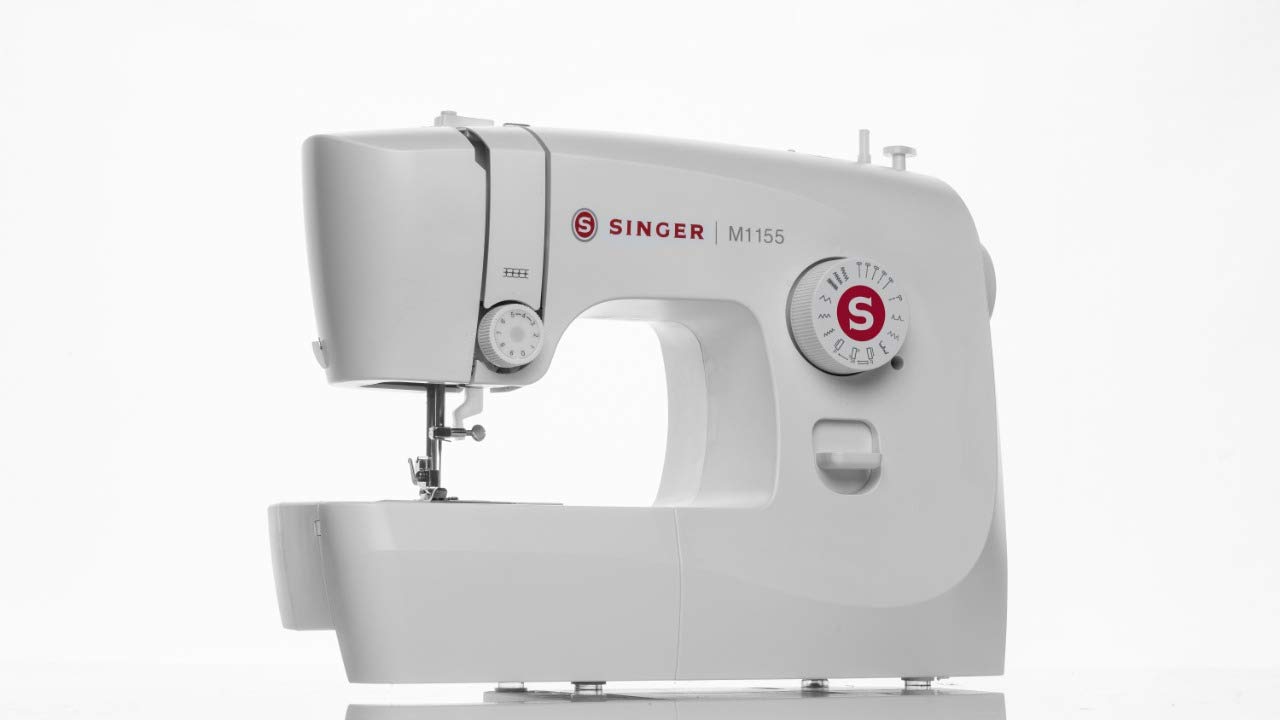
Obraz: Przód view maszyny do szycia SINGER M1155, pokazasinze względu na kompaktową konstrukcję i główne elementy sterujące.
Kluczowe komponenty:
- Pokrętło wyboru ściegu: Used to choose from 14 built-in stitches.
- Pokrętło napięcia: Adjusts thread tension for different fabrics.
- Płytka igłowa: Provides a flat surface for sewing.
- Stopka dociskowa: Holds fabric securely in place.
- Światło LED: Oświetla obszar szycia, zapewniając lepszą widoczność.
- Pokrętło: Ręcznie podnosi i opuszcza igłę.
- Przycisk zasilania: Włącza i wyłącza maszynę.
- Złącze pedału nożnego: For connecting the foot control.

Obraz: Tył view of the SINGER M1155 Sewing Machine, showing the power input and on/off switch.
Organizować coś
1. Rozpakowanie i ustawienie
Ostrożnie wyjmij maszynę z opakowania. Ustaw maszynę na stabilnej, płaskiej powierzchni. Upewnij się, że wokół maszyny jest wystarczająco dużo miejsca, aby zapewnić komfortową obsługę.
2. Podłączenie zasilania
Connect the foot control to the machine's foot pedal connector. Plug the power cord into the machine's power input, then into a suitable electrical outlet. Use the power switch located at the back of the machine to turn it on.
3. Nawijanie szpulki
The SINGER M1155 features automatic bobbin winding. Follow the threading guides on the machine to wind thread onto an empty bobbin. Ensure the bobbin is wound evenly for smooth stitching.
4. Nawlekanie maszyny
The machine is designed for easy threading. Follow the numbered threading path for the upper thread, ensuring the thread passes through all guides and the tension discs correctly. The machine features a top drop-in bobbin system for convenient bobbin insertion.
5. Instalacja igły
Ensure the machine is turned off before changing the needle. Loosen the needle clamp screw, remove the old needle, and insert a new needle with the flat side facing the back of the machine. Tighten the needle clamp screw securely. The machine supports needle positions for left and center stitching.

Obraz: Zbliżenie view of the needle and presser foot area, illustrating the working space for threading and needle changes.
Instrukcja obsługi
1. Wybór ściegu
The SINGER M1155 offers 14 built-in stitches and 19 built-in functions, including a 4-step buttonhole. Turn the stitch selector dial to choose the desired stitch pattern. Refer to the stitch chart on the machine for available options.

Image: The stitch selection dial on the SINGER M1155, showing various stitch patterns and settings.
2. Podstawowe szycie
Place the fabric under the presser foot. Lower the presser foot lever. Gently press the foot control to start sewing. Guide the fabric smoothly without forcing it. The machine has a 5 MM stitch width capability.
3. Korzystanie ze światła LED
The integrated LED light illuminates your sewing area, providing clear visibility for detailed work and reducing eye strain. It activates automatically when the machine is powered on.

Image: The SINGER M1155 Sewing Machine with an arrow pointing to the LED light, indicating its position for illuminating the sewing area.
4. Accessory Storage
The machine includes an accessory storage compartment within its extension table. This provides convenient storage for your bobbins, needles, and other small sewing tools.

Image: The SINGER M1155 Sewing Machine with its accessory drawer pulled out, showing space for storing small sewing tools.
Konserwacja
Regularna konserwacja zapewnia długowieczność i optymalną wydajność Twojej maszyny do szycia.
1. Czyszczenie
- Usuwanie kłaczków: Periodically remove the needle plate and clean out any lint or thread buildup from the bobbin case area and feed dogs using a small brush.
- Czyszczenie powierzchni: Przetrzyj obudowę urządzenia miękką, suchą ściereczką. Nie używaj silnych środków chemicznych ani ściernych środków czyszczących.
2. Smarowanie
Refer to the full service manual for specific lubrication points and frequency. Generally, modern sewing machines like the M1155 require minimal user lubrication.
Rozwiązywanie problemów
Oto rozwiązania typowych problemów, z którymi możesz się spotkać:
- Pominięte ściegi: Ensure the needle is inserted correctly and is not bent. Use the appropriate needle type and size for your fabric and thread. Re-thread the machine completely.
- Zrywanie wątku: Check for correct threading, proper thread tension, and ensure the needle is not bent or dull. Use quality thread.
- Marszczenie się tkaniny: Adjust thread tension. Use a smaller stitch length. Ensure the correct presser foot is used for the fabric type.
- Maszyna nie uruchamia się: Check if the power cord is securely plugged in and the power switch is on. Ensure the foot control is properly connected.
- Głośna praca: Clean the machine thoroughly, especially the bobbin area, to remove any lint or debris. Ensure all parts are correctly assembled.
Specyfikacje
| Funkcja | Szczegół |
|---|---|
| Marka | PIOSENKARZ |
| Numer modelu | S0442431 |
| Wbudowane ściegi | 14 |
| Wbudowane funkcje | 19 |
| Rodzaj dziurki | 4 Step Button Hole |
| Rodzaj szpulki | Top Drop-In Bobbin |
| Oświetlenie | Światło LED |
| Nawijanie szpulki | Automatyczny |
| Rama | Wytrzymała metalowa rama |
| Szerokość ściegu | 5 MM |
| Pozycja igły | Left & Center |
| Tworzywo | Plastikowy |
| Kolor | Biały |
| Źródło zasilania | Elektryczny przewodowy |
| Waga przedmiotu | 5 kg 860 gram |
| Wymiary przedmiotu Dł. x szer. x wys. | 50 x 50 x 28 centymetrów |
| Zawarte komponenty | Main Product, Foot Control, Accessories Box, Warranty Card |
Gwarancja i wsparcie
Your SINGER M1155 Sewing Machine comes with a warranty. Please refer to the included Warranty Card for details regarding coverage and terms. Keep your purchase receipt as proof of purchase.
For technical assistance, service, or warranty claims, please contact Singer India Limited directly.
Producent: Singer India Limited
Numer bezpłatny: 18001033474


