
1. Wprowadzenie i koniecview
The CallToU Wireless Door/Window Sensor Chime (Model CC01-DS04) is a versatile security and alert system designed to notify you when a door or window is opened. It consists of a receiver unit and a magnetic sensor. When the magnetic sensor detects an opening, it wirelessly transmits a signal to the receiver, which then sounds an alarm or chime.
This system is suitable for various applications, including:
- Bezpieczeństwo domu: Detects unauthorized entry through doors or windows.
- Bezpieczeństwo dzieci: Alerts you if children open restricted doors or windows.
- Monitorowanie zwierząt: Notifies you if pets open doors or gates.
- Alert dla klienta: Functions as a welcome chime for retail stores or offices.

Figure 1: CallToU Wireless Door/Window Sensor Chime system overview.
2. Zawartość opakowania
Sprawdź przesyłkę, aby upewnić się, że znajdują się w niej wszystkie elementy:
- 1 x jednostka odbiorcza
- 1 x Magnetic Sensor (Transmitter)
- 1 x Instrukcja obsługi
- Mounting Accessories (Double-sided tape, screws)
- 1 x bateria alkaliczna 12 V 23 A (wstępnie zainstalowana w nadajniku)
3. Funkcje produktu
- Regulowana głośność: 5 levels of volume adjustment, ranging from 0dB (silent) to 110dB.
- Wiele melodii: 55 selectable chime melodies.
- Wskaźnik LED: Visual alert with LED flashing.
- Rozszerzony zasięg: Up to 200 meters (650 feet) in open areas, and up to 80 meters (260 feet) indoors.
- Długa żywotność baterii: Magnetic sensor battery lasts for approximately 13,000 triggers (about 8 months with 50 uses per day).
- Łatwa instalacja: Wireless design with no complex wiring required.
- Rozszerzalny system: One receiver can pair with up to 30 transmitter sensors.

Figure 2: Receiver features including 55 melodies and 5 volume levels.
4. Instrukcje konfiguracji
4.1 Komponentyview
Rysunek 3: Szczegółowy view of receiver and magnetic sensor components.
4.2 Konfiguracja początkowa i parowanie
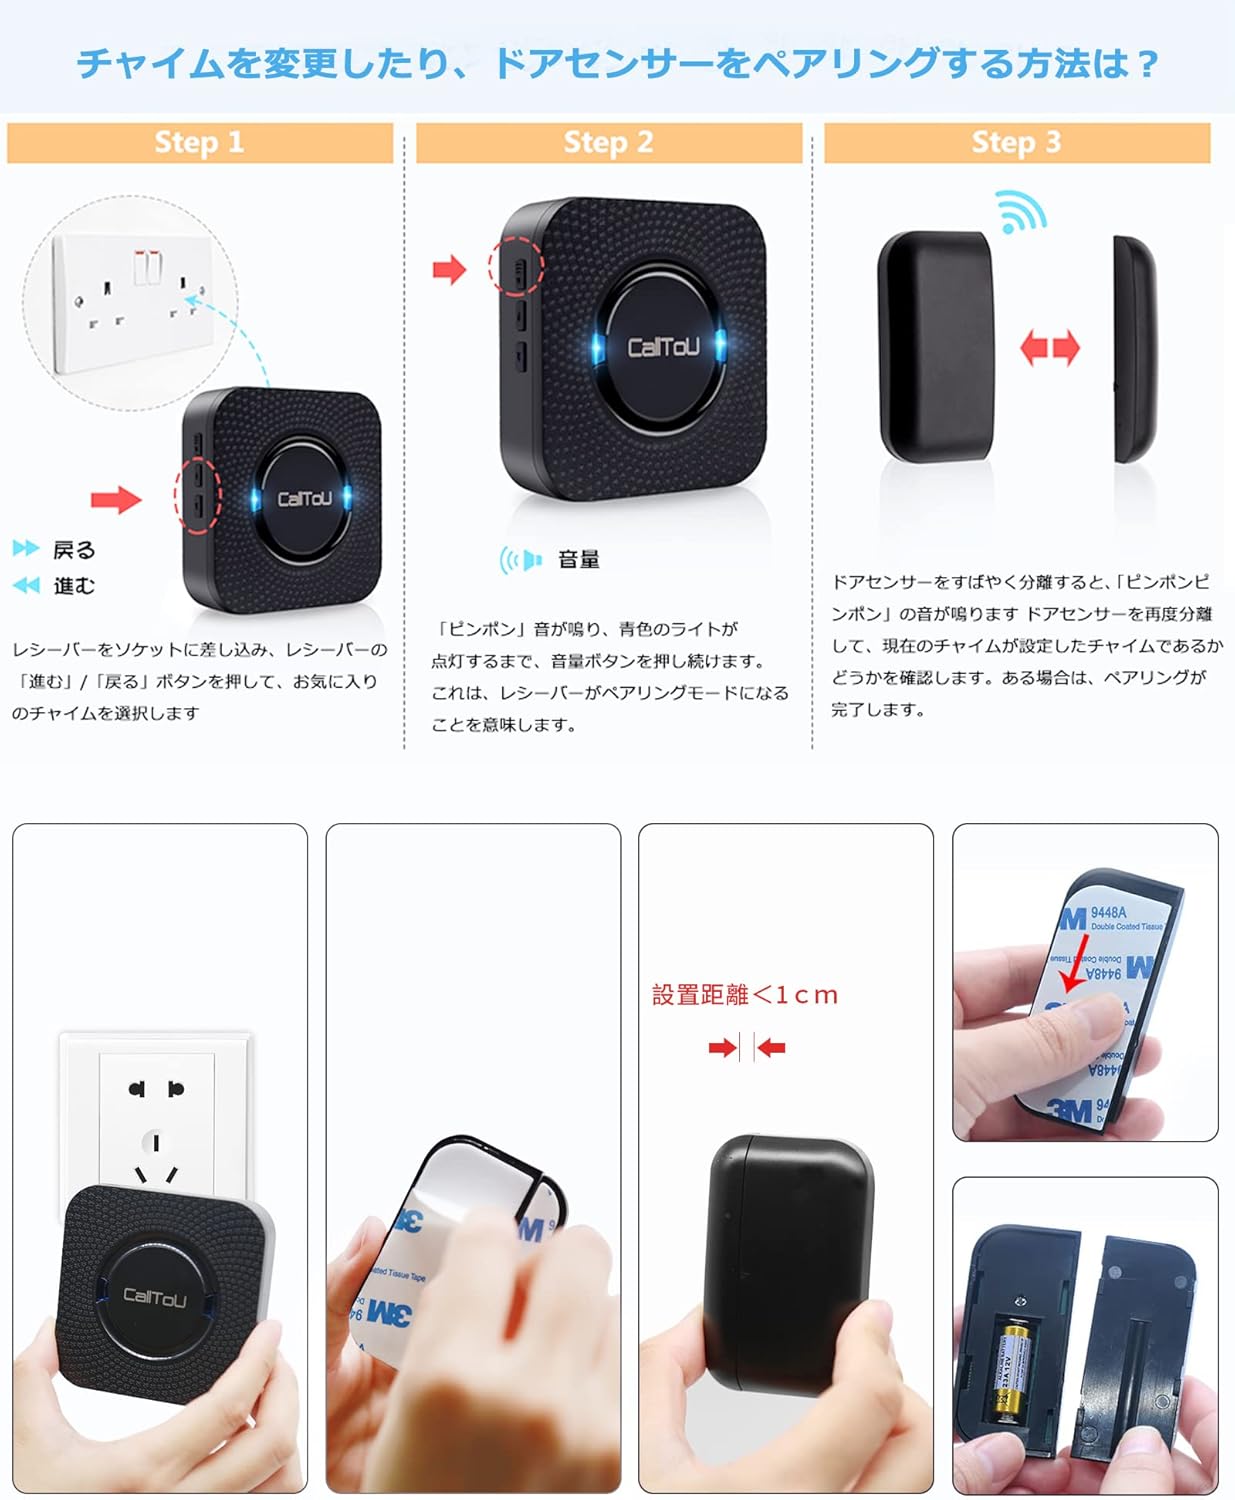
- Włącz odbiornik: Plug the receiver unit into a standard electrical outlet. The receiver will power on and be ready for pairing.
- Wybierz melodię: Press the 'Up' or 'Down' buttons on the side of the receiver to cycle through the 55 available melodies. Select your preferred chime sound.
- Wejdź w tryb parowania: Press and hold the volume button on the side of the receiver for approximately 5 seconds until you hear a "ding-dong" sound and the blue LED light flashes. This indicates the receiver is in pairing mode.
- Activate Magnetic Sensor: Separate the two parts of the magnetic sensor by more than 1.5 cm (0.6 inches). The receiver will emit the selected chime sound and its LED will flash, indicating successful pairing.
- Zamontuj czujnik: Use the provided double-sided tape or screws to attach the magnetic sensor to your desired door or window frame. Ensure the two parts of the sensor are aligned and within 1.5 cm (0.6 inches) of each other when the door/window is closed.

Figure 4: Plug the receiver into an outlet.

Figure 5: Select your desired melody.

Figure 6: Enter pairing mode by holding the volume button.
Video 1: Demonstrates the door sensor setup method, including powering on, selecting a melody, entering pairing mode, and activating the magnetic sensor for successful pairing.

Figure 7: Proper installation of the magnetic sensor on a door or window.

Figure 8: Visual guide for the setup and pairing process.
5. Instrukcja obsługi
- Triggering the Alarm: When the magnetic sensor's two parts separate (e.g., a door or window opens), the sensor will send a signal to the paired receiver.
- Alert odbiornika: The receiver will sound the selected melody and its LED light will flash, alerting you to the opening.
- Regulacja głośności: Press the volume button on the receiver to adjust the sound level through 5 different settings.
- Wybór melodii: Use the 'Up' and 'Down' buttons on the receiver to change the chime melody.

Rysunek 9: Examples of how the door sensor chime can be used in different scenarios.
6. Konserwacja
6.1 Battery Replacement (Magnetic Sensor)
The magnetic sensor is powered by a 12V 23A alkaline battery. When the battery is low, the sensor's indicator light may flash or the transmission range may decrease. Replace the battery as follows:
- Carefully pry open the magnetic sensor casing za pomocą małego śrubokręta.
- Wyjmij stary akumulator 12V 23A.
- Insert a new 12V 23A alkaline battery, ensuring correct polarity.
- Zamknij czujnik casing bezpiecznie.
Video 2: Detailed instructions on how to replace the battery in the door sensor.

Figure 10: Visual guide for magnetic sensor battery replacement.
6.2 Czyszczenie
Przetrzyj urządzenia miękką, suchą ściereczką. Nie używaj środków czyszczących o właściwościach ściernych ani rozpuszczalników.
7. Rozwiązywanie Problemów
| Problem | Możliwa przyczyna | Rozwiązanie |
|---|---|---|
| Odbiornik nie wydaje sygnału dźwiękowego po wykryciu obecności czujnika. | 1. Czujnik i odbiornik nie są sparowane. 2. Sensor battery is low or dead. 3. Sensor and receiver are out of range. 4. Obstructions between sensor and receiver. | 1. Re-pair the sensor and receiver (refer to Section 4.2). 2. Replace the sensor battery (refer to Section 6.1). 3. Move the receiver closer to the sensor. 4. Reduce obstructions or reposition units. |
| Dźwięk dzwonka jest za cichy lub za głośny. | Ustawienie głośności jest nieprawidłowe. | Wyreguluj głośność za pomocą przycisku głośności na odbiorniku. |
| Fałszywe alarmy. | Magnetic sensor parts are too far apart or misaligned. | Ensure the magnetic sensor parts are within 1.5 cm (0.6 inches) when the door/window is closed and are properly aligned. |
8. Specyfikacje
- Marka: CallToU
- Model: CC01-DS04
- Kolor: Czarny
- Wymiary odbiornika: 8.17 x 8.17 x 3 cm (ok. 3.22 x 3.22 x 1.18 cala)
- Magnetic Sensor Dimensions: 9.5 x 9 x 9 cm (overall product dimension, specific sensor dimensions not provided but implied to be smaller)
- Źródło zasilania: Receiver: AC Plug-in; Transmitter: 1 x 12V 23A Alkaline Battery (included)
- Zasięg bezprzewodowy: Up to 200 meters (650 feet) outdoors (line of sight), up to 80 meters (260 feet) indoors
- Poziomy głośności: 5 (0-110dB)
- Melodie: 55 do wyboru
- Technologia czujników: Czujnik kontaktowy (magnetyczny)
- Kod UPC: 779584902443

Rysunek 11: Wymiary produktu.
9. Gwarancja i wsparcie
This CallToU product comes with a 1 rok gwarancji jakości. If you encounter any issues or have questions regarding the product during use, please contact CallToU customer support through Amazon's order details page. We are committed to providing prompt assistance and replacements if necessary.
For further assistance, please refer to the contact information provided with your purchase or visit the official CallToU brand store on Amazon.