1. Wprowadzenie
Thank you for choosing the Monster Prolink Studio Pro 2000 XLR Microphone Cable. This professional-grade cable is engineered for superior audio signal transfer, designed to meet the demanding requirements of studio recording and live performances. This manual provides essential information for the proper setup, operation, maintenance, and troubleshooting of your cable to ensure optimal performance and longevity.

Figure 1: Monster Prolink Studio Pro 2000 XLR Microphone Cable.
2. Funkcje produktu
The Monster Prolink Studio Pro 2000 cable incorporates advanced design and materials to deliver exceptional audio quality and durability:
- Zaawansowana technologia: Designed with state-of-the-art reference cable technology for precision sound, effective shielding, and accurate transient response time.
- Professional Accuracy: Utilizes three Time Correct Multi-Gauge wire networks for extreme accuracy in imaging and dynamic range, ensuring every nuance of your audio is captured.
- Unparalleled Sound Quality: Captures and reproduces every sound detail without interference. Features an advanced heavy-gauge bass control conductor for tight, powerful bass and incredible dynamics.
- Gold-Plated XLR Connectors: Equipped with custom Monster gold-plated XLR male to XLR female connectors, ensuring reliable, high-quality connections and compatibility with standard 3-pin XLR equipment.
- Duraflex Outer Jacket: Provides maximum flexibility and protection against slicing and abrasion, significantly increasing the cable's durability and lifespan.

Figure 2: Internal wiring detail showcasing professional accuracy.

Figure 3: Cables designed for unparalleled sound.
3. Konfiguracja
Follow these steps to properly connect your Monster Prolink Studio Pro 2000 XLR Microphone Cable:
- Zidentyfikuj złącza: The cable features a male XLR connector on one end and a female XLR connector on the other. The male connector has three pins, and the female connector has three corresponding holes.
- Połącz z mikrofonem: Insert the female XLR end of the cable into the male XLR output port of your microphone. Ensure it clicks securely into place.
- Połącz z urządzeniem audio: Insert the male XLR end of the cable into the female XLR input port of your audio interface, mixer, or other compatible audio equipment. Ensure it clicks securely into place.
- Bezpieczne połączenia: Gently tug on both ends of the cable to confirm that the connections are firm and will not accidentally disconnect during use.
This cable is compatible with any device featuring a 3-pin XLR input/output, such as microphones, mixers, audio interfaces, and speaker systems.

Figure 4: XLR male and female connectors.

Figure 5: Microphone connected via XLR cable.

Figure 6: Cable connected to a mixer.
4. Obsługa
Once connected, the Monster Prolink Studio Pro 2000 cable operates passively to transmit audio signals. No specific operational steps are required beyond proper connection. Ensure that the cable is not subjected to excessive bending, twisting, or pulling during use to prevent internal damage and maintain signal integrity. Always route cables safely to avoid tripping hazards and accidental disconnections.
5. Konserwacja
Proper maintenance will extend the life and performance of your Monster Prolink Studio Pro 2000 cable:
- Czyszczenie: Wipe the cable jacket with a soft, dry cloth to remove dust and dirt. For stubborn grime, a slightly damp Można użyć ściereczki, a następnie natychmiast wysuszyć. Unikać silnych środków chemicznych i ściernych środków czyszczących.
- Pielęgnacja złącza: Keep the XLR connectors clean and free of debris. If necessary, use a cotton swab lightly dampened with isopropyl alcohol to clean the pins and contacts, ensuring they are completely dry before reconnection.
- Składowanie: When not in use, coil the cable loosely in large loops. Avoid tight coiling or wrapping around elbows, which can stress the internal conductors. Store the cable in a cool, dry place away from direct sunlight and extreme temperatures.
- Kontrola: Regularly inspect the cable for any signs of wear, such as cuts, kinks, or damage to the connectors. The Duraflex outer jacket is designed for resilience, but consistent abuse can still cause damage.
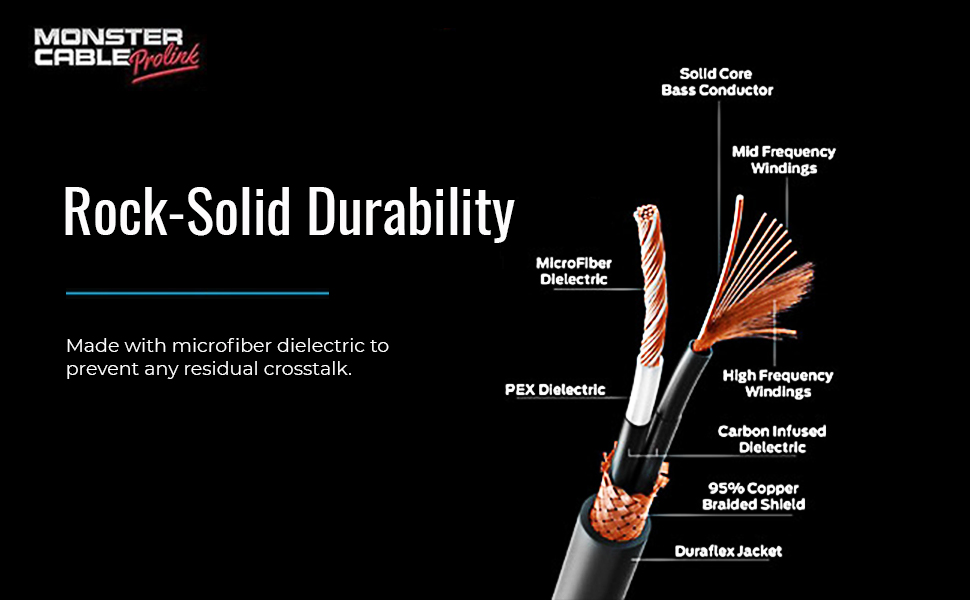
Figure 7: Cable cross-section showing durable construction.
6. Rozwiązywanie Problemów
If you encounter issues with your Monster Prolink Studio Pro 2000 cable, consider the following:
- Brak dźwięku lub dźwięk przerywany:
- Ensure both XLR connectors are fully seated and locked into their respective ports.
- Test the cable with another known working microphone and audio device to isolate if the issue is with the cable or other equipment.
- Check for visible damage to the cable jacket or connectors.
- Humming or Buzzing Noise (Grounding Issues):
- Upewnij się, że cały sprzęt audio jest prawidłowo uziemiony.
- Try connecting the equipment to different power outlets.
- The Monster Studio Pro cable is designed with superior shielding to minimize interference. If humming persists, the issue may lie with other components in your audio chain or power supply.
- Zniekształcony dźwięk:
- Verify that input levels on your mixer or audio interface are not too high, causing clipping.
- Ensure the microphone is functioning correctly.
If troubleshooting steps do not resolve the issue, refer to the Warranty and Support section.
7. Specyfikacje
| Funkcja | Szczegół |
|---|---|
| Marka | Potwór |
| Nazwa modelu | SP2000-M-20 VMP60002 |
| Typ złącza | XLR |
| Typ kabla | XLR |
| Kompatybilne urządzenia | Mixer, Audio Interface, Microphone (with XLR output) |
| Funkcja specjalna | Gold-plated high-speed connector |
| Płeć złącza | Mężczyzna do kobiety |
| Piny złącza | 3 |
| Technologia łączności | Pomocniczy |
| Zalecane zastosowania | Studio Recording, Live Performances |
| Do użytku wewnątrz/na zewnątrz | Wnętrz |
| Waga przedmiotu | 790 grama (ok. 1.74 funta) |
| UPC | 741835114066 |
| GTIN | 741835114066 |

Rysunek 8: Kluczowe specyfikacje produktu.
8. Informacje o gwarancji
Monster stands behind the quality of its products. The Monster Prolink Studio Pro 2000 XLR Microphone Cable is covered by a Dożywotnia gwarancja. This warranty ensures that your professional audio microphone cable is protected by our 100% replacement guarantee against defects in materials and workmanship for the life of the product. For warranty claims or further details, please retain your proof of purchase and contact Monster customer support.
9. Wsparcie
For additional assistance, technical support, or to inquire about warranty services, please visit the official Monster website or contact their customer service department. You can typically find contact information, FAQs, and further resources on the manufacturer's support pages.
Zasoby internetowe: www.monsterproducts.com/support (Byłyample link, please verify official Monster support page)