1. Ważne informacje dotyczące bezpieczeństwa
Please read this entire instruction manual before installation. If you have any questions, please contact MOUNTUP customer support. Improper assembly or installation may cause damage or serious personal injury.
- Nośność: Nie przekraczać maksymalnego udźwigu wynoszącego 35 kg (77 funtów).
- Rozmiar telewizora: This mount is designed for televisions between 26 and 60 inches.
- Typ ściany: These MOUNTUP TV wall mounts are NOT FOR DRYWALL INSTALLATION. They are designed for installation into wood studs or solid concrete/brick walls. Ensure the mounting surface can safely support the combined weight of the equipment and all attached hardware.
- Sprzęt komputerowy: Use only the hardware provided. Do not use the mount for any purpose not expressly specified by the manufacturer.
- Montaż: Ensure all components are securely fastened before use. If any parts are missing or defective, contact MOUNTUP for replacement.
- Ruch: Operate the mount carefully. Avoid sudden movements or excessive force when adjusting the TV position.
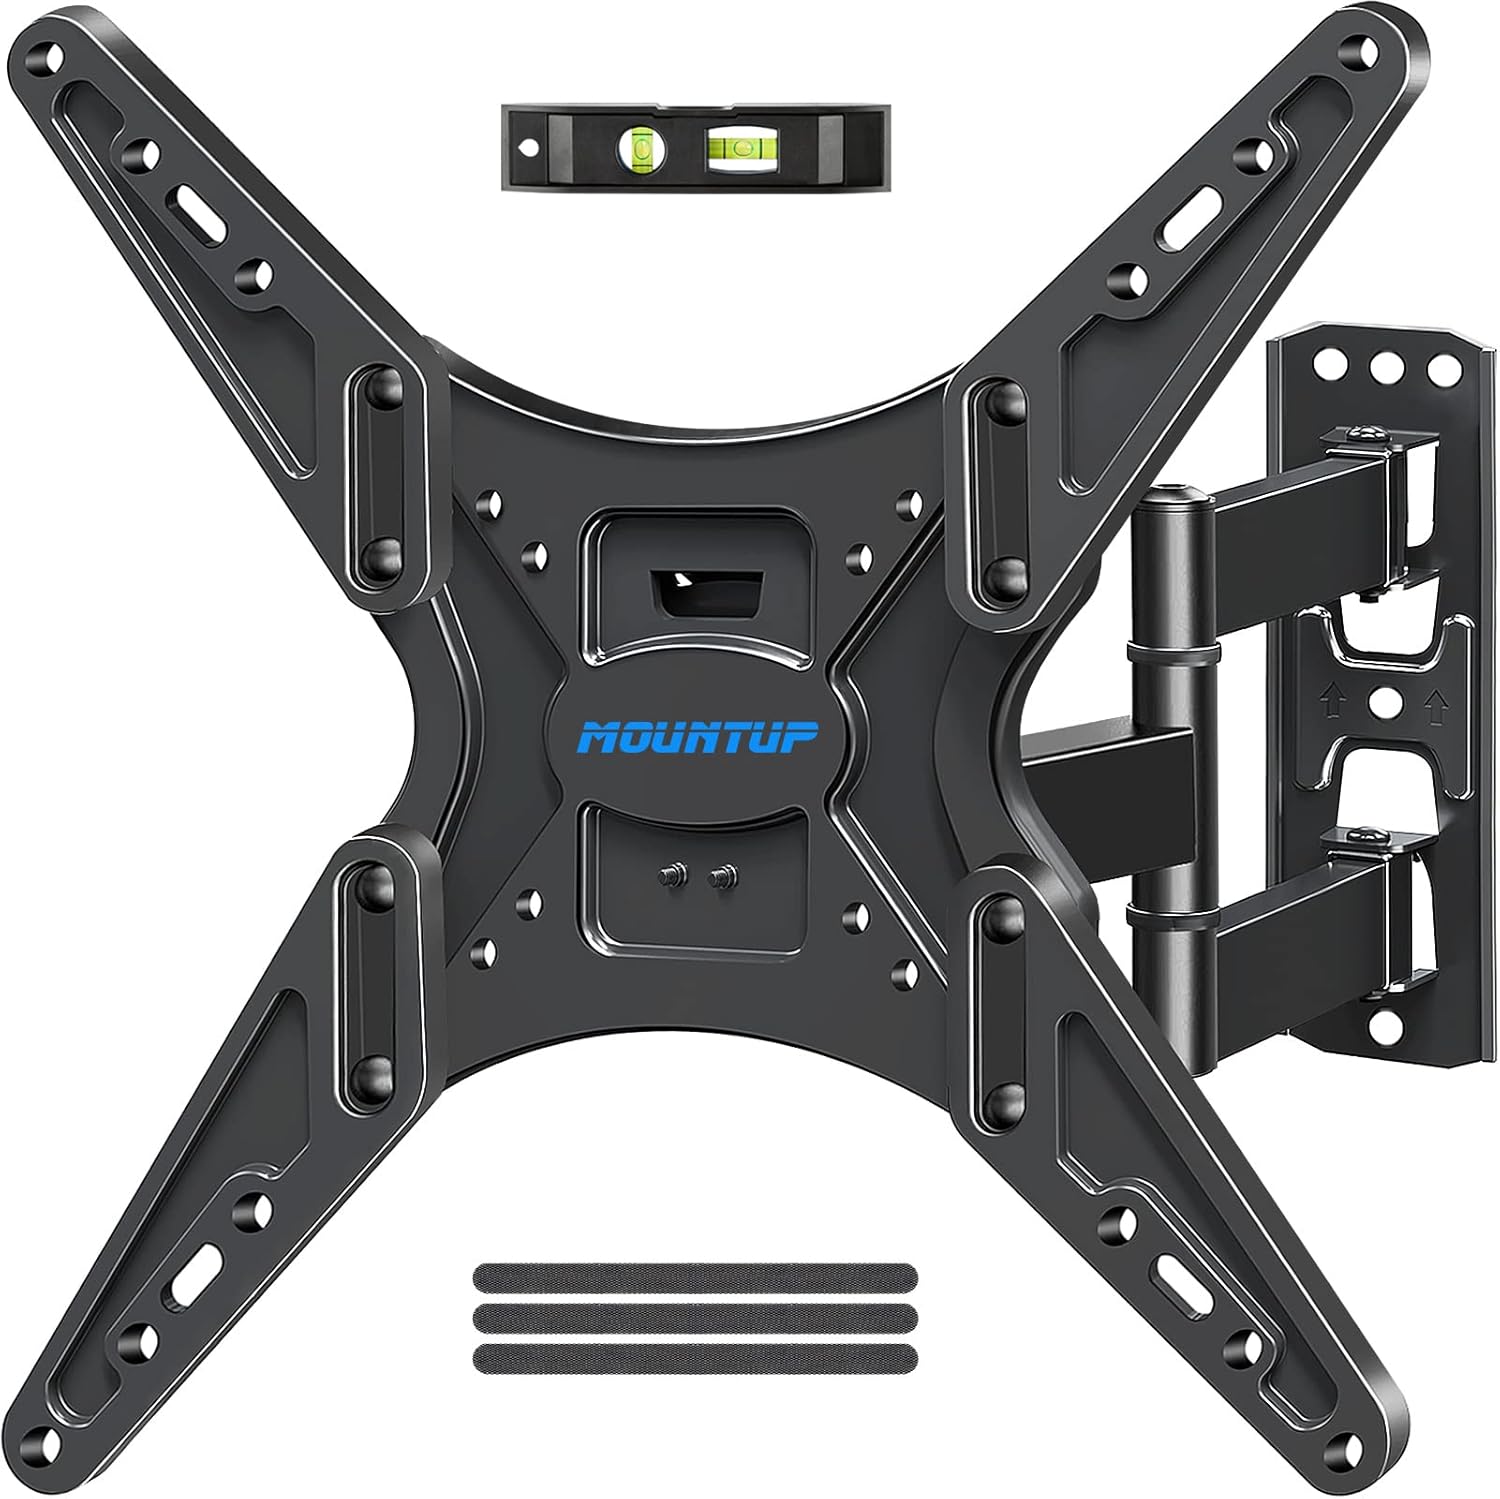
2. Zawartość opakowania
Verify that all components are present and undamaged before beginning installation. If any items are missing or damaged, please contact MOUNTUP customer support.
- 1 x MOUNTUP Full Motion TV Wall Mount (Model MU0014)
- 1 x MOUNTUP Full Motion TV Wall Mount (Model MU0009)
- 1 x Hardware Kit (various screws, washers, spacers, anchors)
- 1 x poziomica
- Instrukcja obsługi

Obraz 2.1: Koniecview of the MOUNTUP TV Wall Mounts Bundle, including both MU0014 and MU0009 models and their respective hardware kits.
3. Specyfikacje produktu
| Funkcja | Specyfikacja |
|---|---|
| Numery modeli | MU0014, MU0009 |
| Kompatybilność z rozmiarem telewizora | 26 - 60 cali |
| Nośność | 77 funta (35 kg) |
| Zgodność ze standardem VESA | Min.: 100x100mm, maks.: 400x400mm |
| Typ ruchu | Przegubowy, obrotowy, pochylany |
| Tilt Angle (MU0014) | +5° / -15° |
| Tilt Angle (MU0009) | -10° |
| Swivel Angle (MU0014) | ±45° |
| Extension (MU0014) | Do 18.9 cali |
| Retraction (MU0014) | 2.5 cali |
| Extension (MU0009) | Do 15.3 cali |
| Retraction (MU0009) | 2 cali |

Image 3.1: Compatibility and specifications for the MOUNTUP MU0009 TV mount, detailing supported TV sizes, weight, and VESA patterns.
4. Konfiguracja i instalacja
4.1 Zanim zaczniesz
Gather the necessary tools and confirm your wall type and TV specifications.
- Wymagane narzędzia: Pencil, Stud Finder, Drill, 1/2 inch (13mm) Socket Wrench, Phillips Head Screwdriver, Level (included).
- Typ ściany: Identify if your wall is wood stud (minimum 2x4 inches) or solid concrete/brick. DO NOT INSTALL ON DRYWALL ALONE.
- TV VESA Pattern: Check the four mounting holes on the back of your TV. Measure the horizontal and vertical distance (in mm) to confirm it falls within the 100x100mm to 400x400mm VESA range.
- Waga telewizora: Sprawdź, czy waga Twojego telewizora nie przekracza 35 kg (77 funtów).
4.2 Instalacja krok po kroku
The installation process is similar for both MU0014 and MU0009 models. Refer to the specific diagrams for each mount as needed.
- Zamontuj uchwyty TV na telewizorze: Select the appropriate screws, washers, and spacers for your TV. Secure the vertical brackets to the back of your TV, ensuring they are centered and level.
- Mark Wall Drilling Locations: Determine the desired height for your TV. Use a stud finder to locate the center of two adjacent wood studs, or mark locations for concrete anchors. Place the wall plate against the wall and mark the drilling holes. Use the included bubble level to ensure accuracy.
- Wywierć otwory pilotażowe: Drill pilot holes at the marked locations. For wood studs, use a 7/32 inch (5.5mm) drill bit. For concrete/brick, use a 3/8 inch (10mm) drill bit and insert concrete anchors.
- Montaż płytki ściennej: Secure the wall plate to the wall using the lag bolts and washers. Tighten all bolts firmly but do not overtighten.
- Zawieś telewizor na uchwycie ściennym: Carefully lift the TV with the attached brackets and hook it onto the wall plate. Ensure the TV is securely seated.
- Zabezpiecz telewizor, aby go zamontować: Use the safety screws or locking mechanisms on the TV brackets to secure the TV to the wall plate, preventing accidental dislodgement.

Rysunek 4.1: Szczegółowy view of the MOUNTUP MU0014 mount components, illustrating the main parts for assembly.
Rysunek 4.2: Szczegółowy view of the MOUNTUP MU0009 mount components, illustrating the main parts for assembly.
5. Operating Your TV Mount
Both MOUNTUP full motion mounts offer flexible viewing options. Adjustments should be made smoothly and carefully.
5.1 Regulacja nachylenia
The MU0014 mount allows for a tilt range of +5° to -15°, while the MU0009 offers a tilt of -10°. Loosen the tilt adjustment knobs or bolts on the TV brackets, adjust the screen to the desired angle, and then securely tighten the knobs/bolts.
5.2 Adjusting Swivel
The MU0014 mount can swivel up to ±45° left or right. Gently push or pull the TV screen to the desired viewing angle. The articulating arm will move smoothly.
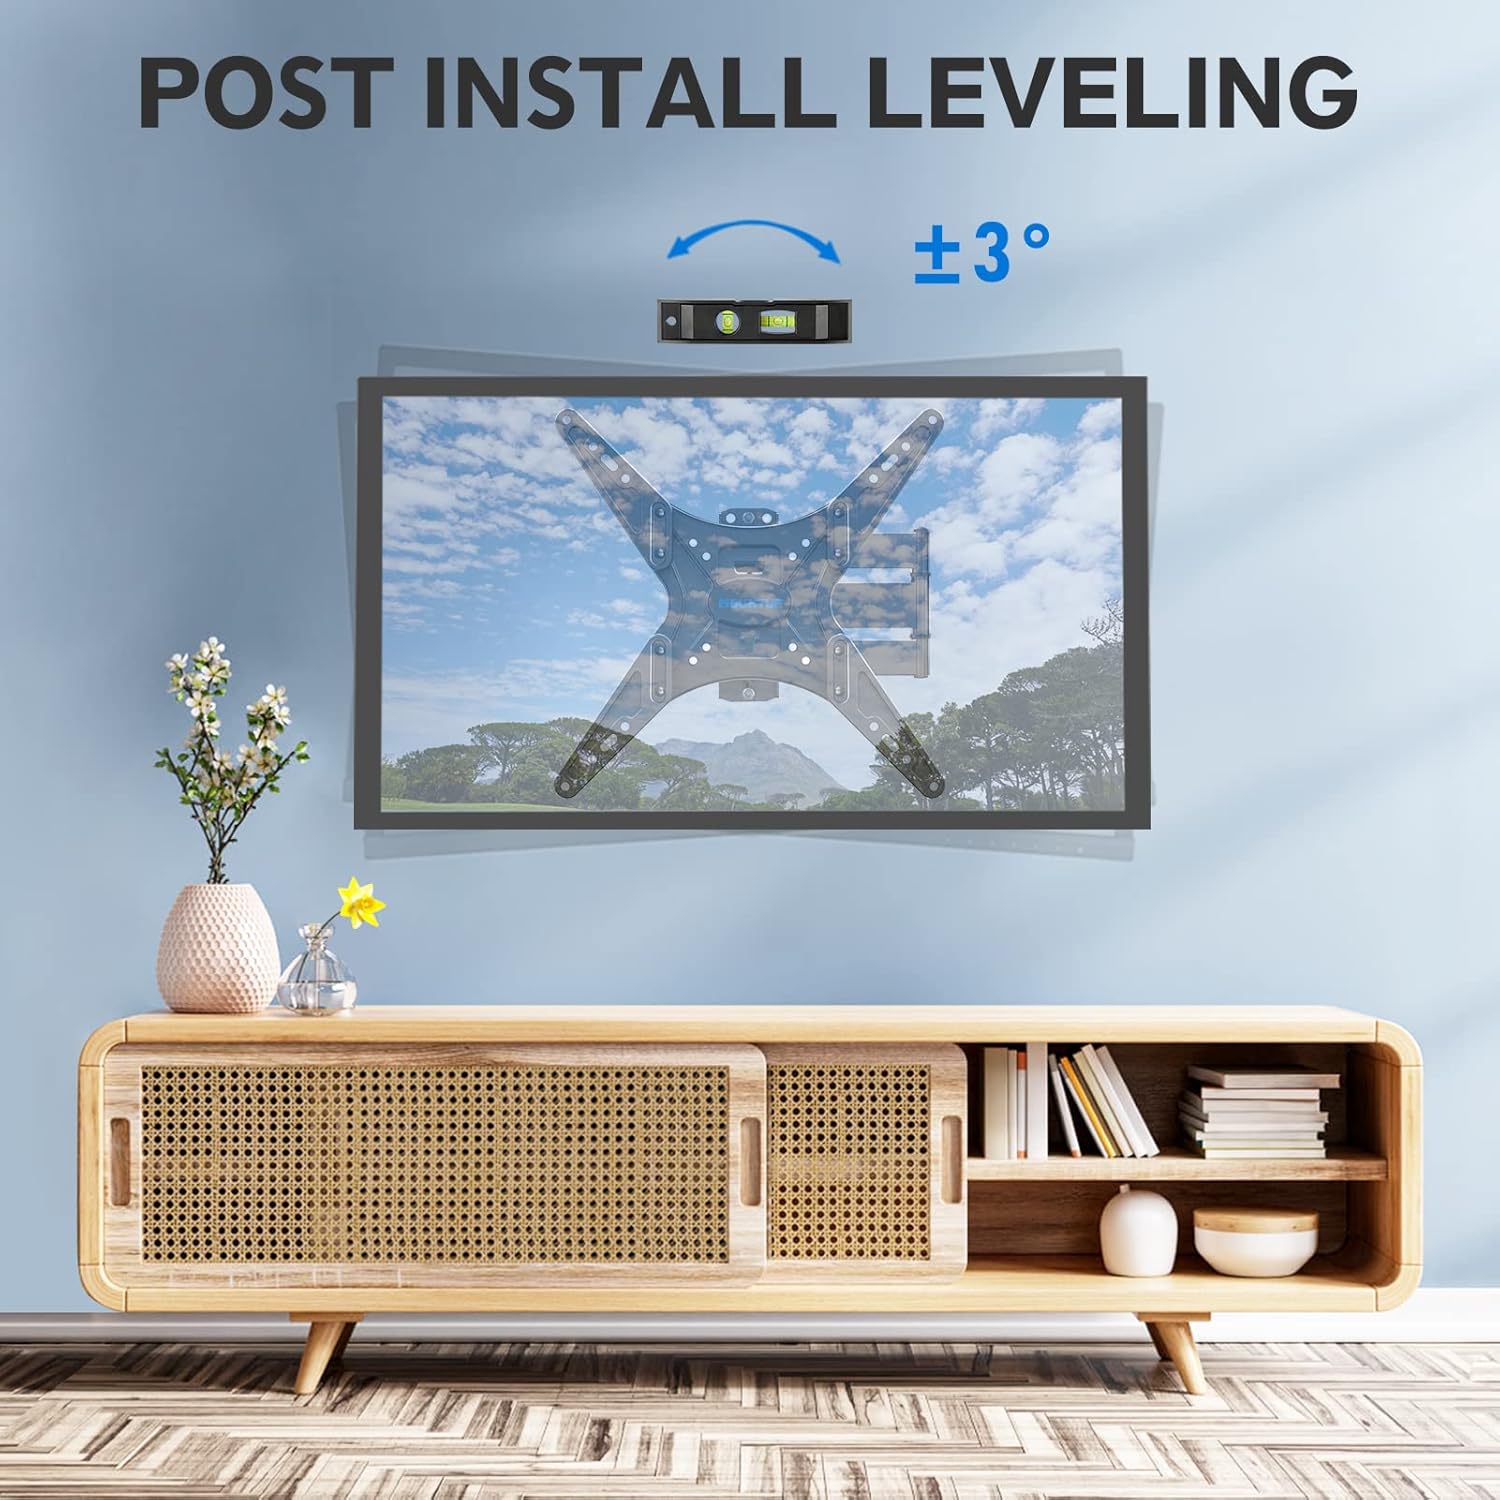
Image 5.1: Demonstrating the tilt and swivel capabilities of the MOUNTUP MU0014 mount for optimal viewelastyczność.
5.3 Wysuwanie i wsuwanie
Extend the TV away from the wall for greater flexibility or retract it closer to the wall to save space. The MU0014 extends up to 18.9 inches and retracts to 2.5 inches. The MU0009 extends up to 15.3 inches and retracts to 2 inches.

Image 5.2: Illustrating the extension and retraction range of the MOUNTUP MU0014 mount.

Image 5.3: Illustrating the extension, retraction, and tilt capabilities of the MOUNTUP MU0009 mount.
5.4 Poziomowanie po instalacji
After installation, if your TV is slightly unlevel, you can make minor adjustments. The mount allows for a post-installation leveling adjustment of approximately ±3°. Consult the specific instructions for your mount model to perform this adjustment.

Image 5.4: Demonstrating the post-installation leveling feature for fine-tuning the TV's horizontal position.
6. Konserwacja
Regularna konserwacja zapewnia długowieczność i bezpieczne działanie uchwytu telewizyjnego.
- Sprawdź połączenia: Periodically (e.g., every 6 months) check all screws and bolts to ensure they remain tight. Retighten if necessary.
- Clean Mount: Przetrzyj uchwyt miękką, suchą ściereczką, aby usunąć kurz. Unikaj stosowania środków czyszczących o właściwościach ściernych i rozpuszczalników.
- Smarowanie: Połączenia przegubowe zaprojektowano z myślą o płynnym ruchu. W przypadku wystąpienia sztywności, na ruchome części można nałożyć niewielką ilość smaru na bazie silikonu, unikając kontaktu z elementami elektrycznymi.
7. Rozwiązywanie Problemów
If you encounter issues with your MOUNTUP TV mount, refer to the following common problems and solutions.
- Telewizor nie jest wypoziomowany po zainstalowaniu: Use the post-installation leveling feature (refer to Section 5.4) to make minor adjustments. Ensure the wall plate was installed level initially.
- Mocowanie wydaje się luźne lub niestabilne: Immediately remove the TV from the mount. Recheck all wall mounting bolts and TV bracket screws for tightness. Ensure the wall type is appropriate and the anchors (if used) are secure. Contact customer support if the issue persists.
- Difficulty adjusting tilt/swivel/extension: Check for any obstructions. Ensure all adjustment knobs or bolts are sufficiently loosened before attempting to move the TV, and retighten them after adjustment.
- Brakujące części: Do not proceed with installation if parts are missing. Contact MOUNTUP customer support for replacement parts.
8. Gwarancja i obsługa klienta
MOUNTUP is committed to providing high-quality products and customer satisfaction. This product comes with a manufacturer's warranty against defects in materials and workmanship. For specific warranty details, please refer to the product packaging or contact MOUNTUP directly.
If you have any questions regarding product installation, operation, or troubleshooting, please do not hesitate to contact MOUNTUP customer support. Our team is available to assist you with pre-purchase inquiries and post-installation support.
Informacje kontaktowe: Please refer to the MOUNTUP official webAby uzyskać aktualne dane kontaktowe działu obsługi klienta, odwiedź witrynę lub dokumentację zakupu.