1. Wprowadzenie
Dziękujemy za zakupasing the XTUGA ES602 Professional DJ Mixer. This manual provides essential information for the safe and efficient operation of your mixer. Please read it thoroughly before use and retain it for future reference.
The XTUGA ES602 is a versatile 7-channel mixing console designed for stage audio, DJ applications, and music production. It features XLR and LINE inputs, +48V phantom power, a built-in digital effect processor, USB/MP3 playback, and Bluetooth connectivity.
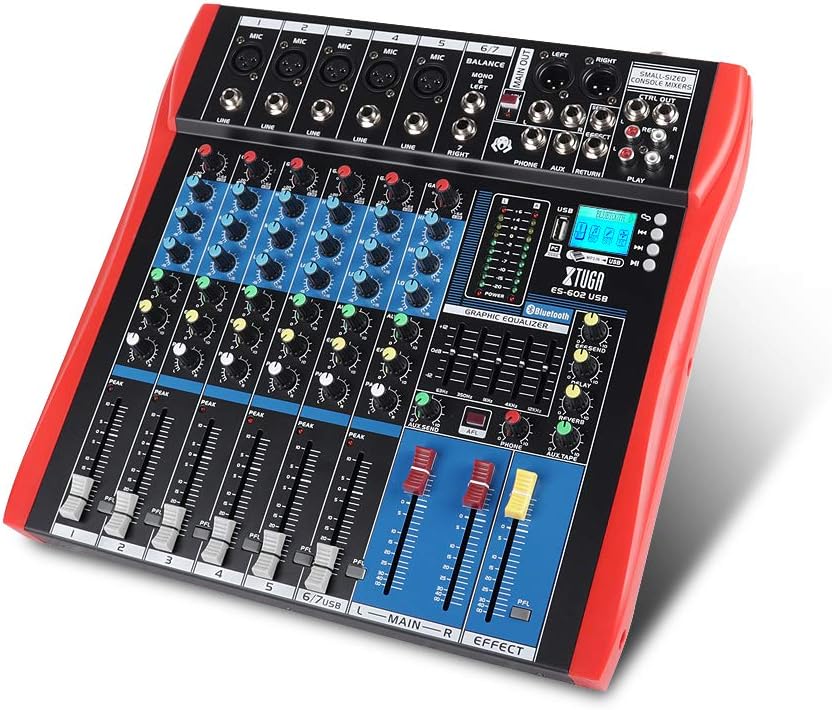
Figure 1: XTUGA ES602 Professional DJ Mixer overview. This image displays the top panel of the mixer, showing all input channels, control knobs, faders, and the master section with the USB/MP3/Bluetooth module.
2. Instrukcje bezpieczeństwa
- Zasilanie: Używaj wyłącznie określonego zasilacza. Upewnij się, że napięcietage pasuje do lokalnego źródła zasilania.
- Woda i wilgoć: Nie wystawiaj urządzenia na działanie deszczu ani wilgoci. Nie stawiaj na urządzeniu przedmiotów wypełnionych płynami.
- Wentylacja: Zapewnij odpowiednią wentylację. Nie blokuj otworów wentylacyjnych.
- Źródła ciepła: Trzymaj urządzenie z dala od źródeł ciepła, takich jak grzejniki, kratki wentylacyjne, piece i inne urządzenia wytwarzające ciepło.
- Czyszczenie: Clean only with a dry cloth. Avoid liquid cleaners.
- Serwisowanie: Nie próbuj samodzielnie naprawiać tego urządzenia. Wszelkie prace serwisowe zlecaj wykwalifikowanemu personelowi.
- Moc fantomowa: When using condenser microphones, ensure +48V phantom power is activated only after connecting the microphone and before connecting to other devices to prevent damage.
3. Funkcje
The XTUGA ES602 mixer offers a range of features for professional audio mixing:
- 7-kanałowa konsola miksująca: Equipped with XLR and LINE inputs for versatile connectivity.
- Zasilanie fantomowe +48 V: Available for condenser microphones.
- Sterowanie indywidualnymi kanałami: Each channel features GAIN, 3-band EQ (HIGH, MID, LOW), AUX, EFFECT, PAN control knobs, and a volume fader.
- PFL (Pre-Fader Listen) Switch: Allows monitoring of individual channels via headphones.
- Built-in Digital Effect Processor: Includes REPEAT, EFF SEND, DELAY, SEND, and RETURN controls for integrated effects.
- USB/MP3 Playback and Recording: Direct USB input for MP3 playback from U-disk and recording capabilities.
- Łączność Bluetooth: Seamlessly connect mobile phones, tablets, and other Bluetooth-enabled devices for audio playback.
- Główne wyjścia: XLR (L/R) and 1/4" (L/R) stereo output jacks.
- Wyjście REC: Dedicated REC (L/R) output for external recording devices.
- Interfejs zestawu słuchawkowego: Do monitorowania dźwięku.
- Wskaźniki LED: Power and output level indicator lights for easy monitoring.
- Trwała konstrukcja: Ultra-thin, all-metal chassis for high density dust resistance and durability.
4. Sterowanie i funkcje
This section details the various controls and connections on your XTUGA ES602 mixer.
4.1 Kanały wejściowe (kanały 1-7)
- Wejście mikrofonowe (XLR): Connects balanced microphones.
- LINE Input (1/4" Jack): Connects line-level instruments or devices.
- +48V PHANTOM Power Switch: Activates phantom power for condenser microphones on XLR inputs.
- Gałka GAIN: Dostosowuje czułość wejściową dla każdego kanału.
- Pokrętła korektora HIGH, MID, LOW: 3-band equalizer for adjusting the treble, midrange, and bass frequencies of each channel.
- Pokrętło AUX: Controls the send level to the auxiliary output.
- Pokrętło efektu: Controls the send level to the internal effect processor.
- Gałka PAN: Adjusts the stereo position (left/right) of the channel.
- PFL Switch: Engages Pre-Fader Listen for monitoring the channel's signal before the fader.
- Dioda szczytowa: Zapala się, gdy sygnał wejściowy jest zbyt wysoki, wskazując na potencjalne przesterowanie.
- Fader kanałów: Adjusts the output volume of the individual channel.
4.2 Sekcja główna
- MAIN OUT (XLR & 1/4" Jacks): Balanced stereo main outputs for connecting to amplifiers lub aktywne głośniki.
- REC OUT (RCA Jacks): Stereo output for connecting to recording devices.
- PHONES Jack (1/4"): Stereo headphone output for monitoring.
- AUX SEND/RETURN Jacks: For connecting external effects processors or monitoring systems.
- MAIN Faders (L/R): Steruje ogólną głośnością wyjściową miksera.
- EFFECT Level Knob: Adjusts the overall level of the internal effects.
- REPEAT, DELAY Knobs: Controls parameters of the digital effect processor.
- Wskaźnik poziomu: LED display showing the main output level.

Rysunek 2: Szczegółowy view of the XTUGA ES602 mixer's channel controls and LED level meters. This image highlights the individual channel knobs for GAIN, EQ, AUX, EFFECT, PAN, and the main output level indicators.
4.3 USB/MP3/Bluetooth Module
- Port USB: For connecting a USB flash drive for MP3 playback or connecting to a computer for recording/playback.
- Wyświetlacz LCD: Shows current mode, track information, and Bluetooth status.
- Przyciski sterujące: Play/Pause, Stop, Previous/Next Track, Mode selection (USB/Bluetooth/PC).
- Wskaźnik Bluetooth: Pokazuje stan połączenia Bluetooth.

Figure 3: Close-up of the Bluetooth and MP3 connection section on the XTUGA ES602 mixer. This image shows the USB port, LCD display, and control buttons for media playback and Bluetooth pairing.
5. Konfiguracja
Follow these steps to set up your XTUGA ES602 mixer.
5.1 Połączenie zasilania
- Upewnij się, że wyłącznik zasilania miksera jest w pozycji WYŁĄCZONY.
- Podłącz dołączony zasilacz do wejścia zasilania miksera.
- Podłącz zasilacz do odpowiedniego gniazdka sieciowego.
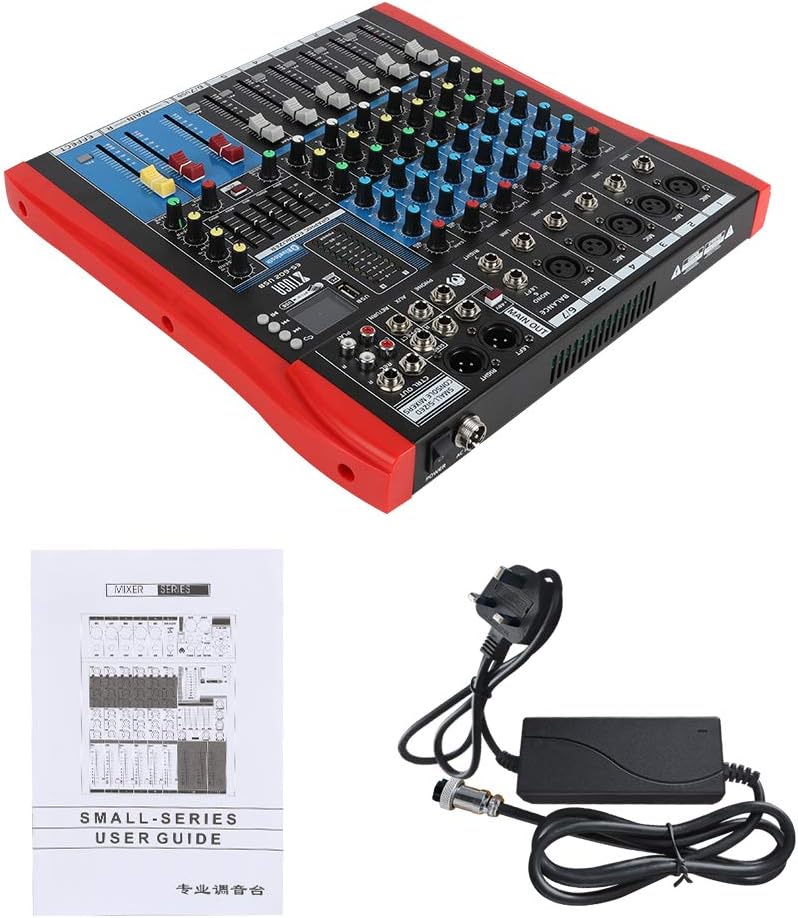
Figure 4: XTUGA ES602 mixer shown with its power adapter and user guide. This illustrates the components included for initial setup.
5.2 Podłączanie mikrofonów i instrumentów
- For microphones, connect XLR cables to the Wejście MIC jacks. If using condenser microphones, activate the +48V PHANTOM Power Switch dla danego kanału.
- For line-level instruments (keyboards, guitars with preamps, etc.), connect 1/4" TS/TRS cables to the Wejście liniowe gniazda.
- Ensure all channel GAIN knobs are set to their minimum position before connecting.
5.3 Podłączanie urządzeń wyjściowych
- Podłącz główne głośniki lub amplifier do MAIN OUT (XLR or 1/4") gniazda.
- For recording, connect an external recording device to the REC OUT (RCA) gniazda.
- Podłącz słuchawki do TELEFONY gniazdo do monitoringu.
5.4 Connecting to a Computer for Recording
- Connect a USB cable from the mixer's Port USB do twojego komputera.
- The mixer should be recognized as an audio device by your operating system.
- Select the mixer as the input device in your digital audio workstation (DAW) or recording software.
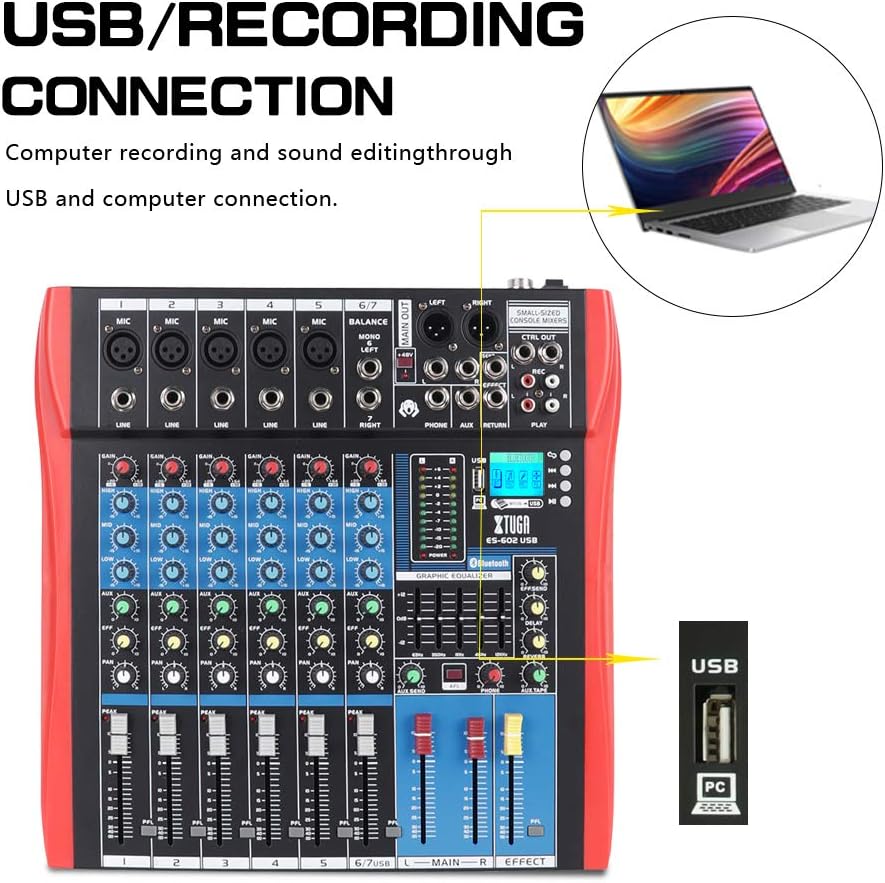
Figure 5: Illustration of the XTUGA ES602 mixer connected to a laptop via USB for recording and sound editing. This highlights the USB input port and its function.
6. Obsługa
This section covers the basic operation of your XTUGA ES602 mixer.
6.1 Włączanie i ustawianie poziomu początkowego
- After all connections are made, turn on your mixer's power switch.
- Powoli podnieś MAIN Faders do komfortowego poziomu słuchania.
- For each active input channel, gradually increase the pokrętło GAIN aż do PEAK LED flashes only occasionally during the loudest parts of the signal.
- Adjust individual Tłumiki kanałów to balance the mix.
6.2 Korzystanie z Bluetooth
- Naciśnij Przycisk TRYB on the USB/MP3/Bluetooth module until "Bluetooth" appears on the LCD display. The Bluetooth indicator will flash.
- On your mobile device, search for Bluetooth devices and select "XTUGA MIXER" (or similar).
- Once paired, the Bluetooth indicator will become solid. You can now play audio from your device through the mixer.
- Use the module's control buttons for Play/Pause, Next/Previous track.
6.3 Odtwarzanie USB/MP3
- Włóż dysk flash USB zawierający dźwięk w formacie MP3 files do Port USB.
- The mixer should automatically switch to USB mode and begin playback. If not, press the Przycisk TRYB aby wybrać USB.
- Use the control buttons to navigate tracks and control playback.
6.4 Nagrywanie
- Do dysku USB: In USB/MP3 mode, press the Przycisk REC on the module to start recording the main mix to the connected USB drive. Press again to stop.
- Do komputera: Ensure the mixer is connected to your computer via USB. Open your recording software and select the mixer as the input device. Start recording within your software.
6.5 Korzystanie z efektów
- Dostosuj Pokrętło EFEKT on individual channels to send a portion of that channel's signal to the internal effect processor.
- Użyj EFFECT Level knob in the master section to control the overall volume of the applied effect.
- Dostosuj POWTARZAĆ I OPÓŹNIENIE knobs to fine-tune the characteristics of the digital effect.
7. Konserwacja
Właściwa konserwacja gwarantuje długowieczność i optymalną wydajność miksera.
- Czyszczenie: Do czyszczenia zewnętrznej części miksera należy używać miękkiej, suchej ściereczki. Nie należy używać środków ściernych, rozpuszczalników ani wosków.
- Ochrona przed kurzem: Gdy mikser nie jest używany, należy go przykryć, aby chronić go przed kurzem i zanieczyszczeniami.
- Składowanie: Przechowywać mikser w chłodnym, suchym miejscu, z dala od bezpośredniego światła słonecznego i ekstremalnych temperatur.
- Zarządzanie kablami: Avoid bending or crimping cables excessively. Disconnect cables by pulling the plug, not the cable itself.
8. Rozwiązywanie Problemów
Jeśli masz problemy z mikserem, zapoznaj się z poniższymi, często występującymi problemami i ich rozwiązaniami.
- Brak dźwięku:
- Check if the mixer is powered on.
- Upewnij się, że wszystko MAIN Faders and individual Tłumiki kanałów are raised.
- Verify that output cables are securely connected to your ampgłośniki/głośniki.
- Sprawdź głośność na swoim ampgłośniki/głośniki.
- Brak sygnału wejściowego:
- Ensure microphones/instruments are properly connected to the correct input jacks.
- Sprawdź czy pokrętło GAIN for the respective channel is sufficiently turned up.
- If using a condenser microphone, ensure Zasilanie PHANTOM +48V jest aktywowany.
- Test input sources (microphones, instruments) with another device to confirm they are working.
- Zniekształcony dźwięk:
- Zmniejszyć pokrętło GAIN for the offending channel if the PEAK LED świeci się ciągle.
- Obniż MAIN Faders if the output level meter is consistently in the red.
- Sprawdź, czy kable nie są uszkodzone.
- Problemy z połączeniem Bluetooth:
- Ensure the mixer is in Bluetooth mode (LCD shows "Bluetooth").
- Upewnij się, że Bluetooth w Twoim urządzeniu mobilnym jest włączony i znajduje się w zasięgu.
- Spróbuj rozparować i ponownie sparować urządzenie.
- Odtwarzanie USB nie działa:
- Ensure the USB drive is properly inserted and contains compatible MP3 files.
- Naciśnij Przycisk TRYB to ensure the mixer is in USB mode.
- Spróbuj użyć innego dysku USB.
9. Specyfikacje
| Funkcja | Specyfikacja |
|---|---|
| Numer modelu | ES602 (also ES802/1202 series) |
| Liczba kanałów | 7 |
| Technologia łączności | Pomocniczy, Bluetooth, USB |
| Wejście audio | Pomocnicze, USB, XLR |
| Typ złącza wyjściowego | Pomocniczy, XLR |
| Źródło zasilania | Elektryczny przewodowy |
| Waga przedmiotu | 3.59 kilogramów |
| Wymiary produktu | Wymiary 46 x 46 x 14 cm |
| Producent | XTUGA |
| UPC | 784124158754 |
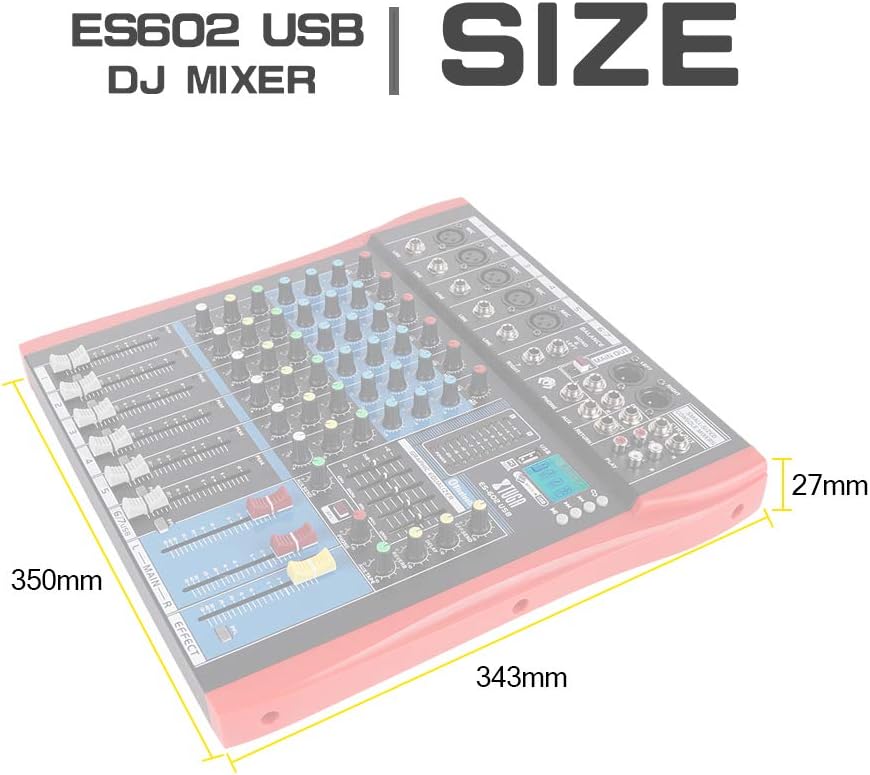
Figure 6: Dimensions of the XTUGA ES602 USB DJ Mixer, showing measurements of 350mm length, 343mm width, and 27mm height.
10. Gwarancja i wsparcie
XTUGA products are designed for reliability and performance. For warranty information and technical support, please refer to the warranty card included with your product or visit the official XTUGA webZachowaj paragon jako dowód zakupu na wypadek ewentualnych roszczeń gwarancyjnych.