
1. Ważne instrukcje bezpieczeństwa
Please read these instructions carefully before installing or using your NODOR NorCook GH 6030 Gas Hob. Keep this manual for future reference.
- Bezpieczeństwo gazowe: Ensure proper ventilation. Do not store flammable materials near the hob. In case of a gas leak, turn off the gas supply, open windows, and do not operate electrical switches.
- Bezpieczeństwo elektryczne: The appliance must be properly earthed. Do not use adapters or extension cords. Disconnect from power before cleaning or maintenance.
- Ogólne bezpieczeństwo: This appliance is for domestic use only. Do not leave children unsupervised near the hob. Use appropriate cookware. Do not use the hob as a space heater.
- Gorące powierzchnie: Palniki i otaczające je powierzchnie nagrzewają się podczas użytkowania. Unikaj dotykania gorących powierzchni.
2. Koniec produktuview
The NODOR NorCook GH 6030 is a gas hob designed for efficient cooking. It features multiple burners with individual control knobs.
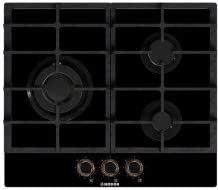
Obraz 1: Przód view of the NODOR NorCook GH 6030 Gas Hob. This image displays the cooktop surface with four gas burners and the corresponding control knobs located at the front.
Składniki:
- Palniki: Various sizes for different cooking needs.
- Podpory Pan: Removable supports for cookware.
- Pokrętła kontrolne: Regulate gas flow and ignite burners.
- Układ zapłonowy: Integrated electronic ignition.
3. Instalacja i konfiguracja
Instalację musi wykonać wykwalifikowany technik, zgodnie z lokalnymi przepisami i normami.
3.1 Rozpakowanie
- Ostrożnie usuń wszystkie materiały opakowaniowe.
- Inspect the hob for any damage. Do not install a damaged appliance.
3.2 Umieszczenie
- Należy zachować odpowiedni odstęp od sąsiadujących ścian i szafek.
- The hob requires a suitable cutout in the countertop. Refer to the installation diagram for precise dimensions.
3.3 Podłączenie gazu
- Connect the hob to the gas supply using approved flexible or rigid piping.
- Check all connections for leaks using a soapy water solution. Never use an open flame.
- Ensure the gas type (Natural Gas or LPG) matches the appliance's configuration. Conversion kits may be required.
3.4 Podłączenie elektryczne
- Connect the appliance to a properly earthed electrical outlet.
- The electrical supply is primarily for the ignition system.
4. Instrukcja obsługi
4.1 Pierwsze użycie
- Before first use, clean the hob surface and pan supports.
- Burn off any manufacturing residues by operating each burner on maximum for a few minutes in a well-ventilated area.
4.2 Zapalanie palnika
- Place appropriate cookware on the pan support.
- Push down the control knob for the desired burner and turn it counter-clockwise to the maximum flame setting.
- Hold the knob down for a few seconds until the flame ignites and stabilizes. If the flame goes out, repeat the process.
- Once ignited, release the knob and adjust the flame to the desired intensity by turning the knob.
4.3 Regulacja intensywności płomienia
- Turn the control knob towards the minimum flame symbol for a lower heat setting.
- Turn the control knob towards the maximum flame symbol for a higher heat setting.
- To turn off the burner, turn the knob clockwise to the "OFF" position.
5. Czyszczenie i konserwacja
Przed przystąpieniem do czyszczenia należy zawsze upewnić się, że płyta grzewcza ostygła i jest odłączona od zasilania.
5.1 Codzienne czyszczenie
- Wipe the hob surface with a soft cloth and mild detergent.
- Aby zapobiec powstawaniu plam, natychmiast usuwaj wszelkie rozlane resztki jedzenia.
- Wysuszyć dokładnie czystą szmatką.
5.2 Burner Components
- Remove pan supports, burner caps, and burner rings.
- Wash them in warm soapy water. For stubborn stains, use a non-abrasive cleaner.
- Ensure all components are completely dry before reassembling. Blocked burner holes can affect performance.
5.3 Pan Supports
- Clean pan supports regularly to remove grease and food residue.
- They can be washed by hand or in a dishwasher if specified by the manufacturer (check product details).
6. Rozwiązywanie Problemów
Przed skontaktowaniem się z serwisem prosimy o sprawdzenie poniższych typowych problemów:
| Problem | Możliwa przyczyna | Rozwiązanie |
|---|---|---|
| Palnik nie zapala się. | Brak dopływu gazu, brak prądutage, clogged burner holes, wet ignition electrode. | Check gas valve. Check power supply. Clean burner components. Dry ignition electrode. |
| Płomień jest nierówny lub żółty. | Clogged burner holes, incorrect gas type, improper air mixture. | Clean burner holes. Verify gas type. Contact a qualified technician for air mixture adjustment. |
| Wykryto zapach gazu. | Wyciek gazu. | Natychmiast zamknij dopływ gazu. Otwórz okna. Nie używaj przełączników elektrycznych. Skontaktuj się ze służbami ratunkowymi i wykwalifikowanym technikiem. |
| Control knob is stiff. | Food residue or dirt under the knob. | Remove knob and clean the area thoroughly. |
Jeśli po wypróbowaniu tych rozwiązań problem nadal występuje, skontaktuj się z wykwalifikowanym technikiem serwisowym.
7. Specyfikacje
| Funkcja | Szczegół |
|---|---|
| Marka | Nodor |
| Model | NorCook GH 6030 |
| Źródło zasilania | Zasilany gazem |
| ASIN | B08KTNDSK1 |
| Producent | NODOR |
8. Gwarancja i wsparcie
This NODOR appliance comes with a manufacturer's warranty. Please refer to the warranty card included with your product for specific terms and conditions, including warranty period and coverage.
For technical support, spare parts, or service inquiries, please contact your local NODOR authorized service center or the retailer from whom you purchased the product. Always provide the model number (GH 6030) and serial number (if applicable) when seeking assistance.
Note: Information regarding spare parts availability and software updates is not available at this time, as per product specifications.