1. Wprowadzenie
Thank you for choosing the Lepro 20W LED Floodlight. This manual provides essential information for the safe installation, operation, and maintenance of your new floodlights. Please read these instructions carefully before use and retain them for future reference.

Image 1.1: Two Lepro 20W LED Floodlights with power cable. These floodlights are designed for outdoor use, providing bright and efficient illumination.
2. Instrukcje bezpieczeństwa
Aby zapewnić bezpieczną obsługę, należy zawsze przestrzegać poniższych wskazówek:
- Bezpieczeństwo elektryczne: Ensure the power supply is disconnected before installation or maintenance. All electrical connections must comply with local wiring regulations. If unsure, consult a qualified electrician.
- Grunt: Aby zapobiec porażeniu prądem elektrycznym, reflektor musi być prawidłowo uziemiony.
- Tomtage: Sprawdź, czy objętość zasilaniatage odpowiada znamionowej objętości reflektoratage (240 V AC).
- Wodoodporność: The product is IP65 rated, meaning it is protected against dust ingress and low-pressure water jets from any direction. However, do not submerge the unit in water.
- Ciepło: The floodlight generates heat during operation. Do not cover the unit or install it in an enclosed space without adequate ventilation.
- Montowanie: Upewnij się, że powierzchnia montażu jest wystarczająco mocna, aby utrzymać ciężar reflektora.
- Źródło światła: Nie należy patrzeć bezpośrednio na źródło światła LED, gdy jest włączone, gdyż może to spowodować zmęczenie lub uszkodzenie oczu.
3. Zawartość opakowania
Twoja paczka powinna zawierać następujące elementy:
- 2 x Lepro 20W LED Floodlights
- Instrukcja obsługi (ten dokument)
4. Funkcje produktu
The Lepro 20W LED Floodlight offers the following key features:
- Ultra-Bright and Energy-Efficient: Utilizes SMD 2835 LEDs and an optimized reflector design to deliver 1700 lumens of daylight white light (5000K) with only 20W of power consumption, equivalent to a 140W halogen lamp.
- Trwałe i odporne na warunki atmosferyczne: Constructed from die-cast aluminum and tempered glass, with an IP65 rating for resistance against dust and water, suitable for all weather conditions.
- Efektywne odprowadzanie ciepła: Features an ultra-thin housing and integrated heat sink design for effective heat management, extending the product's lifespan.
- Szeroki kąt wiązki: Provides a 110° beam angle for broad illumination coverage.
- 360° Rotatable Bracket: The mounting bracket allows for 360° rotation, enabling flexible adjustment of the light direction.
- Łatwa instalacja: Designed for straightforward installation on various surfaces.

Image 4.1: Key lighting specifications of the floodlight, including LED quantity, color temperature, brightness, and beam angle.

Image 4.2: Illustration of the floodlight's coverage, demonstrating that 20W provides 1700 lumens, effectively illuminating a 5-meter diameter area when mounted at 4 meters height.

Image 4.3: The rear of the floodlight, illustrating the heat dissipation fins designed to efficiently release heat and prolong the product's lifespan.

Image 4.4: The 360° rotatable bracket, allowing for flexible adjustment of the light direction to suit various illumination needs.

Image 4.5: Demonstrates the floodlight's durability and weather resistance, highlighting its IP65 waterproof rating, heat resistance, and frost resistance for reliable performance in diverse outdoor conditions.
5. Specyfikacje
| Atrybut | Wartość |
|---|---|
| Marka | Trąd |
| Numer modelu | PR340011-DW-EU-2 |
| Wymiary produktu (dł. x szer. x wys.) | Wymiary 10.82 x 2.6 x 9.6 cm |
| Waga | 540 gramów |
| Stopień ochrony IP | IP65 |
| Liczba elementów | 2 |
| Styl | Nowoczesny |
| Kolor | Cool White/Black |
| Tworzywo | Aluminium, szkło hartowane |
| Maksymalna moctage | 20 watów |
| Tomtage | 240 V (AC) |
| Konkretne zastosowania | Przestrzenie zewnętrzne i zamknięte |
| Cechy specjalne | Energooszczędny |
| Strumień świetlny | 1700 lm |
| Wskaźnik oddawania barw (CRI) | 80.00 |
| Źródło zasilania | AC |
| Typ instalacji | Montaż ścienny |

Image 5.1: Detailed dimensions of the floodlight, including length, width, and height, along with cable length, provided in both millimeters and inches for precise planning.
6. Instalacja
Aby przeprowadzić prawidłową instalację, wykonaj następujące czynności:
- Przygotowanie: Before starting, ensure the power supply is turned off at the main circuit breaker.
- Miejsce montażu: Choose a suitable location for the floodlight. The included bracket allows for mounting on walls, ceilings, or directly on the ground.
- Cechowanie: Use the bracket as a template to mark the drilling points on the desired surface.
- Wiercenie: Drill holes at the marked points. Insert appropriate wall plugs if mounting on masonry.
- Bezpieczny uchwyt: Attach the bracket securely to the surface using screws (not included). The bracket features 2 self-locking screws for easy removal of the spot without tools.
- Dostosuj kąt: The bracket is 360° rotatable. Adjust the floodlight to the desired angle before tightening the bracket screws.
- Okablowanie: Connect the floodlight's 1-meter power cable to your electrical supply. Ensure correct wiring: brown wire for Live, blue wire for Neutral, and green/yellow wire for Ground. Use a waterproof junction box for outdoor connections (not included).
- Kontrola końcowa: Double-check all connections and ensure the floodlight is securely mounted.
- Włączanie: Przywróć zasilanie na głównym wyłączniku.
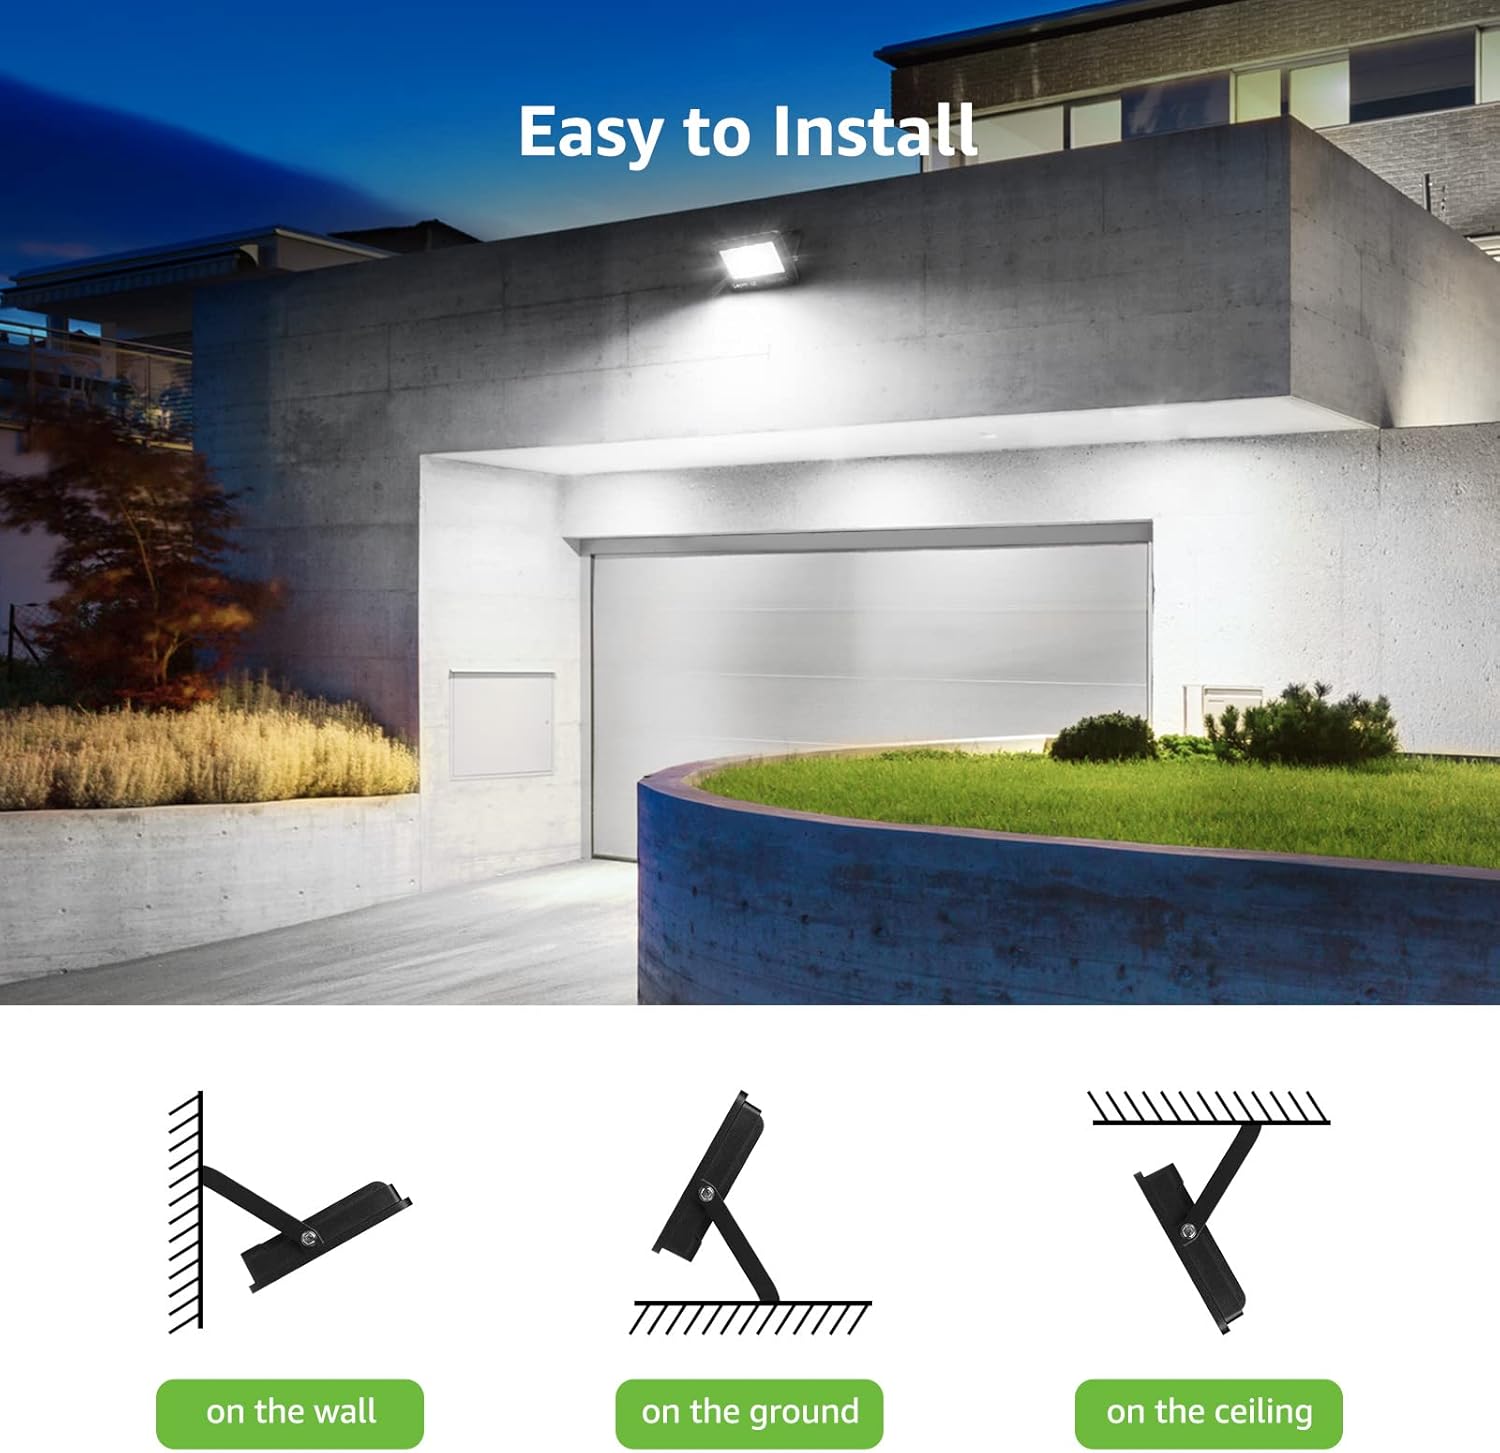
Image 6.1: Various installation methods for the floodlight, demonstrating its versatility for mounting on walls, ground, or ceilings.
7. Działanie
Once installed and connected to a power source, the Lepro 20W LED Floodlight will illuminate when power is supplied. There are no additional controls on the unit itself. Operation is typically controlled via an external switch or timer connected to the power circuit.

Obraz 7.1: Examples of the floodlight in various applications, including residential and commercial outdoor spaces, showcasing its effective illumination.
8. Konserwacja
The Lepro LED Floodlight requires minimal maintenance:
- Czyszczenie: Periodically clean the glass surface with a soft, damp ściereczką, aby zapewnić optymalną moc światła. Nie używaj środków czyszczących o działaniu ściernym ani rozpuszczalników.
- Kontrola: Regularnie sprawdzaj kabel zasilający i obudowę pod kątem ewentualnych uszkodzeń. W przypadku stwierdzenia uszkodzenia natychmiast odłącz zasilanie i zleć sprawdzenie urządzenia wykwalifikowanemu specjaliście.
- Brak części nadających się do samodzielnej naprawy przez użytkownika: The LED light source is integrated and not replaceable by the user. Do not attempt to open the housing.
9. Rozwiązywanie Problemów
Jeśli masz problemy z reflektorem, zapoznaj się z poniższymi typowymi problemami i rozwiązaniami:
| Problem | Możliwa przyczyna | Rozwiązanie |
|---|---|---|
| Światło się nie włącza | Brak zasilania Luźne połączenie przewodów Wadliwy przełącznik zewnętrzny | Sprawdź zasilanie i wyłącznik. Sprawdź, czy wszystkie połączenia przewodów są solidne (najpierw upewnij się, że zasilanie jest wyłączone). Test the external switch or bypass it temporarily. |
| Światło jest słabe lub migocze | Niestabilne zasilanie Nieprawidłowa objętośćtage Uszkodzona jednostka | Zapewnij stabilne źródło zasilania. Sprawdź objętość wejściowątage odpowiada specyfikacji. Jeśli problemy będą się powtarzać, skontaktuj się z obsługą klienta. |
| Woda wewnątrz jednostki | Nieprawidłowa instalacja Damage to housing/seal | Ensure all seals are intact and installation is correct. Disconnect power immediately. Contact customer support. |
If the problem persists after attempting these solutions, please contact Lepro customer support.
10. Gwarancja i wsparcie
Lepro products are designed for reliability and performance. For warranty information or technical support, please refer to the official Lepro webOdwiedź stronę internetową lub skontaktuj się bezpośrednio z działem obsługi klienta. Zachowaj paragon jako dowód zakupu.
Więcej informacji znajdziesz na stronie Lepro Store.