
1. Wprowadzenie
This manual provides detailed instructions for the setup, operation, and maintenance of your BALDR Wireless Weather Station. This device accurately measures indoor and outdoor temperature and humidity, displays weather forecasts, and includes an alarm clock function. Please read this manual thoroughly before use to ensure proper functionality and longevity of the product.
2. Informacje dotyczące bezpieczeństwa
- Nie wystawiaj jednostki głównej ani czujnika zewnętrznego na działanie ekstremalnych temperatur, bezpośredniego światła słonecznego przez dłuższy czas ani nadmiernej wilgoci.
- Unikaj upuszczania urządzenia i narażania go na silne uderzenia.
- Use only the specified battery types (AAA for main unit, AA for outdoor sensor).
- Nie należy mieszać starych i nowych baterii ani różnych typów baterii.
- Zużyte baterie należy utylizować zgodnie z lokalnymi przepisami.
- Trzymaj urządzenie z dala od silnych pól elektromagnetycznych.
3. Zawartość opakowania
- 1 x Główny wyświetlacz
- 1 x bezprzewodowy czujnik zewnętrzny
- 1 x Instrukcja obsługi
4. Koniec produktuview

Obraz: Main display unit and outdoor sensor with key components labeled. The main unit features a calendar, weather forecast, current time, channel indicator, outdoor temperature & humidity, and indoor temperature & humidity. The back of the main unit shows a hanging hole, back buttons, battery compartment, and stand bracket. The outdoor sensor is a compact rectangular device.
Main Display Unit Features:
- Podświetlany wyświetlacz LCD
- Wyświetlacz temperatury i wilgotności w pomieszczeniu
- Outdoor Temperature & Humidity Display
- Weather Forecast Icons (Sunny, Sunny to Cloudy, Cloudy, Rainy, Stormy)
- Time (12/24 hour format)
- Date & Weekday
- Budzik z funkcją drzemki
- MAX/MIN Temperature & Humidity Records
- Supports up to 3 Wireless Outdoor Sensors (one included)
Wireless Outdoor Sensor Features:
- Transmits temperature and humidity data wirelessly to the main unit.
- Channel selection switch (CH1, CH2, CH3).
- LED indicator for signal transmission.
5. Konfiguracja
5.1 Battery Installation and Initial Pairing
For successful pairing, ensure the main unit and outdoor sensor are placed close to each other during initial setup. Install batteries in the main unit first, then in the outdoor sensor.
- Outdoor Sensor Battery Installation:
Open the battery compartment of the outdoor sensor. Set the channel switch to CH1. Insert 2 new 'AA' batteries, observing polarity. Close the battery compartment. - Main Unit Battery Installation:
Open the battery compartment of the main unit. Insert 2 new 'AAA' batteries, observing polarity. Close the battery compartment. The main unit will power on and begin searching for the outdoor sensor. - Łączenie w pary:
Allow 2-3 minutes for the main unit to receive the signal from the outdoor sensor. Do not move the units during this time. Once connected, outdoor temperature and humidity will display on the main unit.

Obraz: Close-up of the outdoor sensor's battery compartment, showing the channel switch set to CH1.

Obraz: Two AA batteries correctly inserted into the outdoor sensor's battery compartment.

Obraz: Two AAA batteries correctly inserted into the main unit's battery compartment.

Obraz: The main unit and outdoor sensor placed side-by-side to facilitate initial pairing.
Wideo: This video demonstrates the quick setup process for the BALDR Wireless Weather Station, including battery installation for both the sensor and the main unit, and the initial pairing steps.
5.2 Umiejscowienie czujnika
The outdoor sensor should be placed in a location that provides accurate readings and is protected from direct weather elements.
- Choose a shaded area to avoid direct sunlight, which can cause inaccurate temperature readings.
- Protect the sensor from direct rain and snow.
- Ensure the sensor is within the transmitting range of the main unit (up to 328ft/100m in open air). Walls and other obstructions can reduce this range.
- Zamontuj czujnik pionowo, korzystając ze zintegrowanego otworu do zawieszania, lub połóż go na płaskiej powierzchni.

Obraz: The wireless outdoor sensor mounted on an exterior wall, illustrating its 100m (328ft) transmitting range to the indoor receiver.

Obraz: An outdoor sensor mounted under a roof eave, demonstrating ideal placement for protection from direct elements.

Obraz: The main unit shown in two placement options: standing on a tabletop and mounted on a wall, highlighting its versatility.
6. Instrukcja obsługi
6.1 Wyświetl ponadview
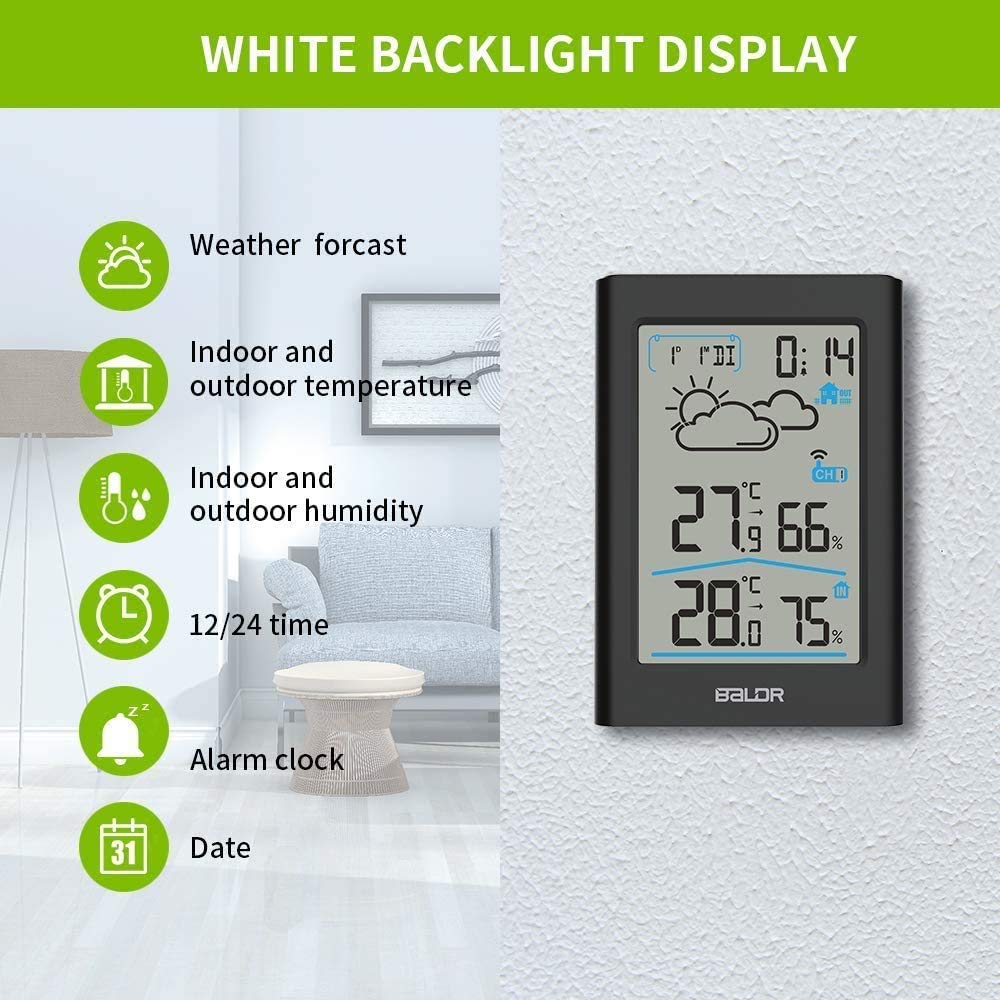
Obraz: The main display unit showing various readings: weather forecast icon, indoor and outdoor temperature, indoor and outdoor humidity, 12/24 hour time, alarm clock status, and date.
6.2 Funkcja podświetlenia
Touch the top button of the main unit to activate the white backlight. The backlight will remain on for 20 seconds, making it easier to read in dim light conditions.

Obraz: The weather station display with its white backlight illuminated, showing clear visibility in a low-light environment.
6.3 Ustawianie czasu i daty
To enter setting mode, long press the 'SET/C/F' button. Use the 'MEM/▼' or 'CH/▲' buttons to adjust values. Press 'SET/C/F' to confirm and move to the next setting.
- Format 12H/24H: Wybierz preferowany format czasu.
- Ustawienie godziny: Ustaw aktualną godzinę.
- Ustawienie minut: Ustaw aktualną minutę.
- Ustawienie roku: Ustaw bieżący rok.
- MD/DM Selectable: Choose between Month/Date or Date/Month format.
- Ustawienie miesiąca: Ustaw bieżący miesiąc.
- Ustawienie daty: Ustaw aktualną datę.
- Weekday Language Setting: Select the language for the weekday display (GER, ENG, ITA, FRE, DUT, SPA, DAN).
- Key Tone ON/OFF: Enable or disable button press sounds.
6.4 Wybór jednostki temperatury
Press the 'SET/C/F' button (short press) to switch between Celsius (℃) and Fahrenheit (℉).
6.5 Prognoza pogody
The weather station provides a weather forecast for the next 12-24 hours based on atmospheric pressure changes. The icons displayed are: Sunny, Sunny to Cloudy, Cloudy, Rainy, and Stormy.
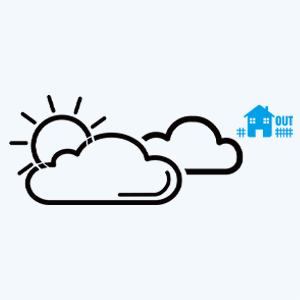
Obraz: A close-up of the weather forecast section on the display, showing various weather icons.

Obraz: The weather station display showing various weather forecast icons (sunny, cloudy, rainy, stormy) overlaid on corresponding real-world sky conditions.
6.6 Rekordy MAX/MIN
The weather station records the maximum and minimum temperature and humidity values over a 24-hour period.
- Press the 'MEM/▼' button once to check the maximum temperature and humidity.
- Press the 'MEM/▼' button twice to check the minimum temperature and humidity.
- To clear the MAX/MIN records, press and hold the 'MEM/▼' button.
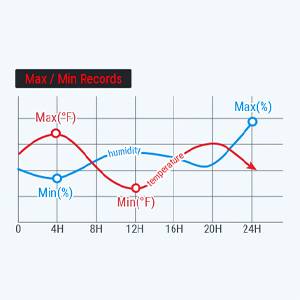
Obraz: A graphical representation of temperature and humidity trends over 24 hours, indicating maximum and minimum recorded values.
6.7 Ustawianie alarmu
- Check Alarm Time: Press the 'ALARM' button once.
- Turn ON/OFF Alarm: Press the 'ALARM' button twice.
- Ustaw godzinę alarmu: Long press and hold the 'ALARM' button to enter alarm setting mode. Use 'MEM/▼' or 'CH/▲' to adjust values. Press 'ALARM' to confirm.
- Funkcja drzemki: When the alarm sounds, press the top button to activate snooze. The alarm will sound again after 5 minutes.
6.8 Changing Sensor Channel
If you have multiple outdoor sensors (up to 3 supported), you can switch between their readings or enable a channel scan.
- Press the 'CH/▲' button to set the channel. The setting order is CH1 → CH2 → CH3 → Channel Scan.
- In Channel Scan mode, the display will cycle through readings from all connected sensors at 10-second intervals.
7. Konserwacja
7.1 Czyszczenie
Przetrzyj urządzenie miękką, damp ściereczka. Nie należy używać środków czyszczących o właściwościach ściernych ani rozpuszczalników.
7.2 Wymiana baterii
Replace batteries when the low battery indicator appears on the display. Always replace all batteries with new ones of the same type.

Obraz: The main unit and outdoor sensor with their battery compartments open, illustrating where batteries are inserted.
8. Rozwiązywanie Problemów
8.1 No Outdoor Temperature/Humidity Display
- Ensure both the main unit and outdoor sensor have fresh batteries installed correctly.
- Verify the outdoor sensor's channel switch matches the selected channel on the main unit (or is in scan mode).
- Place the outdoor sensor closer to the main unit to check if it's a range issue.
- Avoid placing the units near large metal objects, electronic devices, or thick walls that can interfere with the wireless signal.
- Perform a reset: Remove batteries from both units, wait a few minutes, then reinsert batteries into the main unit first, then the outdoor sensor.
Wideo: This video addresses common reasons why the display unit might not receive outdoor temperature and humidity data, providing visual guidance on correct battery installation and channel setting to resolve connectivity issues.
8.2 Niedokładne odczyty
- Ensure the outdoor sensor is not in direct sunlight or exposed to heat sources.
- Verify the main unit is not placed near heat-emitting appliances or in direct sunlight indoors.
- Po pierwszym ustawieniu lub przeniesieniu należy odczekać co najmniej 30 minut, aż obie jednostki się ustabilizują.
9. Specyfikacje
| Funkcja | Specyfikacja |
|---|---|
| Numer modelu | B0341TH-B1 |
| Źródło zasilania (jednostka główna) | Baterie 2 x AAA (brak w zestawie) |
| Źródło zasilania (czujnik zewnętrzny) | 2 baterie AA (brak w zestawie) |
| Technologia łączności | Bezprzewodowy |
| Zasięg bezprzewodowej | Do 328 stóp (100 m) na otwartej przestrzeni |
| Dokładność temperatury | ± 1 ℃ (± 2 ℉) |
| Dokładność wilgotności | ± 2-3% wilgotności względnej |
| Typ wyświetlacza | LCD z podświetleniem |
| Wymiary produktu | 0.86" gł. x 3.15" szer. x 4.76" wys. (jednostka główna) |
| Tworzywo | Acrylonitrile Butadiene Styrene (ABS), Polycarbonate |
10. Gwarancja i pomoc techniczna
BALDR products are designed and manufactured to the highest quality standards. For warranty information or technical support, please refer to the contact details provided on the official BALDR webwitryny lub dokumentacji zakupu.


