
1. Wprowadzenie
The PreSonus AudioBox USB 96 is a compact, bus-powered, 2-channel digital audio interface designed for musicians, podcasters, and producers. It features high-performance Class A mic preamplifiers and professional-quality 24-bit, 96 kHz converters, making it suitable for various recording applications. This device is compatible with both Mac and Windows operating systems and includes PreSonus Studio One Artist DAW software.
Its rugged steel chassis ensures durability, while its intuitive controls provide an efficient recording experience. The AudioBox USB 96 offers two front-panel combo mic/instrument inputs, balanced line-level outputs, a headphone output, and MIDI I/O.
2. Konfiguracja
2.1. Rozpakowanie i kontrola
Carefully remove the AudioBox USB 96 from its packaging. Inspect the unit for any signs of damage that may have occurred during shipping. If the unit is damaged, contact your dealer immediately.
2.2. Połączenia sprzętowe
- Połącz z komputerem: Use the provided USB 2.0 cable to connect the AudioBox USB 96 to an available USB port on your computer. The device is bus-powered, so no external power supply is needed.
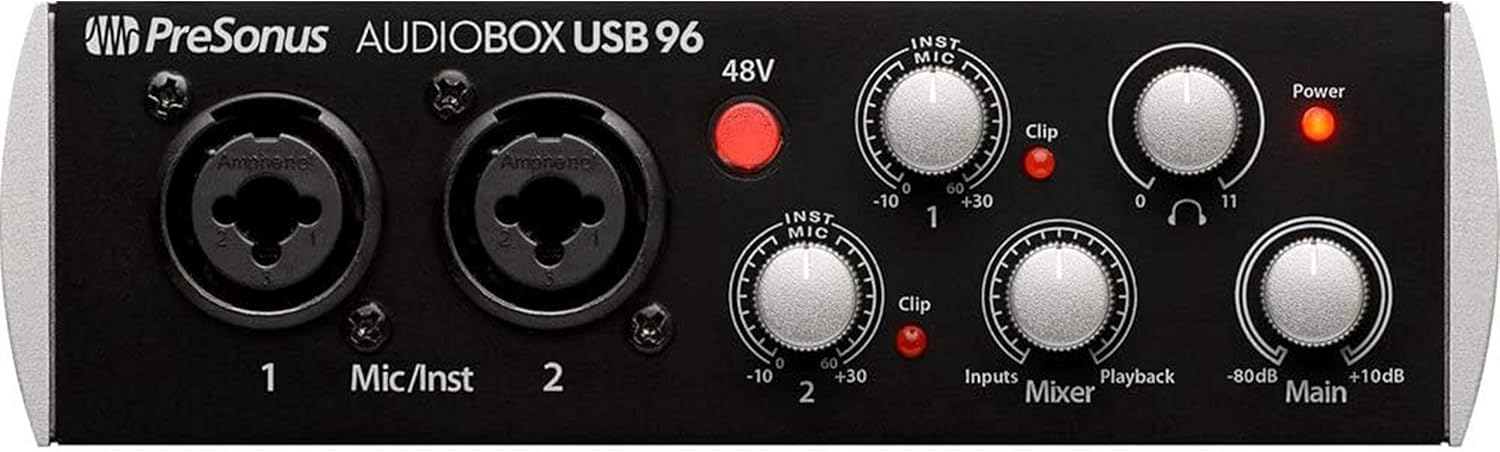
- Podłącz mikrofony/instrumenty: Plug your microphones or instruments (guitars, basses) into the two combo XLR/TRS inputs on the front panel. These inputs are labeled '1' and '2'.
- Podłącz słuchawki: Plug your headphones into the 1/4-inch stereo headphone jack on the front panel.
- Connect Studio Monitors: Connect your powered studio monitors to the balanced 1/4-inch TRS Main Outputs on the rear panel.
- Connect MIDI Devices (Optional): If using MIDI controllers or other MIDI equipment, connect them to the MIDI In and MIDI Out ports on the rear panel.

2.3. Instalacja oprogramowania
Before using your AudioBox USB 96, install the necessary drivers and the included Studio One Artist software. Visit the official PreSonus webStrona (www.presonus.com) to download the latest drivers and register your product to access Studio One Artist.
- Download and install the AudioBox USB 96 drivers for your operating system (Windows or macOS).
- Aby dokończyć instalację sterownika, postępuj zgodnie z instrukcjami wyświetlanymi na ekranie.
- Install PreSonus Studio One Artist or your preferred Digital Audio Workstation (DAW).
- Configure your DAW to use the AudioBox USB 96 as its audio input and output device.
3. Instrukcja obsługi
3.1. Włączanie
The AudioBox USB 96 powers on automatically when connected to your computer via USB. The 'Power' LED on the front panel will illuminate.
3.2. Regulacja wzmocnienia wejściowego
- MIC/INST Gain Knobs: Use the 'MIC/INST' gain knobs for inputs 1 and 2 to adjust the input level of your microphones or instruments. Turn the knob clockwise to increase gain and counter-clockwise to decrease it.
- Wskaźniki klipów: The 'Clip' LED next to each gain knob indicates when the input signal is too high, potentially causing distortion. Adjust the gain so that the 'Clip' LED only flashes occasionally during the loudest parts of your performance.
3.3. Zasilanie fantomowe 48 V
The '48V' button on the front panel activates phantom power for condenser microphones. Press this button when using condenser microphones. Ensure dynamic microphones or ribbon microphones are not connected when 48V phantom power is active, unless they are specifically designed to handle it.
3.4. Monitorowanie
- Mixer Knob: The 'Mixer' knob allows you to blend the direct input signal (Input) with the playback from your computer (Playback). This provides zero-latency monitoring, allowing you to hear your input signal without delay while recording. Turn clockwise for more input signal, counter-clockwise for more playback.
- Wyjście słuchawkowe: Use the 'Headphone' knob to adjust the volume of the headphone output.
- Główne wyjście: The 'Main' knob controls the overall output level to your studio monitors connected to the Main Outputs.

3.5. MIDI Operation
The MIDI In and Out ports allow you to connect MIDI keyboards, controllers, or other MIDI devices to your computer through the AudioBox USB 96. Ensure your DAW is configured to recognize the MIDI input and output from the interface.
4. Konserwacja
- Czyszczenie: Use a soft, dry, lint-free cloth to clean the exterior of the AudioBox USB 96. Avoid using abrasive cleaners, solvents, or waxes, as these can damage the finish.
- Składowanie: When not in use for extended periods, store the device in a cool, dry place, away from direct sunlight and extreme temperatures or humidity.
- Zarządzanie kablami: Ensure all cables are neatly organized and not under tension to prevent damage to the connectors or the unit.
5. Rozwiązywanie Problemów
- Brak zasilania:
- Ensure the USB cable is securely connected to both the AudioBox USB 96 and your computer.
- Wypróbuj inny port USB na swoim komputerze.
- Verify your computer is powered on and not in a low-power state.
- Brak dźwięku:
- Check all audio cable connections (microphones, instruments, headphones, monitors).
- Ensure the 'Main' and 'Headphone' volume knobs are turned up.
- Verify the 'Mixer' knob is set appropriately to blend input and playback.
- Check your computer's sound settings to ensure the AudioBox USB 96 is selected as the default input and output device.
- In your DAW, confirm the AudioBox USB 96 is selected as the audio interface and input/output routing is correct.
- Zniekształcony dźwięk:
- Reduce the 'MIC/INST' gain knobs if the 'Clip' LED is frequently illuminating.
- Sprawdź, czy kable audio nie są uszkodzone.
- Upewnij się, żeample rate and buffer size settings in your DAW match the AudioBox USB 96 capabilities and are optimized for your system.
- Latency (Delay) During Recording:
- Use the 'Mixer' knob for zero-latency direct monitoring of your input signal.
- Adjust the buffer size in your DAW's audio settings. A smaller buffer size reduces latency but requires more CPU power.
- Zasilanie fantomowe 48 V nie działa:
- Ensure the '48V' button is pressed and its indicator light is on.
- Verify your condenser microphone requires phantom power and is correctly connected.
6. Specyfikacje
| Funkcja | Szczegół |
|---|---|
| Technologia łączności | USB 2.0 |
| Liczba kanałów | 2 wejście / 2 wyjście |
| Rezolucja | 24-bit |
| Sampling ceny | 44.1, 48, 88.2, 96 kHz |
| Przedampliofilizatory | 2 Class A Mic/Instrument Preampliofilizatory |
| Moc fantomowa | 48 V (przełączalne) |
| MIDI I / O | Yes (5-pin DIN In/Out) |
| Zasilany autobusem | Tak |
| Kompatybilne urządzenia | Microphones, Instruments, Headphones, Studio Monitors, MIDI Devices |
| Zgodność z systemem operacyjnym | Windows, macOS |
7. Gwarancja i wsparcie
For detailed warranty information and technical support, please visit the official PreSonus website. You can find product registration, driver downloads, FAQs, and contact information for customer service there.
PreSonus Official Webstrona: www.presonus.com