
1. Wprowadzenie
1.1 Produkt powyżejview
The Renkforce RF-HC-100 is a compact 16-megapixel trail camera designed for outdoor monitoring. It features a time-lapse function, night vision capabilities, and a durable, camouflage brown housing. This camera is suitable for wildlife observation, property surveillance, and other outdoor recording needs.
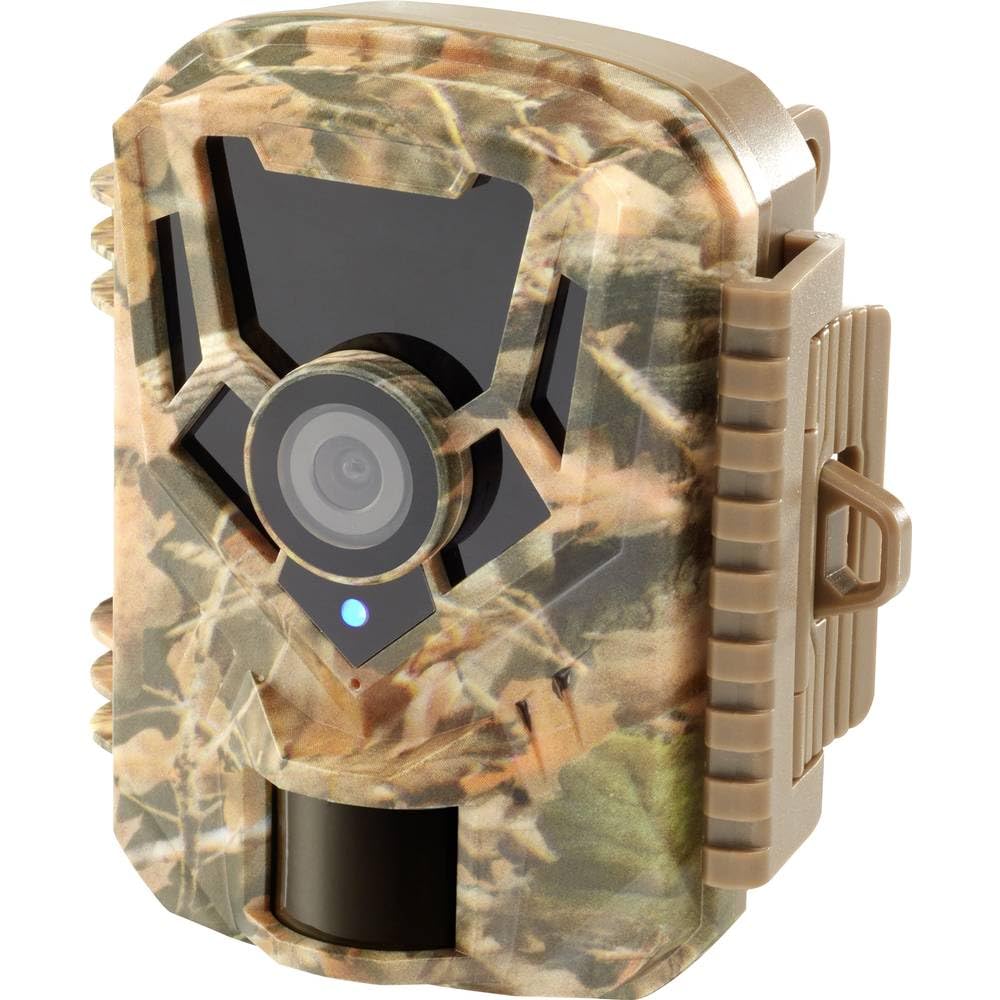
Obraz: Przód view of the Renkforce RF-HC-100 Trail Camera, showcasing its compact design and camouflage pattern.

Obraz: Przód view of the Renkforce RF-HC-100 Trail Camera, highlighting the main lens and motion sensor.
1.2 Zawartość opakowania
- 1 x Renkforce RF-HC-100 Trail Camera Unit
- Note: Additional accessories such as mounting straps, USB cables, or user manuals may be included depending on the specific package.
2. Informacje dotyczące bezpieczeństwa
- Przed przystąpieniem do użytkowania urządzenia należy uważnie przeczytać wszystkie instrukcje.
- Do not expose the camera to extreme temperatures, direct sunlight for prolonged periods, or corrosive liquids.
- Ensure the battery compartment is properly sealed to maintain the IP65 weather resistance.
- Baterie należy utylizować zgodnie z lokalnymi przepisami. Nie należy mieszać starych i nowych baterii ani różnych typów baterii.
- Przechowywać urządzenie w miejscu niedostępnym dla dzieci.
- Nie należy podejmować prób rozmontowania lub modyfikacji kamery, gdyż spowoduje to utratę gwarancji i może spowodować uszkodzenia.
3. Funkcje produktu
The Renkforce RF-HC-100 Trail Camera offers the following key features:
- Obrazowanie o wysokiej rozdzielczości: 16 Megapixel effective capture resolution for clear photos and 1080p video recording.
- Widzenie nocne: Equipped with color night vision for monitoring in low-light conditions.
- Funkcja poklatkowa: Wykonuj zdjęcia w określonych odstępach czasu, aby obserwować zdarzenia długoterminowe.
- Gniazdo karty SD: Supports external SD cards for ample storage of photos and videos.
- Odporność na warunki atmosferyczne: IP65 international protection rating ensures durability in various outdoor environments.
- Kompaktowa konstrukcja: Miniature form factor with a camouflage brown finish for discreet placement.
- Szeroki kąt View: 90-degree angle of view to cover a broad area.
- Łączność: Features wired connectivity (USB, AV ports) and Wi-Fi protocol for data transfer and control via application.
- Opcje montażu: Includes support for wall mounting.
4. Konfiguracja
4.1 Instalacja baterii
- Otwórz obudowę kamery poprzez odpięcie bocznych zatrzasków.
- Zlokalizuj komorę baterii.
- Insert the required number of AA batteries (not included) according to the polarity markings (+/-).
- Dokładnie zamknij komorę baterii.
4.2 Instalacja karty SD
- Po otwarciu obudowy kamery znajdź gniazdo karty SD.
- Insert a compatible SD card (up to 32GB, Class 10 recommended) into the slot with the metal contacts facing down until it clicks into place.
- To remove, push the SD card in again until it springs out.

Image: The Renkforce RF-HC-100 Trail Camera with its housing open, revealing the control panel, USB, AV, and DC ports, and the ON/SETUP/OFF switch.
4.3 Montaż kamery
The camera can be mounted using a strap or a wall mount bracket (if included or purchased separately).
- Mocowanie paska: Thread a mounting strap through the slots on the back of the camera and secure it to a tree or pole.
- Montaż na ścianie: Use the integrated mounting points or a compatible wall mount bracket to attach the camera to a flat surface. Ensure the camera is stable and pointed in the desired direction.
5. Instrukcja obsługi
5.1 Włączanie/wyłączanie i wybór trybu
Locate the ON/SETUP/OFF switch inside the camera housing.
- OFF: Wyłącza kamerę.
- USTAWIAĆ: Enters setup mode, allowing you to configure settings via the internal display.
- NA: Activates the camera for recording based on the configured settings.
5.2 Konfigurowanie ustawień
In SETUP mode, use the navigation buttons (if available) to access the menu and adjust parameters such as:
- Rozdzielczość zdjęć/wideo
- Czułość czujnika PIR
- Opóźnienie wykrywania
- Interwał poklatkowy
- Data i godzina
- Recording Mode (Photo, Video, Photo+Video, Time-Lapse)
5.3 Odzyskiwanie danych
Aby uzyskać dostęp do nagranych files:
- Przez USB: Connect the camera to a computer using a USB cable. The camera will appear as a removable disk.
- Za pomocą karty SD: Remove the SD card from the camera and insert it into a computer's card reader.
6. Konserwacja
- Czyszczenie: Use a soft, dry cloth to clean the camera lens and housing. For stubborn dirt, a slightly damp Można użyć ściereczki, ale należy uważać, aby do urządzenia nie dostała się wilgoć.
- Wymiana baterii: Wymień baterie, gdy pojawi się wskaźnik niskiego poziomu naładowania baterii lub gdy wydajność urządzenia ulegnie pogorszeniu.
- Zarządzanie kartami SD: Regularly format the SD card (after backing up important data) to maintain optimal performance and prevent errors.
- Składowanie: Jeśli aparat nie będzie używany przez dłuższy czas, należy wyjąć baterie i przechowywać go w chłodnym, suchym miejscu, z dala od bezpośredniego światła słonecznego.
7. Rozwiązywanie Problemów
| Problem | Możliwa przyczyna | Rozwiązanie |
|---|---|---|
| Kamera się nie włącza. | Low or dead batteries; incorrect battery installation; power switch in OFF position. | Replace batteries; ensure correct polarity; set switch to ON or SETUP. |
| Słaba jakość obrazu/wideo. | Brudny obiektyw, słabe warunki oświetleniowe, nieprawidłowe ustawienia rozdzielczości. | Clean the lens; ensure adequate lighting or use night vision; adjust resolution settings. |
| Kamera nie nagrywa. | SD card full or faulty; incorrect mode selected; PIR sensor blocked. | Format or replace SD card; select appropriate recording mode; clear sensor path. |
| Nie można połączyć się z komputerem. | Faulty USB cable; camera not in correct mode; driver issues. | Try a different USB cable; ensure camera is in connection mode (if applicable); try another computer or card reader. |
8. Specyfikacje
| Nazwa modelu | RF-HC-100 (RF-4466574) |
| Effective Capture Resolution | 16 megapiksela |
| Rozdzielczość wideo | 1080p |
| Wymiary (dł. x szer. x wys.) | 21 x 12 x 9 cm (8.27 x 4.72 x 3.54 cala) |
| Waga | 186 gramów (0.41 funta) |
| Technologia łączności | Wired (USB, AV), Wi-Fi Protocol (for control/transfer) |
| Cechy specjalne | Local Recording, Night Vision (Color Night Vision) |
| Środowisko użytkowania | Plenerowy |
| Międzynarodowa Ocena Ochrony | IP65 |
| Źródło zasilania | Manual Operation (Battery-powered, batteries not included) |
| Cotage | 1.5 watów |
| View Kąt | 90 stopni |
| Kolor | Camouflage Brown |
| Tworzywo | Metal (internal) |
| Typ mocowania | Wspornik do montażu na ścianie |
9. Gwarancja i wsparcie
Renkforce provides support for its products. Spare parts availability is indicated for 1 year from the date of purchase. For technical assistance, troubleshooting beyond this manual, or warranty claims, please refer to the contact information provided with your product packaging or visit the official Renkforce webstrona.