GVDA GD128
Instrukcja obsługi multimetru cyfrowego GVDA GD128
Model: GD128
Marka: GVDA
1. Wprowadzenie
The GVDA GD128 SMART Digital Multimeter is a professional testing instrument designed for accurate and reliable measurements. It is an ideal choice for professional electricians, engineers, electronics enthusiasts, and for general household use. This manual provides detailed instructions on the safe and effective operation of your GD128 multimeter.
Kluczowe możliwości obejmują:
- Obj. AC i DCtage Pomiar
- Pomiar prądu przemiennego i stałego
- Pomiar rezystancji
- Pomiar pojemności
- Pomiar ciągłości
- Pomiar diody
- NCV (objętość bez kontaktutage) Pomiar
- True RMS for accurate readings of non-sinusoidal signals
- Large VA color HD LCD screen with 9999 counts display
- Zakres automatyczny i ręczny
- Flashlight and Input Connector LED Indication

Rysunek 1.1: Cyfrowy multimetr GVDA GD128 z sondami pomiarowymi.
2. Informacje dotyczące bezpieczeństwa
WARNING: To avoid electrical shock or personal injury, please read and understand all instructions and safety information before using this multimeter.
- Przed dokonaniem pomiarów należy zawsze upewnić się, że multimetr jest ustawiony na właściwą funkcję i zakres.
- Nie należy przekraczać maksymalnych wartości wejściowych w żadnym zakresie.
- Zachowaj ostrożność podczas pracy z objętościątagpowyżej 30 V AC RMS, 42 V szczytowo lub 60 V DC. Te wartościtagStwarzają ryzyko porażenia prądem.
- Przed użyciem sprawdź przewody pomiarowe pod kątem uszkodzonej izolacji lub odsłoniętego metalu. W przypadku uszkodzenia wymień je.
- Do not operate the multimeter if it appears damaged or if it is not operating properly.
- Zawsze odłączaj zasilanie obwodu i rozładuj wszystkie ładunki wysokiego napięcia.tage kondensatory przed badaniem rezystancji, ciągłości, diod lub pojemności.
- Przed użyciem należy sprawdzić, czy pokrywa komory baterii jest szczelnie zamknięta.
- This device meets safety standards EN61010-1,-2-030, EN61010-2-033, EN61326-1 CAT III 1000V, CAT IV 600V.
3. Koniec produktuview i komponenty
Familiarize yourself with the different parts of your GVDA GD128 Digital Multimeter.

Rysunek 3.1: Przód i bok view of the GD128 Multimeter with labeled components.
- Obszar czujnika NCV
- Przycisk zasilania
- Klawisz latarki
- Wskaźnik ostrzegawczy
- Flesz
- Wskaźnik gniazda wejściowego
- Jack inny niż obecny i NCV
- COM jack (Common)
- mA (<600mA) jack
- Gniazdo 10A
- Auto power off key
- Klawisz funkcyjny
- Wyświetlacz

Rysunek 3.2: Tył view of the GD128 Multimeter highlighting the integrated LED flashlight.
4. Konfiguracja
4.1 Instalacja baterii
The GVDA GD128 Multimeter requires 3 x 1.5V AAA batteries (not included) for operation.
- Upewnij się, że multimetr jest wyłączony.
- Znajdź komorę baterii z tyłu urządzenia.
- Za pomocą śrubokręta otwórz pokrywę komory baterii.
- Włóż 3 baterie AAA, zwracając uwagę na prawidłową biegunowość (+ i -), zgodnie ze wskazaniami wewnątrz komory.
- Załóż pokrywę komory baterii i zabezpiecz ją śrubą.

Rysunek 4.1: Komora baterii na 3 baterie AAA.
4.2 Podłączanie przewodów pomiarowych
Connect the test leads to the appropriate input jacks for the desired measurement function. Always connect the black test lead to the COM (Common) jack. Connect the red test lead to the jack corresponding to the measurement type (e.g., VΩHz for voltage/resistance/frequency, mA for milliampere current, 10A for amp(aktualne).
5. Instrukcja obsługi
The GD128 features both auto-ranging and manual-ranging capabilities. The "SMART" function automatically identifies AC/DC voltage, opór i ciągłość.
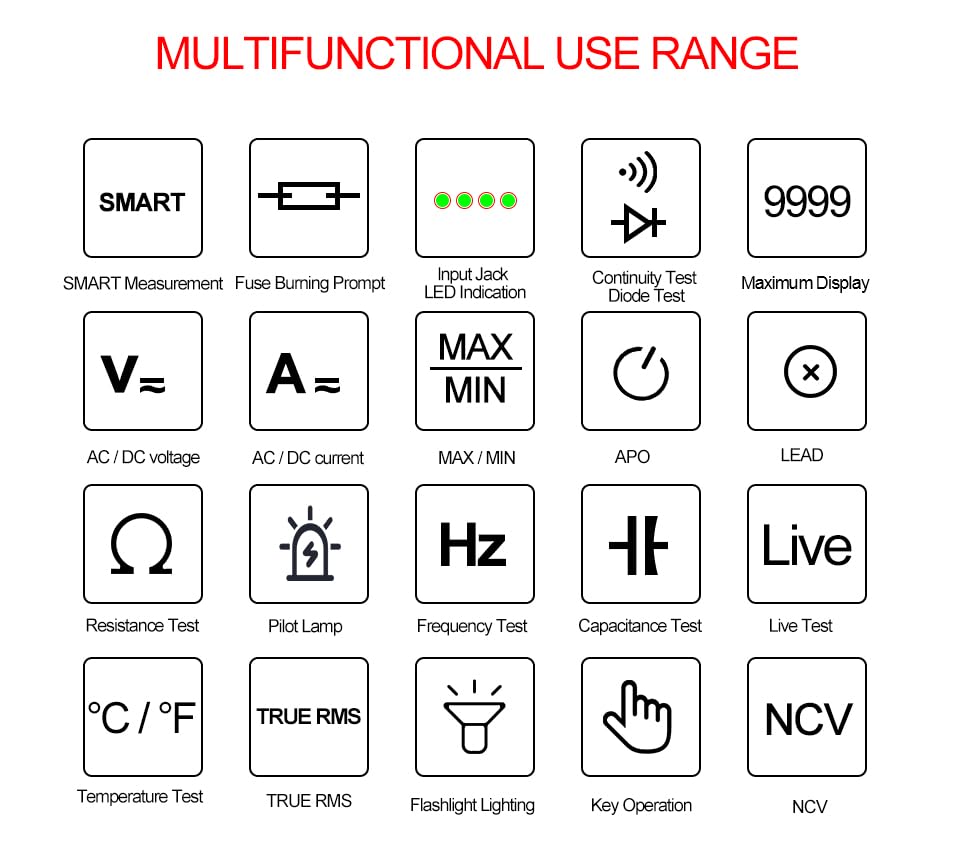
Figure 5.1: Multifunctional Use Range icons.
5.1 Włączanie/wyłączanie zasilania
Naciśnij Przycisk zasilania (2) to turn the multimeter on or off.
5.2 Wybór funkcji
The multimeter typically starts in SMART mode. Press the FUNC (Function) key (12) or WYBRAĆ key to cycle through different measurement modes within a category (e.g., AC/DC voltagnp. rezystancja/ciągłość/dioda).
5.3 Common Measurement Functions
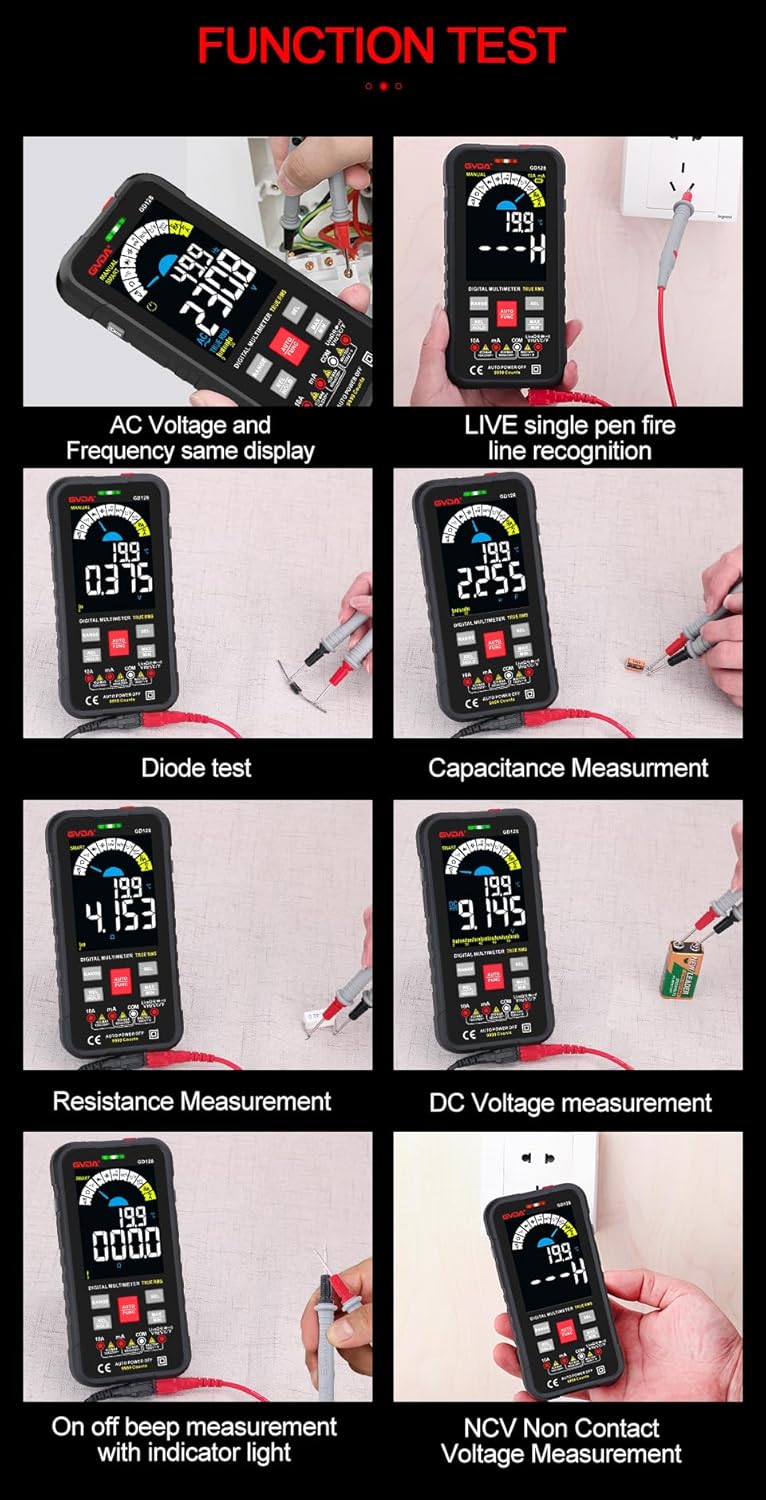
Rysunek 5.2: Examples of various function tests.
5.3.1 objtagPomiary (prąd przemienny/stały)
- Podłącz czarny przewód pomiarowy do gniazda COM, a czerwony przewód pomiarowy do gniazda VΩHz.
- Select the appropriate AC (~) or DC (---) voltagTryb e.
- Podłącz przewody pomiarowe równolegle do obwodu lub elementu, który chcesz zmierzyć.
- Na wyświetlaczu pojawi się wartość głośnościtage czytanie.
5.3.2 Pomiar prądu (AC/DC)
- Podłącz czarny przewód pomiarowy do gniazda COM.
- For current up to 600mA, connect the red test lead to the mA jack. For current up to 10A, connect the red test lead to the 10A jack.
- Select the appropriate AC (~) or DC (---) current mode.
- Podłącz multimetr szeregowo do obwodu, który chcesz zmierzyć.
- Na wyświetlaczu pojawi się aktualny odczyt.
5.3.3 Pomiar rezystancji (Ω)
- Podłącz czarny przewód pomiarowy do gniazda COM, a czerwony przewód pomiarowy do gniazda VΩHz.
- Select the Resistance (Ω) mode.
- Przed pomiarem rezystancji należy upewnić się, że obwód jest odłączony od napięcia.
- Podłącz przewody pomiarowe do mierzonego elementu.
- Na wyświetlaczu pojawi się odczyt rezystancji.
5.3.4 Pomiar pojemności (F)
- Podłącz czarny przewód pomiarowy do gniazda COM, a czerwony przewód pomiarowy do gniazda VΩHz.
- Select the Capacitance (F) mode.
- Aby uniknąć uszkodzenia multimetru, przed dokonaniem pomiaru należy upewnić się, że kondensator jest całkowicie rozładowany.
- Podłącz przewody pomiarowe do zacisków kondensatora.
- Na wyświetlaczu pojawi się odczyt pojemności.
5.3.5 Test ciągłości (Ω)
- Podłącz czarny przewód pomiarowy do gniazda COM, a czerwony przewód pomiarowy do gniazda VΩHz.
- Select the Continuity mode.
- Touch the test leads to the points you want to check for continuity. A continuous beep indicates a complete circuit.
5.3.6 Test diody (→|)
- Podłącz czarny przewód pomiarowy do gniazda COM, a czerwony przewód pomiarowy do gniazda VΩHz.
- Select the Diode Test mode.
- Connect the red test lead to the anode and the black test lead to the cathode of the diode. The display will show the forward voltage drop. Reverse the leads; an open circuit (OL) reading indicates a good diode.
5.3.7 NCV (objętość bezkontaktowa)tage) Pomiar
- Wybierz tryb NCV.
- Move the NCV sensor area (1) near the conductor. The multimeter will beep and the warning indicator (4) will light up with increasinczęstotliwość g, ponieważ wykrywa objętość prądu przemiennegotage.
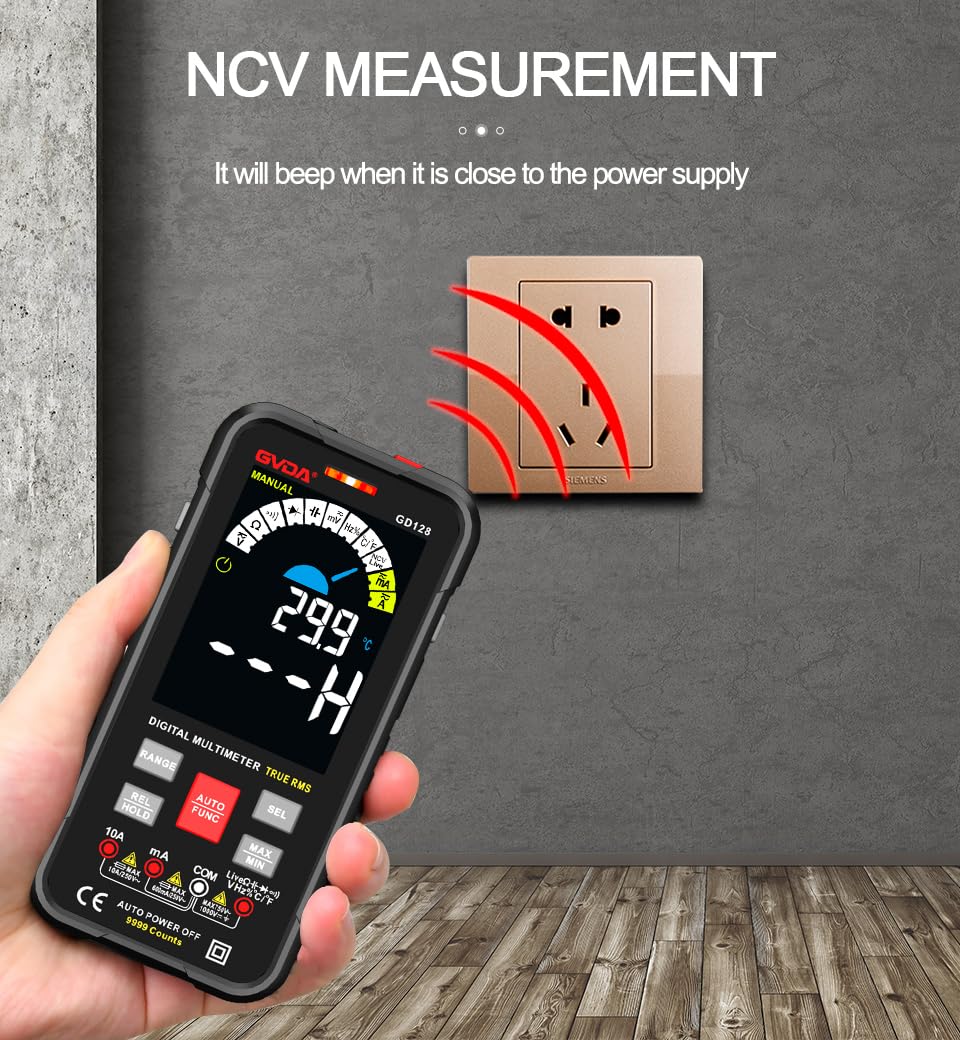
Rysunek 5.3: NCV (objętość bezkontaktowa)tage) measurement in progress.
5.3.8 Inne funkcje
- Prawdziwa wartość skuteczna: Provides accurate readings for both sinusoidal and non-sinusoidal AC waveforms.
- MAKS./MIN./ŚRED.: Naciśnij MAKS./MIN. key to record maximum, minimum, and average readings.
- REL (pomiar względny): Naciśnij REL/TRZYMAJ key briefly to set the current reading as a reference for subsequent measurements.
- Przechowywanie danych: Naciśnij REL/TRZYMAJ key briefly to freeze the current reading on the display.
- Flesz: Naciśnij Klawisz latarki (3) to turn the built-in flashlight on/off.
- Automatyczne wyłączanie (APO): The multimeter will automatically power off after a period of inactivity to save battery life.
6. Aplikacje
The GVDA GD128 Digital Multimeter is versatile and suitable for a wide range of applications, including but not limited to:

Figure 6.1: Diverse applications of the GD128 Multimeter.
- Electronic beginners and hobbyists
- Electronic circuit installation and testing
- Electronic maintenance and repair
- Electromechanical maintenance
- Vehicle inspection and automotive electrical work
- Maintenance of household appliances
- General electrical troubleshooting
7. Specyfikacje
Detailed technical specifications for the GVDA GD128 Digital Multimeter:
| Funkcja | Zakres | Precyzja |
|---|---|---|
| Objętość DCtage | 99.99mV/999.9mV; 9.999V/99.9V/1000V | ±(0.5%+3) |
| AC Objętośćtage | 99.9mV/999.9/mV; 9.999V/99.9V/750V | ±(0.8%+3) |
| Prąd stały | 9.999 mA/99.99 mA/999.9 mA; 9.99A | ±(0.8%+3) dla mA, ±(1.2%+3) dla A |
| Prąd zmienny | 9.999 mA/99.99 mA/999.9 mA; 9.99A | ±(1.0%+3) dla mA, ±(1.5%+3) dla A |
| Opór | 99.99/999.9 ohms/9.999k/99.99k/999.9kohm; 9.999 m/99.99 m ohms | ±(0.8%+3) dla kΩ, ±(1.2%+3) dla MΩ |
| Pojemność | 9.999/99.99/999.9nF/9.999/99.99/999.9uF; 9.999mF/99.99mF | ±(4.0%+3) dla nF/uF, ±(5.0%+5) dla mF |
| Częstotliwość | 99.99/999.9/9.999k/99.99k/999.9kHz/9.999mHz | ±(1.0%+3) |
| Cykl pracy | 0.1%-99.99% | ±(1.0%+2) |
| Temperatura | -40~1000°C; -40-1832°F | ±2°C |
| Wyświetl liczbę | 9999 liczy | |
| Typ wyświetlacza | Kolorowy ekran VA | |
| Sampling Oceń | Około. 3 razy na sekundę | |
| Wyświetlanie przekroczenia zakresu | "OL" | |
| Niska objętośćtage Wskazanie | Wskaźnik niskiego poziomu naładowania baterii | |
| Zasilacz | 3 baterie AAA 1.5 V (brak w zestawie) | |
| Waga produktu | Około 230g | |
| Rozmiar produktu | 83x23x165mm | |
| Ocena bezpieczeństwa | EN61010-1,-2-030 EN61010-2-033, EN61326-1 CAT III 1000 V CAT IV 600 V |
8. Konserwacja
Właściwa konserwacja gwarantuje trwałość i dokładność multimetru.
- Czyszczenie: Wyczyść obudowę za pomocą reklamyamp szmatką i łagodnym detergentem. Nie używaj materiałów ściernych ani rozpuszczalników.
- Wymiana baterii: Aby zapewnić dokładne odczyty, należy niezwłocznie wymienić baterie, gdy tylko pojawi się wskaźnik niskiego poziomu naładowania.
- Wymiana bezpiecznika: If the current measurement function fails, the fuse may be blown. Refer to the warning label inside the battery compartment for fuse specifications (e.g., F600mA/250V, F10A/250V). Ensure the multimeter is off and test leads are disconnected before replacing fuses.
- Składowanie: Jeśli multimetr nie będzie używany przez dłuższy czas, wyjmij baterie, aby zapobiec wyciekowi. Przechowuj w chłodnym, suchym miejscu, z dala od bezpośredniego światła słonecznego.
9. Rozwiązywanie Problemów
If you encounter issues with your GVDA GD128 Multimeter, try the following:
- Brak wyświetlacza/włączone zasilanie: Sprawdź instalację baterii i upewnij się, że nie są rozładowane. W razie potrzeby wymień je.
- Nieprawidłowe odczyty: Verify test lead connections, ensure the correct function and range are selected, and check if the circuit is de-energized for resistance/continuity/capacitance tests.
- Wyświetlacz „OL”: Indicates an over-range condition or an open circuit (e.g., when measuring resistance on an open wire).
- Brak sygnału dźwiękowego ciągłości: Check if the circuit is truly continuous. If not, the circuit is open.
- Fuse Blown Warning: If the current measurement function is not working, the fuse might be blown. Replace the fuse as per maintenance instructions.
W przypadku powtarzających się problemów skontaktuj się z obsługą klienta.
10. Gwarancja i wsparcie
Your GVDA GD128 Digital Multimeter comes with a 30-dniowa gwarancja for system failures or factory problems. Please retain your proof of purchase for warranty claims.
For technical support, warranty claims, or further assistance, please refer to the contact information provided with your product packaging or visit the official GVDA webstrona.
11. Zawartość opakowania
Upon opening your GVDA GD128 Digital Multimeter package, you should find the following items:

Figure 11.1: Contents included in the GD128 Multimeter package.
- 1 x GVDA GD128 Digital Multimeter
- 1 x Test Lead Set (Original pen cable)
- 1 x torba na ubrania
- 1 x Thermocouple Probe
- 1 x Instrukcja obsługi
- 1 x Gift Box (Packaging)
Ask a question about this manual
Ask about setup, troubleshooting, compatibility, parts, safety, or missing instructions. Manuals+ will review the question and use this page’s manual context to help answer it.