1. Wprowadzenie
The Autopilot APCET2 is a versatile temperature controller designed for both cooling and heating applications. It features automatic day and night set points, detected by a built-in photocell, allowing for precise temperature management. Easy-to-use knobs facilitate setting adjustments, and a Memory-lock feature ensures consistent performance by preventing accidental changes to set points.
Główne cechy:
- Controls heating or cooling equipment with both day/night set points.
- Includes a 20-foot remote precision temperature sensor.
- Temperature control differential of +/- 3°F.
- Built-in photocell for automatic day/night detection.
- Temperature control range: 50°F–100°F (10°C–38°C).
- Electric power source.
2. Informacje dotyczące bezpieczeństwa
Przed użyciem tego urządzenia należy przeczytać i zrozumieć wszystkie instrukcje bezpieczeństwa. Nieprzestrzeganie tych instrukcji może spowodować porażenie prądem, pożar lub poważne obrażenia.
- Tylko do użytku wewnątrz pomieszczeń: This device is intended for indoor use in dry locations. Do not expose to water or high humidity.
- Ocena elektryczna: Ensure the connected device's electrical rating does not exceed the thermostat's maximum load (1800 watts, 15 amps at 120V AC).
- Prawidłowe uziemienie: Always plug the thermostat into a properly grounded 3-prong outlet.
- Unikaj przeciążania: Do not plug multiple high-power devices into the thermostat using a power strip or adapter.
- Rozmieszczenie czujnika: Position the temperature sensor away from direct heat sources, cold drafts, or direct sunlight to ensure accurate readings.
- Czyszczenie: Disconnect power before cleaning. Use a dry cloth; do not use liquid cleaners.
- Dzieci i zwierzęta: Przechowywać urządzenie w miejscu niedostępnym dla dzieci i zwierząt domowych.
3. Koniec produktuview
The Autopilot APCET2 thermostat features a user-friendly design with clearly labeled controls and indicators.
Przód View:

Rysunek 3.1: Przód view of the Autopilot APCET2 thermostat. This image displays the main control panel, including the two temperature setting knobs, the day/night mode switch, the heating/cooling mode switch, and the integrated power outlet for connecting your device. The "ON" and "POWER" indicator lights are also visible.
- Day/Night Temperature Knobs: Two separate knobs for setting desired temperatures for day and night cycles.
- Day/Night Mode Switch: Toggles between 24-hour operation or automatic day/night detection via photocell.
- Heating/Cooling Mode Switch: Selects whether the thermostat controls a heating or cooling device.
- Zintegrowane gniazdo zasilania: Where the controlled device is plugged in.
- Wskaźnik zasilania: Świeci się, gdy urządzenie jest zasilane.
- Output Indicator Light: Illuminates when power is being supplied to the connected device.
Z powrotem View:

Rysunek 3.2: Z powrotem view of the Autopilot APCET2 thermostat. This image shows the standard 3-prong power plug for connecting the thermostat to a wall outlet, along with the screws for potential wall mounting.
- Wtyczka zasilania: Standard 3-prong plug for connecting to a 120V AC wall outlet.
- Otwory montażowe: Do opcjonalnego montażu na ścianie.
Wymiary:
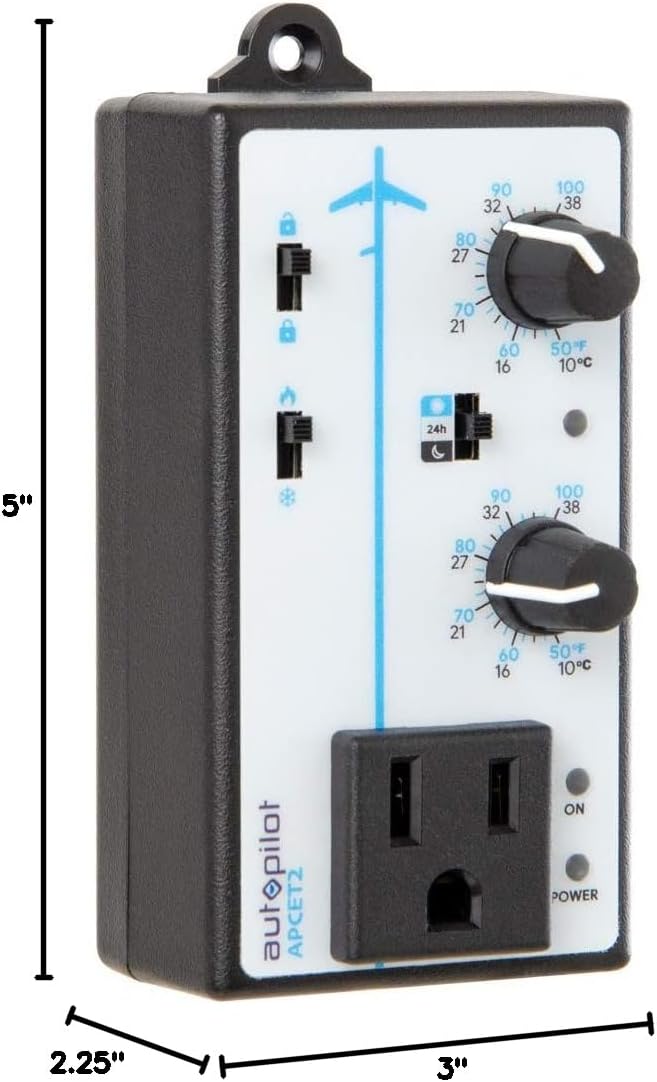
Rysunek 3.3: Dimensions of the Autopilot APCET2 thermostat. The image indicates the device measures approximately 3 inches deep, 2.25 inches wide, and 5 inches high.
4. Instrukcje konfiguracji
- Rozpakuj urządzenie: Carefully remove the Autopilot APCET2 thermostat and its components from the packaging.
- Podłącz czujnik temperatury: Plug the 20-foot remote precision temperature sensor into the designated port on the side of the thermostat. Ensure a secure connection.
- Umieść czujnik: Place the temperature sensor in the area where you want to monitor and control the temperature. Avoid placing it in direct sunlight, near heat sources, or in drafts, as this can affect accuracy.
- Podłącz termostat: Insert the 3-prong plug of the Autopilot APCET2 thermostat into a standard 120V AC grounded wall outlet. The Power indicator light should illuminate.
- Podłącz swoje urządzenie: Plug the heating or cooling device you wish to control into the integrated power outlet on the front of the thermostat.
- Kontrola wstępna: Przed przystąpieniem do pracy należy sprawdzić, czy wszystkie połączenia są solidne.
5. Instrukcja obsługi
The Autopilot APCET2 offers flexible temperature control with day and night settings and heating/cooling modes.
5.1 Selecting Operating Mode (Heating or Cooling)
- Zlokalizuj Heating/Cooling Mode Switch on the front panel (typically marked with flame and snowflake icons).
- Przesuń przełącznik na ikona płomienia Do Tryb ogrzewania. In this mode, the connected device will turn ON when the temperature drops below the set point and turn OFF when it rises above the set point (considering the +/- 3°F differential).
- Przesuń przełącznik na ikona płatka śniegu Do Tryb chłodzenia. In this mode, the connected device will turn ON when the temperature rises above the set point and turn OFF when it drops below the set point (considering the +/- 3°F differential).
5.2 Setting Day and Night Temperatures
The thermostat allows for distinct day and night temperature settings.
- Day Temperature Setting: Użyj górne pokrętło (associated with the sun icon) to set your desired daytime temperature. Rotate the knob clockwise to increase the temperature and counter-clockwise to decrease it. The range is 50°F–100°F (10°C–38°C).
- Night Temperature Setting: Użyj dolne pokrętło (associated with the moon icon) to set your desired nighttime temperature. Rotate the knob clockwise to increase the temperature and counter-clockwise to decrease it. The range is 50°F–100°F (10°C–38°C).
5.3 Day/Night Detection Mode
The thermostat can automatically switch between day and night settings using its built-in photocell.
- Zlokalizuj Day/Night Mode Switch (typically marked with a 24h icon and sun/moon icons).
- Przesuń przełącznik na sun/moon icon Do Automatyczne wykrywanie dnia/nocy. The built-in photocell will detect ambient light levels and automatically switch between your set day and night temperatures.
- Przesuń przełącznik na 24h icon Do 24-Hour Operation. In this mode, the thermostat will continuously use the Day Temperature Setting, regardless of light conditions.
5.4 Memory-Lock Feature
The Memory-lock feature prevents accidental changes to your set points.
- Do zamek the settings, slide the small switch next to the padlock icon to the pozycja zablokowana. This will prevent the temperature knobs from being accidentally adjusted.
- Do odblokować the settings, slide the switch to the pozycja odblokowana.
6. Konserwacja
Regular maintenance ensures optimal performance and longevity of your Autopilot APCET2 thermostat.
- Czyszczenie: Disconnect the thermostat from the power outlet before cleaning. Use a soft, dry cloth to wipe the exterior. Do not use abrasive cleaners, solvents, or immerse the unit in water.
- Pielęgnacja czujnika: Keep the temperature sensor clean and free from dust or debris. Ensure the sensor cable is not pinched or damaged.
- Składowanie: If storing the device for an extended period, disconnect it from power, clean it, and store it in a cool, dry place.
7. Rozwiązywanie Problemów
If you encounter issues with your Autopilot APCET2 thermostat, refer to the following common problems and solutions:
| Problem | Możliwa przyczyna | Rozwiązanie |
|---|---|---|
| Device not turning ON/OFF at set temperature. | Incorrect mode selected (Heating/Cooling). Temperature differential not met. Thermostat not receiving power. Podłączone urządzenie jest uszkodzone lub nie ma zasilania. | Verify the Heating/Cooling switch is in the correct position. Allow for the +/- 3°F temperature differential. Check if the thermostat is securely plugged into a live outlet and the Power indicator is ON. Przetestuj podłączone urządzenie, podłączając je bezpośrednio do gniazdka ściennego. |
| Temperature settings cannot be adjusted. | Memory-lock feature is engaged. | Slide the Memory-lock switch to the unlocked position. |
| Day/Night mode not switching automatically. | Photocell mode not selected. Photocell is obstructed or in constant light/darkness. | Ensure the Day/Night Mode switch is set to the sun/moon icon. Check that the photocell (small sensor on the front) is not covered and is exposed to natural light changes. |
| Niedokładne odczyty temperatury. | Temperature sensor improperly placed or damaged. | Relocate the sensor away from direct heat, cold drafts, or sunlight. Inspect the sensor and cable for damage. |
Jeśli po wypróbowaniu tych rozwiązań problem nadal występuje, skontaktuj się z obsługą klienta.
8. Specyfikacje
| Marka | Autopilot |
| Nazwa modelu | Advanced Day & Night Cooling or Heating |
| Numer modelu | APCET2 |
| Wymiary produktu | 3" gł. x 2.25" szer. x 5" wys. |
| Typ kontrolera | Knob & Push Button |
| Funkcja specjalna | Lockable (Memory-lock) |
| Kolor | Czarny |
| Konkretne zastosowania | Temperature Control in Grow Rooms, Controlling Heating and Cooling Equipment |
| Rodzaj kontroli temperatury | Programowalny |
| Zawarte komponenty | 20' remote precision temperature sensor |
| Źródło zasilania | Elektryczny |
| Tomtage | 120 wolty |
| Cotage | 1800 watów |
| Waga przedmiotu | 8.1 uncji |
| Zakres regulacji temperatury | 50°F–100°F (10°C–38°C) |
| Różnica temperatur | +/- 3 ° F |
| Typ wyświetlacza | LCD |
| Podświetlenie | Tak |
| Typ montażu | Montaż ścienny |
9. Gwarancja i obsługa klienta
For warranty information or technical assistance, please contact Autopilot customer support. Refer to the product packaging or the official Autopilot webna naszej stronie znajdziesz najnowsze dane kontaktowe.
When contacting support, please have your product model number (APCET2) and purchase information readily available.