
1. Wprowadzenie
The YOSUDA PRO Magnetic Exercise Bike 010C is designed for effective indoor cycling workouts. Featuring a hyper-quiet magnetic system and robust alloy steel construction, it offers a smooth and stable exercise experience. This manual provides essential information for assembly, operation, maintenance, and troubleshooting to ensure safe and optimal use of your exercise bike.
Główne cechy:
- Hyper Quiet Magnetic System: Operates at less than 20 dB for silent workouts.
- Solidna pojemność: Supports users up to 400 lbs with heavy alloy steel construction.
- Regulowana rezystancja: 50 lbs flywheel with 100 micro-adjustable magnetic resistance levels.
- Inteligentna łączność: Bluetooth support for sports apps and real-time data tracking.
- Comfort & Customization: 4-way adjustable seat and 2-way adjustable handlebars for personalized fit.
- Zintegrowany wyświetlacz: Large screen monitor displays RPM, time, speed, distance, calories, and odometer. Includes a tablet holder.
2. Konfiguracja
2.1 Montaż
The YOSUDA PRO Magnetic Exercise Bike is designed for straightforward assembly, with most major components pre-assembled. Tools and a detailed guide are included to assist you.
- Rozpakowywanie: Ostrożnie wyjmij wszystkie elementy z opakowania. Upewnij się, że wszystkie części wymienione w instrukcji są obecne.
- Zamontuj stabilizatory: Przymocuj przednie i tylne stabilizatory do ramy głównej za pomocą dołączonych śrub i narzędzi.
- Zainstaluj pedały: Attach the pedals to the crank arms. Note that pedals are typically marked 'L' for left and 'R' for right. Ensure they are tightened securely.
- Montaż sztycy: Insert the seat post into the main frame and adjust to an initial comfortable height.
- Montaż wspornika kierownicy: Insert the handlebar post into the main frame and adjust to an initial comfortable height.
- Podłącz kable monitora: Connect the monitor cables from the main frame to the display unit.
- Install Monitor: Secure the monitor onto the handlebar post.
- Montaż uchwytu na butelkę z wodą: Attach the water bottle holder to the designated area on the frame.

Obraz: Ponadview of YOSUDA PRO Magnetic Exercise Bike components during assembly.
2.2 Dostosowania początkowe
Prawidłowe ustawienie siodełka i kierownicy jest kluczowe dla komfortu i efektywności ćwiczeń.
- Regulacja siedzenia: The seat can be adjusted 4-ways (up/down and forward/backward). Loosen the adjustment knob, slide the seat to your desired position, and tighten the knob securely. Ensure your knees have a slight bend at the bottom of the pedal stroke.
- Regulacja kierownicy: The handlebars can be adjusted 2-ways (up/down). Loosen the adjustment knob, raise or lower the handlebars to a comfortable height, and tighten the knob. Your back should be straight and comfortable.
- Paski do pedałów: Adjust the toe-caged pedal straps to secure your feet firmly in place. This prevents your feet from slipping during intense workouts.
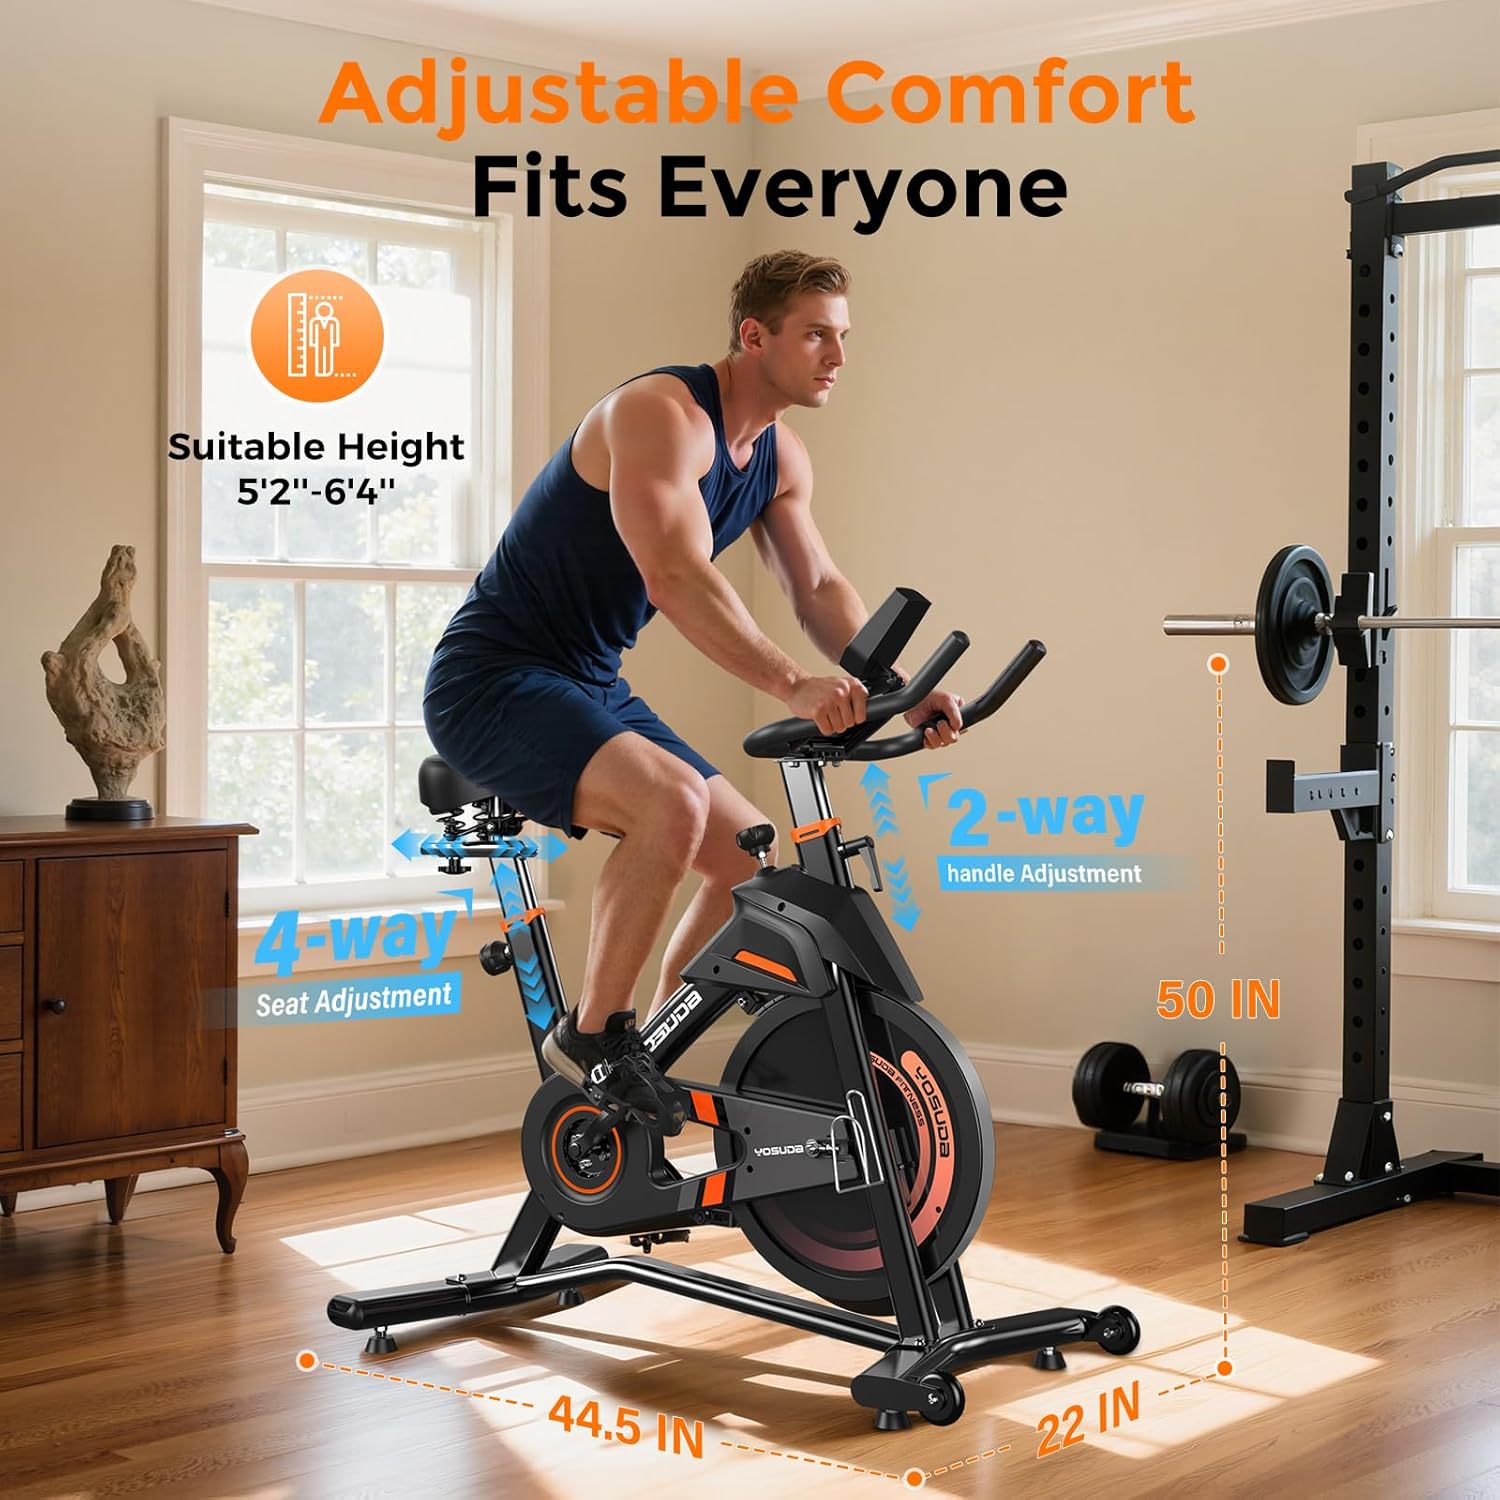
Obraz: Szczegółowy view of the adjustable seat and handlebars for personalized comfort.
3. Działanie
3.1 Powering On and Monitor Functions
The exercise bike is pedal-powered and does not require an external power source for operation. The monitor is battery-operated.
- Aktywacja automatyczna: Monitor włącza się automatycznie po rozpoczęciu pedałowania.
- Wyświetl metryki: The large screen monitor displays:
- Obroty na minutę: Obroty na minutę
- CZAS: Duration of your workout
- PRĘDKOŚĆ: Current speed in miles
- DYSTANS: Total distance covered in miles
- KALORIE: Szacunkowe spalone kalorie
- DROGOMIERZ: Total accumulated distance
- Resetowanie danych: To clear workout data, press and hold the "RESET" button on the monitor.
- Uchwyt do tabletu: Utilize the integrated tablet holder to place your device for entertainment or to follow workout programs.

Image: Close-up of the exercise bike's monitor and tablet holder.
3.2 Regulacja oporu
The YOSUDA PRO Magnetic Exercise Bike features 100 micro-adjustable magnetic resistance levels, allowing for precise control over your workout intensity.
- Zwiększ odporność: Turn the resistance knob clockwise to increase the magnetic resistance, making pedaling harder.
- Zmniejsz opór: Obróć pokrętło oporu w kierunku przeciwnym do ruchu wskazówek zegara, aby zmniejszyć opór magnetyczny, dzięki czemu pedałowanie stanie się łatwiejsze.
- Awaryjny postój: Press down firmly on the resistance knob to engage the emergency brake and quickly stop the flywheel.

Image: The resistance knob and flywheel, illustrating the magnetic resistance system.
3.3 Smart Features and App Integration
This exercise bike is equipped with Bluetooth connectivity to enhance your workout experience.
- Połącz z aplikacjami: Pair your device via Bluetooth with compatible sports apps to track your exercise data, participate in virtual courses, and monitor your progress.
- Dane w czasie rzeczywistym: Receive real-time recording of exercise data directly to your connected device.

Image: User engaging with virtual rides through top fitness applications.
4. Konserwacja
Regular maintenance ensures the longevity and safe operation of your YOSUDA PRO Magnetic Exercise Bike.
- Czyszczenie: Wytrzyj rower reklamąamp Po każdym użyciu przetrzyj ściereczką pot i kurz. Unikaj środków czyszczących o działaniu ściernym.
- Kontrola pedałów: Inspect and re-tighten pedals every 1-2 months to ensure they remain secure for safe use. Loose pedals can cause injury or damage.
- Napęd pasowy: The silent belt drive system requires minimal maintenance. Keep the area around the belt clean and free of debris.
- Sprawdzenie stabilności: Periodically check all bolts and nuts to ensure they are tight. Re-tighten as necessary to maintain the bike's stability.
5. Rozwiązywanie Problemów
If you encounter any issues with your exercise bike, refer to the following common solutions:
- Piszczące dźwięki: Check all connection points and ensure they are tightened. Apply a small amount of lubricant to moving parts if necessary, avoiding the flywheel and brake system.
- Niestabilny rower: Ensure the bike is placed on a flat, level surface. Adjust the leveling feet on the stabilizer bars until the bike is stable.
- Monitor nie wyświetla: Check the batteries in the monitor and replace them if needed. Ensure the sensor cable is securely connected.
- Problemy oporu: If resistance feels inconsistent or unresponsive, check the connection of the resistance cable to the knob and the magnetic brake system.
6. Specyfikacje
| Funkcja | Szczegół |
|---|---|
| Marka | JOSUDA |
| Nazwa modelu | L-007C |
| Funkcja specjalna | Light Commercial, Magnetic, Smart with Bluetooth |
| Kolor | Czarny Pomarańczowy |
| Źródło zasilania | Napędzany pedałami (nieelektryczny) |
| Zalecane zastosowania | Wnętrz |
| Waga przedmiotu | 37.65 kilograma (ok. 83 funty) |
| Tworzywo | Stal stopowa |
| Mechanizm oporu | Magnetyczny |
| Wymiary produktu | 50" gł. x 22" szer. x 44.5" wys. |
| Maksymalna zalecana waga | 400 funtów |
| Liczba poziomów oporu | 100 |
| Układ napędowy | Pasek |
7. Gwarancja i pomoc techniczna
YOSUDA is committed to providing excellent customer service and product support.
- Obsługa techniczna: Enjoy 24/7 technical support for any inquiries or assistance you may need with your exercise bike.
- Informacje kontaktowe: For specific warranty details or to reach customer support, please refer to the contact information provided in your product packaging or visit the official YOSUDA webstrona.
8. Oficjalne filmy o produktach
W tej chwili nie ma żadnych oficjalnych filmów sprzedawców dostępnych do osadzenia.