
1. Koniec produktuview
The HOMCOM Model 837-061 shoe cabinet is designed for efficient shoe storage and organization in entryways or hallways. It features three tilt-out compartments for shoes and a side cabinet with a hanging bar for umbrellas or small bags. The top surface can be used for keys, phones, or decorative items.
- Spacious Shoe Storage: Three tilt-out compartments, each accommodating up to 4 pairs of shoes, for a total capacity of 6-12 pairs (depending on shoe size and type).
- Regulowane przegrody: Each shoe compartment includes a removable and adjustable divider with two positions to customize storage space.
- Szafka boczna: A dedicated side cabinet with a door and hanging bar, suitable for umbrellas, small bags, or other accessories.
- Trwała konstrukcja: Made from resistant engineered wood (MDF) for long-lasting use.
- Zabezpieczenie przed wywróceniem: Includes an anti-tip safety system to secure the cabinet to the wall, preventing accidental tipping.

Image 1.1: The HOMCOM shoe cabinet, Model 837-061, shown in a typical home entryway with decorative items on top.
2. Informacje dotyczące bezpieczeństwa
Przed montażem i użytkowaniem należy przeczytać i zrozumieć wszystkie instrukcje bezpieczeństwa. Nieprzestrzeganie tych instrukcji może spowodować obrażenia ciała lub uszkodzenie produktu.
- Urządzenie zapobiegające przewróceniu: It is mandatory to install the included anti-tip device to secure the cabinet to a wall. This prevents the cabinet from tipping over, especially if children or pets attempt to climb it.
- Nośność: Do not exceed the maximum supported weight of 15 kg (33 lbs) on the top surface. Overloading can compromise stability.
- Montaż: Assemble the product on a soft, clean surface to prevent scratches. Ensure all screws and fasteners are tightened securely before use.
- Umieszczenie: Place the cabinet on a flat, level surface to ensure stability.
- Bezpieczeństwo dzieci: Podczas montażu małe części i materiały opakowaniowe należy trzymać z dala od dzieci.

Image 2.1: Illustration of the anti-tip design, showing how to secure the cabinet to the wall for enhanced stability and safety.
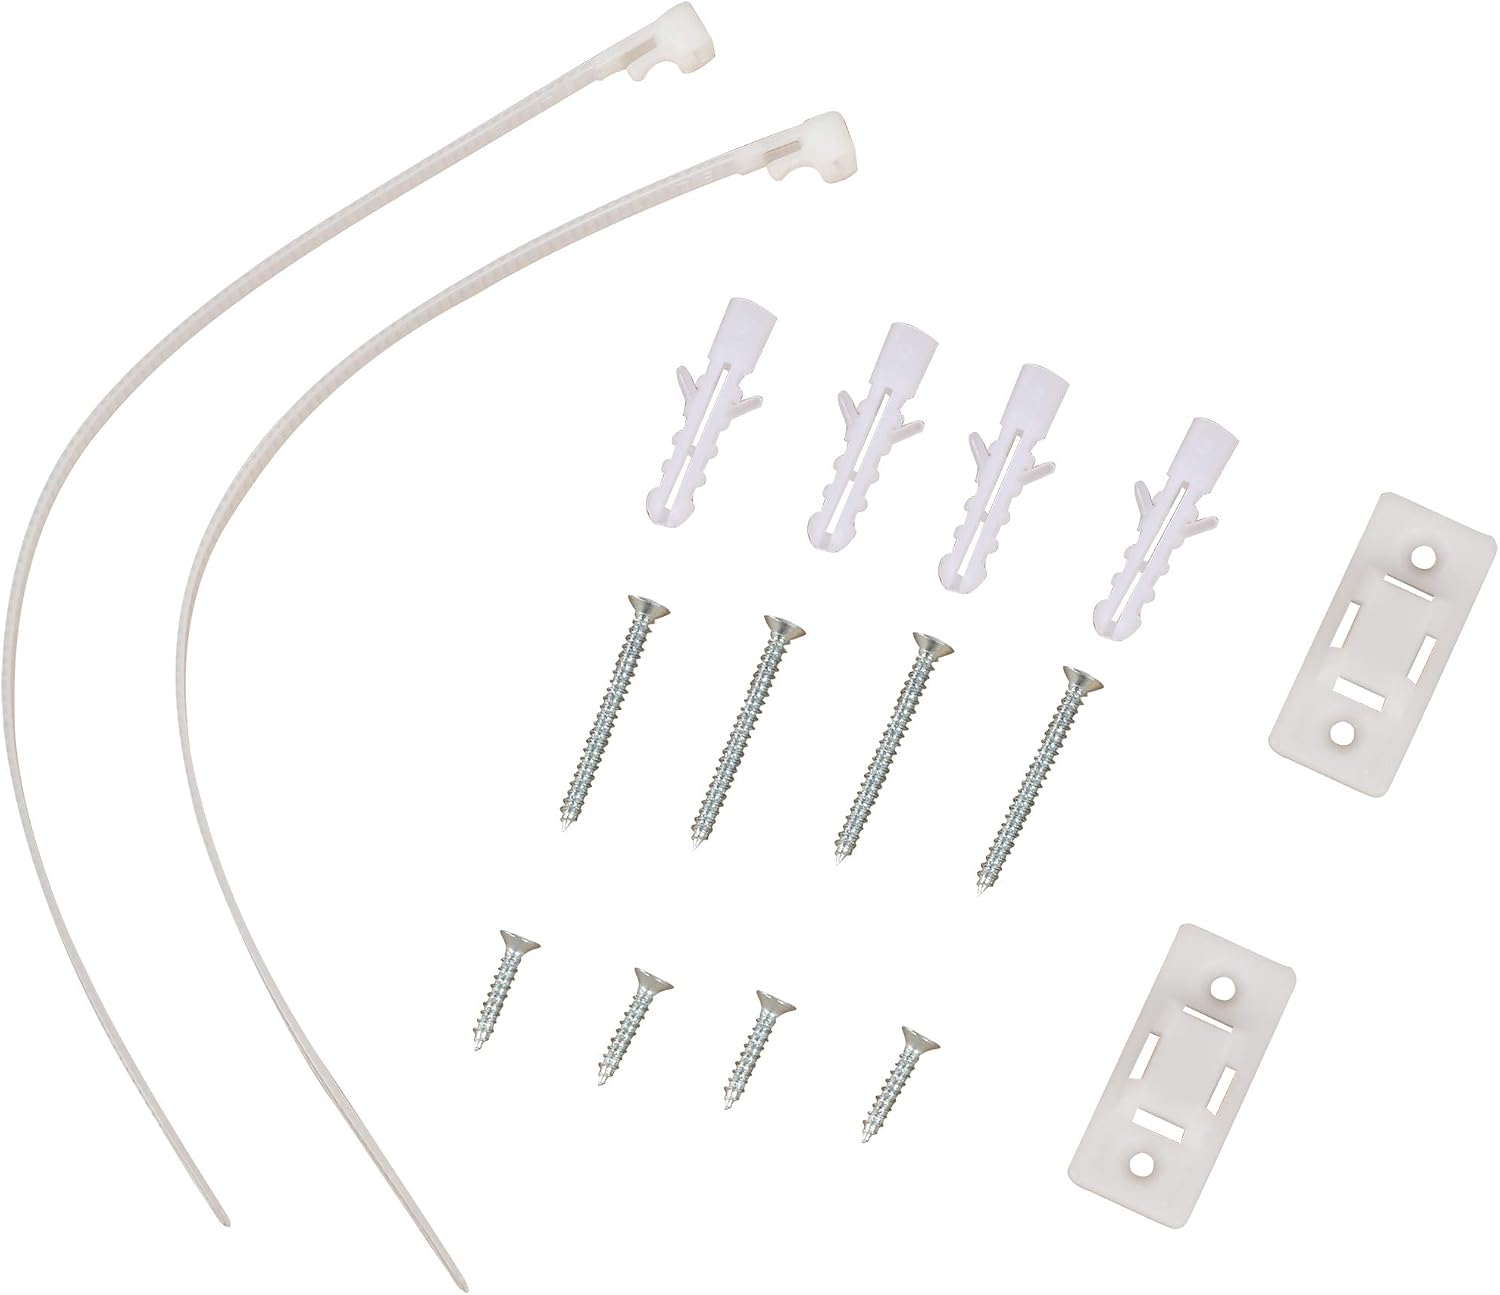
Image 2.2: Detail of the anti-tip bracket installed on the rear panel of the shoe cabinet.
3. Instalacja i montaż
This product requires assembly. It is recommended to have two people for assembly. Please ensure all parts are present before beginning.
3.1. Zawartość opakowania
Verify that all components and hardware are included in the package. Refer to the parts list in your physical instruction manual for detailed identification.

Image 3.1: All screws, wall anchors, and anti-tip straps included for assembly and secure installation.
3.2. Etapy montażu (wytyczne ogólne)
- Rozpakuj i zidentyfikuj: Carefully unpack all components and lay them out on a soft, clean surface. Identify each part using the provided labels or diagrams.
- Złóż ramę główną: Begin by connecting the main side panels and base using the designated screws and dowels. Ensure connections are snug but do not overtighten initially.
- Montaż przegródek na buty: Attach the mechanisms for the tilt-out shoe compartments to the interior of the cabinet. Insert the adjustable dividers into the desired positions.
- Zamontuj drzwi: Secure the three tilt-out doors to their respective mechanisms. Attach the side cabinet door using hinges.
- Install Side Cabinet Bar: Place the hanging bar inside the side cabinet.
- Ostateczne dokręcanie: Once all components are in place, carefully tighten all screws to ensure structural integrity.
- Montaż urządzenia zabezpieczającego przed przewróceniem: Attach the anti-tip brackets to the top rear of the cabinet. Secure the straps to a wall stud or use appropriate wall anchors (provided) to prevent tipping.
Note: For detailed, step-by-step assembly instructions, please refer to the printed manual included with your product.
4. Instrukcja obsługi
4.1. Storing Shoes
To store shoes, gently pull the handle of a tilt-out compartment. The door will tilt forward, revealing the internal shelves. Place shoes on the shelves, ensuring they fit within the compartment's depth and height. Push the door back until it closes securely.

Image 4.1: The shoe cabinet with all three tilt-out compartments open, demonstrating the three-level hanging shelves and capacity for up to 12 pairs of regular-sized shoes.
4.2. Adjusting Dividers
Each tilt-out compartment features an adjustable divider. To adjust, open the compartment door. The divider can be moved between two positions or removed entirely to accommodate different shoe sizes or types (e.g., boots, high heels). Carefully lift and reposition the divider as needed.

Obraz 4.2: Zbliżenie view illustrating the adjustable divider mechanism within a shoe compartment, allowing for flexible storage configurations.
4.3. Using the Side Cabinet
The side cabinet provides additional storage. Open the door to access the interior, which includes a hanging bar. This space is ideal for storing umbrellas, small bags, or other entryway essentials.
5. Konserwacja
Proper maintenance will ensure the longevity and appearance of your HOMCOM shoe cabinet.
- Czyszczenie: Przetrzyj powierzchnie miękką, damp szmatką. Unikaj stosowania silnych środków chemicznych, ściernych środków czyszczących i nadmiernej wilgoci, ponieważ mogą one uszkodzić wykończenie z drewna modyfikowanego.
- Zasypka: Regularnie przecieraj obudowę suchą, miękką ściereczką, aby zapobiec gromadzeniu się kurzu.
- Wycieki: Natychmiast wycieraj wszelkie rozlane płyny, aby zapobiec ich uszkodzeniu przez wilgoć lub powstawaniu plam.
- Sprawdzenie sprzętu: Okresowo sprawdzaj wszystkie śruby i elementy mocujące, aby upewnić się, że są dobrze dokręcone. W razie potrzeby dokręć.
- Unikaj bezpośredniego światła słonecznego: Długotrwałe narażenie na bezpośrednie działanie promieni słonecznych może spowodować blaknięcie lub odbarwienie wykończenia drewna.
- Kontrola wilgotności: Utrzymuj stałą temperaturę i wilgotność w pomieszczeniu, aby zapobiec odkształcaniu się lub pękaniu drewna.

Image 5.1: A close-up showing the layers of engineered wood (MDF) used in the construction of the cabinet, highlighting its natural and resistant properties.
6. Rozwiązywanie Problemów
Jeśli napotkasz jakiekolwiek problemy z szafką na buty, zapoznaj się z poniższymi typowymi problemami i ich rozwiązaniami:
- Szafka wydaje się niestabilna:
- Upewnij się, że szafka jest umieszczona na płaskiej i równej powierzchni.
- Sprawdź, czy wszystkie śruby montażowe są mocno dokręcone.
- Confirm the anti-tip device is correctly installed and anchored to the wall.
- Tilt-out doors do not close properly:
- Check if shoes are obstructing the closing mechanism.
- Ensure the internal dividers are correctly positioned and not interfering with the door.
- Verify that the door hinges and mechanisms are properly aligned and tightened.
- Side cabinet door is misaligned:
- Adjust the hinges if they are adjustable.
- Ensure the cabinet is level.
- Brakujące części lub uszkodzone podzespoły:
- Contact HOMCOM customer service with your model number and a description of the issue.
7. Specyfikacje
| Marka | DOMKOM |
| Numer modelu | 837-061 |
| Tworzywo | Drewno inżynieryjne (MDF) |
| Kolor | Naturalny |
| Wymiary całkowite (dł. x szer. x wys.) | 79 cm x 26 cm x 120 cm (31.1" x 10.2" x 47.2") |
| Max. Weight Capacity (Top Surface) | 15 kg (33 funta) |
| Pojemność butów | 6-12 pairs (depending on shoe size/type) |
| Wymagany montaż | Tak |

Image 7.1: Detailed dimensions of the shoe cabinet: 79 cm width, 26 cm depth, and 120 cm height.
8. Gwarancja i wsparcie
Aby uzyskać informacje o gwarancji, pomocy technicznej lub zamówić części zamienne, prosimy o kontakt z działem obsługi klienta HOMCOM. Zapoznaj się z dokumentacją zakupu lub oficjalnymi informacjami HOMCOM. webstrona dla danych kontaktowych.
Kontaktując się z pomocą techniczną, przygotuj numer modelu (837-061) i datę zakupu.