
1. Wprowadzenie
The AVMATRIX VS0601 is a compact, multi-format video switcher designed for professional video production. It features a robust metal housing and supports 6 channels of SDI and HDMI inputs, offering versatile video switching, audio mixing, and various transition effects. The unit is engineered for compatibility with diverse equipment, providing flexibility for live events and broadcast applications.
Główne cechy:
- 6 channel inputs: 4xSDI and 2xHDMI inputs
- 2xSDI & 1xHDMI PGM outputs, 1xSDI AUX output, 1xSDI & 1xHDMI multiview wyjścia
- T-Bar/ AUTO/ CUT transitions and MIX/ FADE/ WIPE effects
- Picture-in-Picture (PiP) mode with adjustable size and position
- Audio mixer: 3.5mm stereo/ RCA audio & SDI/ HDMI embedded audio
- Interfejs GPIO do systemu liczenia na żywo
- FTB (Fade to Black) function for emergency situations
2. Konfiguracja
2.1 Rozpakowanie i kontrola
Carefully unpack the VS0601 switcher and inspect it for any signs of damage. Ensure all components listed in the packaging are present.
2.2 Podłączanie zasilania
- Connect the provided DC 12V power adapter to the 'DC 12V' input port on the rear panel of the VS0601.
- Podłącz zasilacz do odpowiedniego gniazdka elektrycznego.
- Ensure the 'OFF/ON' switch on the rear panel is in the 'OFF' position before connecting power.
2.3 Połączenia wejściowe wideo
The VS0601 supports both SDI and HDMI video inputs. The device auto-detects the input signal format.
- Wejścia SDI: Connect up to four SDI sources (cameras, media players, etc.) to the 'SDI IN' ports (1-4) using BNC cables.
- Wejścia HDMI: Connect up to two HDMI sources to the 'HDMI IN' ports (5-6) using HDMI cables.
2.4 Połączenia wyjściowe wideo
The switcher provides multiple program (PGM) and multiview wyjścia.
- PGM Outputs: Connect your main display or recording device to the 'PGM OUT' SDI (x2) or HDMI (x1) ports.
- Wyjście AUX: Use the 'AUX' SDI output for an additional program feed.
- Wieloview Wyjścia: Podłącz monitor do 'MULTIVIEW OUT' SDI or HDMI ports to view all input sources simultaneously.
2.5 Połączenia audio
- Wejście audio: Connect external audio sources to the 3.5mm stereo audio input or the RCA (L/R) audio input ports.
- Wyjście audio: Connect monitoring headphones or speakers to the 3.5mm stereo audio output or the RCA (L/R) audio output ports.
2.6 Inne połączenia
- TALLY: Connect a tally system to the DB-15 GPIO interface for live production cues.
- LAN: Use the RJ45 LAN port for network control and time synchronization.

Figure 2.1: Rear panel connections of the AVMATRIX VS0601. This image displays the various input and output ports including SDI IN, HDMI IN, PGM OUT, MULTIVIEW OUT, AUX, Audio IN/OUT, TALLY, LAN, and DC 12V power input.
3. Instrukcja obsługi
3.1 Włączanie/wyłączanie
- To power on, switch the 'OFF/ON' toggle on the rear panel to the 'ON' position.
- To power off, switch the 'OFF/ON' toggle to the 'OFF' position.
3.2 Elementy sterujące na panelu przednimview
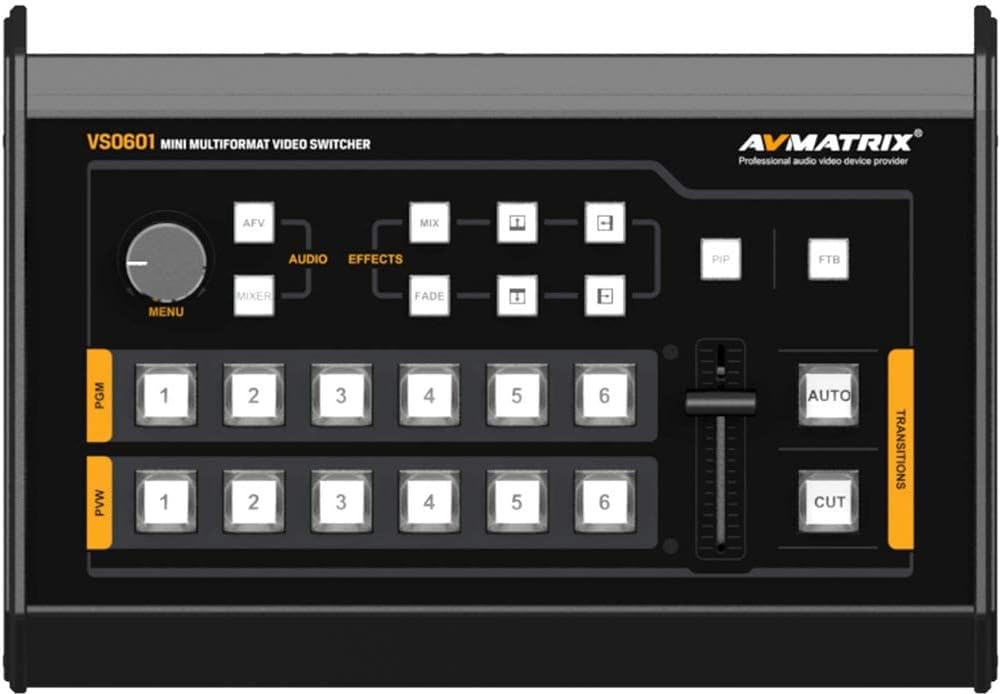
Figure 3.1: Front control panel of the AVMATRIX VS0601. This image highlights the PGM and PVW input selection buttons, T-Bar fader, AUTO/CUT transition buttons, MENU knob, and effect selection buttons (MIX, FADE, WIPE, PiP, FTB).
3.3 Input Selection (PGM & PVW)
The front panel features two rows of numbered buttons (1-6) for Program (PGM) and Preview (PVW) selection.
- PGM (Program): The top row of buttons selects the input currently live on the main output.
- PVW (przedview): The bottom row of buttons selects the input to be prepared for the next transition. This input will be visible on the multiview wyjście.
3.4 Przejścia
The VS0601 offers various transition methods and effects.
- SKALECZENIE: Press the 'CUT' button for an instant, hard cut between the PVW and PGM sources.
- AUTOMATYCZNY: Press the 'AUTO' button to execute a smooth transition (e.g., fade, wipe) between PVW and PGM sources at a preset speed.
- Drążek w kształcie litery T: Manually control the transition speed and direction by moving the T-Bar fader. Pushing the T-Bar up or down will transition between the PVW and PGM sources.
- Effects (MIX, FADE, WIPE): Select the desired transition effect (MIX, FADE, WIPE) using the dedicated buttons above the T-Bar. The selected effect will be applied when using the AUTO button or T-Bar.
3.5 Picture-in-Picture (PiP) Mode
Activate PiP mode by pressing the 'PiP' button. Use the 'MENU' knob and associated buttons to adjust the size and position of the PiP window. The PiP source is typically the PVW input, overlaid on the PGM input.
3.6 Miksowanie dźwięku
The audio mixer allows control over embedded SDI/HDMI audio and external analog audio inputs.
- Use the 'AUDIO' buttons and 'MENU' knob to navigate and adjust audio levels for each input.
- The 3.5mm stereo and RCA inputs can be mixed with embedded audio from video sources.
3.7 FTB (Fade to Black)
Press the 'FTB' button to instantly fade the program output to black. Press it again to return to the previous program source.
4. Konserwacja
4.1 Czyszczenie
To maintain optimal performance and appearance, regularly clean the exterior of the VS0601.
- Use a soft, dry cloth to wipe down the unit.
- W przypadku uporczywych plam delikatnieamppl szmatkę wodą lub łagodnym, nieściernym środkiem czyszczącym.
- Unikaj stosowania silnych środków chemicznych, rozpuszczalników i materiałów ściernych, gdyż mogą one uszkodzić wykończenie.
- Ensure no liquids enter the device through vents or ports.
4.2 Warunki środowiskowe
Operate the VS0601 within the specified environmental ranges to prevent damage and ensure longevity.
- Temperatura pracy: -20 do 60°C (-4 do 140°F)
- Temperatura przechowywania: -30 do 70°C (-22 do 158°F)
- Wilgotność robocza: 20%~70% RH (bez kondensacji)
Avoid exposing the unit to extreme temperatures, direct sunlight, excessive dust, or high humidity.
4.3 Power Supply Care
Always use the original power adapter provided with the unit. Do not use damaged cables or adapters. Disconnect power during electrical storms or when the unit is not in use for extended periods.
5. Rozwiązywanie Problemów
This section addresses common issues you might encounter with the AVMATRIX VS0601. If problems persist, contact customer support.
5.1 Brak wyjścia wideo
- Sprawdź moc: Sprawdź, czy urządzenie jest włączone i czy zasilacz jest prawidłowo podłączony.
- Verify Input Sources: Confirm that all video input sources are active and sending a signal.
- Sprawdź kable: Ensure all SDI and HDMI cables are securely connected to both the switcher and the display/recording device. Try swapping cables if possible.
- Wybór wejścia: Verify that the correct input is selected on the PGM row of buttons.
- Format wyjściowy: Check if the output format of the VS0601 is compatible with your display/recording device. The PGM output can be scaled.
5.2 Brak wyjścia audio
- Check Audio Connections: Ensure external audio cables are properly connected to the audio input/output ports.
- Poziomy dźwięku: Verify that audio levels are not muted or set too low in the audio mixer settings.
- Wbudowany dźwięk: If using embedded audio, confirm the source device is sending audio with the video signal.
5.3 Device Freezes or Unexpected Power Loss
- Zasilanie: Ensure the power adapter is providing stable 12V, 2A power. An unstable power source can cause interruptions.
- Wentylacja: Check that the unit has adequate ventilation and is not overheating. Ensure vents are not blocked.
- Oprogramowanie sprzętowe: Check the AVMATRIX website for any available firmware updates that may address stability issues.
- Reset: Power cycle the device by turning it off, waiting 10 seconds, and then turning it back on.
5.4 Wieleview Not Displaying All Inputs
- Wieloview Połączenie wyjściowe: Ensure the monitor is correctly connected to the 'MULTIVIEW OUT' port.
- Sygnały wejściowe: Confirm that all connected input sources are active and sending valid video signals.
6. Specyfikacje
| Funkcja | Specyfikacja |
|---|---|
| Wejścia wideo | 4x 3G/HD/SD-SDI, 2x HDMI |
| Szybkość wideo SDI | Automatyczne wykrywanie, SD/HD/3G-SDI |
| Zgodność z SDI | SMPTE 259M/ SMPTE 292M/SMPTE 424M |
| Wyjścia PGM | 2x 3G/HD/SD-SDI; 1x HDMI Type A |
| Format wyjściowy PGM | 1080p 60/50/30/25/24; 1080i 50/60 |
| Wieloview Wyjście | 1x 3G-SDI; 1x HDMI Type A |
| Wieloview Format wyjściowy | 1080 p 60 |
| Wejście audio | 1x 3.5mm Stereo audio; 1x RCA (L/R) |
| Wyjście audio | 1x 3.5mm Stereo audio; 1x RCA (L/R) |
| GPIO | Tally, DB-15x1 |
| Sieć lokalna | RJ45, Synchronize local time |
| Temperatura pracy | -20 do 60°C |
| Temperatura przechowywania | -30 do 70°C |
| Wilgotność robocza | 20%~70% wilgotności względnej |
| Pobór mocy | ≤ 14.5 W |
| Zasilacz | DC 12V, 2A |
| Wymiary | 6.78" x 2.17" x 9.81" (17.22 x 5.51 x 24.92 cm) |
| Waga | 2.2 funta (1 kg) |
7. Informacje o gwarancji
Specific warranty terms and conditions for the AVMATRIX VS0601 may vary by region and reseller. Please refer to the warranty card included with your product or contact your point of purchase for detailed information regarding warranty coverage, duration, and service procedures. Keep your proof of purchase for warranty claims.
8. Wsparcie
For technical assistance, troubleshooting beyond this manual, or service inquiries, please contact AVMATRIX customer support or your authorized reseller. You may also visit the official AVMATRIX webwitryna zawierająca dodatkowe zasoby, odpowiedzi na często zadawane pytania i aktualizacje oprogramowania sprzętowego.
Zasoby internetowe:
- Oficjalny AVMATRIX Webstrona: www.avmatrix.net (Uwaga: To jest symbol zastępczy URL, sprawdź aktualny oficjalny website for AVMATRIX)