
1. Wprowadzenie
This manual provides detailed instructions for the installation, operation, and maintenance of the Fafeicy TM626 DIN Rail Mount AC220V Power Timer Switch. This digital timer is designed for precise time control of electrical appliances and systems, offering programmable on/off cycles for various applications.
The TM626 is suitable for controlling street lights, factory equipment, advertising signs, production machinery, radio and television equipment, stage lighting, and other power equipment that requires regular automated switching.
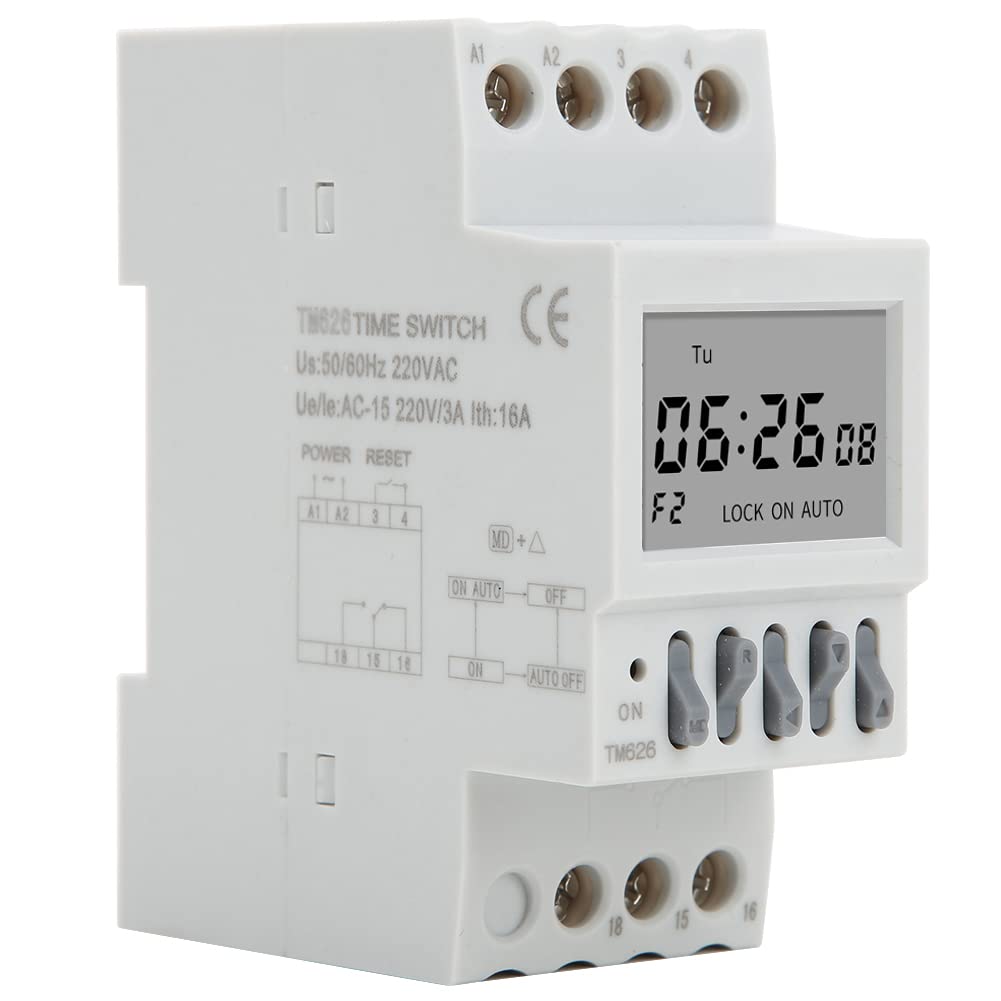
Obraz 1.1: Pod kątem view of the Fafeicy TM626 Power Timer Switch, showing the display and terminal connections.

Image 1.2: The TM626 timer switch is ideal for automating various applications, including street lighting, industrial equipment, and advertising displays.
2. Informacje dotyczące bezpieczeństwa
Przed instalacją lub uruchomieniem tego urządzenia należy przeczytać i zrozumieć wszystkie instrukcje bezpieczeństwa. Nieprzestrzeganie tych instrukcji może spowodować porażenie prądem, pożar lub poważne obrażenia.
- Przed przystąpieniem do prac instalacyjnych lub konserwacyjnych należy upewnić się, że zasilanie jest odłączone.
- Instalację powinien wykonać wyłącznie wykwalifikowany elektryk.
- Nie przekraczaj określonej objętościtage (AC220V) and current (16A) ratings.
- Trzymaj urządzenie z dala od wody i środowisk o wysokiej wilgotności.
- Nie próbuj samodzielnie otwierać ani naprawiać urządzenia. W celu uzyskania pomocy skontaktuj się z wykwalifikowanym personelem.
3. Koniec produktuview
The Fafeicy TM626 is a compact digital timer switch designed for DIN rail mounting. It features a clear LCD display for time and program settings, along with intuitive control buttons.
3.1 Składniki
- Wyświetlacz LCD: Pokazuje aktualny czas, dzień i status programowania.
- Przyciski sterujące: Used for setting time, programming, and manual override.
- Bloki zaciskowe: For connecting power input and load output.
- DIN Rail Clips: Do bezpiecznego montażu na standardowej szynie DIN.

Obraz 3.1: Przód view of the TM626 timer switch, highlighting the LCD display and control buttons.

Obraz 3.2: Bok view of the TM626, illustrating the integrated DIN rail mounting clips.
4. Specyfikacje
| Funkcja | Specyfikacja |
|---|---|
| Marka | Fafeicy |
| Numer modelu | TM626 (Fafeicy txusog0m3i) |
| Objętość operacyjnatage | Prąd zmienny 220 V (50/60 Hz) |
| Prąd znamionowy | 16A |
| Rozmiar ekranu | 1.6 cali |
| Żywotność mechaniczna | ≥ 30,000 razy |
| Życie elektryczne | ≥ 10,000 razy |
| Wymiary (w przybliżeniu) | Width: 35mm (1.4in), Height: 82mm (3.2in), Depth: 68mm (2.7in) |
| Montowanie | Szyna DIN |
| Kraj pochodzenia | Chiny |

Image 4.1: Dimensional drawing of the TM626 timer switch, showing key measurements.

Image 4.2: The TM626 timer switch, illustrating its robust design for long mechanical and electrical life.
5. Konfiguracja i instalacja
Follow these steps for proper installation and initial setup of your TM626 timer switch.
5.1 Montaż
- Ensure the main power supply is OFF before mounting.
- Locate a standard 35mm DIN rail within your electrical panel.
- Align the DIN rail clips on the back of the TM626 with the DIN rail.
- Press the timer firmly onto the rail until it clicks into place.
5.2 Okablowanie
Refer to the wiring diagram on the device and below for correct connections. Incorrect wiring can damage the device or cause electrical hazards.

Obraz 5.1: Bok view of the TM626 showing the wiring terminals and a simplified internal diagram. Terminals A1 and A2 are for power input (AC220V). Terminals 15, 16, 18 are for load output (15: Common, 16: Normally Closed, 18: Normally Open).
- Connect the AC220V power supply to terminals A1 I A2.
- Connect the common wire of your load to terminal 15.
- For normally open operation (load turns ON when timer activates), connect the load's live wire to terminal 18.
- For normally closed operation (load turns OFF when timer activates), connect the load's live wire to terminal 16.
- Upewnij się, że wszystkie połączenia są bezpieczne i izolowane.
5.3 Początkowe włączenie zasilania
After wiring, restore power. The display should light up. If the display is blank, check power connections. The timer may require an initial charge if it has been stored for a long time; allow it to be powered for a few minutes.
6. Instrukcja obsługi
The TM626 timer switch allows you to set the current time and program multiple on/off cycles.
6.1 Ustawianie aktualnego czasu i dnia
- Naciśnij ZEGAR button (if available, or a similar button for time setting).
- Użyj D+ (Day), H+ (Hour), and M+ (Minute) buttons to adjust the current day, hour, and minute.
- Naciskać ZEGAR ponownie, aby zapisać i wyjść.
6.2 Programowanie cykli włączania/wyłączania
The TM626 typically supports multiple ON/OFF programs. The exact number may vary, but common models support 8-16 programs.
- Naciśnij ŻARCIE button. The display will show "1 ON".
- Używać D+ to select the day(s) for this ON event (e.g., Mon-Fri, Sat-Sun, every day, specific days).
- Używać H+ I M+ aby ustawić pożądany czas WŁ.
- Naciskać ŻARCIE Ponownie. Na wyświetlaczu pojawi się komunikat „1 OFF”.
- Używać D+, H+, I M+ to set the desired OFF time for the first program.
- Repeat steps 1-5 for additional ON/OFF programs (e.g., "2 ON", "2 OFF", etc.).
- Po ustawieniu wszystkich żądanych programów naciśnij przycisk ZEGAR button to exit programming mode and save settings.
6.3 Sterowanie ręczne
Ten PODRĘCZNIK or WŁ./AUTO/WYŁ button allows you to manually override the programmed settings.
- Pressing this button cycles through modes: ON (zawsze włączony), AUTOMATYCZNY (follows programs), WYŁĄCZONY (zawsze wyłączone).
- Wybierać AUTOMATYCZNY for the timer to execute its programmed schedules.
6.4 Funkcja resetowania
To clear all settings and return the timer to its factory default state, locate the small NASTAWIĆ button (often recessed) and press it using a pointed object (e.g., a pen tip). This will erase all time and program settings.
7. Konserwacja
The Fafeicy TM626 timer switch requires minimal maintenance to ensure long-term reliable operation.
- Czyszczenie: Do czyszczenia zewnętrznej części urządzenia należy używać miękkiej, suchej ściereczki. Nie należy używać środków czyszczących o właściwościach ściernych ani rozpuszczalników.
- Kontrola: Okresowo należy sprawdzać, czy połączenia przewodów są dobrze dokręcone oraz czy nie występują ślady zużycia lub uszkodzenia.
- Zapas baterii: The device typically includes an internal battery for retaining settings during power outages. This battery is usually non-replaceable by the user and recharges when the device is powered.
8. Rozwiązywanie Problemów
If you encounter issues with your TM626 timer switch, refer to the following common problems and solutions:
| Problem | Możliwa przyczyna | Rozwiązanie |
|---|---|---|
| Wyświetlacz jest pusty. | Brak zasilania; wewnętrzny akumulator rozładowany. | Check power connections to A1/A2. Allow device to be powered for several minutes to charge the internal battery. |
| Obciążenie nie włącza się/wyłącza zgodnie z programem. | Incorrect programming; timer in manual ON/OFF mode; incorrect wiring; faulty load. | Verify program settings. Ensure the timer is in AUTOMATYCZNY mode. Check wiring connections (15, 16, 18). Test the load independently. |
| Czas jest nieprawidłowy. | Time not set correctly; power interruption (though internal battery should prevent this). | Reset and re-set the current time and day. Ensure the internal battery is charged. |
| Przyciski nie reagują. | Awaria urządzenia; tymczasowa usterka oprogramowania. | Perform a full reset using the recessed RESET button. If the issue persists, contact support. |
9. Gwarancja i wsparcie
For warranty information or technical support, please refer to the documentation provided with your purchase or contact Fafeicy customer service through their official channels. Keep your purchase receipt as proof of purchase.
W celu uzyskania ogólnych informacji prosimy odwiedzić stronę Fafeicy Brand Store.