
1. Wprowadzenie
Thank you for choosing the HiLook HIKVISION 204U-K1 4-Channel 5MP HD DVR. This manual provides essential information for the proper installation, operation, and maintenance of your digital video recorder. Please read this manual thoroughly before using the product and retain it for future reference.
2. Ważne instrukcje bezpieczeństwa
- Zasilanie: Używaj wyłącznie zasilacza przeznaczonego do tego urządzenia. Upewnij się, że napięcie zasilania jest prawidłowe.tage is stable and meets the requirements.
- Wentylacja: Nie zasłaniaj żadnych otworów wentylacyjnych. Montaż należy wykonać zgodnie z instrukcją producenta.
- Woda i wilgoć: Nie wystawiaj urządzenia na działanie deszczu ani wilgoci. Nie stawiaj na urządzeniu przedmiotów wypełnionych płynami, takich jak wazony.
- Temperatura: Operate the device within the specified temperature range. Avoid extreme hot or cold environments.
- Czyszczenie: Czyścić wyłącznie suchą szmatką. Nie używaj środków czyszczących w płynie ani w aerozolu.
- Serwisowanie: Nie próbuj samodzielnie naprawiać tego produktu. Wszelkie czynności serwisowe należy powierzyć wykwalifikowanemu personelowi serwisowemu.
- Dysk twardy: Handle the hard drive with care. Improper installation or removal can cause data loss or damage.
3. Zawartość opakowania
Verify that all items are present and in good condition upon unpacking. If any items are missing or damaged, contact your retailer.
- HiLook HIKVISION 204U-K1 DVR Unit
- Zasilacz
- Mysz USB
- SATA Data Cable (for HDD connection)
- SATA Power Cable (for HDD connection)
- Szybki przewodnik

Figure 3.1: The HiLook HIKVISION 204U-K1 DVR unit, shown with an optional hard drive and included accessories such as a mouse and cables.
4. Konfiguracja początkowa
4.1. Podłączanie rejestratora DVR
Follow these steps to connect your DVR to cameras, a monitor, and the network.
- Zainstaluj dysk twardy (opcjonalnie): If your DVR did not come with a pre-installed hard drive, open the DVR casing, connect the SATA data and power cables to the HDD, and secure the HDD inside the DVR.
- Podłącz kamery: Connect your surveillance cameras to the BNC video input ports on the rear panel of the DVR. This model supports 4 channels.
- Podłącz monitor: Podłącz monitor do portu wyjściowego HDMI lub VGA na tylnym panelu.
- Połącz sieć: Connect an Ethernet cable from the DVR's LAN port to your router or network switch for remote access and network features.
- Podłącz mysz USB: Plug the included USB mouse into one of the USB ports for navigation.
- Podłącz zasilanie: Podłącz zasilacz do wejścia zasilania rejestratora DVR, a następnie podłącz go do gniazdka elektrycznego.

Figure 4.1: Rear panel of the DVR, illustrating the various input and output ports including video in, audio in/out, VGA, HDMI, USB, network interface, and power supply.
4.2. Włączanie
After all connections are made, the DVR will power on automatically. The system will boot up, and you should see the HiLook logo on your connected monitor. Follow the on-screen prompts for initial setup, including setting up an administrator password and configuring network settings.
5. Instrukcja obsługi
5.1. Koniec interfejsu użytkownikaview
The DVR's graphical user interface (GUI) can be navigated using the USB mouse. Right-click to access the main menu, and left-click to select options. The live view displays feeds from connected cameras.
5.2. Nagrywanie i odtwarzanie
- Nagrywanie ręczne: Z koncertu view, click the record icon to start or stop manual recording for a specific channel.
- Zaplanowane nagrywanie: Wejdź do menu głównego i przejdź do Nagrywanie > Harmonogram to set up continuous or motion-triggered recording schedules for each camera.
- Odtwarzanie nagranego dźwięku: Z menu głównego wybierz Odtwarzanie nagranego dźwięku. Choose the date, time, and camera channel to review nagrano footage.
5.3. Detekcja ruchu i alerty
The DVR supports smart motion detection and can send alerts via email or push notifications to a mobile application.
- Configure Motion Detection: Idź do Main Menu > Alarm > Motion Detection. Select the camera channel, enable motion detection, and define the detection area and sensitivity.
- Set Up Email Alerts: In Main Menu > Network > Email, configure your SMTP server settings and recipient email addresses. Enable email linkage for motion detection events.
- Powiadomienia aplikacji mobilnej: Download the official HiLook mobile application. Add your DVR to the app and enable push notifications for alarm events.

Figure 5.1: A smartphone screen showing a real-time email notification triggered by smart motion detection.

Figure 5.2: A smartphone displaying multiple smart motion-triggered alerts, indicating movement detected in specific areas monitored by surveillance cameras.
6. Konserwacja
- Czyszczenie: Regularly clean the exterior of the DVR with a soft, dry cloth. Ensure ventilation openings are free from dust.
- Aktualizacje oprogramowania układowego: Sprawdź oficjalny HiLook website for the latest firmware updates. Updating firmware can improve performance and add new features. Follow the provided instructions carefully.
- Zarządzanie dyskiem twardym: Periodically check the health of your hard drive through the DVR's system settings. Ensure sufficient storage space is available for recordings.
- Bezpieczeństwo hasła: Regularly change your administrator password to maintain system security.
7. Rozwiązywanie Problemów
If you encounter issues with your DVR, refer to the table below for common problems and solutions.
| Problem | Możliwa przyczyna | Rozwiązanie |
|---|---|---|
| Brak wyjścia wideo na monitorze | Loose HDMI/VGA cable; Incorrect monitor input; DVR not powered on. | Check cable connections; Select correct input on monitor; Verify power supply. |
| Brak obrazu z kamery | Camera not powered; Loose BNC cable; Faulty camera. | Ensure camera power; Check BNC connections; Test camera with another input if possible. |
| Nie można uzyskać zdalnego dostępu do rejestratora DVR | Network cable disconnected; Incorrect network settings; Firewall blocking access. | Verify Ethernet connection; Check IP address, gateway, DNS settings; Configure router/firewall. |
| Brak nagrywania | Hard drive not installed/initialized; Recording schedule not set; HDD full. | Install/initialize HDD; Configure recording schedule; Check HDD status and capacity. |
| Wykrywanie ruchu nie działa | Motion detection disabled; Sensitivity too low; Detection area not set. | Enable motion detection; Adjust sensitivity; Define detection area. |
8. Specyfikacje techniczne
Below are the key technical specifications for the HiLook HIKVISION 204U-K1 DVR.
| Funkcja | Specyfikacja |
|---|---|
| Model | 204U-K1 |
| Wejście wideo | 4-channel BNC interface (supports HDTVI/AHD/CVI/CVBS/IP) |
| Kompresja wideo | H.265 Pro+/H.265 Pro/H.265/H.264 |
| Wyjście wideo | 1 HDMI, 1 VGA (wyjście jednoczesne) |
| Rozdzielczość wyjściowa HDMI | Up to 4K (3840 × 2160) for 204U-K1 |
| Wejście/wyjście audio | 1-ch RCA (2-way audio) / 1-ch RCA |
| Dysk twardy (HDD) | 1 interfejs SATA, pojemność do 10 TB |
| Interfejs sieciowy | 1 interfejs Ethernet RJ45 10M/100M z samodostosowującą się komunikacją |
| Interfejs USB | 2xUSB 2.0 |
| Zasilacz | 12 V prądu stałego |
| Wymiary (szer. × gł. × wys.) | Approx. 200 × 200 × 45 mm (7.9 × 7.9 × 1.8 inch) |
| Waga (bez HDD) | Około 1 kg (2.2 funty) |
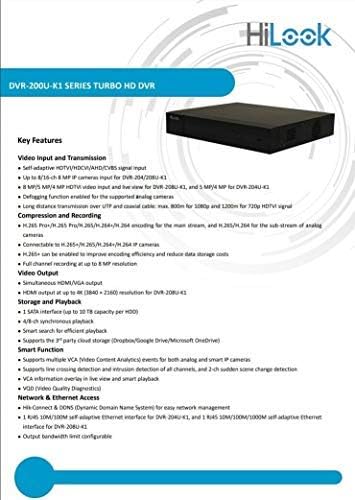
Figure 8.1: A detailed list of key features for the DVR-200U-K1 series, including video input/transmission, compression, video output, storage, smart functions, and network access.
9. Gwarancja i obsługa klienta
Your HiLook HIKVISION 204U-K1 DVR comes with a limited warranty. Please refer to the warranty card included in your package or visit the official HiLook website for detailed warranty terms and conditions. For technical assistance, troubleshooting, or service inquiries, please contact your authorized HiLook dealer or customer support.
Zasoby internetowe: For additional support, firmware downloads, and FAQs, please visit the official HiLook support webstrona.