
Wstęp
This manual provides detailed instructions for the proper use and maintenance of your ORDRO HDV-F7 FHD 1080P Camcorder. Please read this manual thoroughly before operating the device to ensure optimal performance and longevity.
Zawartość opakowania
Sprawdź, czy w przesyłce znajdują się wszystkie elementy wymienione poniżej:
- ORDRO HDV-F7 Camcorder
- Instrukcja obsługi
- Kabel USB
- HDMI HD/AV Cable
- Zdalne sterowanie
- Rumak
- Battery x 2 (NP-180, 3.7V 1800mAh Li-ion)
- Camera Bag / Lens Cover
- Karta SD 16 GB
- Czytnik kart SD

Rysunek 1: Included accessories for the ORDRO HDV-F7 camcorder.
Produkt ponadview
Zapoznaj się z głównymi elementami i elementami sterowania swojej kamery.
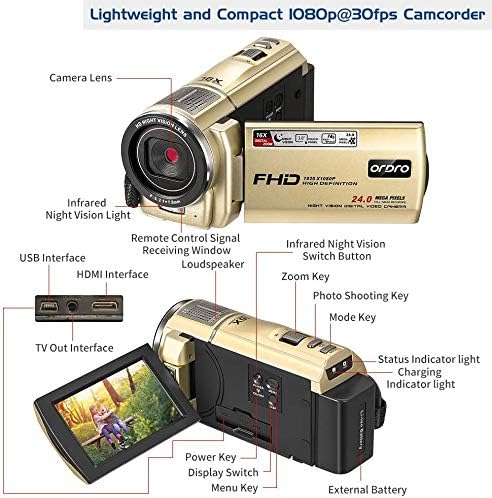
Rysunek 2: Labeled components of the ORDRO HDV-F7 camcorder.
- Obiektyw aparatu: Nagrywa filmy i robi zdjęcia.
- Światło podczerwone do widzenia w nocy: Provides illumination for recording in dark environments.
- Interfejs USB: For connecting to a computer or power source.
- Interfejs HDMI: Do podłączenia do telewizora lub monitora.
- Remote Control Signal Receiving Window: Odbiera sygnały z pilota.
- Głośnik: Do odtwarzania dźwięku.
- Infrared Night Vision Switch Button: Activates/deactivates night vision mode.
- Klawisz powiększenia: Adjusts digital zoom (16X).
- Photo Shooting Key: Rejestruje nieruchome obrazy.
- Klawisz trybu: Przełącza między trybami wideo, zdjęć i odtwarzania.
- Kontrolka stanu: Shows current operating status.
- Lampka wskaźnika ładowania: Wskazuje stan ładowania.
- Przycisk zasilania: Włącza/wyłącza kamerę.
- Przełącznik wyświetlacza: Controls the LCD screen.
- Klawisz menu: Dostęp do menu ustawień kamery.
- Bateria zewnętrzna: Removable battery pack.
Organizować coś
1. Ładowanie i instalacja akumulatora
- Insert the provided battery into the charger.
- Podłącz ładowarkę do gniazdka elektrycznego. Zaświeci się kontrolka ładowania.
- For first use, charge the battery for at least 3 hours. A fully charged battery provides up to 2 hours of video recording or 3 hours of photo taking.
- Once charged, slide the battery into the battery compartment on the camcorder until it clicks into place.

Rysunek 3: Battery capacity and installation area.
2. Wkładanie karty SD
- Znajdź gniazdo karty SD w kamerze.
- Insert the 16GB SD card (included) into the slot with the metal contacts facing the correct direction, as indicated on the camcorder.
- Push the card gently until it clicks into place. To remove, push the card in again until it springs out.
Instrukcja obsługi
1. Włączanie/wyłączanie zasilania
- Aby włączyć, naciśnij i przytrzymaj Przycisk zasilania.
- Aby wyłączyć, naciśnij i przytrzymaj Przycisk zasilania Ponownie.
2. Nagrywanie wideo
- Ensure the camcorder is in video mode (check the display icon). If not, press the Klawisz trybu przełączyć.
- Frame your shot using the 3.0'' TFT LCD screen. Note that this is a fixed zoom camera; ensure subjects are more than 1.5 meters away for clear focus.
- Naciśnij Photo Shooting Key (often doubles as record button) to start recording. The recording indicator will light up.
- Naciśnij Photo Shooting Key ponownie, aby zatrzymać nagrywanie.
3. Robienie zdjęć
- Ensure the camcorder is in photo mode (check the display icon). If not, press the Klawisz trybu przełączyć.
- Skomponuj kadr.
- Naciśnij Photo Shooting Key aby uchwycić obraz.
4. Funkcja powiększania
- Użyj Klawisz powiększenia to digitally zoom in or out up to 16X.
- Note that digital zoom may reduce image quality compared to optical zoom.
5. Wizja nocna w podczerwieni
The camcorder features infrared night vision for recording in low-light or completely dark environments.
- Aby aktywować, naciśnij Infrared Night Vision Switch Button. The IR lights will turn on.
- To deactivate, press the button again.

Rysunek 4: Demonstration of infrared night vision capability.
6. WebFunkcjonalność kamery
Kamerę można używać jako webcam for video calls or online meetings.
- Podłącz kamerę do komputera za pomocą dołączonego kabla USB.
- Wybierać 'Webcam Mode' on the camcorder's display if prompted.
- Twój komputer powinien rozpoznać kamerę jako webcam. Select it in your video conferencing software.

Rysunek 5: Connecting the camcorder as a webcam or to a TV.
7. Podłączanie do telewizora
Możesz view your recorded videos and photos directly on a television.
- Connect the camcorder to your TV using the provided HDMI cable.
- Przełącz źródło sygnału wejściowego w telewizorze na odpowiedni port HDMI.
- Enter the camcorder's playback mode to view swoje media.
8. Korzystanie z pilota zdalnego sterowania
The remote control allows for convenient operation from a distance, especially when the camcorder is mounted on a tripod.
- Point the remote control towards the camcorder's remote control signal receiving window.
- Use the buttons on the remote to control recording, playback, zoom, and other functions.

Rysunek 6: Remote control usage and tripod mounting point.
Konserwacja
1. Czyszczenie
- Do czyszczenia obudowy kamery należy używać miękkiej, suchej ściereczki.
- Aby uniknąć zarysowań, do czyszczenia obiektywów i ekranu LCD należy używać specjalnej ściereczki i płynu do czyszczenia obiektywów.
- Nie używaj żrących środków chemicznych ani materiałów ściernych.
2. Pielęgnacja baterii
- Baterie, które nie są używane, przechowuj w chłodnym i suchym miejscu.
- Aby przedłużyć żywotność akumulatora, należy unikać jego całkowitego rozładowywania.
- Jeśli akumulator będzie przechowywany przez dłuższy okres, należy go naładować do około 50% pojemności.
3. Przechowywanie
- Store the camcorder in its protective bag or case to prevent dust and damage.
- Unikaj ekstremalnych temperatur i wysokiej wilgotności.
Rozwiązywanie problemów
| Problem | Możliwa przyczyna | Rozwiązanie |
|---|---|---|
| Kamera nie włącza się. | Bateria jest rozładowana lub nie została prawidłowo zainstalowana. | Charge the battery fully and ensure it is correctly inserted. |
| Image/Video is blurry. | Subject is too close (less than 1.5m) or lens is dirty. | Ensure subject is beyond 1.5m. Clean the lens with a soft cloth. |
| Błąd karty SD. | SD card not inserted correctly or corrupted. | Reinsert the SD card. Try formatting the card (this will erase all data). If the issue persists, try a different SD card. |
| No image on TV when connected via HDMI. | Incorrect TV input selected or cable issue. | Ensure the TV input is set to the correct HDMI port. Check HDMI cable connection. |
Specyfikacje
| Funkcja | Szczegół |
|---|---|
| Numer modelu | ORDRO HDV-F7 |
| Rozdzielczość przechwytywania wideo | 1080p@25fps (FHD) |
| Technologia czujnika fotograficznego | CMOS (5.0 MP, up to 24.0MP interpolation) |
| Rozmiar ekranu | 3.0 Inches TFT LCD (270 degree rotation) |
| Zoom cyfrowy | 16X |
| Cechy specjalne | IR Night Vision, LED Fill Light, WebFunkcjonalność kamery |
| Technologia łączności | HDMI, USB |
| Typ pamięci flash | Karta SD (w zestawie 16 GB) |
| Typ baterii | NP-180, 3.7V 1800mAh Li-ion (x2 included) |
| Waga przedmiotu | 0.7 funtów |
| Typ fokusu | Auto Focus (fixed zoom, focus range > 1.5m) |
| Stabilizacja obrazu | Cyfrowy |
Informacje o gwarancji
The ORDRO HDV-F7 Camcorder comes with a 1-letnia gwarancja od daty zakupu. Niniejsza gwarancja obejmuje wady produkcyjne i usterki powstałe w wyniku normalnego użytkowania. Prosimy zachować dowód zakupu na wypadek roszczeń gwarancyjnych.
Obsługa klienta
If you encounter any issues not covered in the troubleshooting section or require further assistance, please contact ORDRO customer service. Refer to the contact information provided with your product packaging or visit the official ORDRO webstronie, aby uzyskać szczegółowe informacje na temat pomocy technicznej.