NEEWER S101-300W
Neewer S101-300W Professional Studio Monolight Strobe Flash Light
Model: S101-300W | Brand: NEEWER
1. Wprowadzenie
The Neewer S101-300W Studio Monolight is a professional-grade strobe flash designed for studio photography, offering powerful and consistent illumination. This manual provides comprehensive instructions for the safe and effective operation, setup, and maintenance of your S101-300W monolight.

Image: The Neewer S101-300W Studio Monolight, showcasing its compact design and included power cable.
Wideo: Ponadview of the Neewer S101-300W Professional Studio Monolight Strobe Light, demonstrating its features and applications in a studio setting.
2. Informacje dotyczące bezpieczeństwa
Przed użyciem tego produktu należy przeczytać wszystkie ostrzeżenia i instrukcje dotyczące bezpieczeństwa, aby zapobiec porażeniu prądem elektrycznym, pożarowi lub poważnym obrażeniom.
- Nie wystawiać urządzenia na działanie deszczu i wilgoci.
- Nie rozmontowuj ani nie próbuj samodzielnie naprawiać urządzenia. Wszelkie prace serwisowe powierzaj wykwalifikowanemu personelowi.
- Upewnij się, że napięcie zasilaniatagodpowiada wymaganiom określonym dla jednostki.
- Keep the unit away from flammable materials. The modeling lamp can become very hot during operation.
- Allow the modeling lamp to cool down before touching or replacing it.
- Always disconnect the power cord before cleaning or when not in use.
3. Koniec produktuview i komponenty
Familiarize yourself with the various parts and controls of your S101-300W monolight.
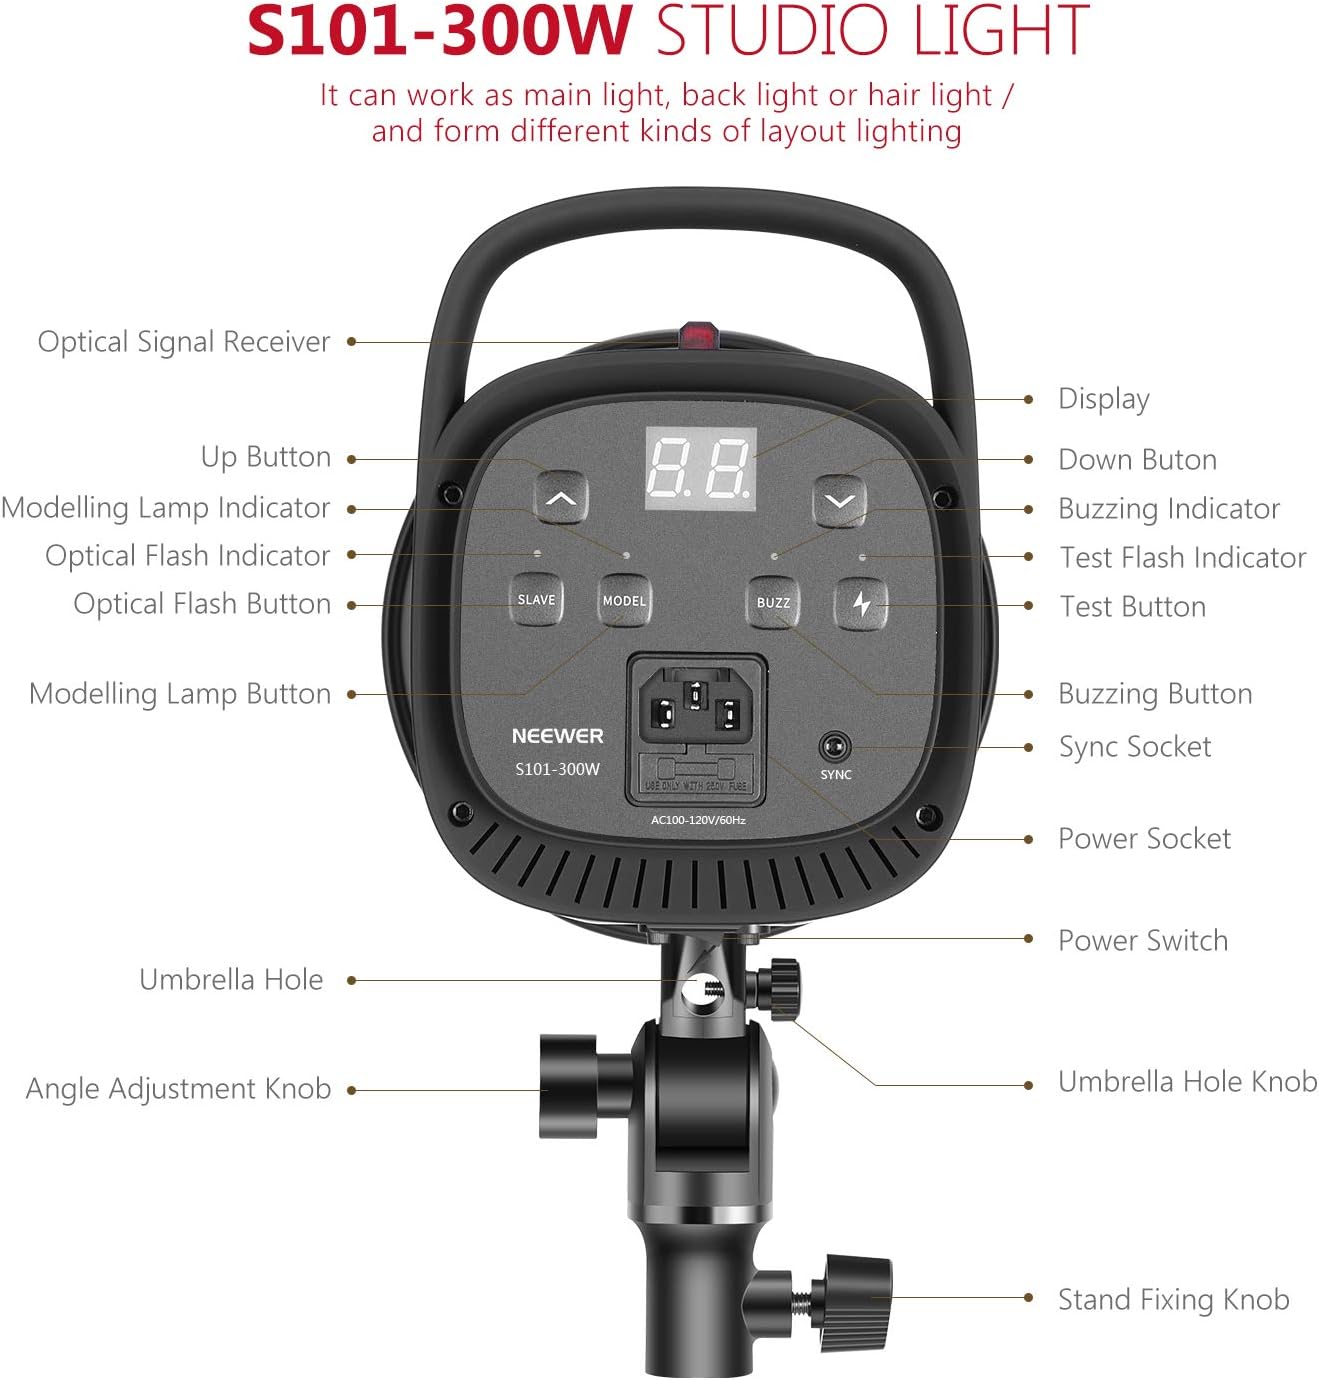
Image: Detailed diagram illustrating the various components and control buttons on the rear panel of the S101-300W monolight.
- Optical Signal Receiver: Detects optical flash signals from a master flash.
- Przycisk w górę: Increases flash power or modeling lamp jasność.
- Modelowanie Lamp Wskaźnik: Shows the status of the modeling lamp.
- Optical Flash Indicator: Lights up when an optical flash is detected.
- Optical Flash Button (SLAVE): Toggles S1/S2 slave modes.
- Modelowanie Lamp Button (MODEL): Turns the modeling lamp on/off and adjusts brightness.
- Wyświetlacz: Shows current power settings.
- Przycisk w dół: Decreases flash power or modeling lamp jasność.
- Buzzing Indicator: Indicates the buzzing sound status.
- Test Flash Indicator: Lights up when the unit is ready to flash.
- Test Button (TEST): Wyzwala błysk testowy.
- Buzzing Button (BUZZ): Toggles the buzzing sound on/off.
- Sync Socket: 3.5mm port for wired sync connection.
- Gniazdo zasilania: Podłącza przewód zasilający.
- Przycisk zasilania: Włącza/wyłącza urządzenie.
- Otwór na parasol: Socket for mounting a soft umbrella.
- Pokrętło regulacji kąta: Secures the tilt angle of the monolight.
- Stand Fixing Knob: Secures the monolight to a light stand.
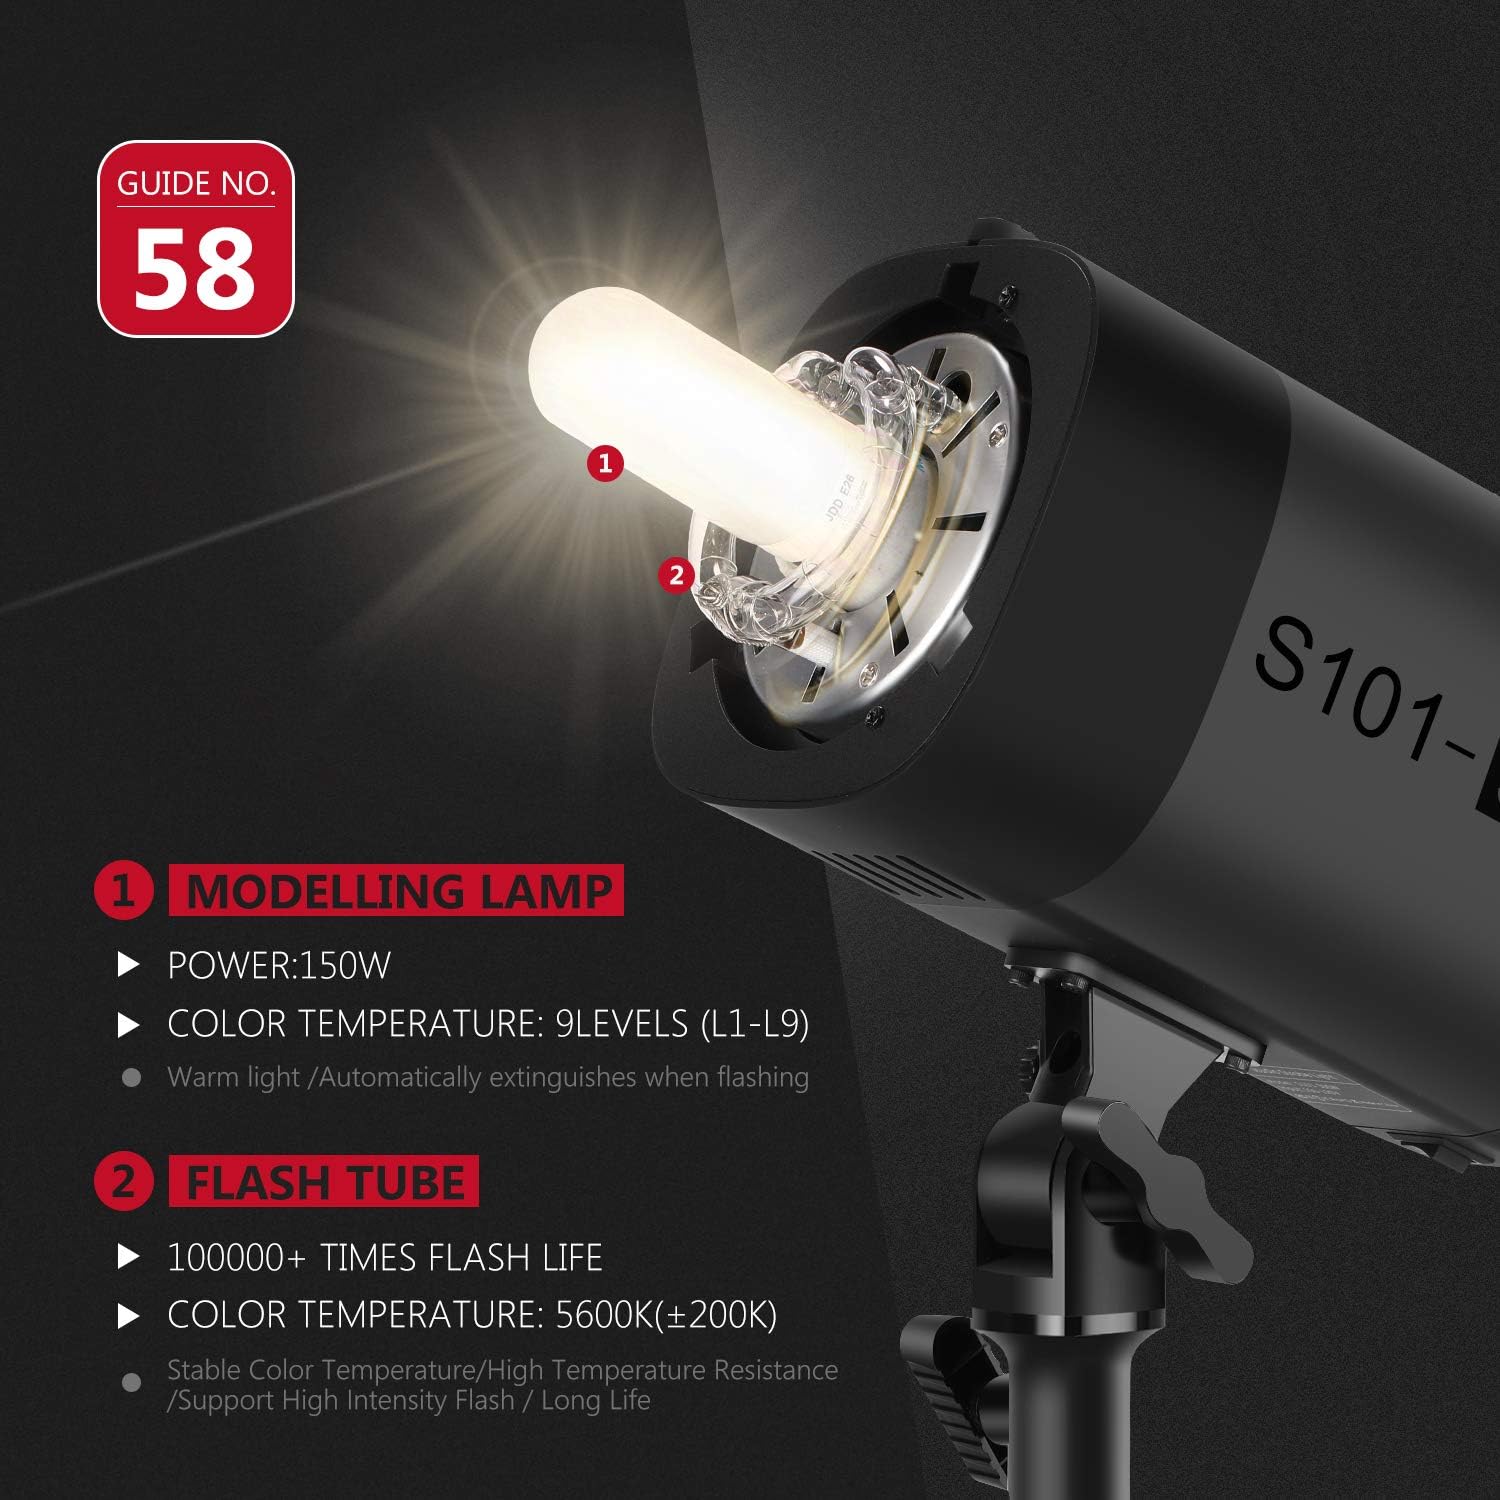
Obraz: Zbliżenie view of the 150W modeling lamp and flash tube, highlighting their specifications.
4. Konfiguracja
4.1 Montaż monolightu
- Attach the monolight to a compatible light stand using the stand fixing knob. Ensure it is securely tightened.
- Adjust the tilt angle of the monolight using the angle adjustment knob to direct the light as needed.

Image: Demonstration of the 180° angle adjustment feature for precise light positioning.
4.2 Attaching Accessories (Bowens Mount)
The S101-300W features a standard Bowens mount for attaching various light modifiers.
- Align the accessory (e.g., standard reflector, softbox, beauty dish) with the Bowens mount on the front of the monolight.
- Włóż akcesorium i obróć je zgodnie z ruchem wskazówek zegara, aż zatrzaśnie się na miejscu, mocno je zabezpieczając.
- To remove, press the release button on the mount and rotate the accessory counter-clockwise.
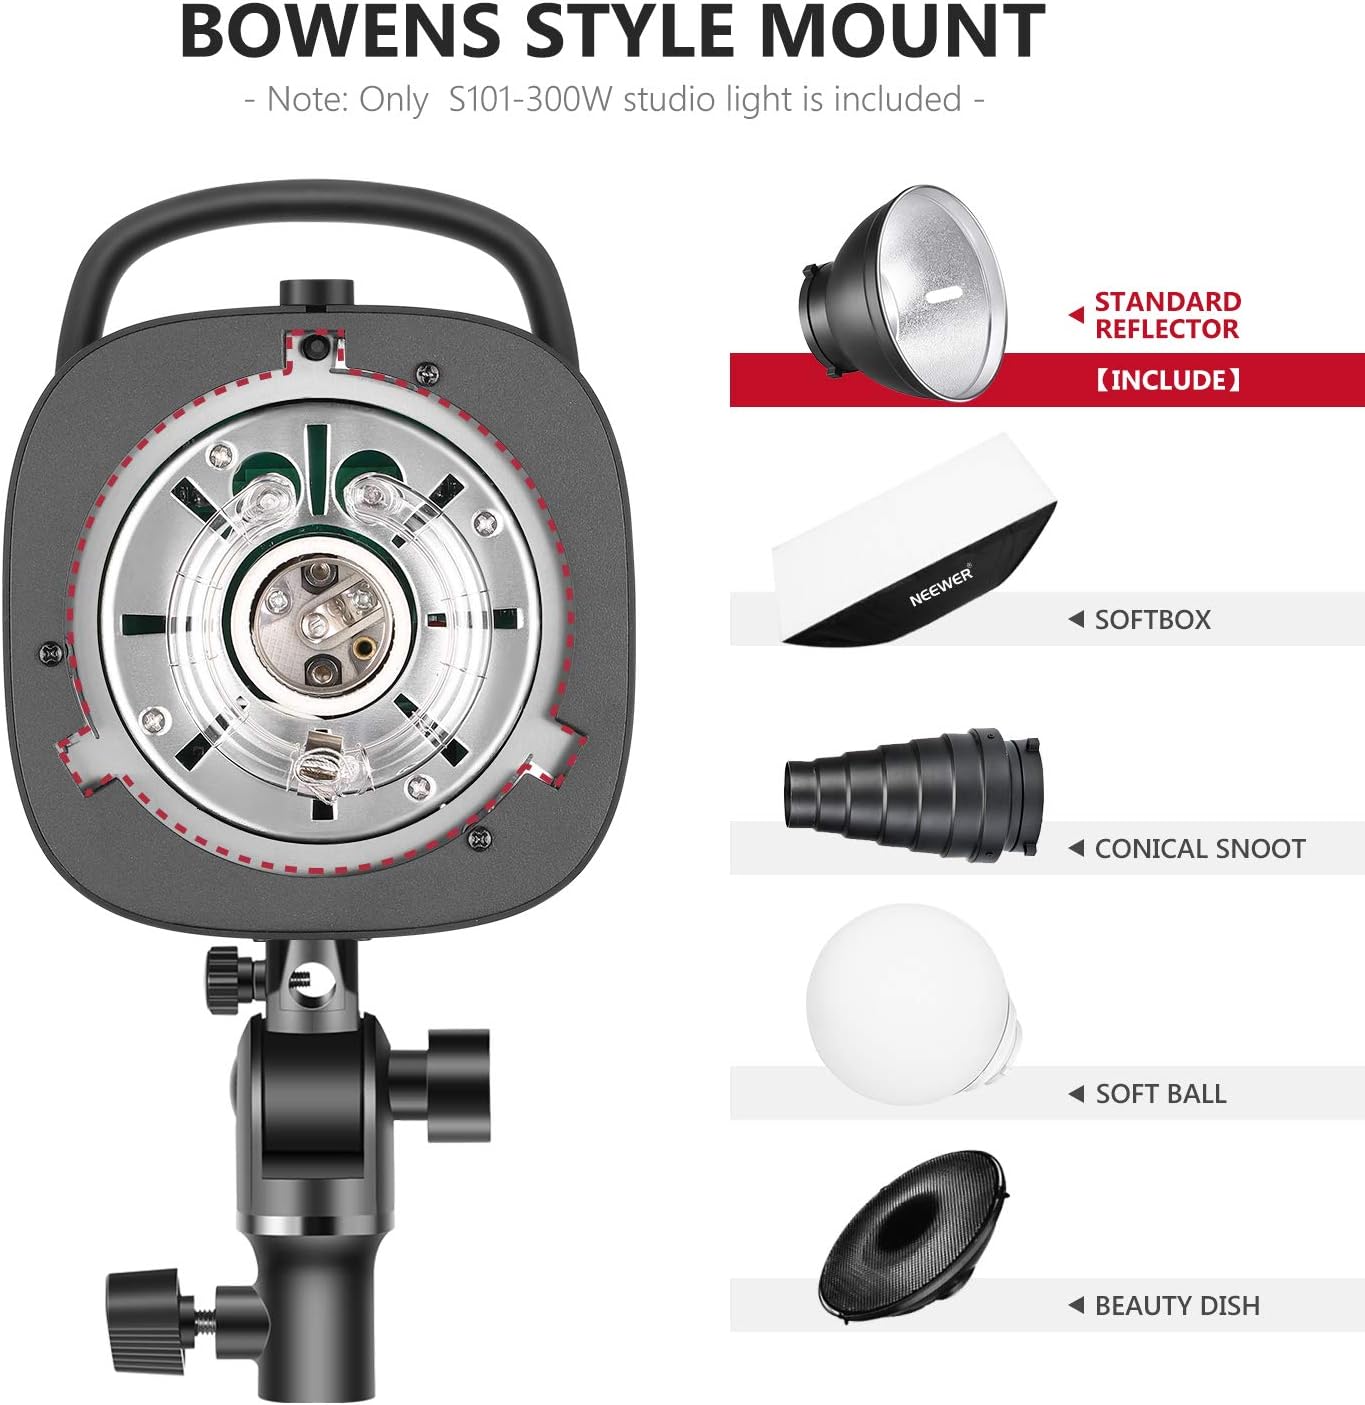
Image: Illustration of the Bowens style mount and compatible light modifiers such as standard reflector, softbox, conical snoot, soft ball, and beauty dish.
4.3 Połączenie zasilania
Connect the provided power cord to the power socket on the monolight and then to a suitable AC power outlet.
For use with a soft umbrella, insert the umbrella shaft into the umbrella hole located on the mounting bracket.

Image: Close-up of the umbrella hole, designed to mount a soft umbrella for diffused lighting.
5. Instrukcja obsługi
5.1 Włączanie/wyłączanie
Flip the Power Switch to the "ON" position to power on the monolight. The display will illuminate. Flip to "OFF" to power down.
5.2 Regulacja mocy błysku
Użyj Up I W dół buttons to adjust the flash output power. The power level is displayed on the screen, ranging from 7.0 (1/8th power) to 10 (1/1 power). The unit will emit a buzzing sound when fully recycled and ready to flash (if buzzing is enabled).
5.3 Modelling Lamp Działanie
Naciśnij MODEL button to turn the 150W modeling lamp on or off. Use the Up I W dół buttons to adjust its brightness (L1-L9). The modeling lamp automatically extinguishes when the flash fires.
Ważny: Modelowanie lamp can become very hot. For safety, it is recommended not to use the modeling lamp for more than 10 minutes continuously, especially with flammable accessories. Allow it to cool down for at least 10 minutes before continued use.
5.4 Flash Modes (S1/S2 Optical Control, Sync Socket)
The S101-300W supports multiple flash triggering modes:
- Sterowanie ręczne: Trigger the flash directly using the TEST button or a compatible trigger connected via the sync socket.
- S1 Mode (Optical Slave): In S1 mode, the monolight acts as a slave flash. It will trigger simultaneously with the first flash from a master flash unit. This is suitable for manual flash systems.
- S2 Mode (Pre-flash Cancel Slave): In S2 mode, the monolight also acts as a slave but ignores the pre-flash from a master flash unit (common in TTL systems). It will trigger on the second flash.
- 3.5mm Sync Socket: Connect a wired sync cable from your camera or flash trigger to the 3.5mm Sync Socket for reliable wired synchronization.

Image: Visual representation of the multiple flash modes: Manual Control, S1/S2 Optical Control, and 3.5mm Sync Socket.
5.5 Recycle Time and Flash Duration
The monolight has a recycle time of 0.4-2.5 seconds, depending on the flash power setting. The flash duration ranges from 1/2000s to 1/800s, allowing for freezing fast motion.
6. Konserwacja
- Czyszczenie: Use a soft, dry cloth to clean the exterior of the monolight. Do not use abrasive cleaners or solvents.
- Składowanie: Przechowuj lampę monolight w chłodnym i suchym miejscu, z dala od bezpośredniego światła słonecznego i nadmiernej wilgoci.
- Wymiana żarówki: Jeżeli modelowanie lamp or flash tube needs replacement, ensure the unit is unplugged and cooled down. Refer to a qualified technician for flash tube replacement.
7. Rozwiązywanie Problemów
| Problem | Możliwa przyczyna | Rozwiązanie |
|---|---|---|
| Monolight does not power on. | Brak zasilania, uszkodzony przewód zasilający, awaria urządzenia. | Check power cord connection and wall outlet. Try a different power cord. If issue persists, contact support. |
| Lampa błyskowa się nie uruchamia. | Not fully recycled; incorrect trigger mode; faulty sync cable/trigger. | Wait for the Test Flash Indicator to light up. Ensure correct S1/S2 mode or proper sync cable connection. Test with the TEST button. |
| Modelowanie lamp wyłącza się automatycznie. | Ochrona przed przegrzaniem. | This is a safety feature. Allow the unit to cool down for at least 10 minutes before reactivating the modeling lamp. Reduce continuous usage time. |
| Nierównomierna moc błysku. | Low battery in external trigger (if used); unit not fully recycled. | Replace trigger batteries. Allow sufficient recycle time between flashes. |
8. Specyfikacje
| Funkcja | Szczegół |
|---|---|
| Model | S101-300W (Item model number: 10096969) |
| Moc błysku | 300 W |
| Temperatura barwowa | 5600K (±200K) |
| Modelowanie Lamp | 150W (Adjustable L1-L9) |
| Prędkość synchronizacji błysku | Do 1/2000 s |
| Czas recyklingu | 0.4-2.5 sekund |
| Typ mocowania | Góra Bowensa |
| Metoda synchronizacji | Optical (S1/S2), 3.5mm Sync Socket |
| Waga przedmiotu | 6.09 funta (ok. 2.76 kg) |
| Wymiary opakowania | 14.5 x 11.1 x 7.5 cala (ok. 36.8 x 28.2 x 19.1 cm) |
| Zawarte komponenty | Monolight, Standard Reflector, Power Cord |
9. Gwarancja i wsparcie
NEEWER products are designed and manufactured to the highest quality standards. For warranty information and technical support, please refer to the warranty card included with your product or visit the official NEEWER webZachowaj paragon jako dowód zakupu.
For further assistance, you may contact NEEWER customer service through their official channels.
Ask a question about this manual
Ask about setup, troubleshooting, compatibility, parts, safety, or missing instructions. Manuals+ will review the question and use this page’s manual context to help answer it.