1. Wprowadzenie i koniecview
The ESX INFOTAINMENT VN1015-MA-DAB-4G is an advanced Android-based naviceiver designed for vehicle integration, offering a comprehensive multimedia and navigation experience. This unit features a 10.1-inch anti-glare multi-angle touchscreen, Android operating system, 4G/LTE connectivity, DAB+ digital radio, and Google Maps navigation. It supports Bluetooth hands-free calling and audio streaming, USB and MicroSD media playback, and includes inputs for rearview cameras and auxiliary devices.
Główne cechy obejmują:
- 10.1-inch high-resolution, anti-glare multi-angle touchscreen.
- Android Operating System for versatile app usage.
- Integrated 4G/LTE dongle for mobile internet (requires optional SIM card).
- DAB+ digital radio reception with station logos and AM/FM radio with RDS.
- Google Maps navigation (online and offline capabilities).
- Bluetooth hands-free system with audio streaming.
- Multiple connectivity options: 2x USB ports, 1x MicroSD slot, 1x camera input, 2x video outputs, 1x AUX/video input, 1x AUX/audio input.
- Support for steering wheel controls (optional adapter may be required).
2. Konfiguracja i instalacja
Proper installation is crucial for the optimal performance of your ESX VN1015-MA-DAB-4G naviceiver. It is highly recommended that installation be performed by a qualified professional to ensure correct wiring and vehicle compatibility.
2.1. Identyfikacja komponentów
Familiarize yourself with the various ports and connections on the rear of the unit before installation.
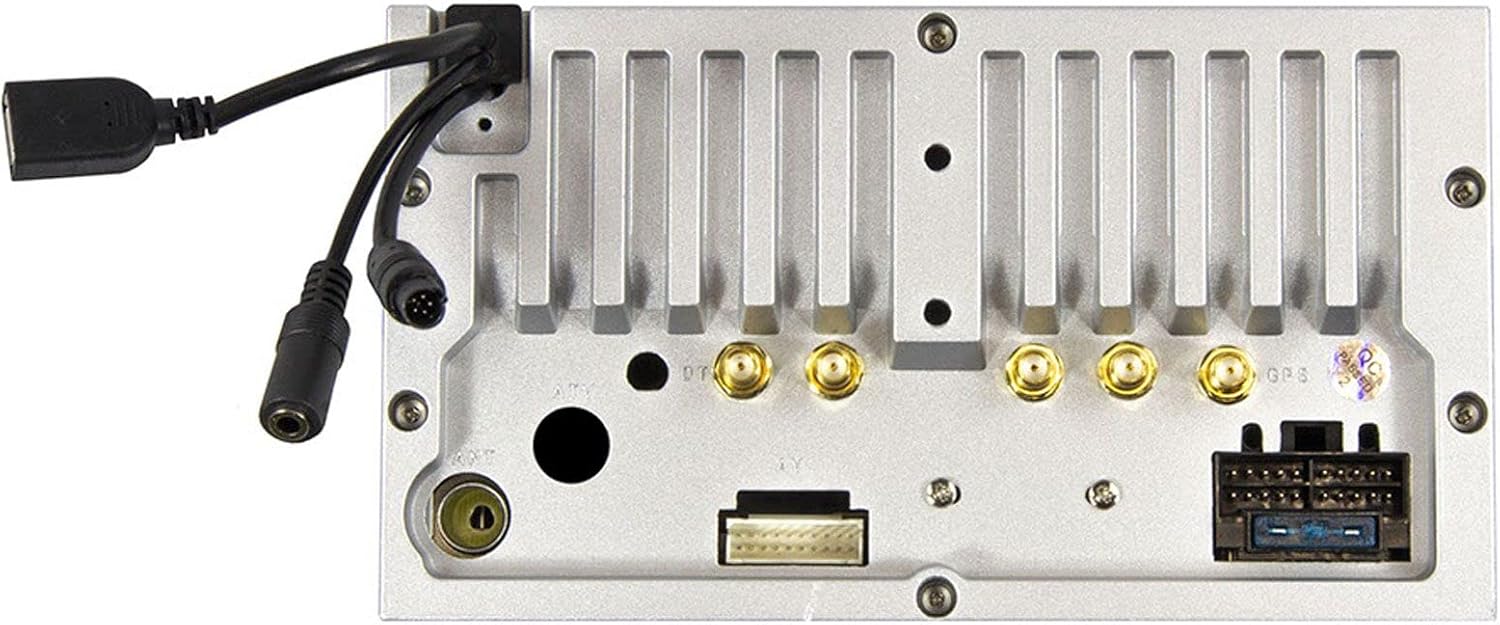
Rysunek 2.1: Tył view of the ESX VN1015-MA-DAB-4G unit, illustrating the power harness, antenna inputs, USB ports, and auxiliary connections.
2.2. Połączenia okablowania
- Zasilanie: Connect the main power harness to your vehicle's electrical system, ensuring correct positive, negative, and accessory (ACC) connections.
- Wyjścia głośnikowe: Connect your vehicle's speakers to the corresponding outputs on the naviceiver.
- Połączenia antenowe: Connect the FM/AM antenna. For DAB+ digital radio, connect the included DAB+ antenna to the designated port.
- Antena GPS: Podłącz antenę GPS i zamontuj ją w miejscu z wolnym dostępem do światła. view nieba w celu optymalnego odbioru sygnału.
- Porty USB: Connect external USB devices for media playback or smartphone connectivity.
- Mikrofon: Connect the external microphone (VNA-MIC-AND, optional) for improved hands-free call quality.
- Tyłview Kamera: Podłącz tyłview camera to the dedicated camera input. Ensure the reverse trigger wire is correctly connected for automatic display switching.
- Wyjścia wideo: Utilize the two video outputs for connecting external monitors.
- Wejścia AUX: Connect external audio/video sources to the AUX/video and AUX/audio inputs.
- 4G/LTE Dongle: If using mobile internet via 4G/LTE, insert a compatible SIM card into the optional 4G/LTE dongle and connect it to a USB port.
- Sterowanie z kierownicy: If your vehicle supports steering wheel controls, an optional adapter may be required to integrate this functionality.
2.3. Pierwsze uruchomienie
After all connections are secure, turn on your vehicle's ignition. The naviceiver should power on. Follow any on-screen prompts for initial setup, such as language selection and time zone.
3. Instrukcja obsługi
This section details the primary functions and operations of your ESX VN1015-MA-DAB-4G naviceiver.
3.1. Podstawowe sterowanie i interfejs
The unit features a responsive touchscreen and physical buttons for common functions.

Rysunek 3.1: The main screen showing the radio interface with frequency display and control buttons.
- Przycisk zasilania: Press and hold to turn the unit on/off. A short press may mute audio or put the unit into standby.
- Regulacja głośności: Dostosuj poziom wyjściowy dźwięku.
- Przycisk Home: Powrót do głównego ekranu głównego systemu Android.
- Przycisk Wstecz: Navigates back one step in menus or applications.
- Przycisk aparatu: Direct access to the camera input display (e.g., rearview kamera).
3.2. System operacyjny Android
The naviceiver runs on an Android operating system, allowing access to various applications and customization options.

Rysunek 3.2: The applications screen, displaying various pre-installed and user-installed Android apps.
- App Launcher: Access all installed applications from the app drawer.
- Widżety: Customize your home screen with widgets for quick access to information or functions.
- Ustawienia: Adjust system settings, network connections, display, audio, and more.
- Łączność z Internetem: Connect to the internet via a WiFi hotspot (from a compatible smartphone) or by inserting a SIM card into the 4G/LTE dongle.
3.3. Radio Functions (AM/FM/DAB+)
The unit supports both analog and digital radio broadcasts.
- Wybór zespołu: Switch between AM, FM, and DAB+ bands.
- Strojenie: Manually tune or use the auto-scan function to find available stations.
- Ustawienia wstępne: Zapisz swoje ulubione stacje, aby mieć do nich szybki dostęp.
- RDS (FM): Radio Data System displays station information (e.g., station name, song title).
- Funkcje DAB+: Enjoy higher quality digital audio and view station logos where available.
3.4. Łączność Bluetooth
Pair your smartphone for hands-free communication and audio streaming.
- Łączenie w pary: Enable Bluetooth on your smartphone and search for the naviceiver. Select the unit and confirm the pairing code.
- Rozmowy bez użycia rąk: Make and receive calls directly from the naviceiver screen.
- Strumieniowe przesyłanie dźwięku: Play music from your smartphone wirelessly through the naviceiver.
3.5. Navigation (Google Maps)
Utilize Google Maps for turn-by-turn navigation.

Rysunek 3.3: The navigation interface showing a map with a selected destination.
- Nawigacja online: Requires an active internet connection (WiFi hotspot or 4G/LTE).
- Mapy offline: Download maps for specific regions to use navigation without an internet connection.
- Wpis celu podróży: Enter addresses or points of interest using the touchscreen keyboard.
3.6. Odtwarzanie multimediów
Odtwarzaj dźwięk i wideo filez różnych źródeł.
- USB: Connect USB drives containing media files.
- MicroSD: Insert a MicroSD card into the dedicated slot for media or navigation data.
- Obsługiwane formaty: The unit supports a wide range of audio and video formats. Refer to the system settings for a complete list.
3.7. Wejście kamery
The naviceiver automatically displays the rearview camera feed when the vehicle is in reverse, or manually via the camera button.

Rysunek 3.4: Tyłview wyświetlacz kamery z dynamicznymi liniami pomocniczymi do parkowania.
- Aktywacja automatyczna: When connected correctly, the rearview camera image appears automatically when shifting into reverse.
- Wytyczne dotyczące parkowania: Adjustable parking lines assist with maneuvering.
4. Konserwacja
Regular maintenance ensures the longevity and optimal performance of your naviceiver.
- Czyszczenie ekranu: Delikatnie przetrzyj ekran dotykowy miękką, niepozostawiającą włókien ściereczką. W przypadku uporczywych plam delikatnie przetrzyj.ampPrzetrzyj ściereczkę wodą lub środkiem do czyszczenia ekranów. Unikaj silnych środków chemicznych i materiałów ściernych.
- Aktualizacje oprogramowania: Okresowo sprawdzaj dostępność aktualizacji oprogramowania za pomocą ustawień systemowych lub strony producenta. webAktualizacje mogą poprawić wydajność witryny, dodać nowe funkcje i naprawić błędy.
- Opieka ogólna: Unikaj wystawiania urządzenia na działanie ekstremalnych temperatur, długotrwałego bezpośredniego światła słonecznego i nadmiernej wilgoci. Upewnij się, że wszystkie połączenia są solidne.
5. Rozwiązywanie Problemów
This section addresses common issues you might encounter with your ESX VN1015-MA-DAB-4G naviceiver.
| Problem | Możliwa przyczyna | Rozwiązanie |
|---|---|---|
| Urządzenie nie włącza się. | Brak zasilania; Przepalony bezpiecznik; Nieprawidłowe okablowanie. | Check vehicle's fuse box and the unit's power connections. Ensure ACC wire is receiving power. |
| Brak dźwięku. | Volume too low; Mute activated; Incorrect speaker wiring; Audio source issue. | Increase volume. Check if mute is active. Verify speaker connections. Try a different audio source. |
| GPS signal loss or inaccurate navigation. | Antena GPS jest zablokowana lub odłączona; Nieaktualne mapy. | Upewnij się, że antena GPS ma czyste pole widzenia view of the sky and is securely connected. Update maps if necessary. |
| Problemy z połączeniem Bluetooth. | Device not in pairing mode; Interference; Unit not discoverable. | Ensure both devices are in pairing mode. Restart both devices. Check Bluetooth settings on the naviceiver. |
| Ekran dotykowy nie reaguje. | System freeze; Software error. | Perform a soft reset (refer to the unit's specific reset procedure, often a small reset button). If persistent, a factory reset might be needed (data loss may occur). |
| DAB+ radio not receiving stations. | DAB+ antenna not connected or faulty; Poor signal area. | Check DAB+ antenna connection. Ensure the antenna is correctly installed. Try rescanning for stations in a different location. |
If you encounter issues not listed here or if the suggested solutions do not resolve the problem, please contact ESX customer support or your authorized dealer.
6. Specyfikacje
Below are the technical specifications for the ESX VN1015-MA-DAB-4G Naviceiver:
| Funkcja | Szczegół |
|---|---|
| Marka | rozszerzenie ESX |
| Model | VN1015-MA-DAB-4G |
| Rozmiar ekranu | 10.1 cali (25.6 cm) |
| Typ wyświetlacza | High-resolution, anti-glare multi-angle touchscreen |
| System operacyjny | Android |
| BARAN | 4 GB |
| Pamięć Flash | 64 GB |
| Łączność | Bluetooth, USB, 4G/LTE (via dongle), WiFi (via hotspot) |
| Tuner radiowy | AM/FM with RDS, DAB+ Digital Radio |
| Nawigacja | Google Maps (online/offline) |
| Wejścia | 1x Camera Input, 1x AUX/Video Input, 1x AUX/Audio Input, 2x USB Ports, 1x MicroSD Slot |
| Wyjścia | 2x Video Outputs, Pre-amplified outputs (Front/Rear/Subwoofer) |
| Metoda kontroli | Ekran dotykowy |
| Kompatybilne urządzenia | Smartfon |
7. Gwarancja i wsparcie
Your ESX VN1015-MA-DAB-4G naviceiver comes with a Certificate of Authenticity. For specific warranty terms and conditions, please refer to the documentation provided with your purchase or contact your authorized ESX dealer.
For technical support, troubleshooting assistance beyond this manual, or inquiries regarding parts and service, please contact your point of purchase or visit the official ESX webstrona z informacjami kontaktowymi dotyczącymi obsługi klienta.